

- Config #1
- Config #2
Prerequisites
Try me
Try me
Set up Wi-Fi
Download Models and Artifacts
download_artifacts.sh script, set executable
permissions, and run it to download the model, media, and label files:Enable qticamsrc
qticamsrc on Config #2:Enable Audio and GPU Delegate
wpctl status and run the following command:AI Vision Applications
Object Detection
The gst-ai-object-detection application allows you to detect objects within images and videos. The use cases show the execution of YOLOv5, YOLOv8 and YOLOX on Qualcomm AI HW accelerator. The following figure shows the pipeline, which receives the input from a live camera feed, file, USB source, or an RTSP stream, preprocesses it, runs inferences on AI hardware. The results are either displayed on the screen, saved as an encoded MP4 file, or streamed over the RTSP server. For information about the plugins used in the pipeline flow, see Pipeline flow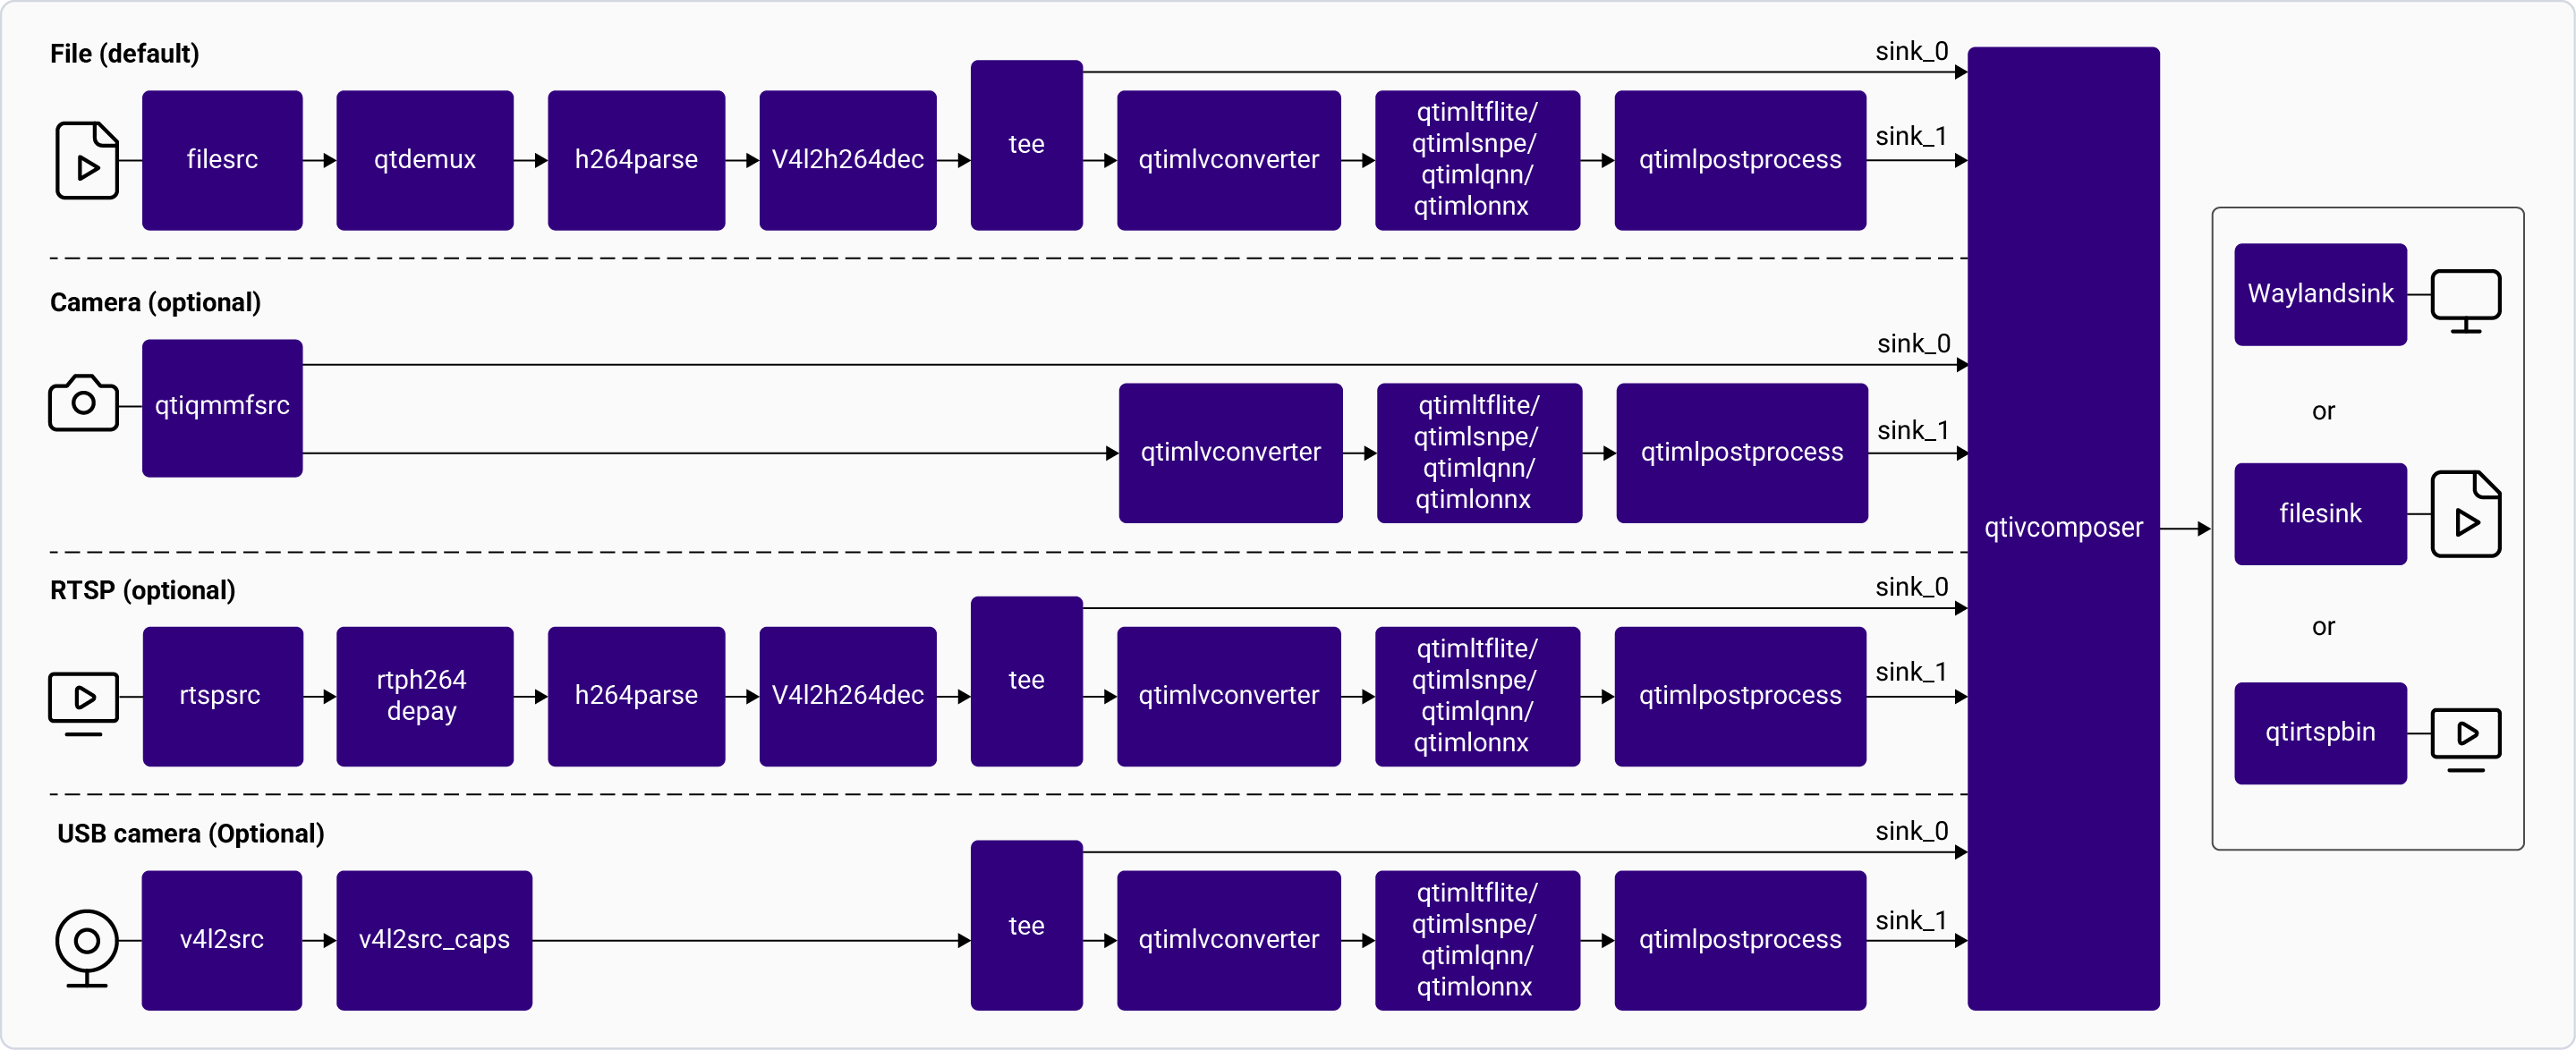
gst-ai-object-detection
Try me
Try me
Input and Output Capabilities
Sample Model and Label Files
Run the application on the target device
Download artifacts
Prerequisites. This downloads all required artifacts to the target device.Run the application
/etc/configs/config_detection.json file to read the input parameters.To display all available options:Configurations
The gst-ai-object-detection application uses the/etc/configs/config_detection.json file. Update its properties to match your model, input stream, and output. See Config JSON Field Description for all fields.video-format, resolution, and framerate parameters in the config file
to match the camera capabilities, see Configure USB camera.snpe-tensors field applies only to the SNPE runtime. To retrieve the output tensor names for a DLC model, open the model in Netron.snpe-tensors field is optional.Available configurations
Available configurations
- Config #2
- Config #1
Expected Output
Detected objects with bounding boxes and labels are overlaid on the video and displayed on the local display.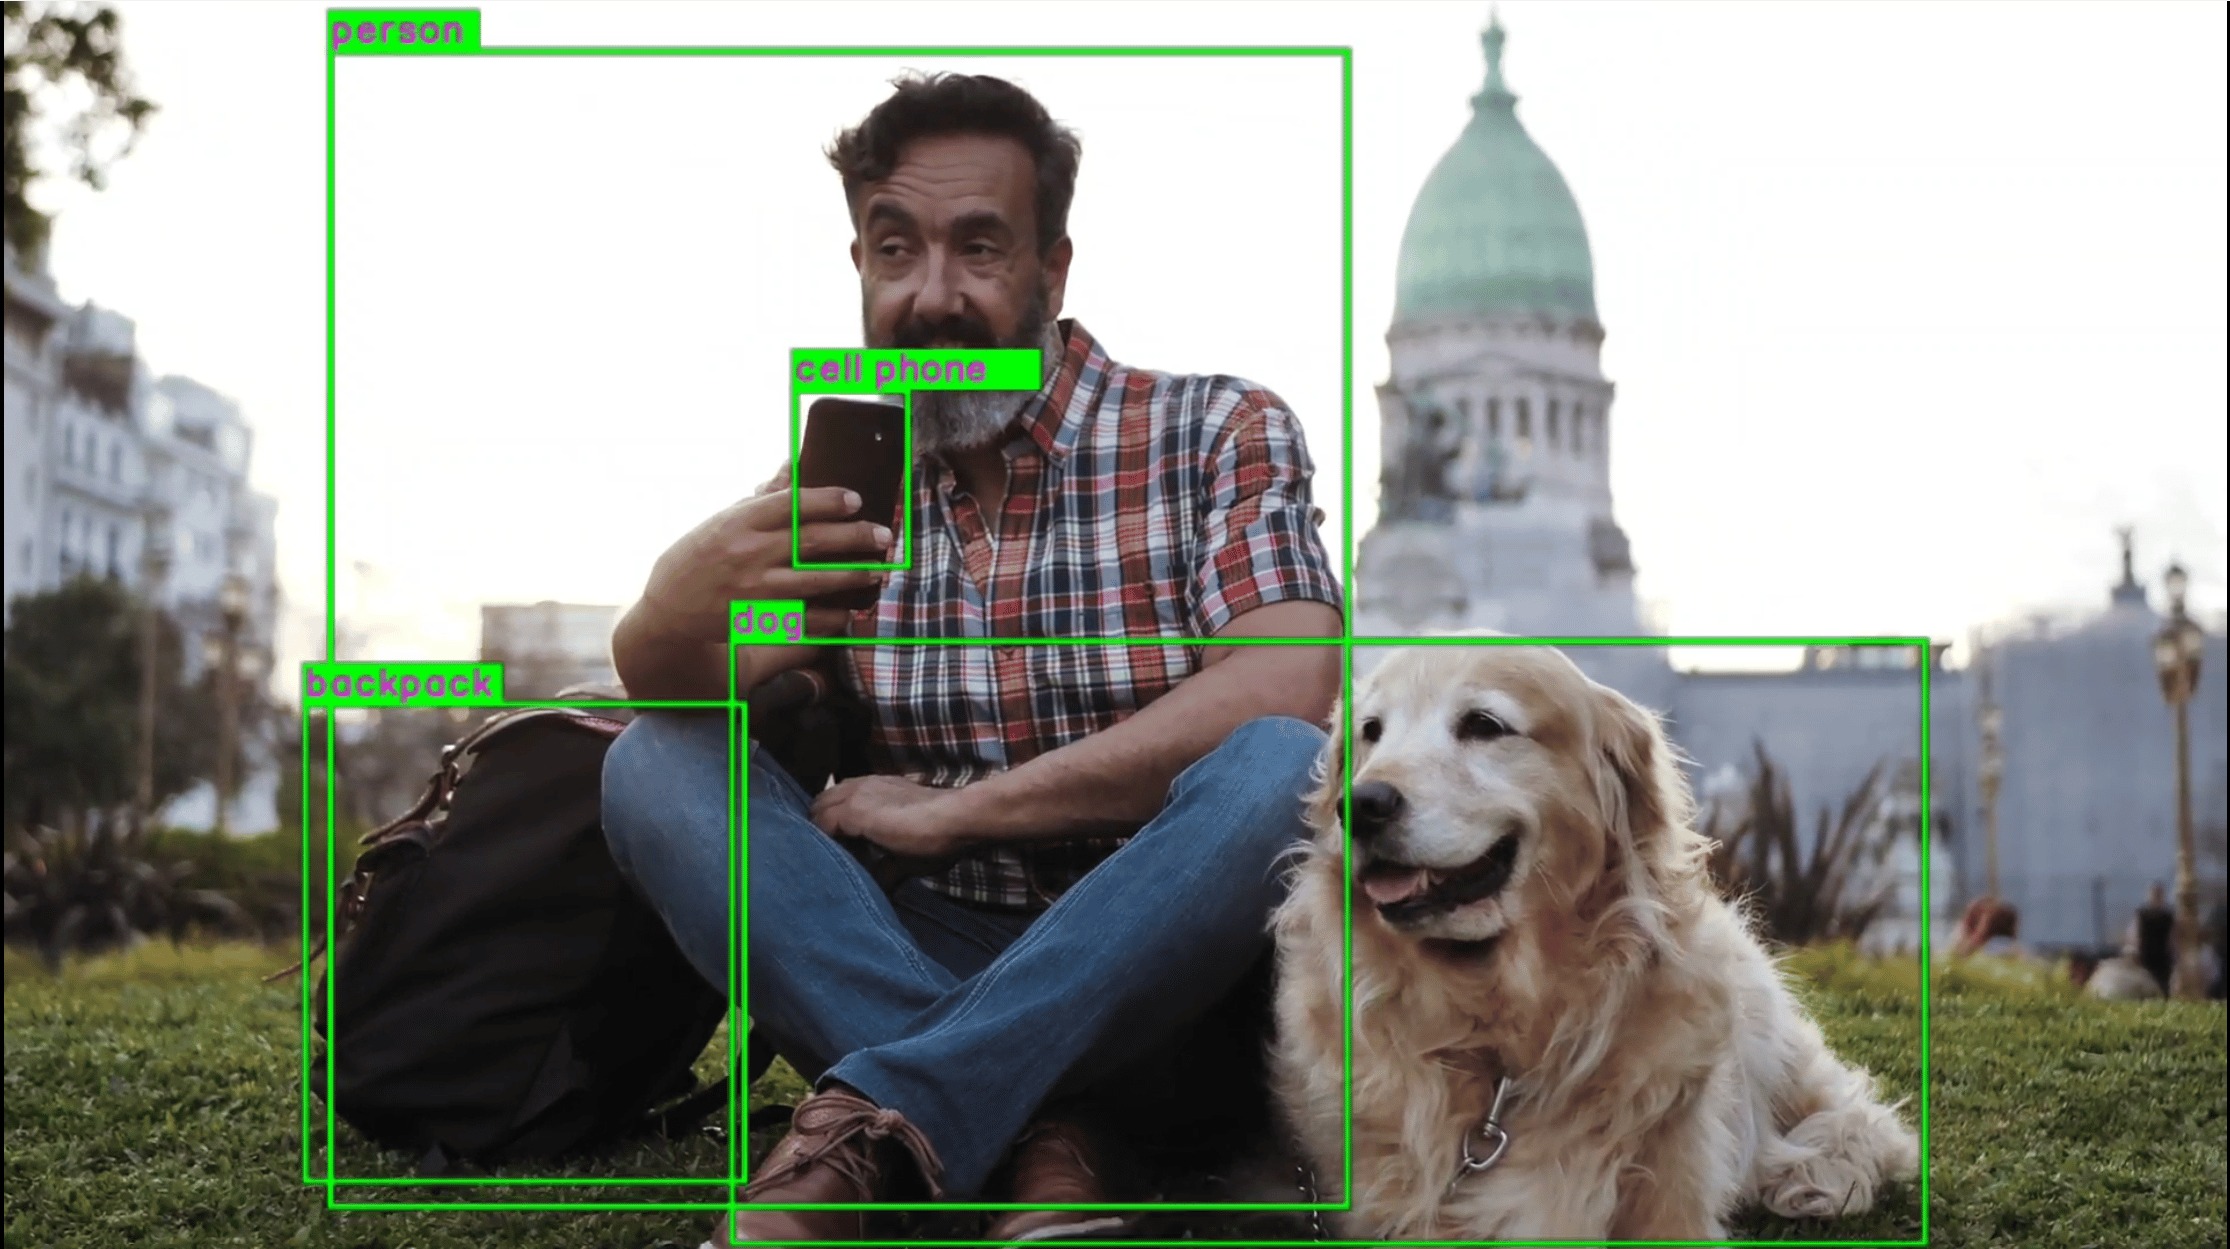
Pipeline Flow
The following table lists the plugins used in the object detection pipeline:Config JSON Field Description
Image Classification
The gst-ai-classification application is designed to identify the subject in an image. The use cases are implemented using the Qualcomm Neural Processing SDK, LiteRT, or Qualcomm AI Engine Direct models. The pipeline receives a video stream from a camera, file source, USB source, or RTSP, preprocesses it, and runs the inference on AI hardware. The results are either displayed on the screen, saved as an encoded MP4 file, or streamed over the RTSP server. For information about the plugins used in the pipeline flow, see Pipeline flow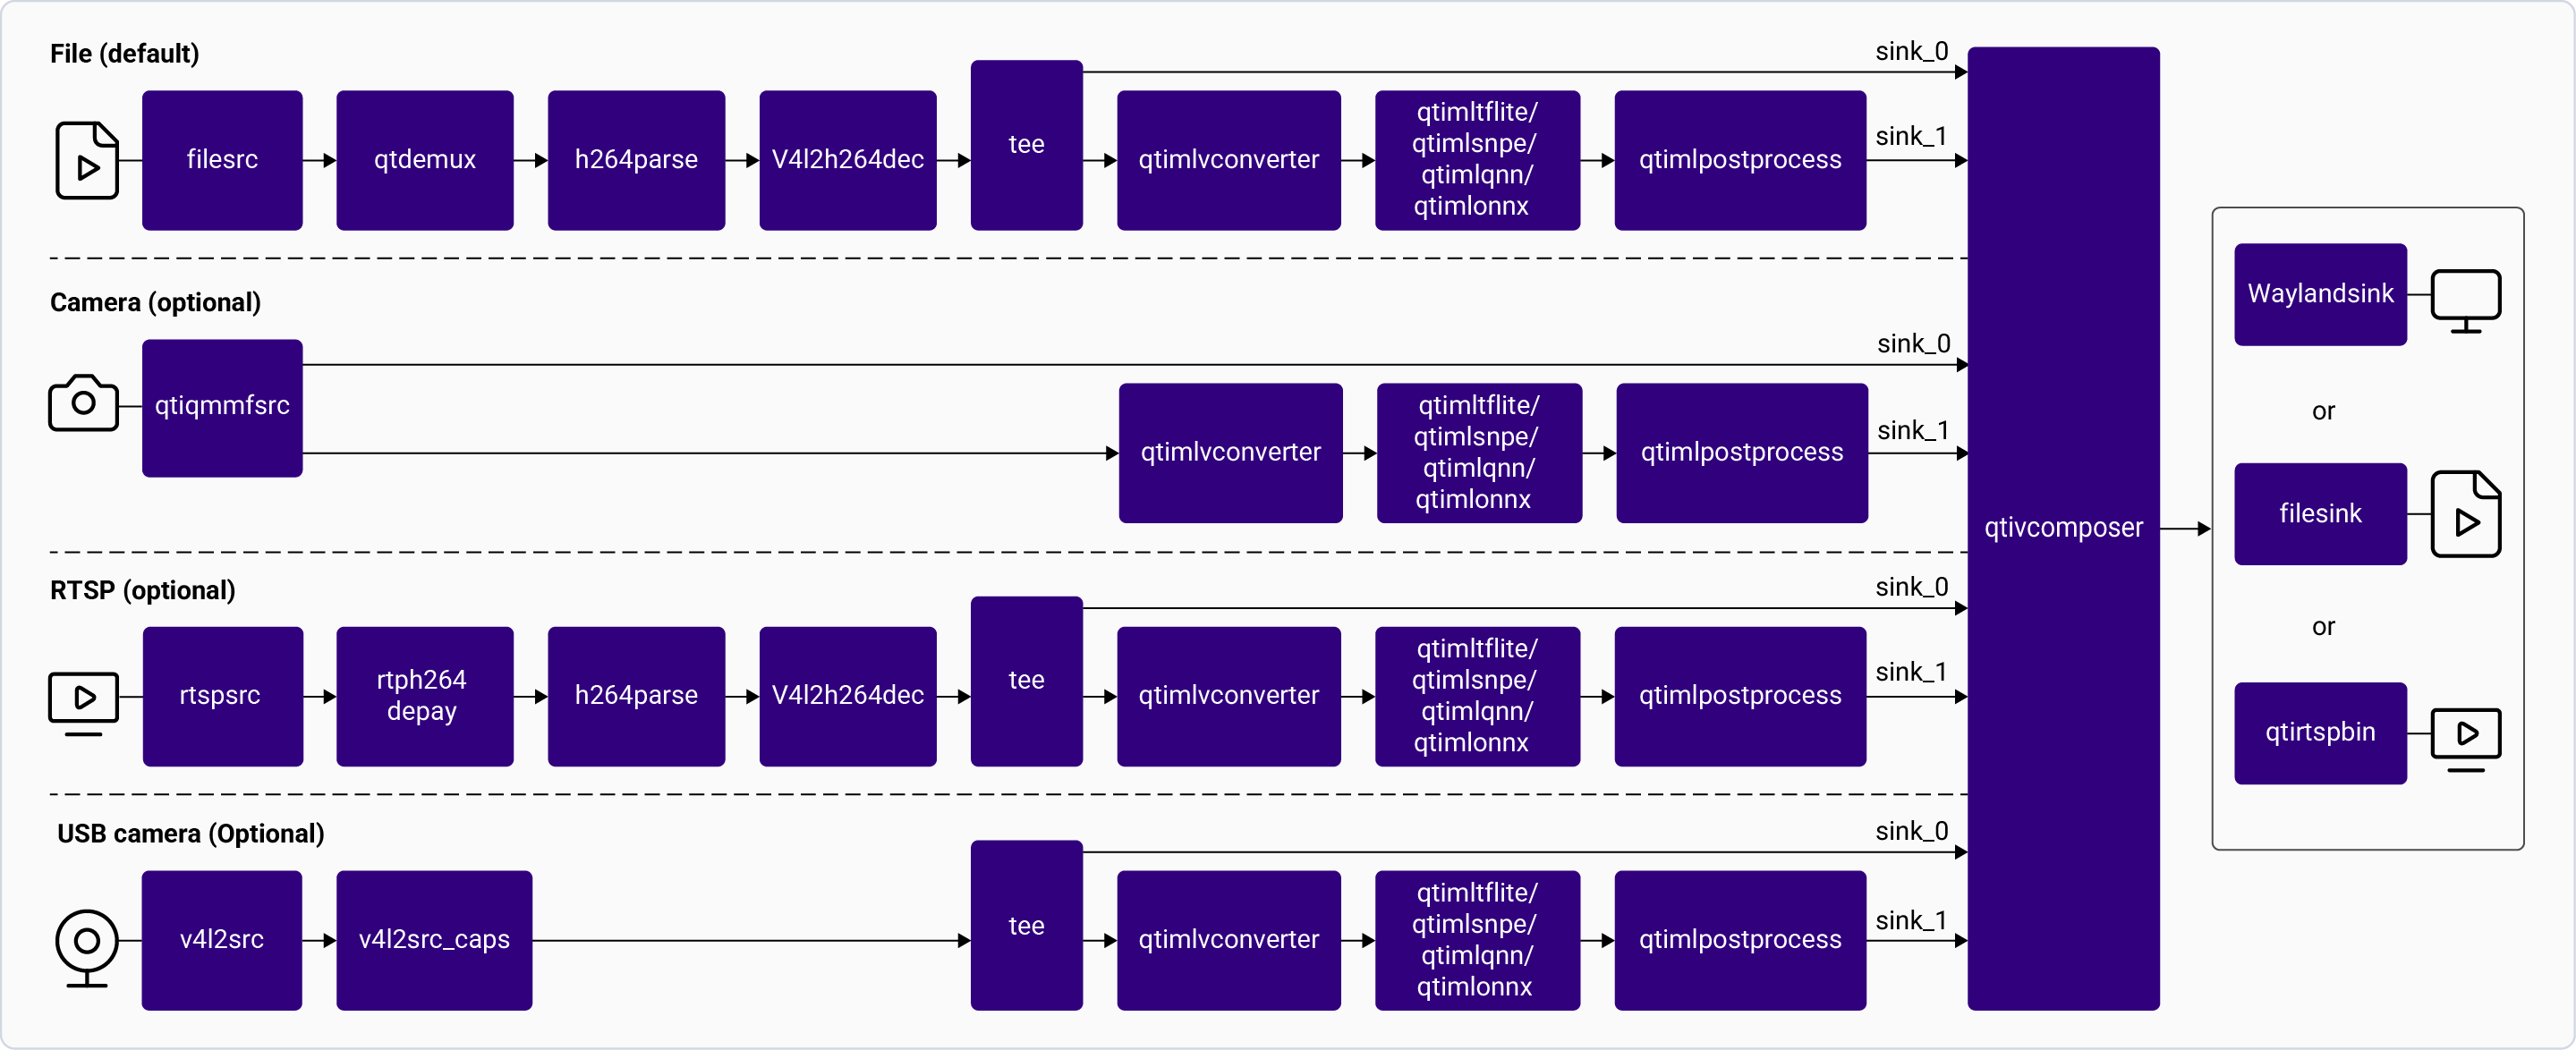
gst-ai-classification
Try me
Try me
Input and Output Capabilities
Sample Model and Label Files
Run the application on the target device
Download artifacts
Prerequisites. This downloads all required artifacts to the target device.Run the application
/etc/configs/config_classification.json file to read the input parameters.To display all available options:Configurations
The gst-ai-classification application uses the/etc/configs/config_classification.json file. Update its properties to match your model, input stream, and output. See Config JSON Field Description for all fields.video-format, resolution, and framerate parameters in the config file
to match the camera capabilities, see Configure USB camera.Available configurations
Available configurations
- Config #2
- Config #1
Expected Output
The classified object label and confidence score are overlaid on the video and displayed on the local display
Pipeline Flow
The following table lists the plugins used in the classification pipeline:Config JSON Field Description
Face Detection
The gst-ai-face-detection application collects the live video input from a camera, file, or an RTSP stream and uses the Qualcomm AI Engine direct and LiteRT face detection models to produce a preview with the overlaid AI model output on the HDMI display. The following figure shows the pipeline, which receives the input, preprocesses it, runs inferences on AI hardware, and displays the results on the screen. For information about the plugins used in the pipeline flow, see Pipeline flow.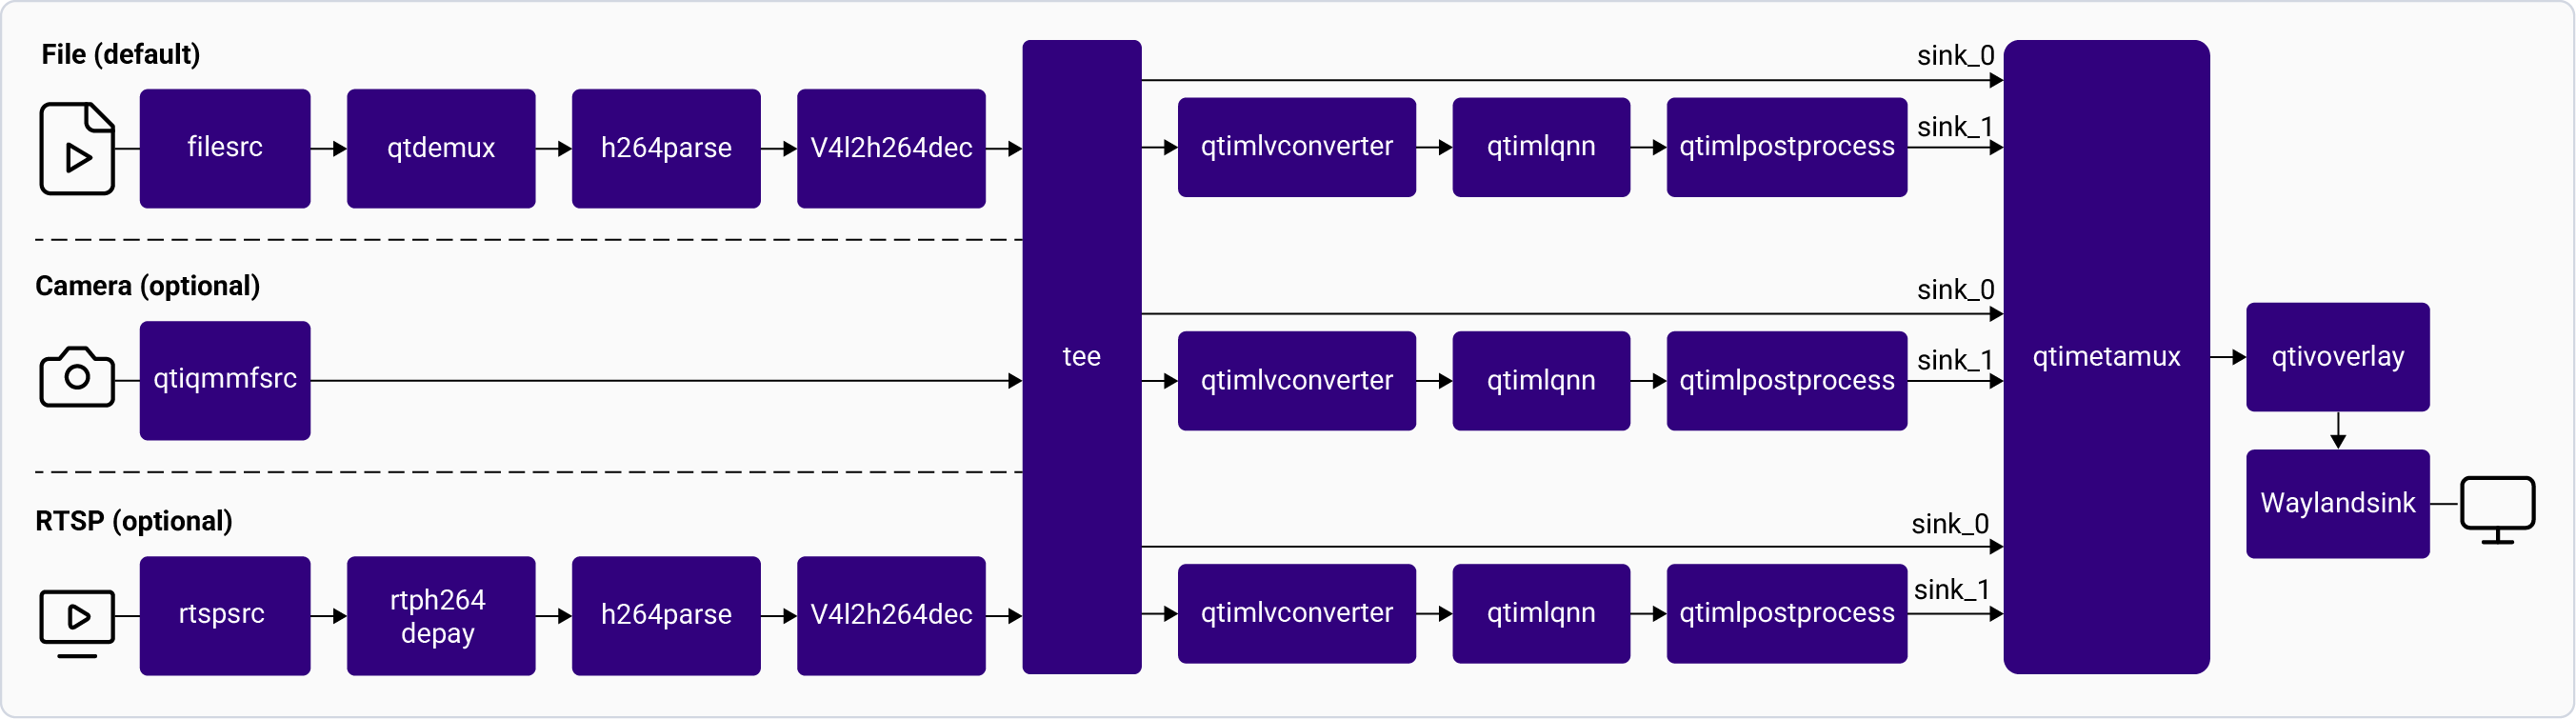
gst-ai-face-detection
Try me
Try me
Input and Output Capabilities
Sample Model and Label Files
Run the application on the target device
Download artifacts
Prerequisites. This
downloads all required artifacts to the target device.Run the application
/etc/configs/config_face_detection.json file to read the input parameters.To display all available options:Configurations
The gst-ai-face-detection application uses the/etc/configs/config_face_detection.json file. Update its properties to match your model, input stream, and output. See Config JSON Field Description for all fields.Available configurations
Available configurations
- Config #2
- Config #1
Expected Output
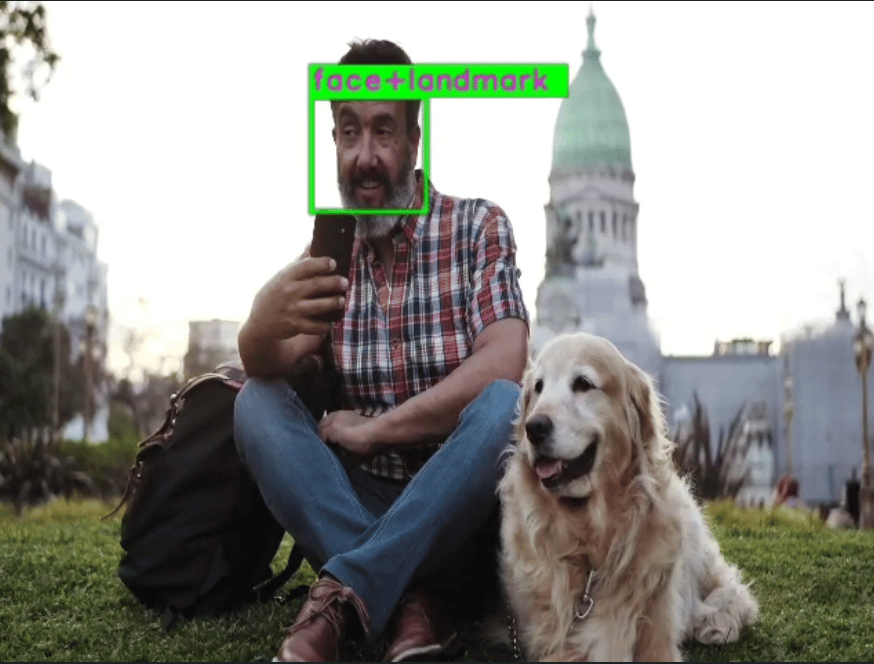
Pipeline Flow
The following table lists the plugins used in the face detection pipeline:Config JSON Field Description
Semantic Segmentation
The gst-ai-segmentation application allows you to divide an image into different and meaningful parts or segments and assign a label to each homogeneous segment based on the similarity of the attributes. The application uses Qualcomm Neural Processing SDK runtime, Qualcomm AI Engine direct runtime, and LiteRT for image segmentation. The following figure shows the pipeline, which receives the input from a live camera feed, file, or an RTSP stream, preprocesses the video data, runs inferences using AI hardware, and displays the segmented data on the screen. For information about the plugins used in the pipeline flow, see Pipeline flow.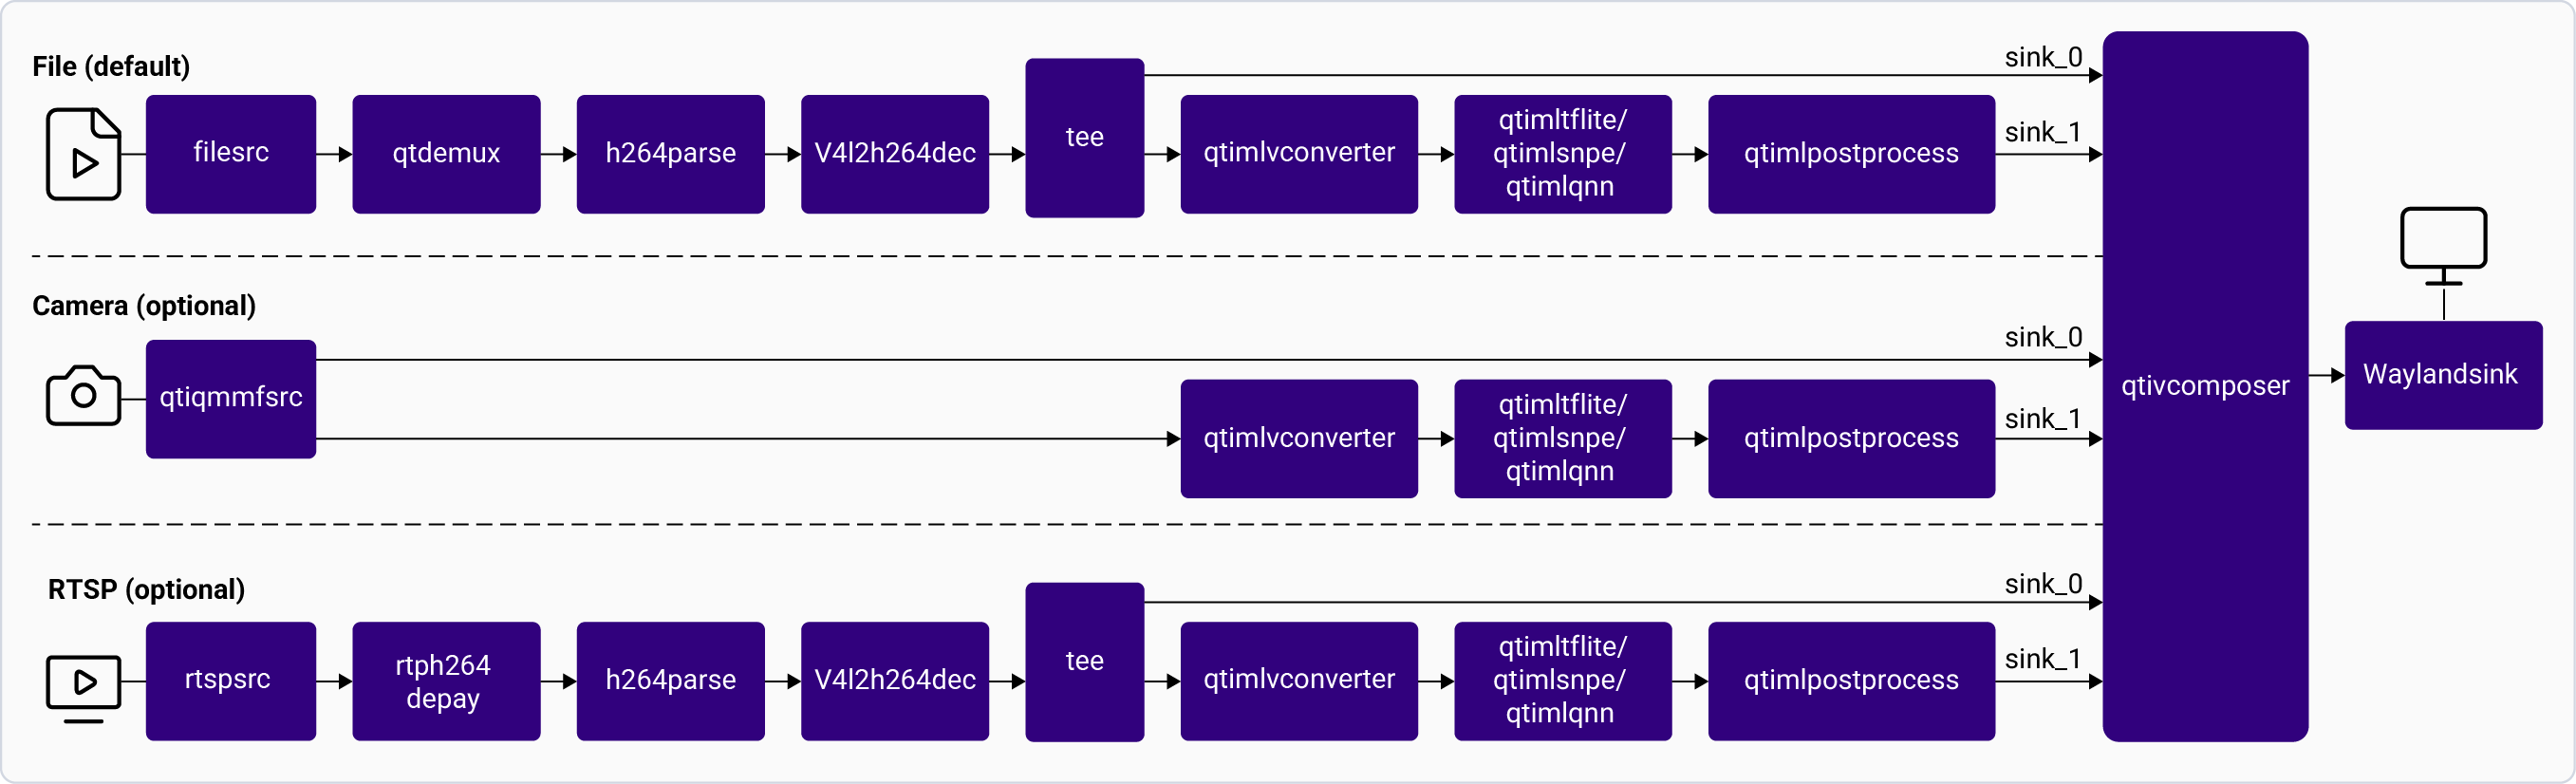
gst-ai-segmentation
Try me
Try me
Input and Output Capabilities
Sample Model and Label Files
Run the application on the target device
Download artifacts
Prerequisites. This
downloads all required artifacts to the target device.Run the application
/etc/configs/config_segmentation.json file to read the input parameters.To display all available options:Configurations
The gst-ai-segmentation application uses the/etc/configs/config_segmentation.json file. Update its properties to match your model, input stream, and output. See Config JSON Field Description for all fields.Available configurations
Available configurations
- Config #2
- Config #1
Expected Output
The segmented data is displayed on the local display.
Pipeline Flow
The following table lists the plugins used in the segmentation pipeline:Config JSON Field Description
Pose Detection
The gst-ai-pose-detection application allows you to detect the body pose of the subject in an image or video. The use case processes input streams from a camera, file, or an RTSP source and uses LiteRT and Qualcomm AI Engine direct models for pose detection. The results are either displayed on the screen, saved as an encoded MP4 file, or streamed over the RTSP server. The following figure shows the pipeline, which receives the input from a live camera feed, file, USB source, or an RTSP stream, preprocesses it, conducts inference on AI hardware, and generates the output. This process allows for real-time pose detection and visualization of human poses. For information about the plugins used in the pipeline flow, see Pipeline flow.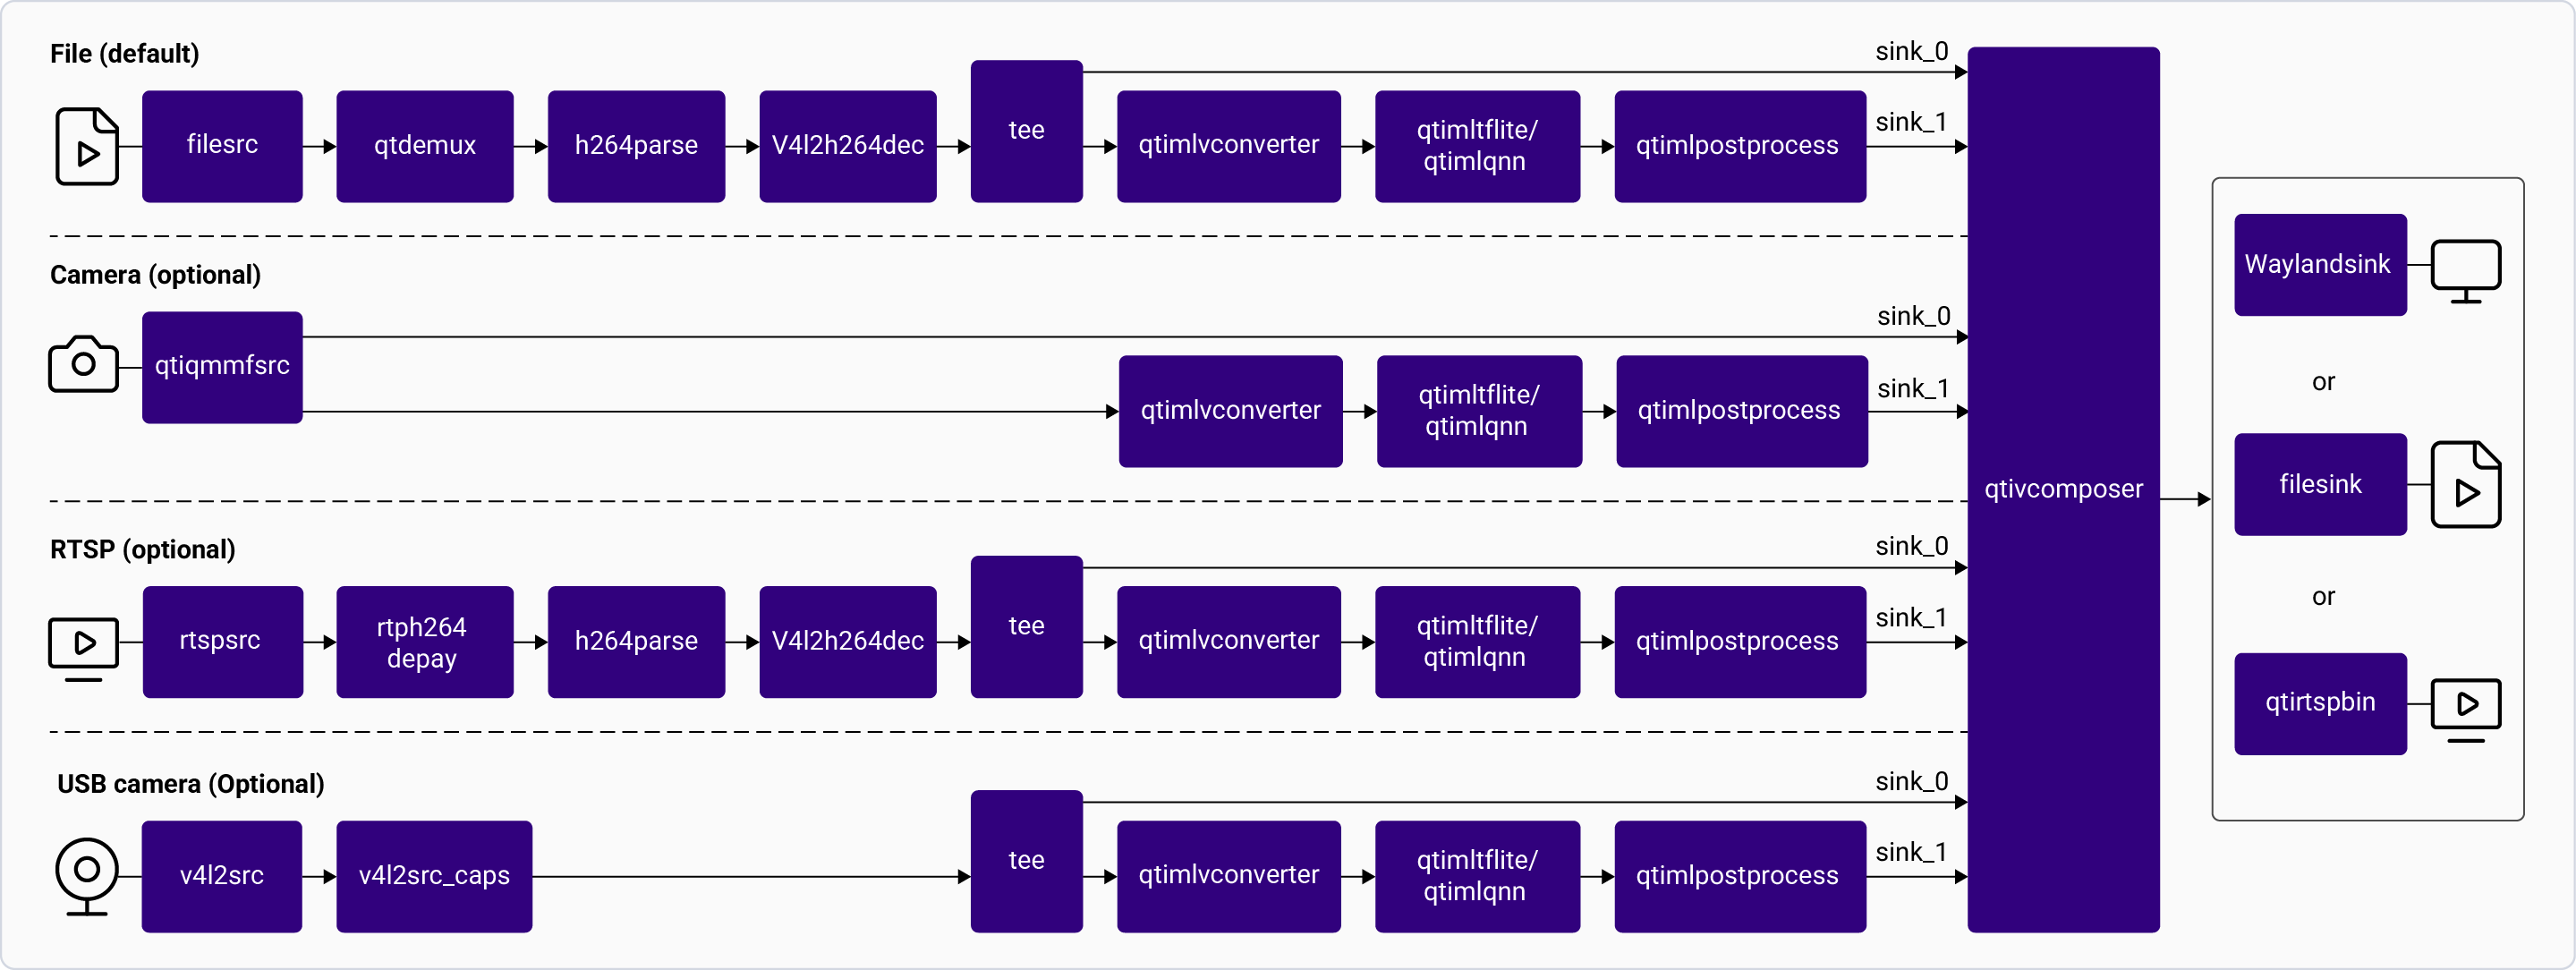
gst-ai-pose-detection
Try me
Try me
Input and Output Capabilities
Sample Model and Label Files
Run the application on the target device
Download artifacts
Prerequisites. This downloads all required artifacts to the target device.Run the application
/etc/configs/config_pose.json file to read the input parameters.To display all available options:Configurations
The gst-ai-pose-detection application uses the/etc/configs/config_pose.json file. Update its properties to match your model, input stream, and output. See Config JSON Field Description for all fields.video-format, resolution, and framerate
parameters in the config file to match the camera capabilities, see Configure USB camera.hrnet_settings.json file.Available configurations
Available configurations
- Config #2
- Config #1
Expected Output
The displayed output shows the detected pose of the objects.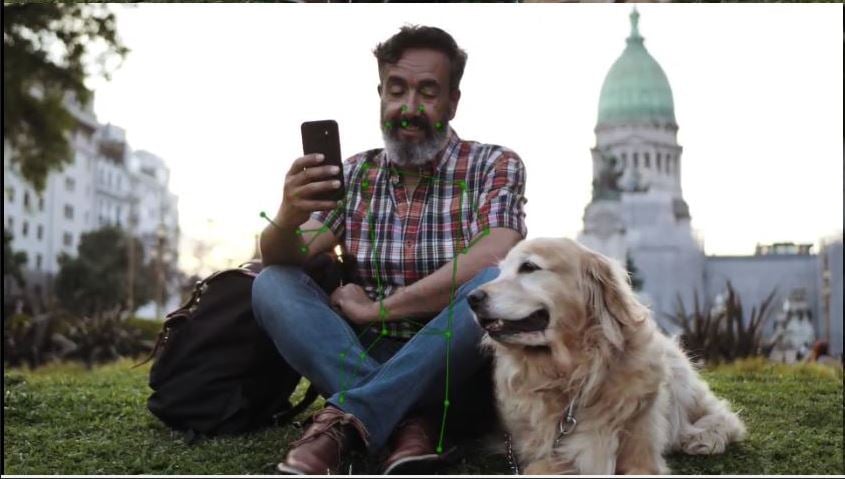
Pipeline Flow
The following table lists the plugins used in the pose detection pipeline:Config JSON Field Description
Mono Depth
The gst-ai-monodepth application allows you to infer depth of a source feed from a live camera stream, file, or an RTSP stream. The following figure shows the pipeline, which captures feed from the source, preprocesses it, and runs inferences using the AI hardware. For information about the plugins used in the pipeline, see Pipeline flow.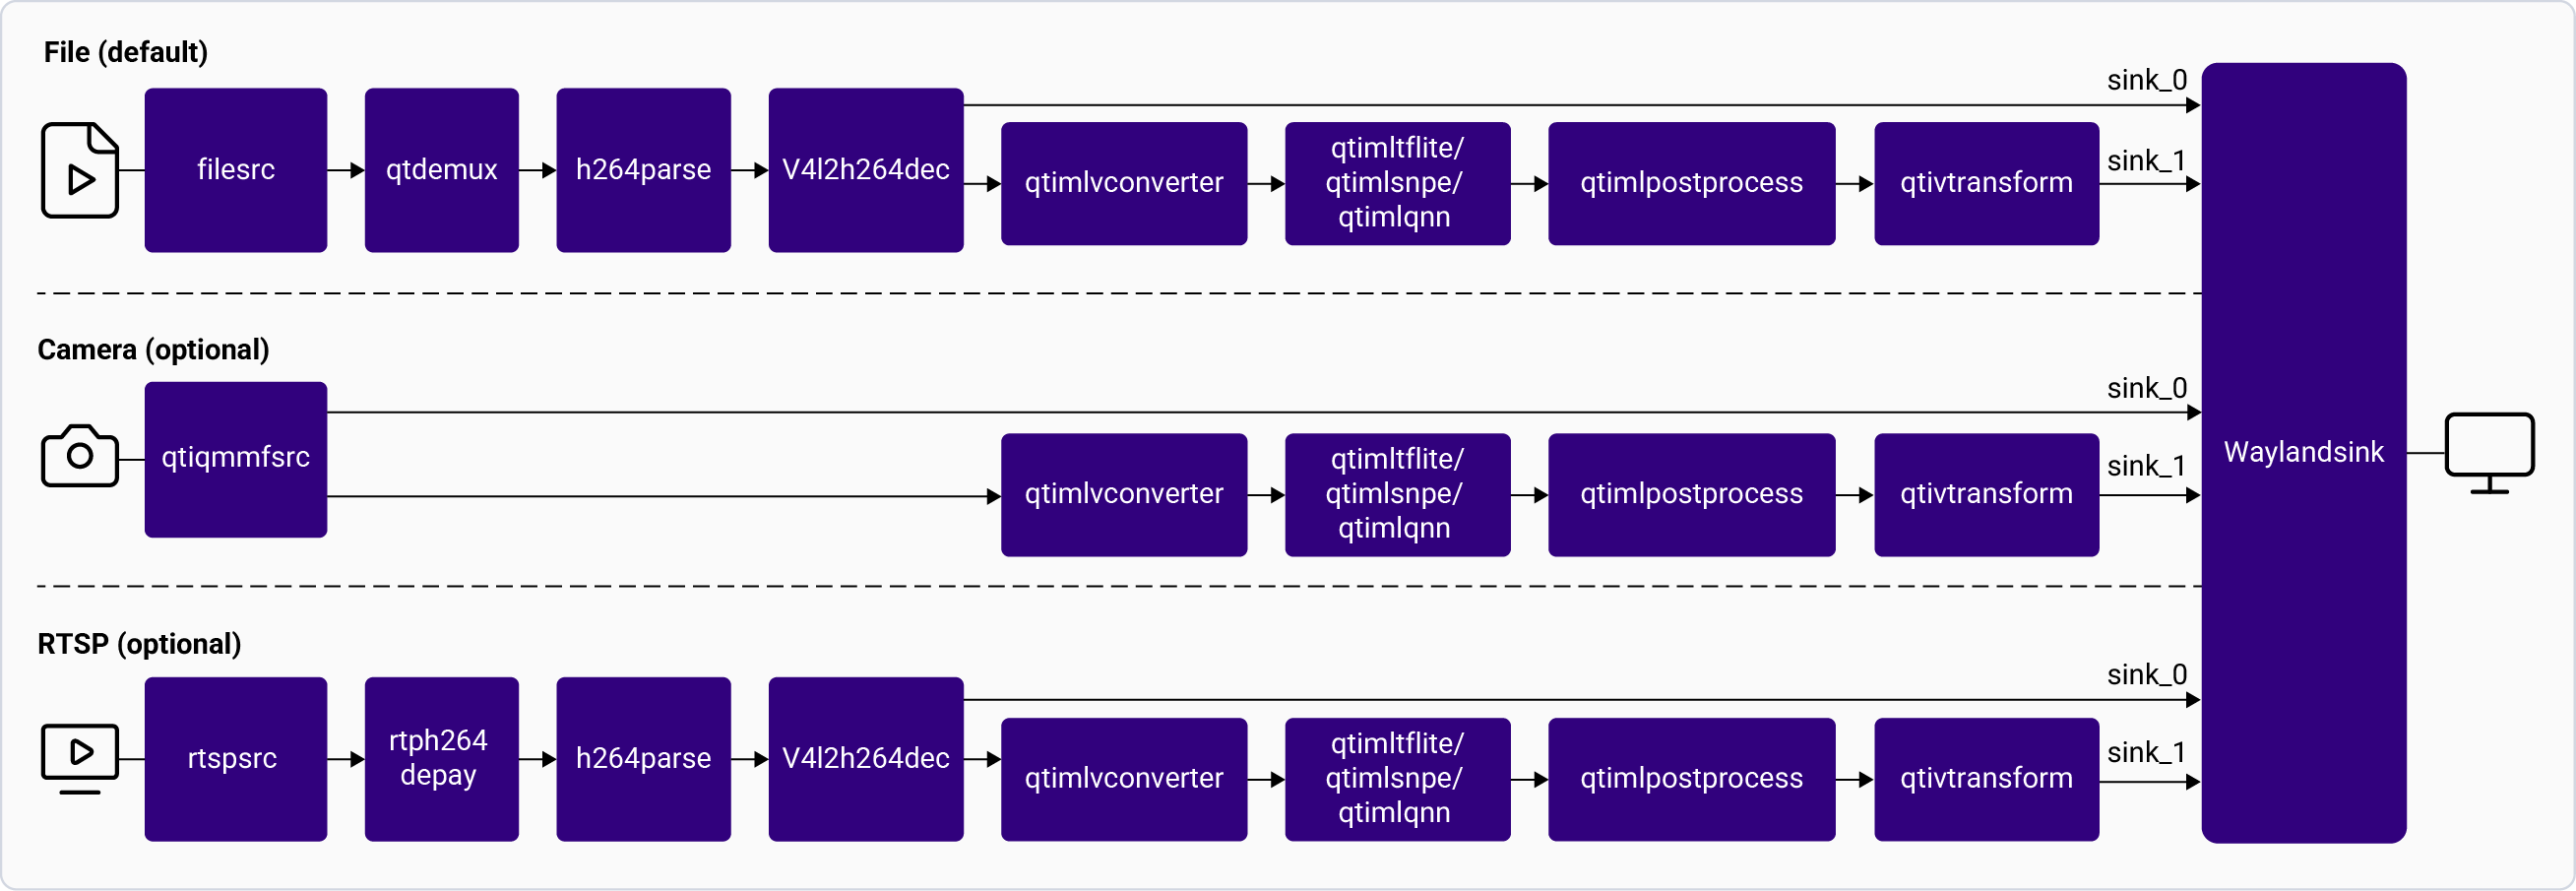
gst-ai-monodepth
Try me
Try me
Input and Output Capabilities
Sample Model and Label Files
Run the application on the target device
Download artifacts
Prerequisites. This downloads all required artifacts to the target device.Run the application
/etc/configs/config_monodepth.json file to read the input parameters.To display all available options:Configurations
The gst-ai-monodepth application uses the/etc/configs/config_monodepth.json file. Update its properties to match your model, input stream, and output. See Config JSON Field Description for all fields.Available configurations
Available configurations
- Config #2
- Config #1
Expected Output
The overlaid model output stream is shown side by side with the live feed.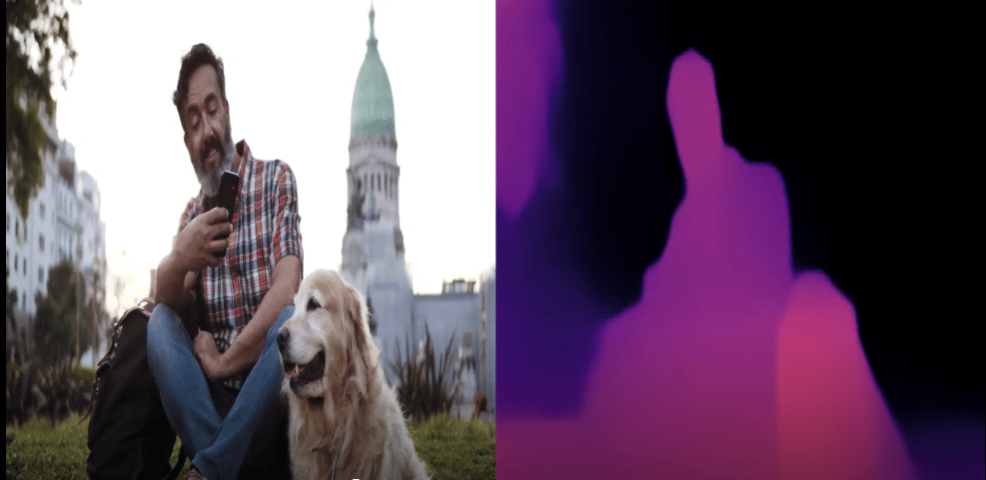
Pipeline Flow
The following table lists the plugins used in the monodepth pipeline:Config JSON Field Description
Super Resolution
The gst-ai-superresolution application allows you to generate high resolution video frames from low-resolution input. The following figures shows the pipeline, which receives a video stream from a file source as input, processes it through the super resolution module using LiteRT, and displays the output.Config #1 for the QLI 2.0 GA release
because CPU runtime is not supported.

gst-ai-superresolution
Try me
Try me
Input and Output Capabilities
Sample Model Files
Run the application on the target device
Download artifacts
Prerequisites. This
downloads all required artifacts to the target device.Run the application
/etc/configs/config-superresolution.json file to read the input parameters.To display all available options:Configurations
The gst-ai-superresolution application uses the/etc/configs/config-superresolution.json file. Update its properties to match your model, input stream, and output. See Config JSON Field Description for all fields.Available configurations
Available configurations
- Config #2
Expected Output
The output is displayed on an HDMI monitor.
Pipeline Flow
The following table lists the plugins used in the superresolution pipeline:Config JSON Field Description
AI Event Encoder
The gst-ai-event-encoder application receives the live video stream input from camera, file, or RTSP source. When a human enters the video frame the application preprocesses the video, runs inferences on the AI hardware, and encodes the video. The encoding stops 5 seconds after the human moves away from the frame and restarts when anyone enters the frame. The following figures show the event detection and recording pipelines for event encoder application. For information about the plugins used in the pipeline flow, see Pipeline flow.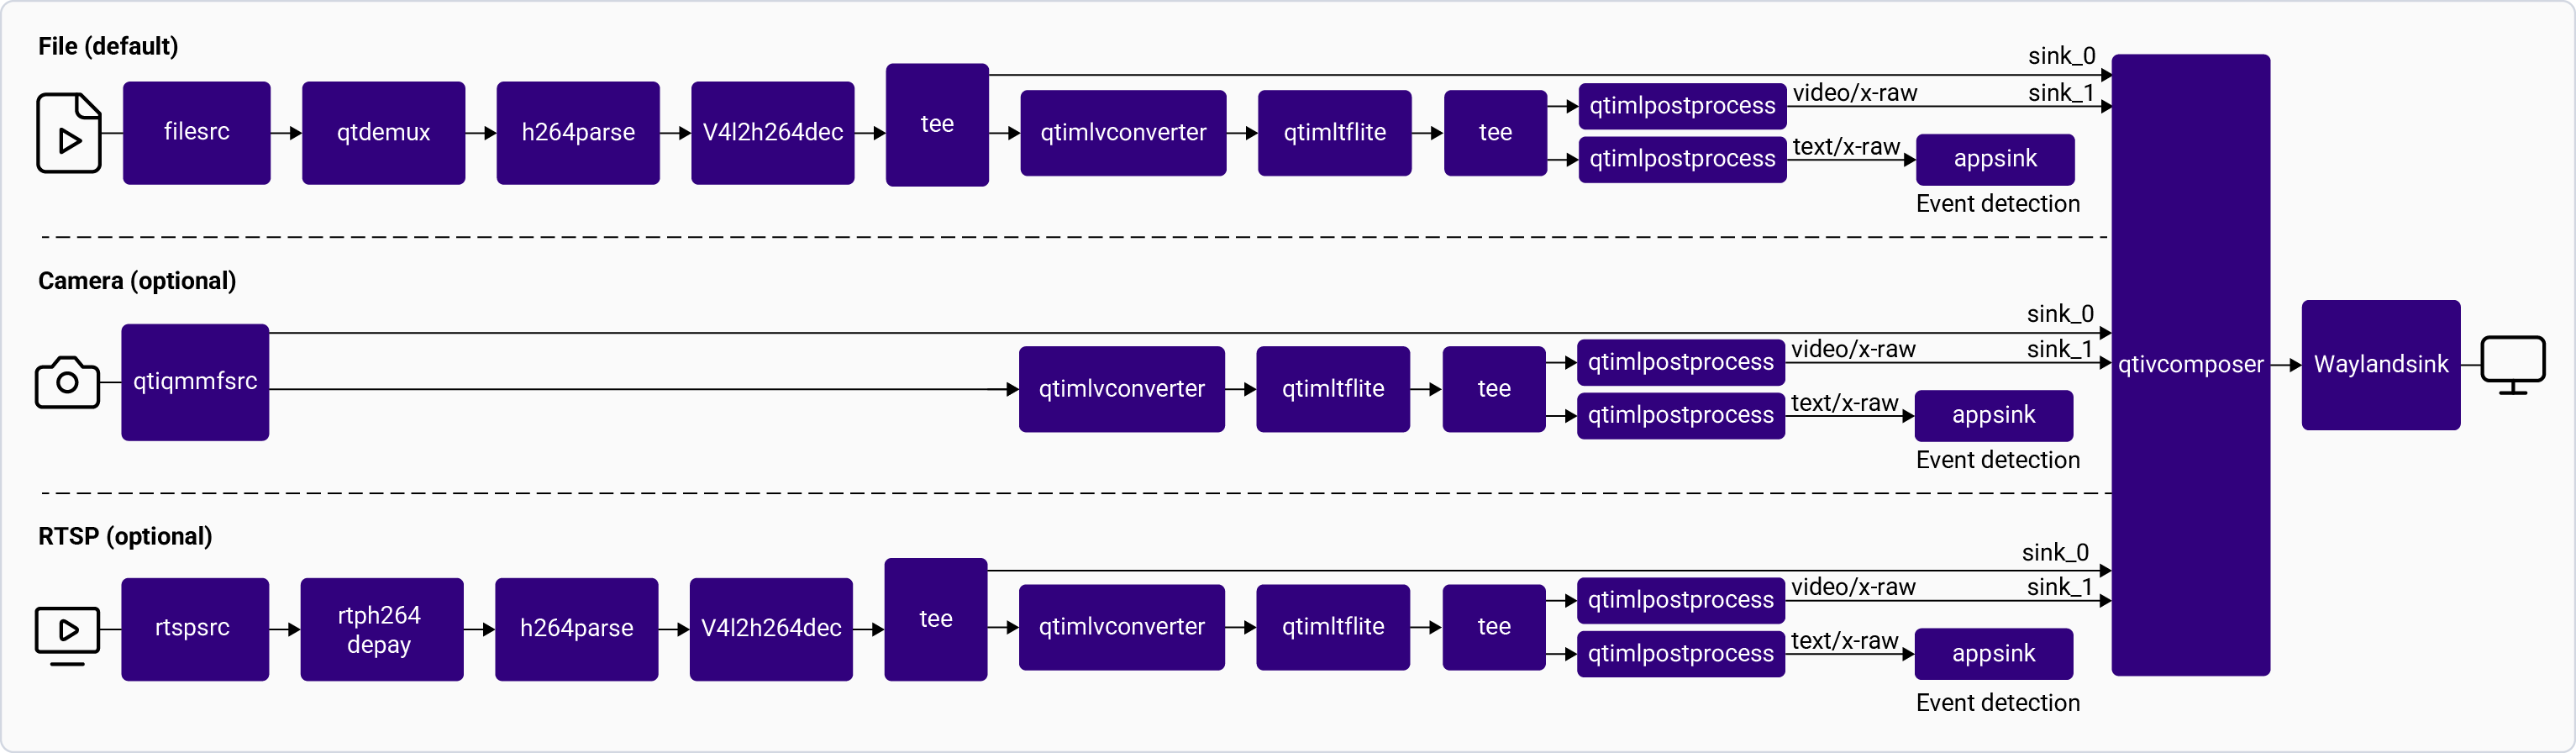

gst-ai-event-encoder
Try me
Try me
Input and Output Capabilities
Sample Model and Label Files
Run the application on the target device
Download artifacts
Prerequisites. This downloads all required artifacts to the target device.Run the application
/etc/configs/config-event-encoder.json file to read the input parameters.To display all available options:Configurations
The gst-ai-event-encoder application uses the/etc/configs/config-event-encoder.json file. Update its properties to match your model, input stream, and output. See Config JSON Field Description for all fields.Available configurations
Available configurations
- Config #2
- Config #1
Expected Output
The output is saved as an MP4 file within/etc/media folder as output-1.mp4, output-2.mp4, and so on.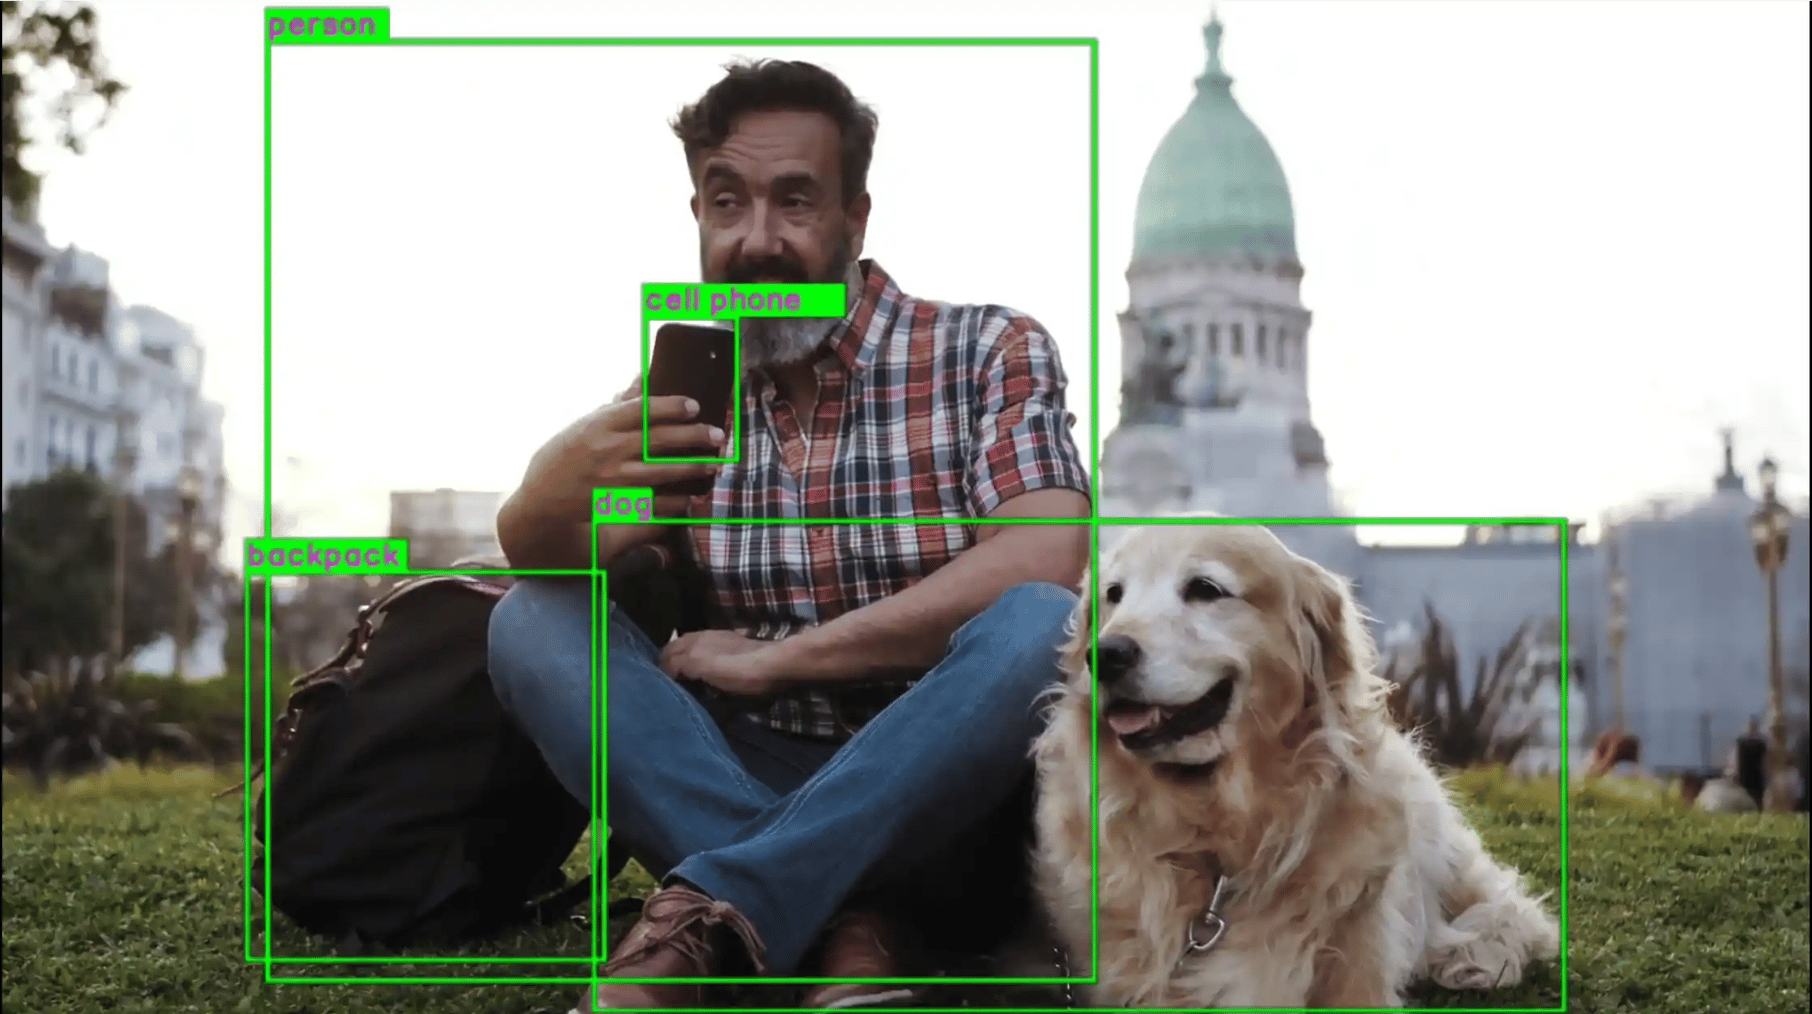
Pipeline Flow
The following table lists the plugins used in the event encoder pipeline:Config JSON Field Description
Metadata Parser
The gst-ai-metadata-parser-example application receives the live video stream input from camera, file, or RTSP source, and passes the stream to the YOLO models for object detection and preview. The overlaid AI model output, including labels and bounding boxes, is displayed on an HDMI display. The extracted metadata is logged to the console and used to count the number of humans in the frame. The following figure shows the pipeline for metadata parsing. For information about the plugins used in the pipeline flow, see Pipeline flow.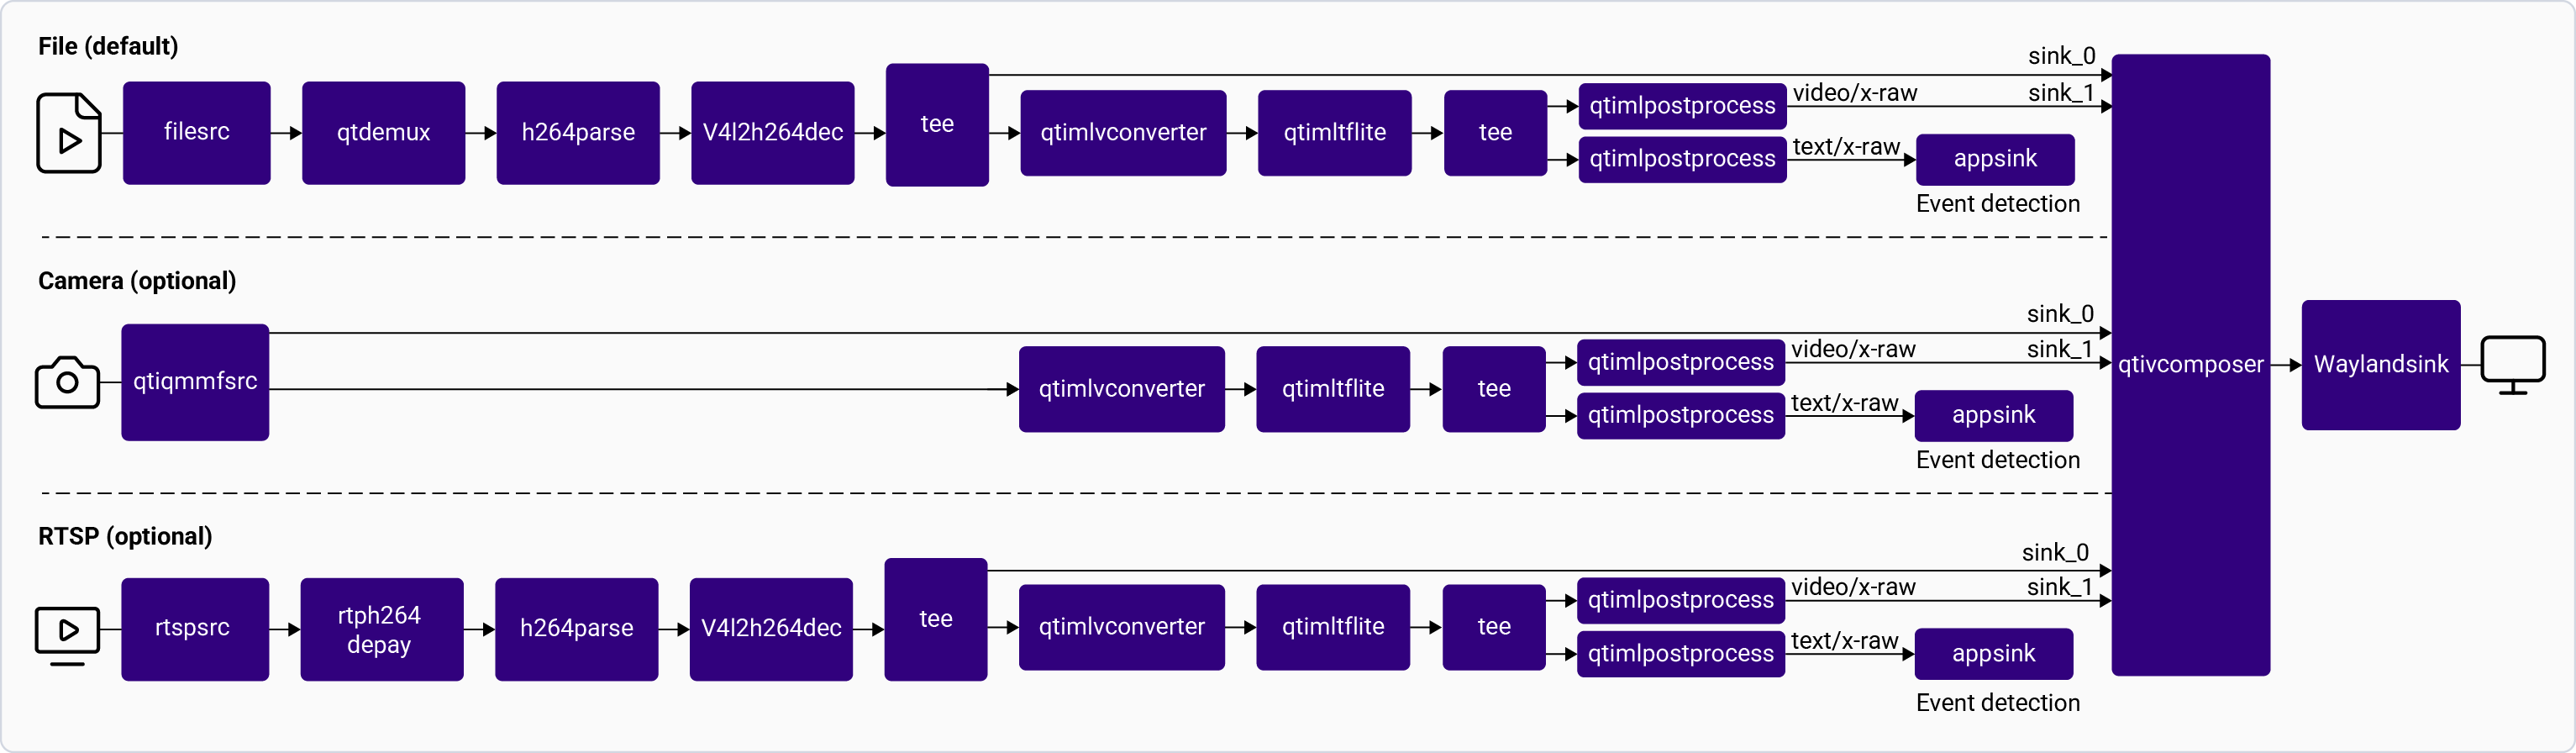
gst-ai-metadata-parser-example
Try me
Try me
Input and Output Capabilities
Sample Model and Label Files
Run the application on the target device
Download artifacts
Prerequisites. This downloads all required artifacts to the target device.Run the application
/etc/configs/config-metadata-parser-example.json file to read the input parameters.To display all available options:Configurations
The gst-ai-metadata-parser-example application uses the/etc/configs/config-metadata-parser-example.json file. Update its properties to match your model, input stream, and output. See Config JSON Field Description for all fields.Available configurations
Available configurations
- Config #2
- Config #1
Expected Output
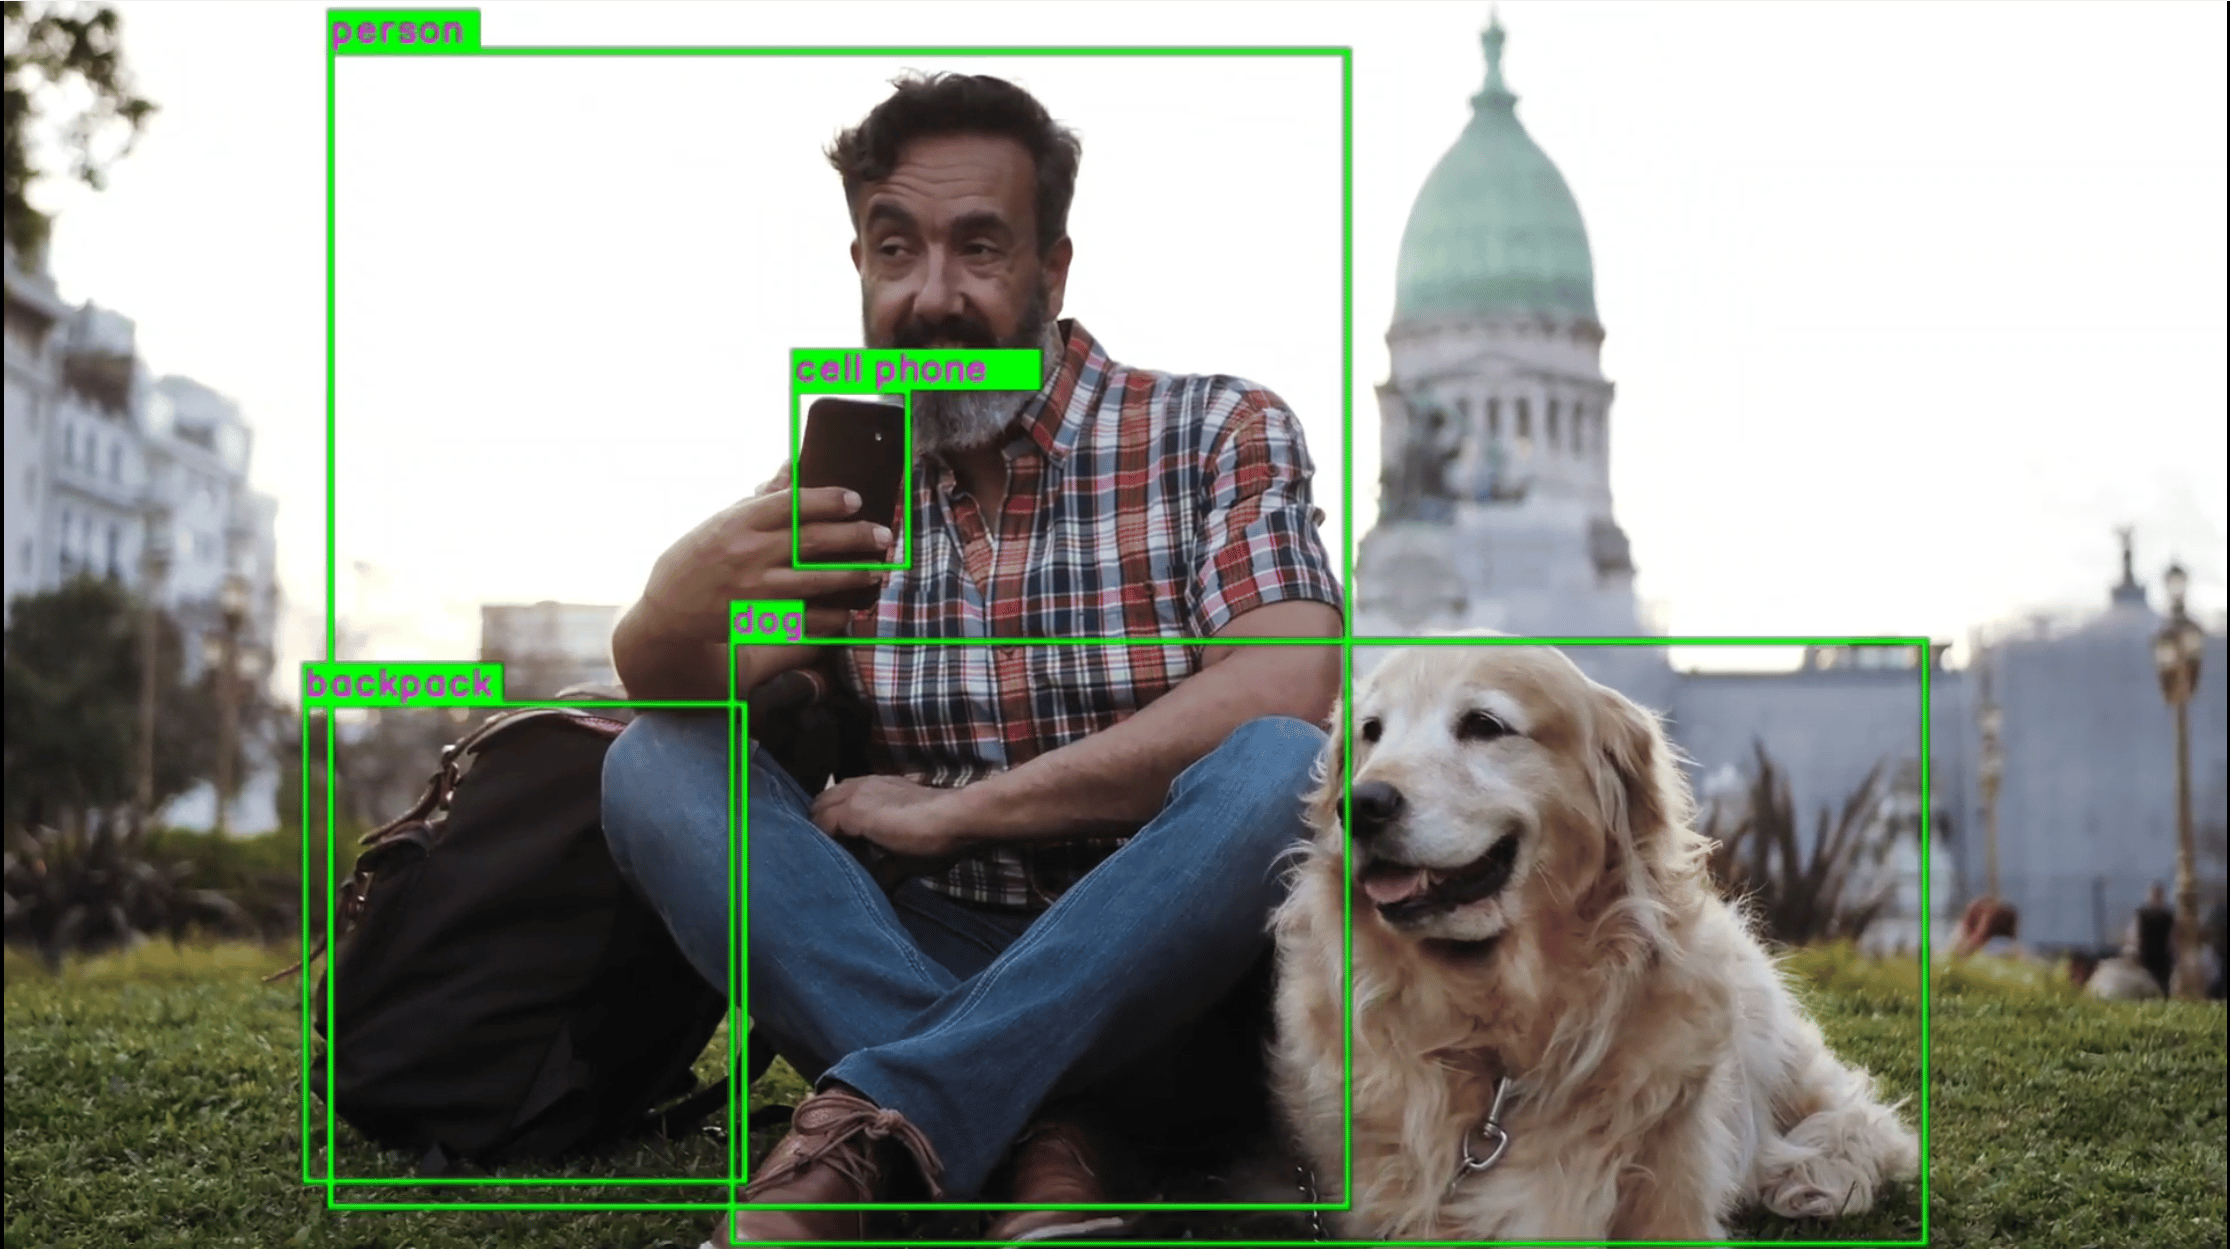
Pipeline Flow
The following table lists the plugins used in the metadata parser pipeline:Config JSON Field Description
AI USB Camera
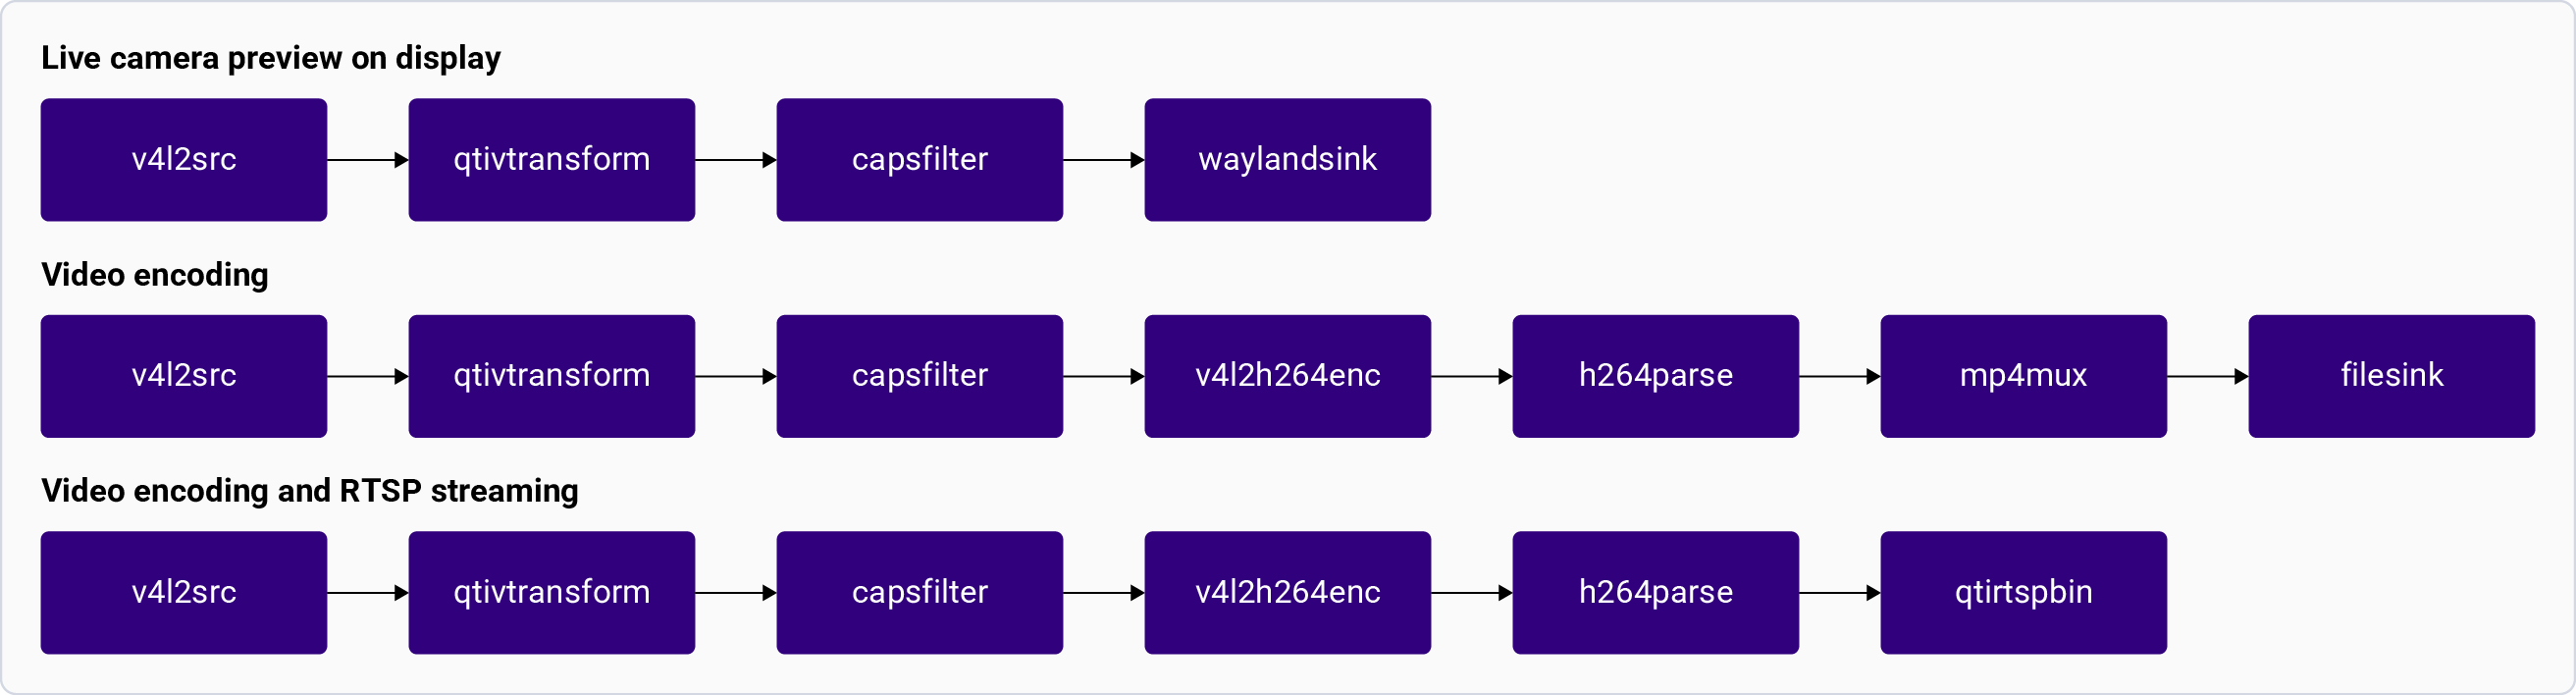
The gst-ai-usb-camera-app streams video from a USB webcam connected to theQualcomm EVK. This webcam should be accessible as a /dev/videoX device. Additionally, you can perform object detection and preview the results.
You can choose to preview the output on Wayland, or encode to a video file, or live stream through the RTSP.
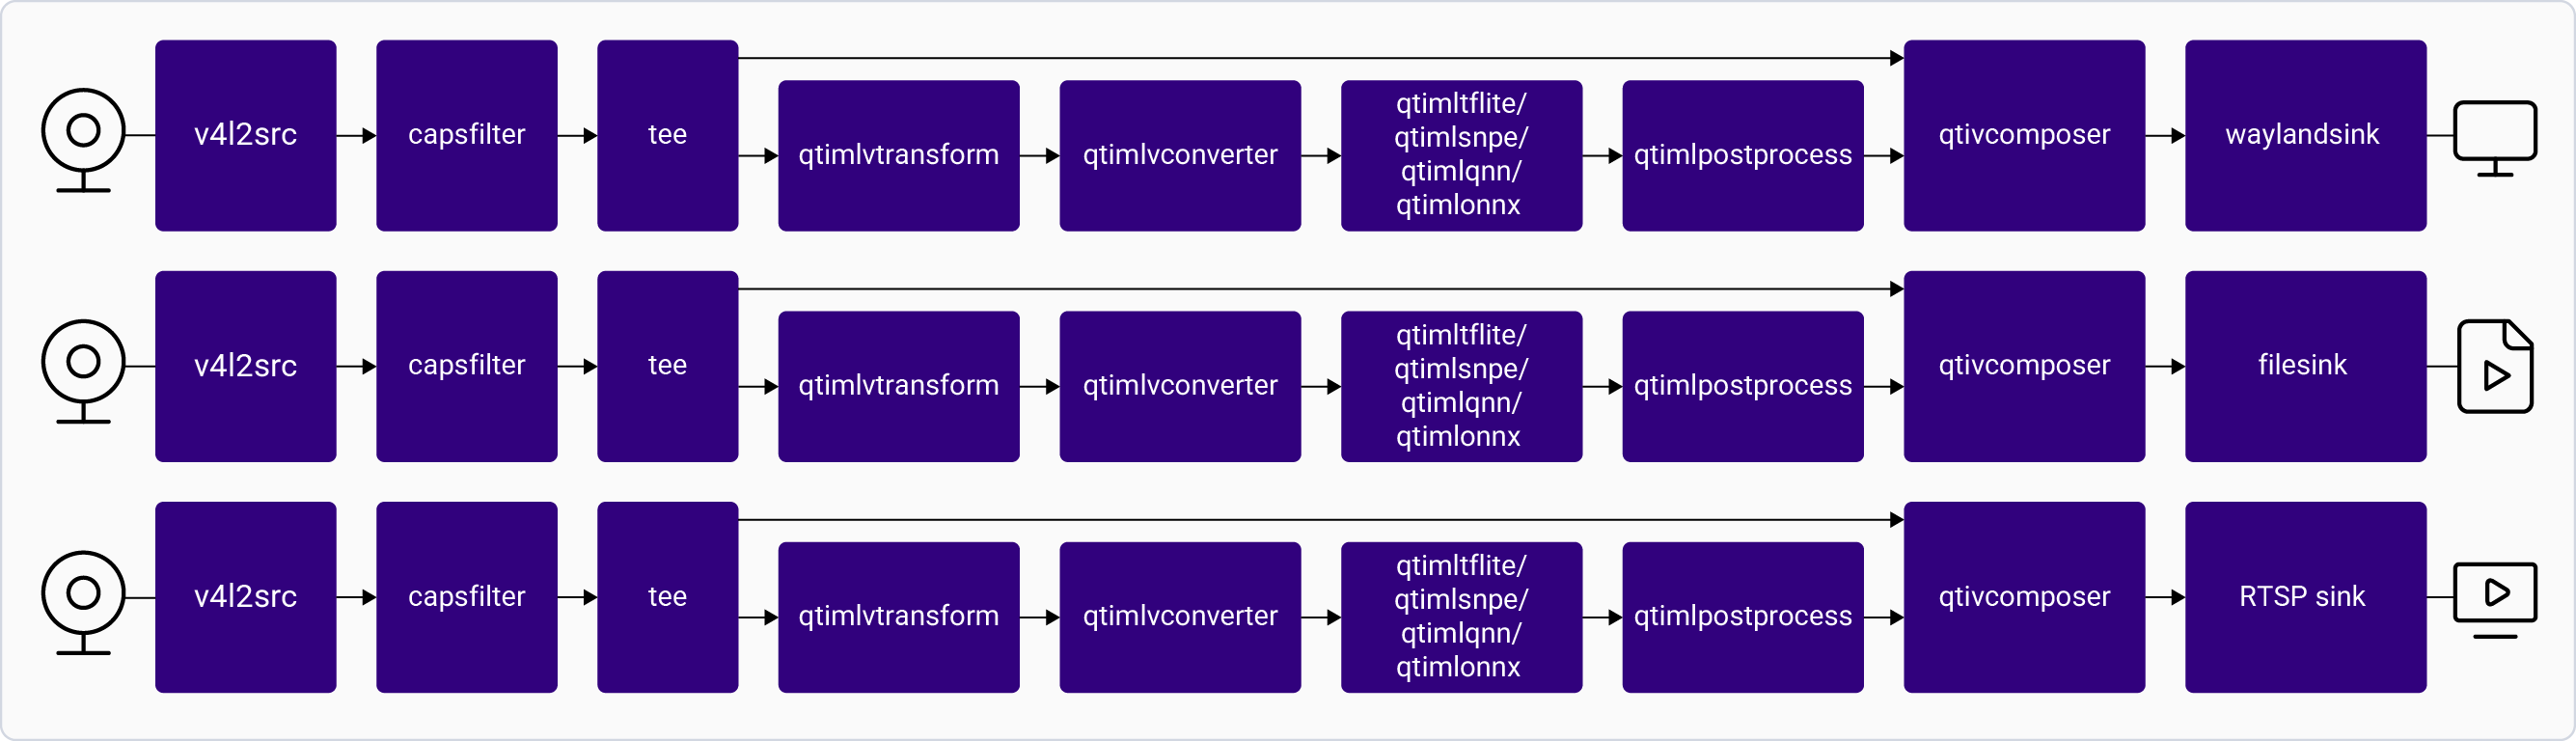
Alternatively, you can set enable-object-detection as True to perform object detection.
The following figures show a pipeline, which processes the input from the USB camera to generate various outputs.
For information about the plugins used in this pipeline, see Pipeline flow.
gst-ai-usb-camera-app
Try me
Try me
Input and Output Capabilities
Sample Model and Label Files
Run the application on the target device
Download artifacts
Prerequisites. This downloads all required artifacts to the target device.Run the application
/etc/configs/config-usb-camera-app.json file to read the input parameters.To display all available options:Configurations
The gst-ai-usb-camera-app application uses the/etc/configs/config-usb-camera-app.json file. Update its properties to match your model, input stream, and output. See Config JSON Field Description for all fields.video-format, resolution, and framerate parameters in the config file
to match the camera capabilities.Yolo-NAS-Quantized.tflite model using the YOLOv8 value in the yolo-model-type field.snpe-tensors field applies only to the SNPE runtime. To retrieve the output tensor names for a DLC model, open the model in Netron.snpe-tensors field is optional.Available configurations
Available configurations
- Config #2
- Config #1
Expected Output
Pipeline flow
The following table lists the plugins used in AI USB camera pipelines:Config JSON field description
Face Recognition
The gst-ai-face-recognition application collects the live video input from a camera or an RTSP stream and shares this input for face detection, facial landmarking, and face recognition. It uses theface_det_quantized models for face detection, facemap_3dmm_quantized model for facial landmarking, and face_attrib_net_quantized model for face recognition labels.
The result is a preview of the overlaid AI model on the HDMI display.
Config #1 for the QLI 2.0 GA release
because CPU runtime is not supported.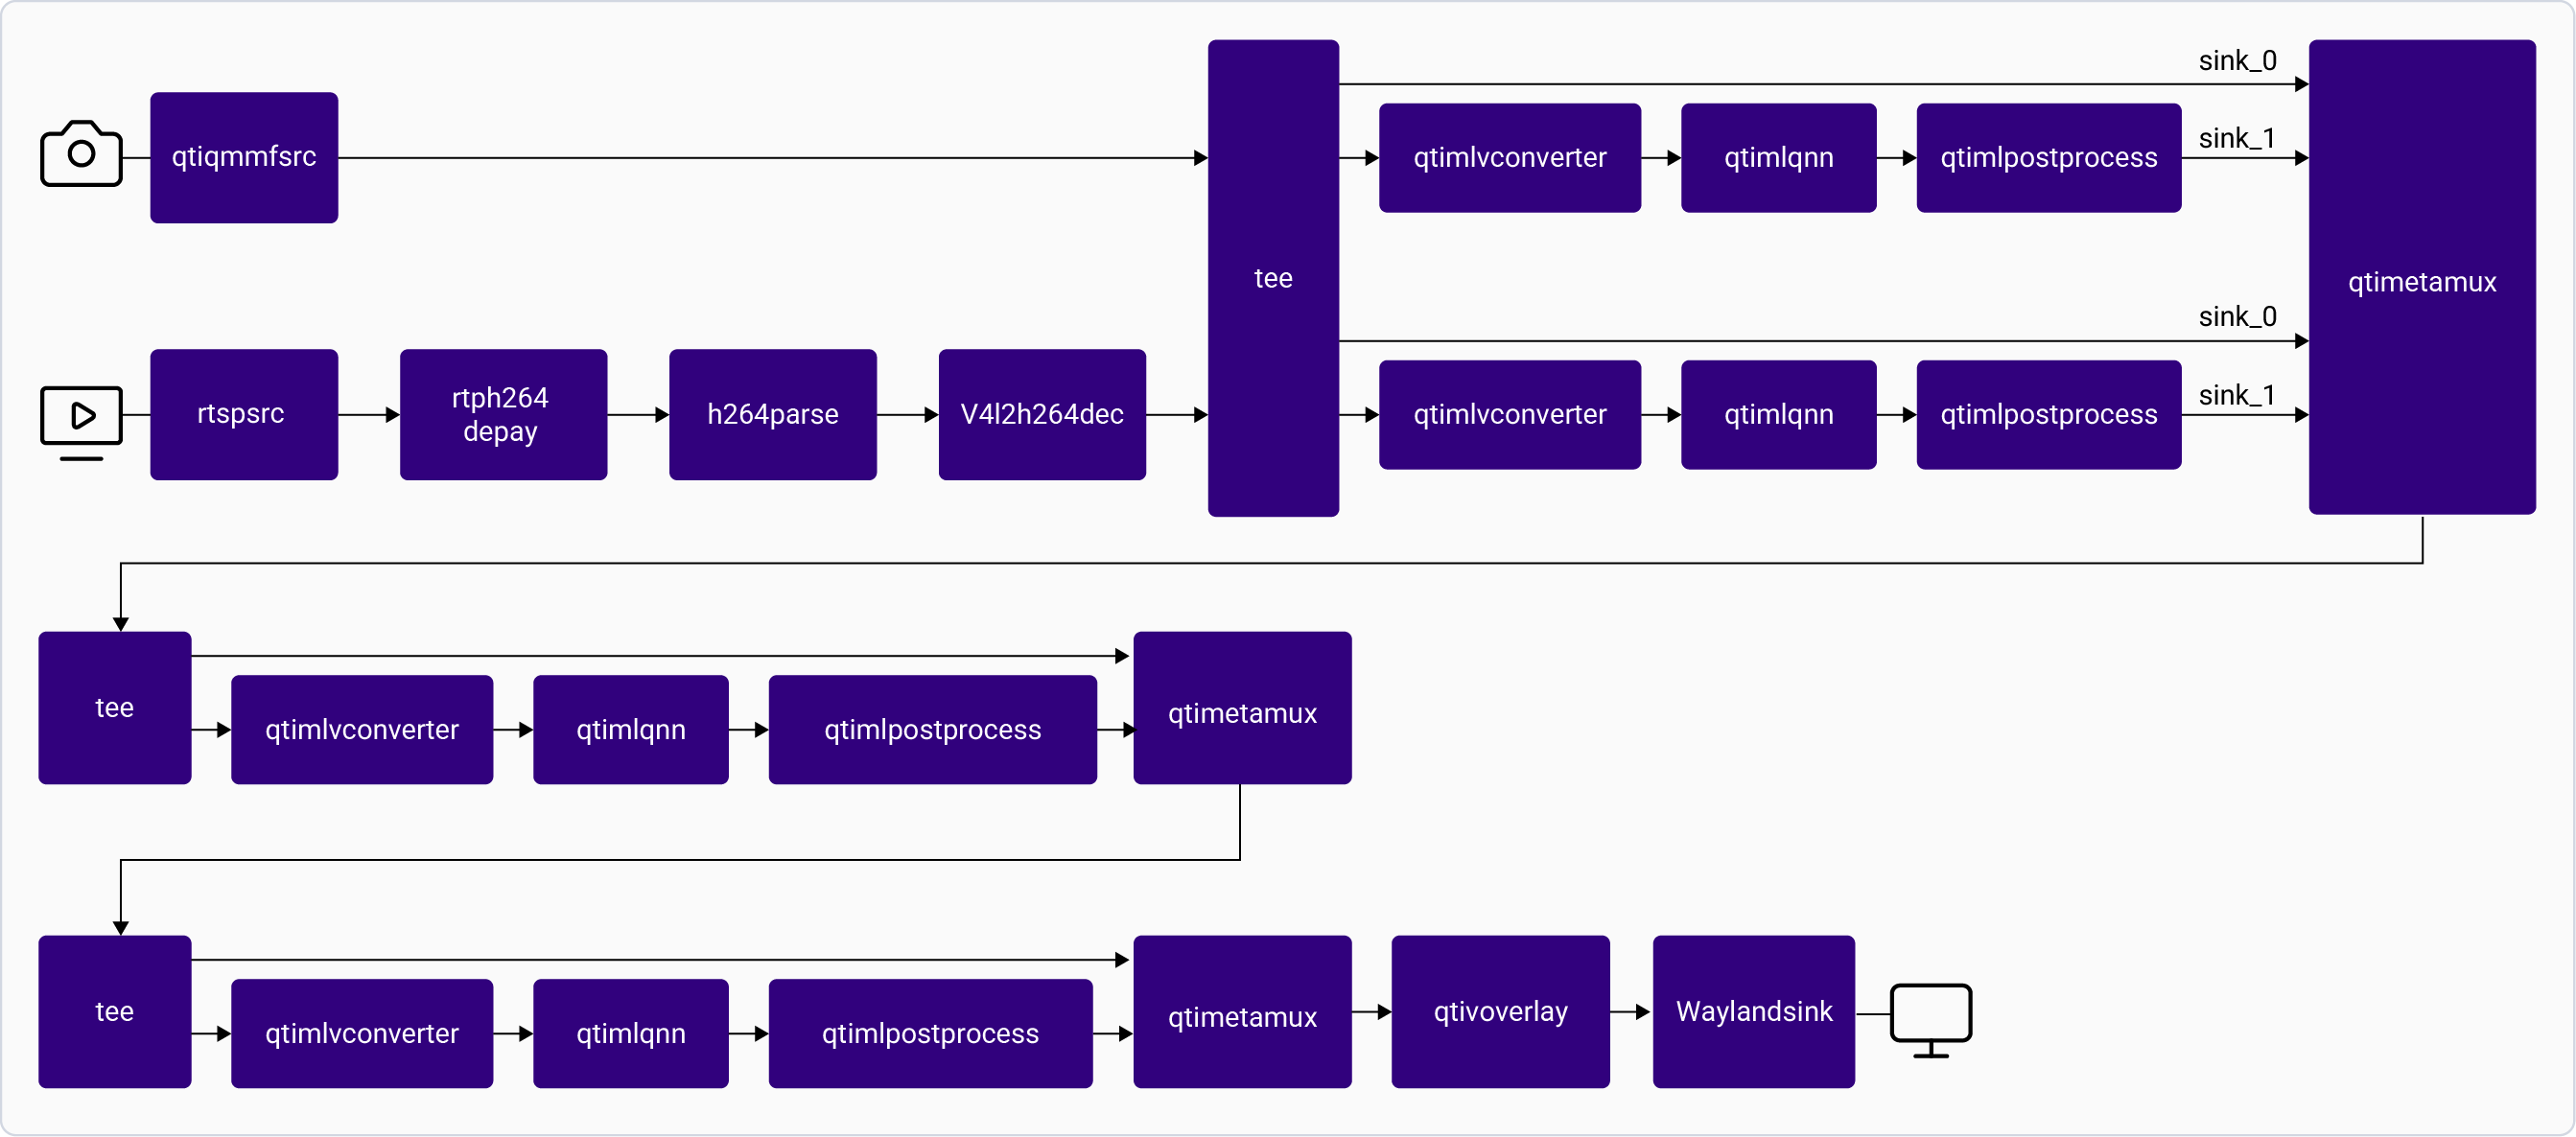
gst-ai-face-recognition
For information about the plugins used in the pipeline flow, see Pipeline flow.
Try me
Try me
Input and Output Capabilities
Sample Model and Label Files
Register a face for facial recognition
Before running the gst-ai-face-recognition application, you can register a face for secure verification and authentication:PLAYING: Move the pipeline to the Playing state.Plugin Mode➔camsrc➔capture-image: Capture the image using a camera source.
GstImageCaptureModeforarg0.guintforarg1.
capture-image do the following for each side:(b)Back and (q)Quit.After running the pipeline, five individual tensor bins are created (
tensor_0.bin to tensor_4.bin) with facial properties recorded for each side of the face./etc/data/, find the tensor bins. To pull the bins from the target device to the Linux host computer, run the following commands:facedb.py script in the same directory as the tensor bins on the Linux host computer.facedb.py script:<Name of the person> is case and style sensitive. Ensure that you use the same name consistently.face.bin binary to /etc/data directory and rename it to face0.bin.face_recognition.json file and register the new person into the database, use the following reference label file for two-person registered face:face_recognition.json.face_recognition_settings.json file use the following reference label file:face_recognition.json and face_recognition_settings.json files to the /etc/labels directory on the target device.Run the application on the target device
Download artifacts
Prerequisites. This downloads all required artifacts to the target device.Run the application
/etc/configs/config-face-recognition file to read the input parameters.To display all available options:Configurations
The gst-ai-face-recognition application uses the/etc/configs/config-face-recognition.json file. Update its properties to match your model, input stream, and output. See Config JSON Field Description for all fields.Available configurations
Available configurations
- Config #2
Expected output
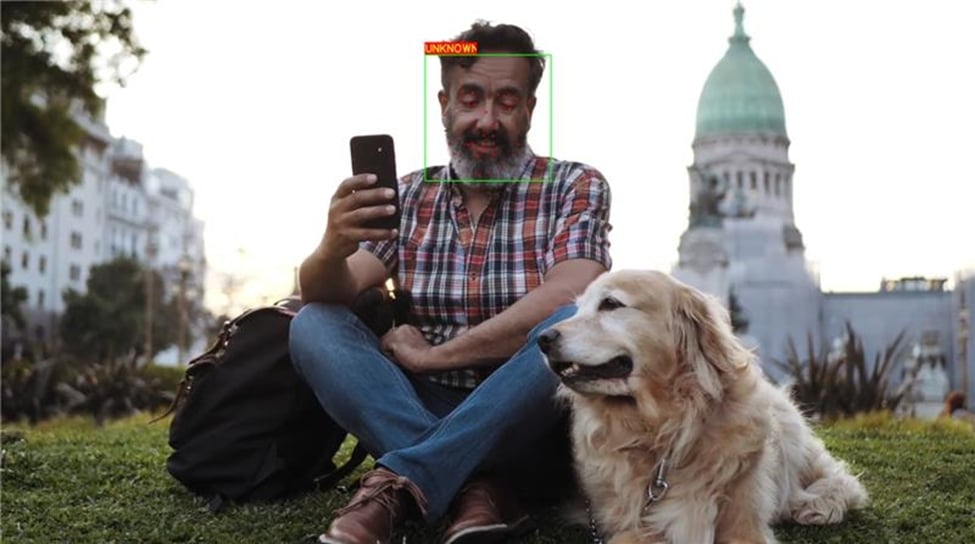
Pipeline Flow
The following table lists the plugins used in the daisychain detection and classification pipeline:Config JSON Field Description
AI Audio Applications
Audio Classification
The gst-ai-audio-classification application shows audio classification using input from either a file source or a microphone. It displays both the classification results and a video preview. The following figure shows the pipeline, which gets the input from a file or a microphone, preprocesses it, and runs inferences on AI hardware. The results are displayed on the screen. For information about the plugins used in the pipeline flow, see Pipeline flow.
gst-ai-audio-classification
Try me
Try me
Sample Model and Label Files
Run the application on the target device
Download artifacts
Prerequisites. This downloads all required artifacts to the target device.Run the application
/etc/configs/config-audio-classification.json file to read the input parameters.To display all available options:Configurations
The gst-ai-audio-classification application uses the/etc/configs/config-audio-classification.json file. Update its properties to match your model, input stream, and output. See Config JSON Field Description for all fields.Available configurations
Available configurations
- Config #2
- Config #1
Expected Output
The output video and classified audio are played on the screen.
Pipeline Flow
The following table lists the plugins used in the audio classification pipeline:Config JSON Field Description
AI Multi-Model Applications
Daisychain Detection + Classification
The gst-ai-daisychain-detection-classification application allows you to perform cascaded object detection and classification with a camera, file source, or RTSP stream. The use case involves detecting objects and classifying the detected objects. The following figures show the pipeline workflow, which captures the video stream from the source, preprocesses it, and runs inferences using AI hardware. The results are either displayed on the screen, saved as an encoded MP4 file, or streamed over the RTSP server. For information about the plugins used in this pipeline, see Pipeline flow.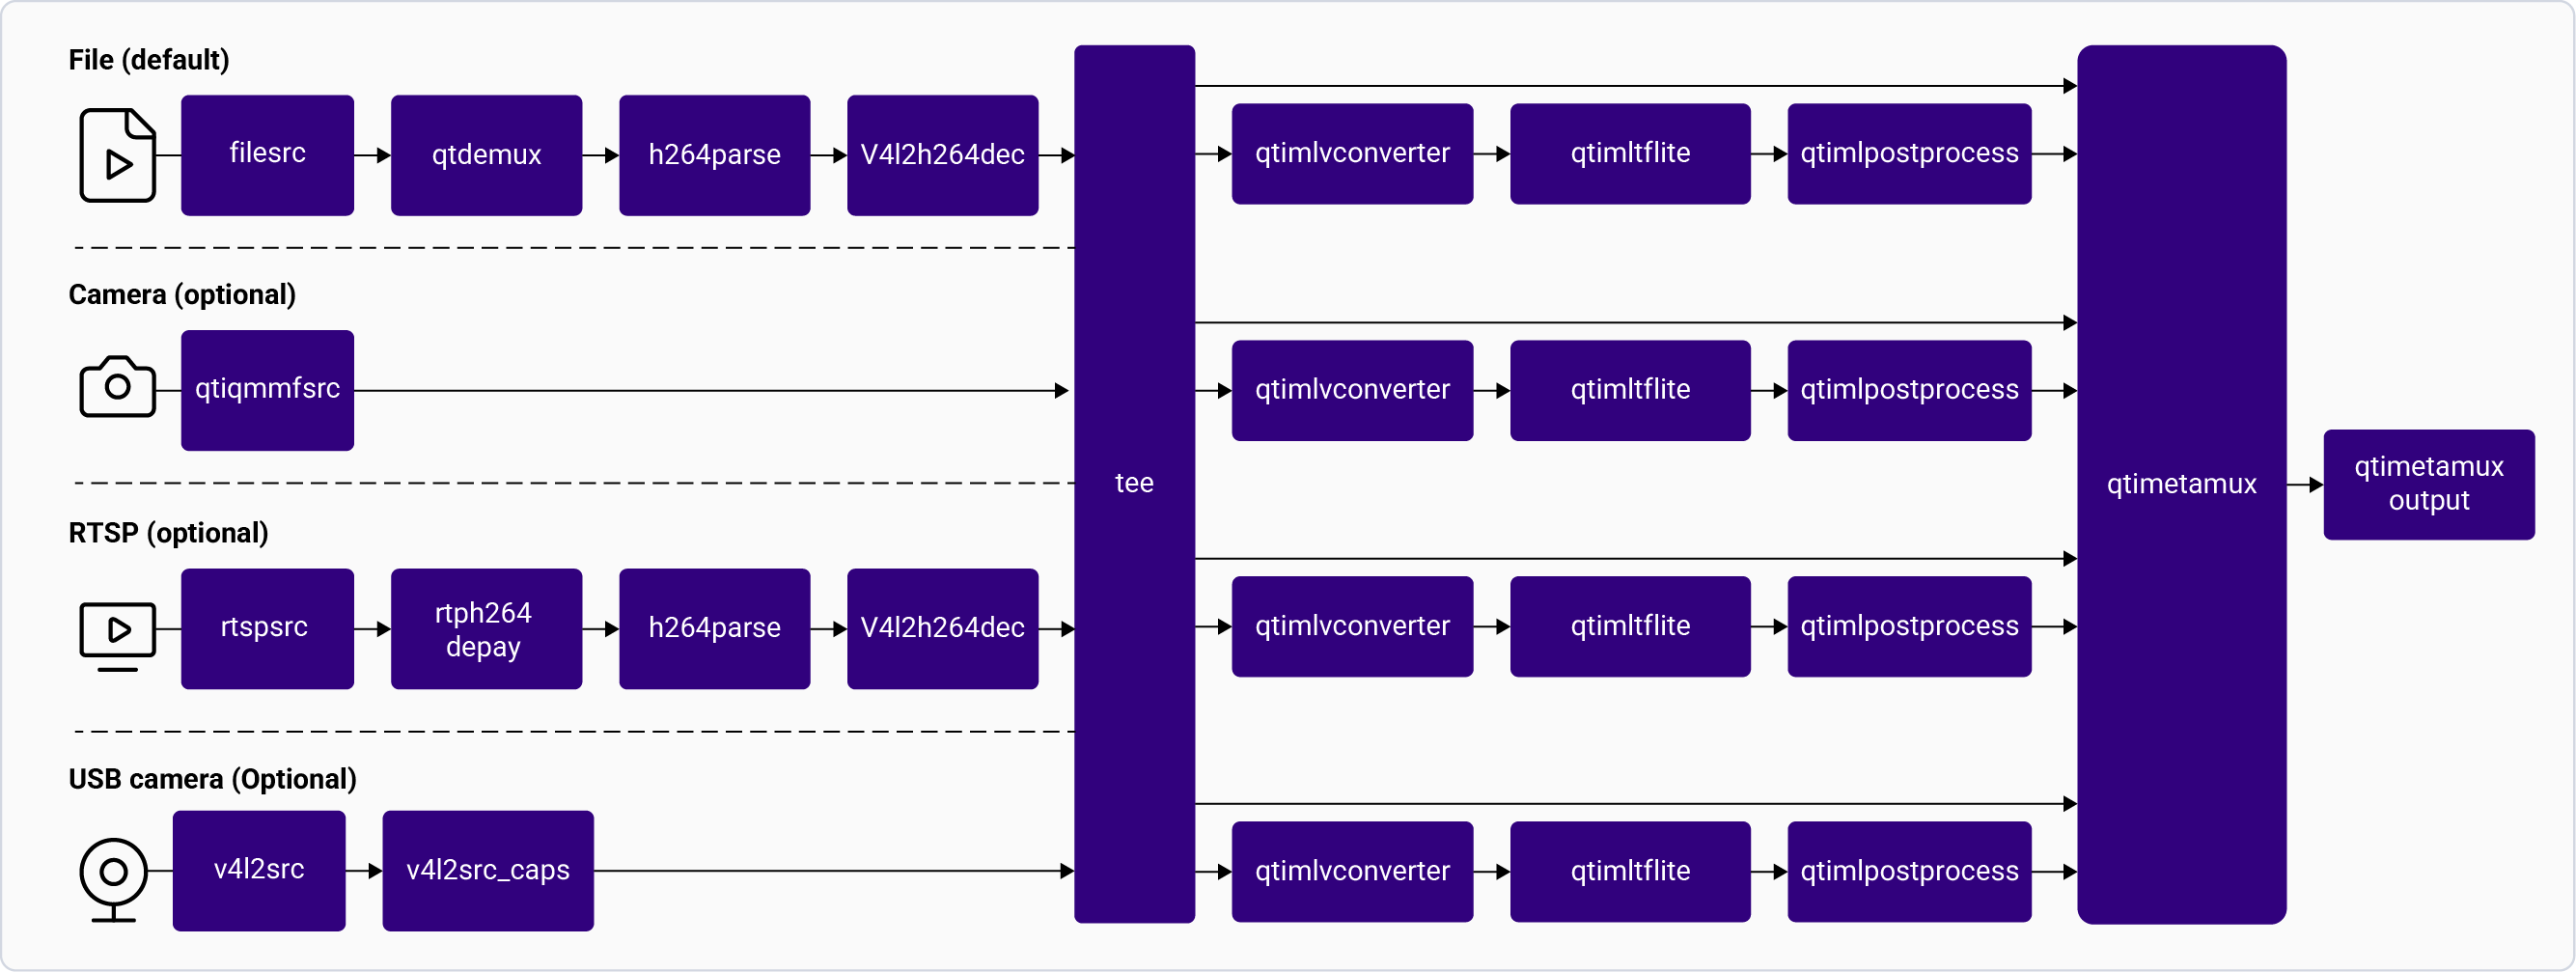
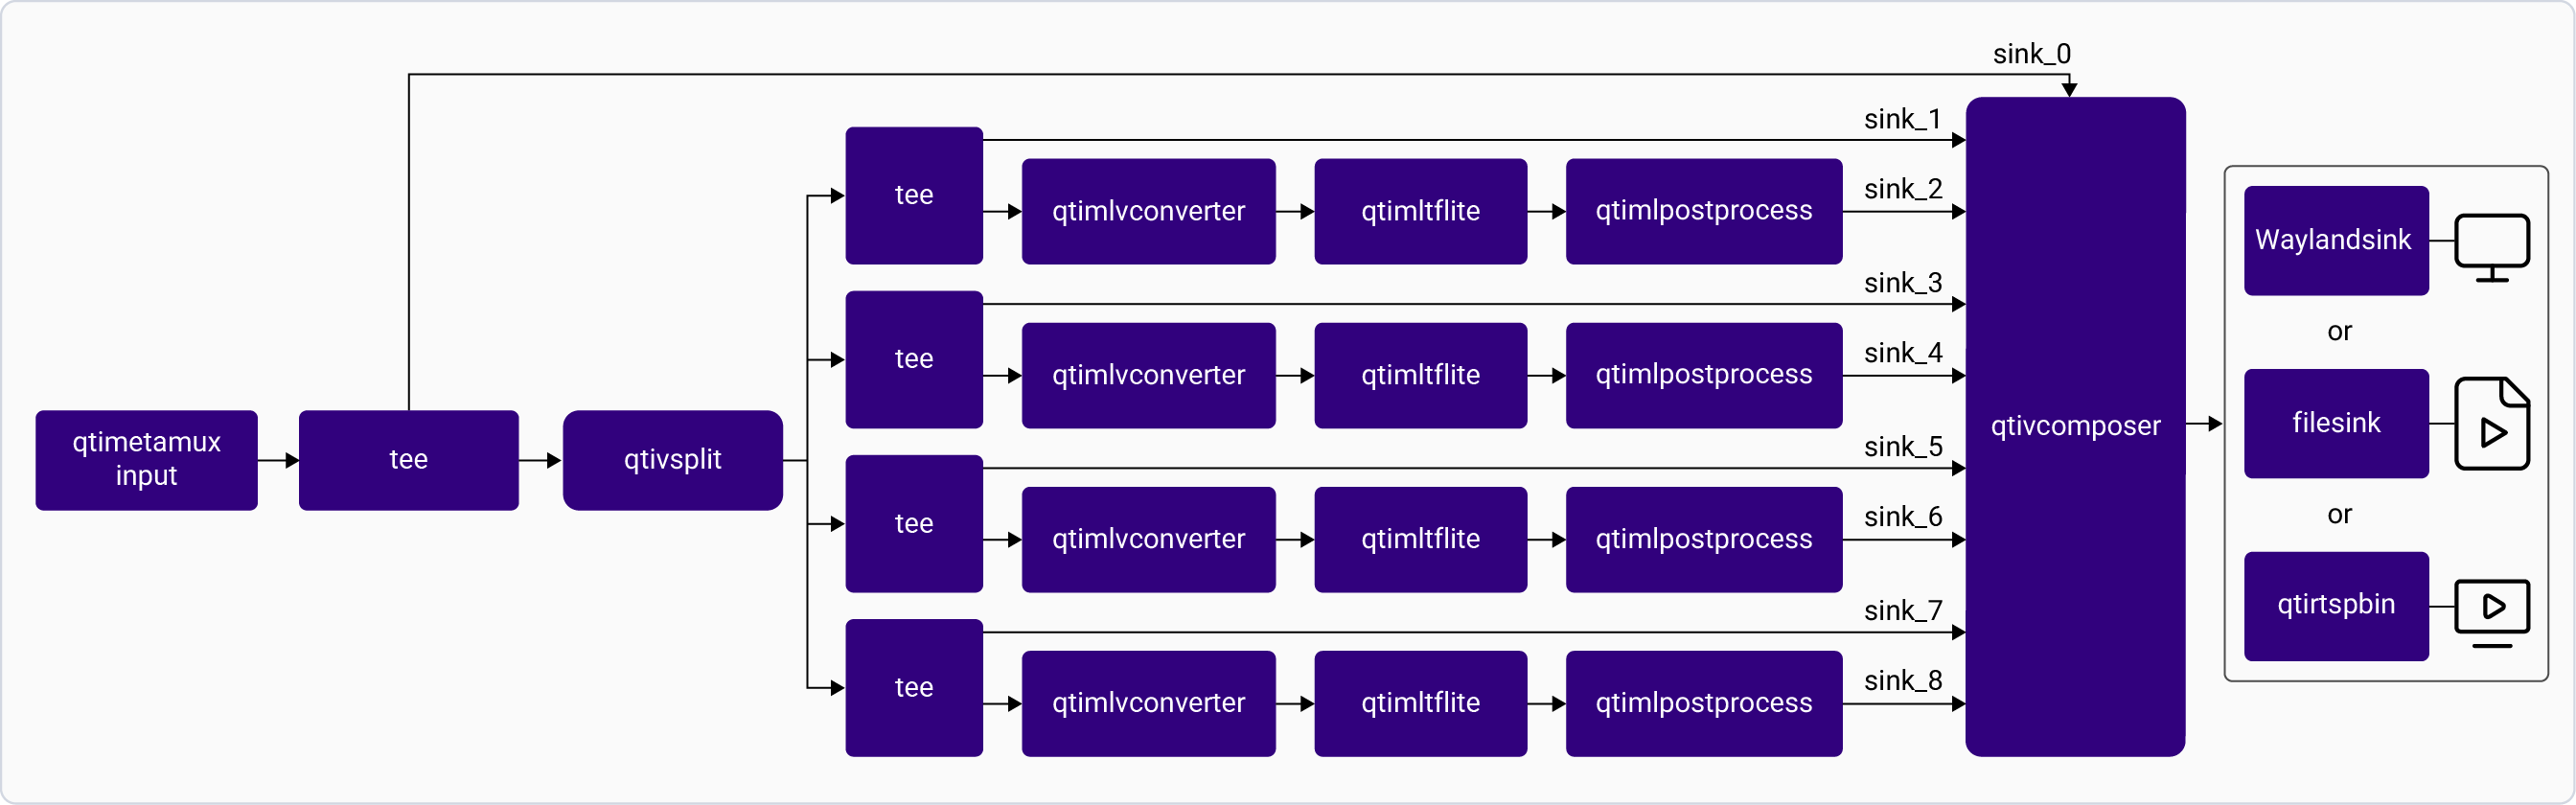
gst-ai-daisychain-detection-classification
Try me
Try me
Input and Output Capabilities
Sample Model and Label Files
Run the application on the target device
Download artifacts
Prerequisites. This downloads all required artifacts to the target device.Run the application
/etc/configs/config_daisychain_detection_classification.json file to read the input parameters.To display all available options:Configurations
The gst-ai-daisychain-detection-classification application uses the/etc/configs/config_daisychain_detection_classification.json file. Update its properties to match your model, input stream, and output. See Config JSON Field Description for all fields.video-format, resolution, and framerate parameters in the config file
to match the camera capabilities, see Configure USB camera.Available configurations
Available configurations
- Config #2
- Config #1
Expected Output
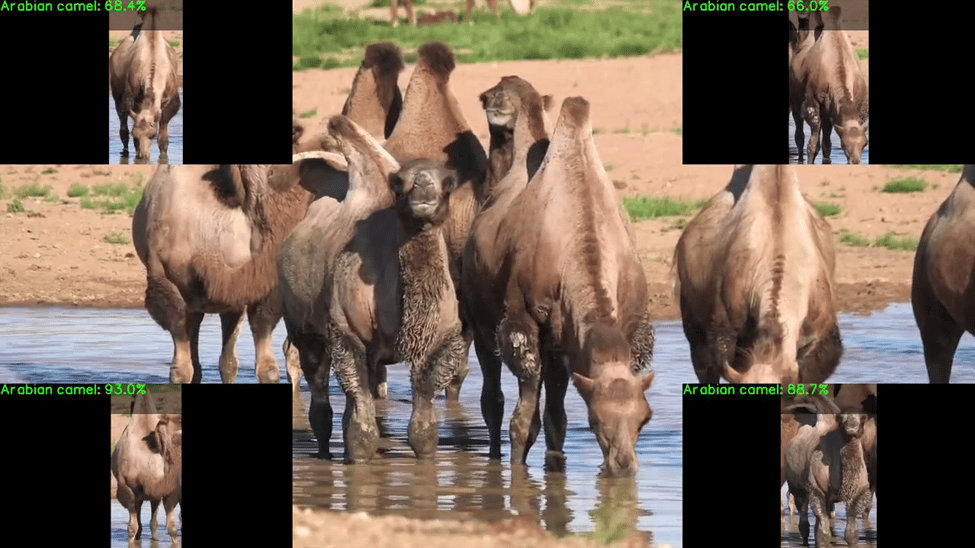
The cropped video frame is overlaid on the frame and displayed on a local device.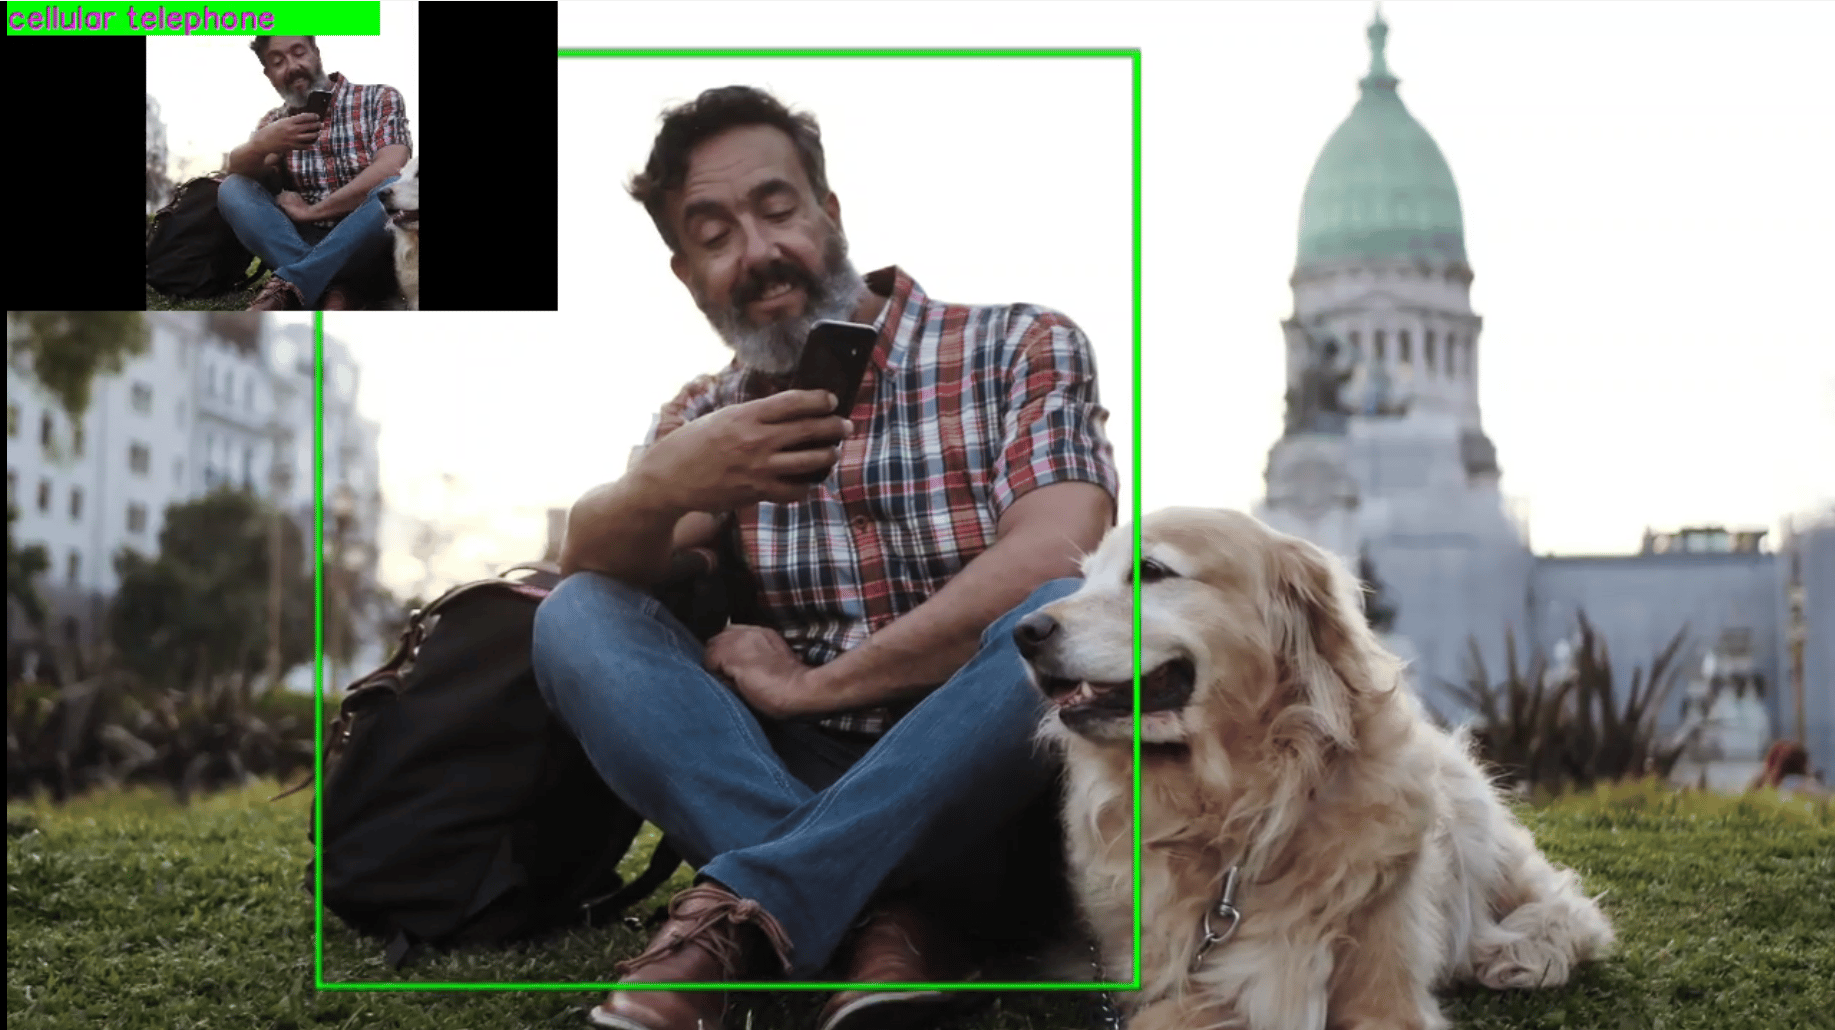
Pipeline Flow
The following table lists the plugins used in the daisychain detection and classification pipeline:Config JSON Field Description
Daisychain Detection + Pose
The gst-ai-daisychain-detection-pose application allows you to perform cascaded object detection and pose detection with a camera, file source, or an RTSP stream. The use cases involve detecting objects and estimating the body poses of the subject in an image or a video. The following figure show the application workflow, which receives the source, postprocesses it, and runs inferences on AI hardware. The results are either displayed on the screen, saved as an encoded MP4 file, or streamed over the RTSP server. For information about the plugins used in the pipeline flow, see Pipeline flow.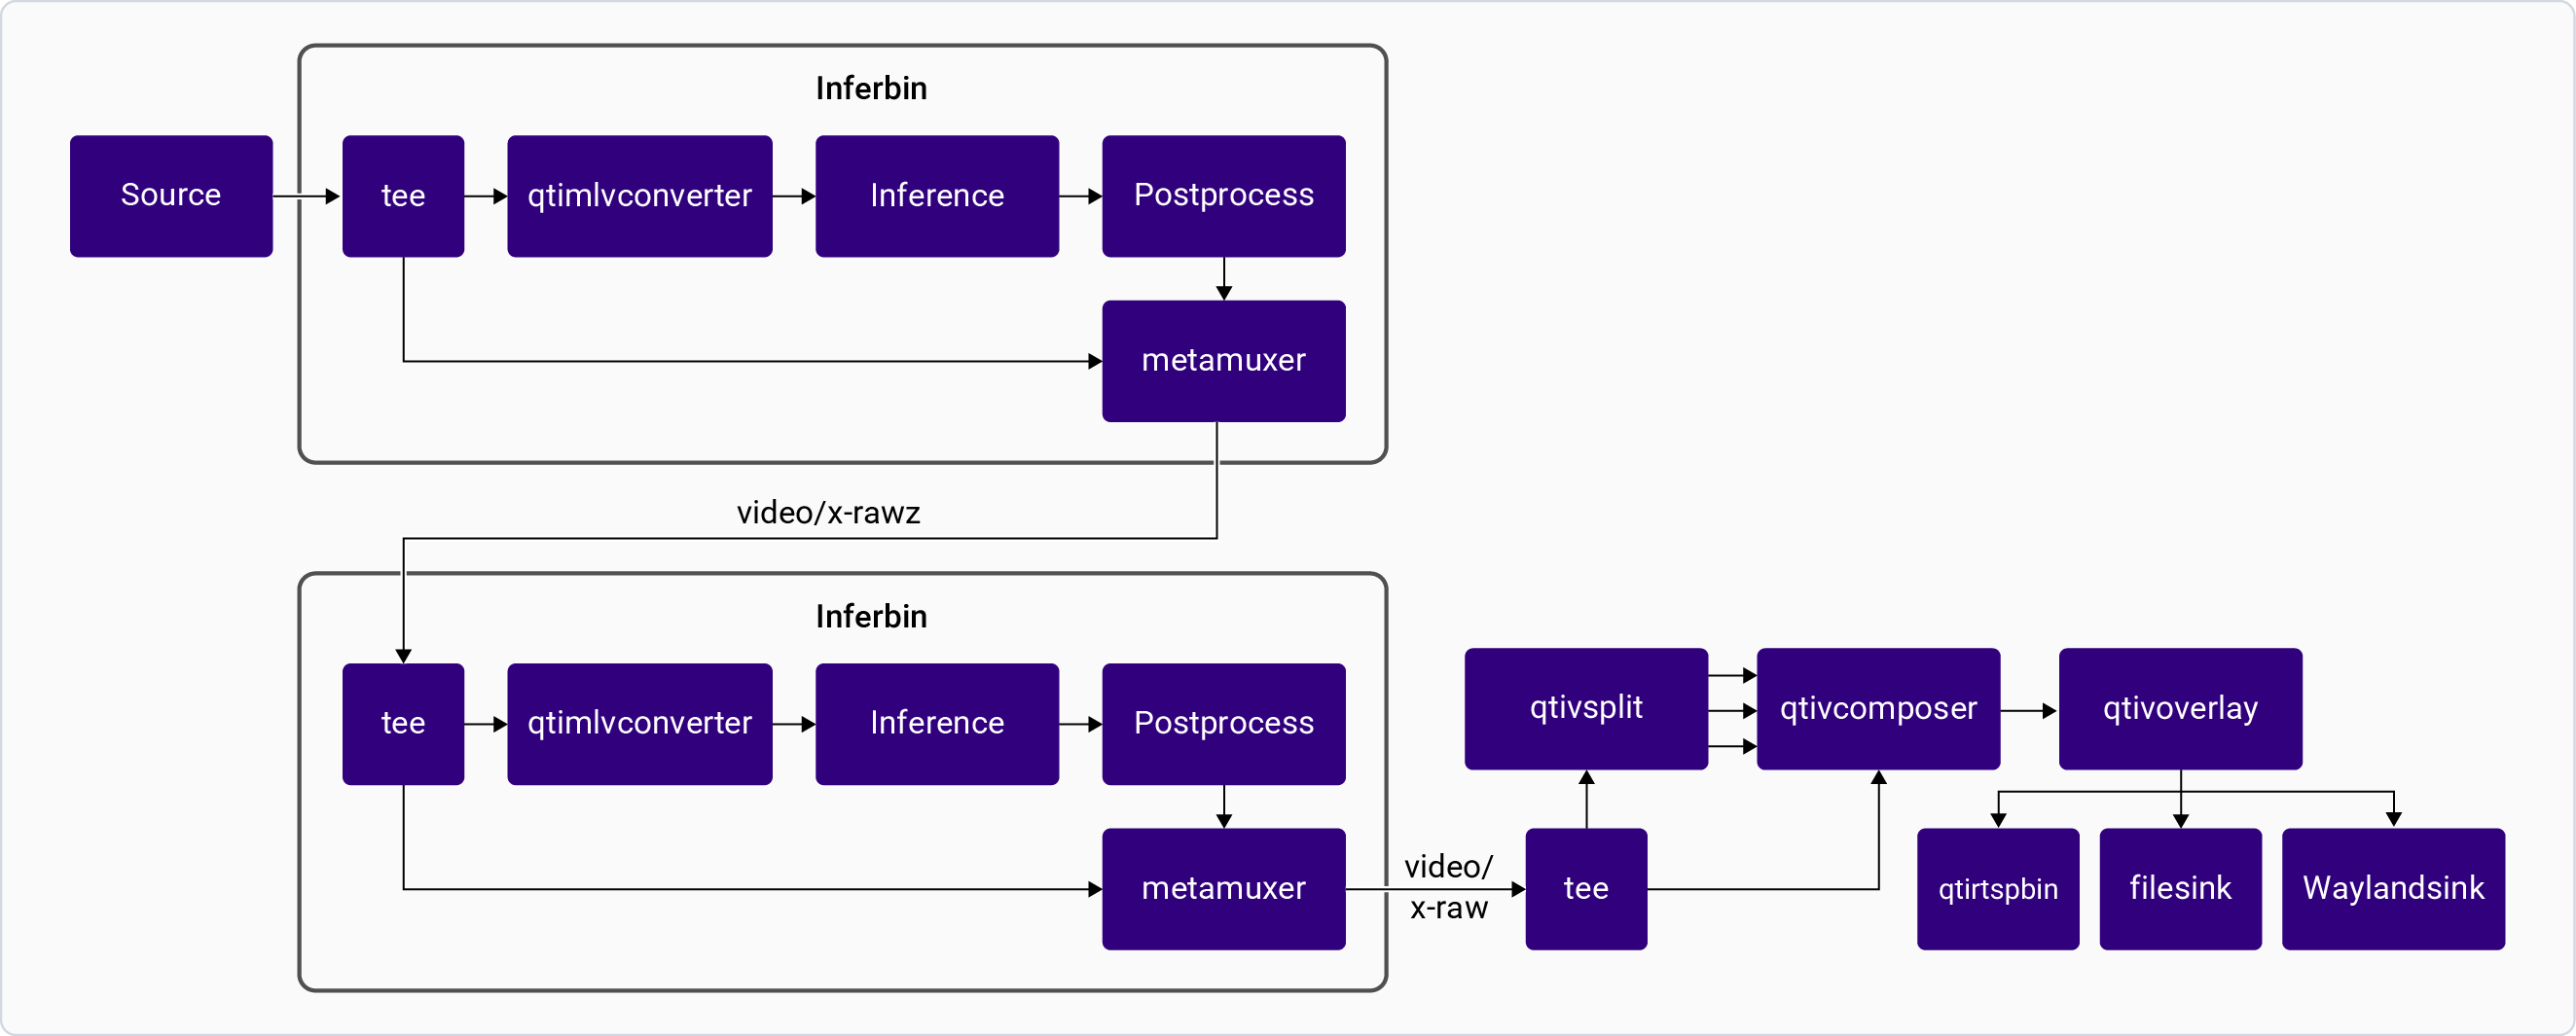
gst-ai-daisychain-detection-pose
Try me
Try me
Input and Output Capabilities
Sample Model and Label Files
Run the application on the target device
Download artifacts
Prerequisites. This downloads all required artifacts to the target device.Run the application
/etc/configs/config-daisychain-detection-pose.json file to read the input parameters.To display all available options:Configurations
The gst-ai-daisychain-detection-pose application uses the/etc/configs/config-daisychain-detection-pose.json file. Update its properties to match your model, input stream, and output. See Config JSON Field Description for all fields.QCS6490, if file-path and rtsp-ip-port are not present in the configuration file, then the camera input is selected.video-format, resolution, and framerate parameters in the config file
to match the camera capabilities, see Configure USB camera.Available configurations
Available configurations
- Config #2
- Config #1
Expected Output
The cropped video frame is overlaid on the frame and displayed on a local device.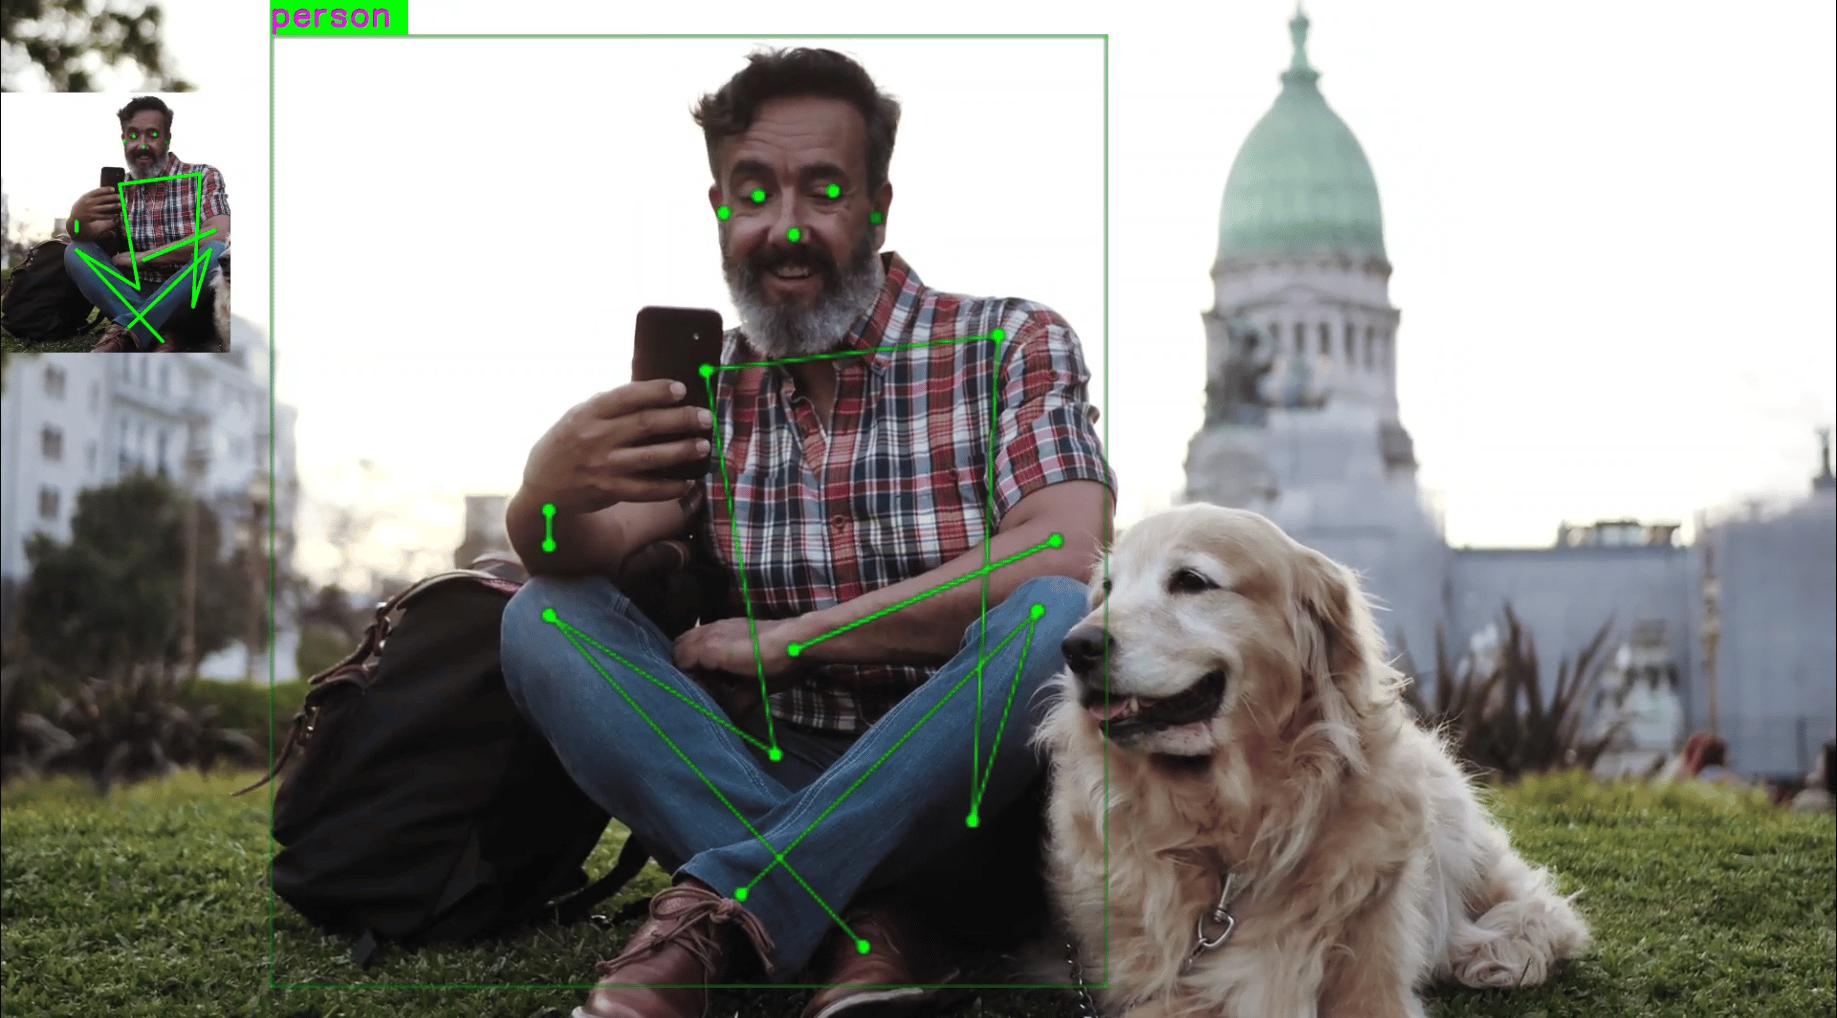
Pipeline Flow
The following table lists the plugins used in the daisychain detection and pose pipeline:Config JSON Field Description
Multistream Inference
The gst-ai-multistream-inference application shows AI inference (object detection and classification) on up to 32 input streams coming from camera, file, or RTSP stream. The following figure shows the pipeline, which receives several input streams, preprocesses them, runs AI inferences, combines the streams, and merges them all into a single video output. The maximum number of input streams supported on each SoC as verified on 1080P and 720P are follows:- QCS6490–8
- Dragonwing IQ-8275–16
-
Dragonwing IQ-9075–32
The output is displayed on an HDMI display, saved as an H.264 encoded MP4 file, or converted into an RTSP stream.This application isn’t supported in
Config #1for theQLI 2.0 GArelease because CPU runtime is not supported.
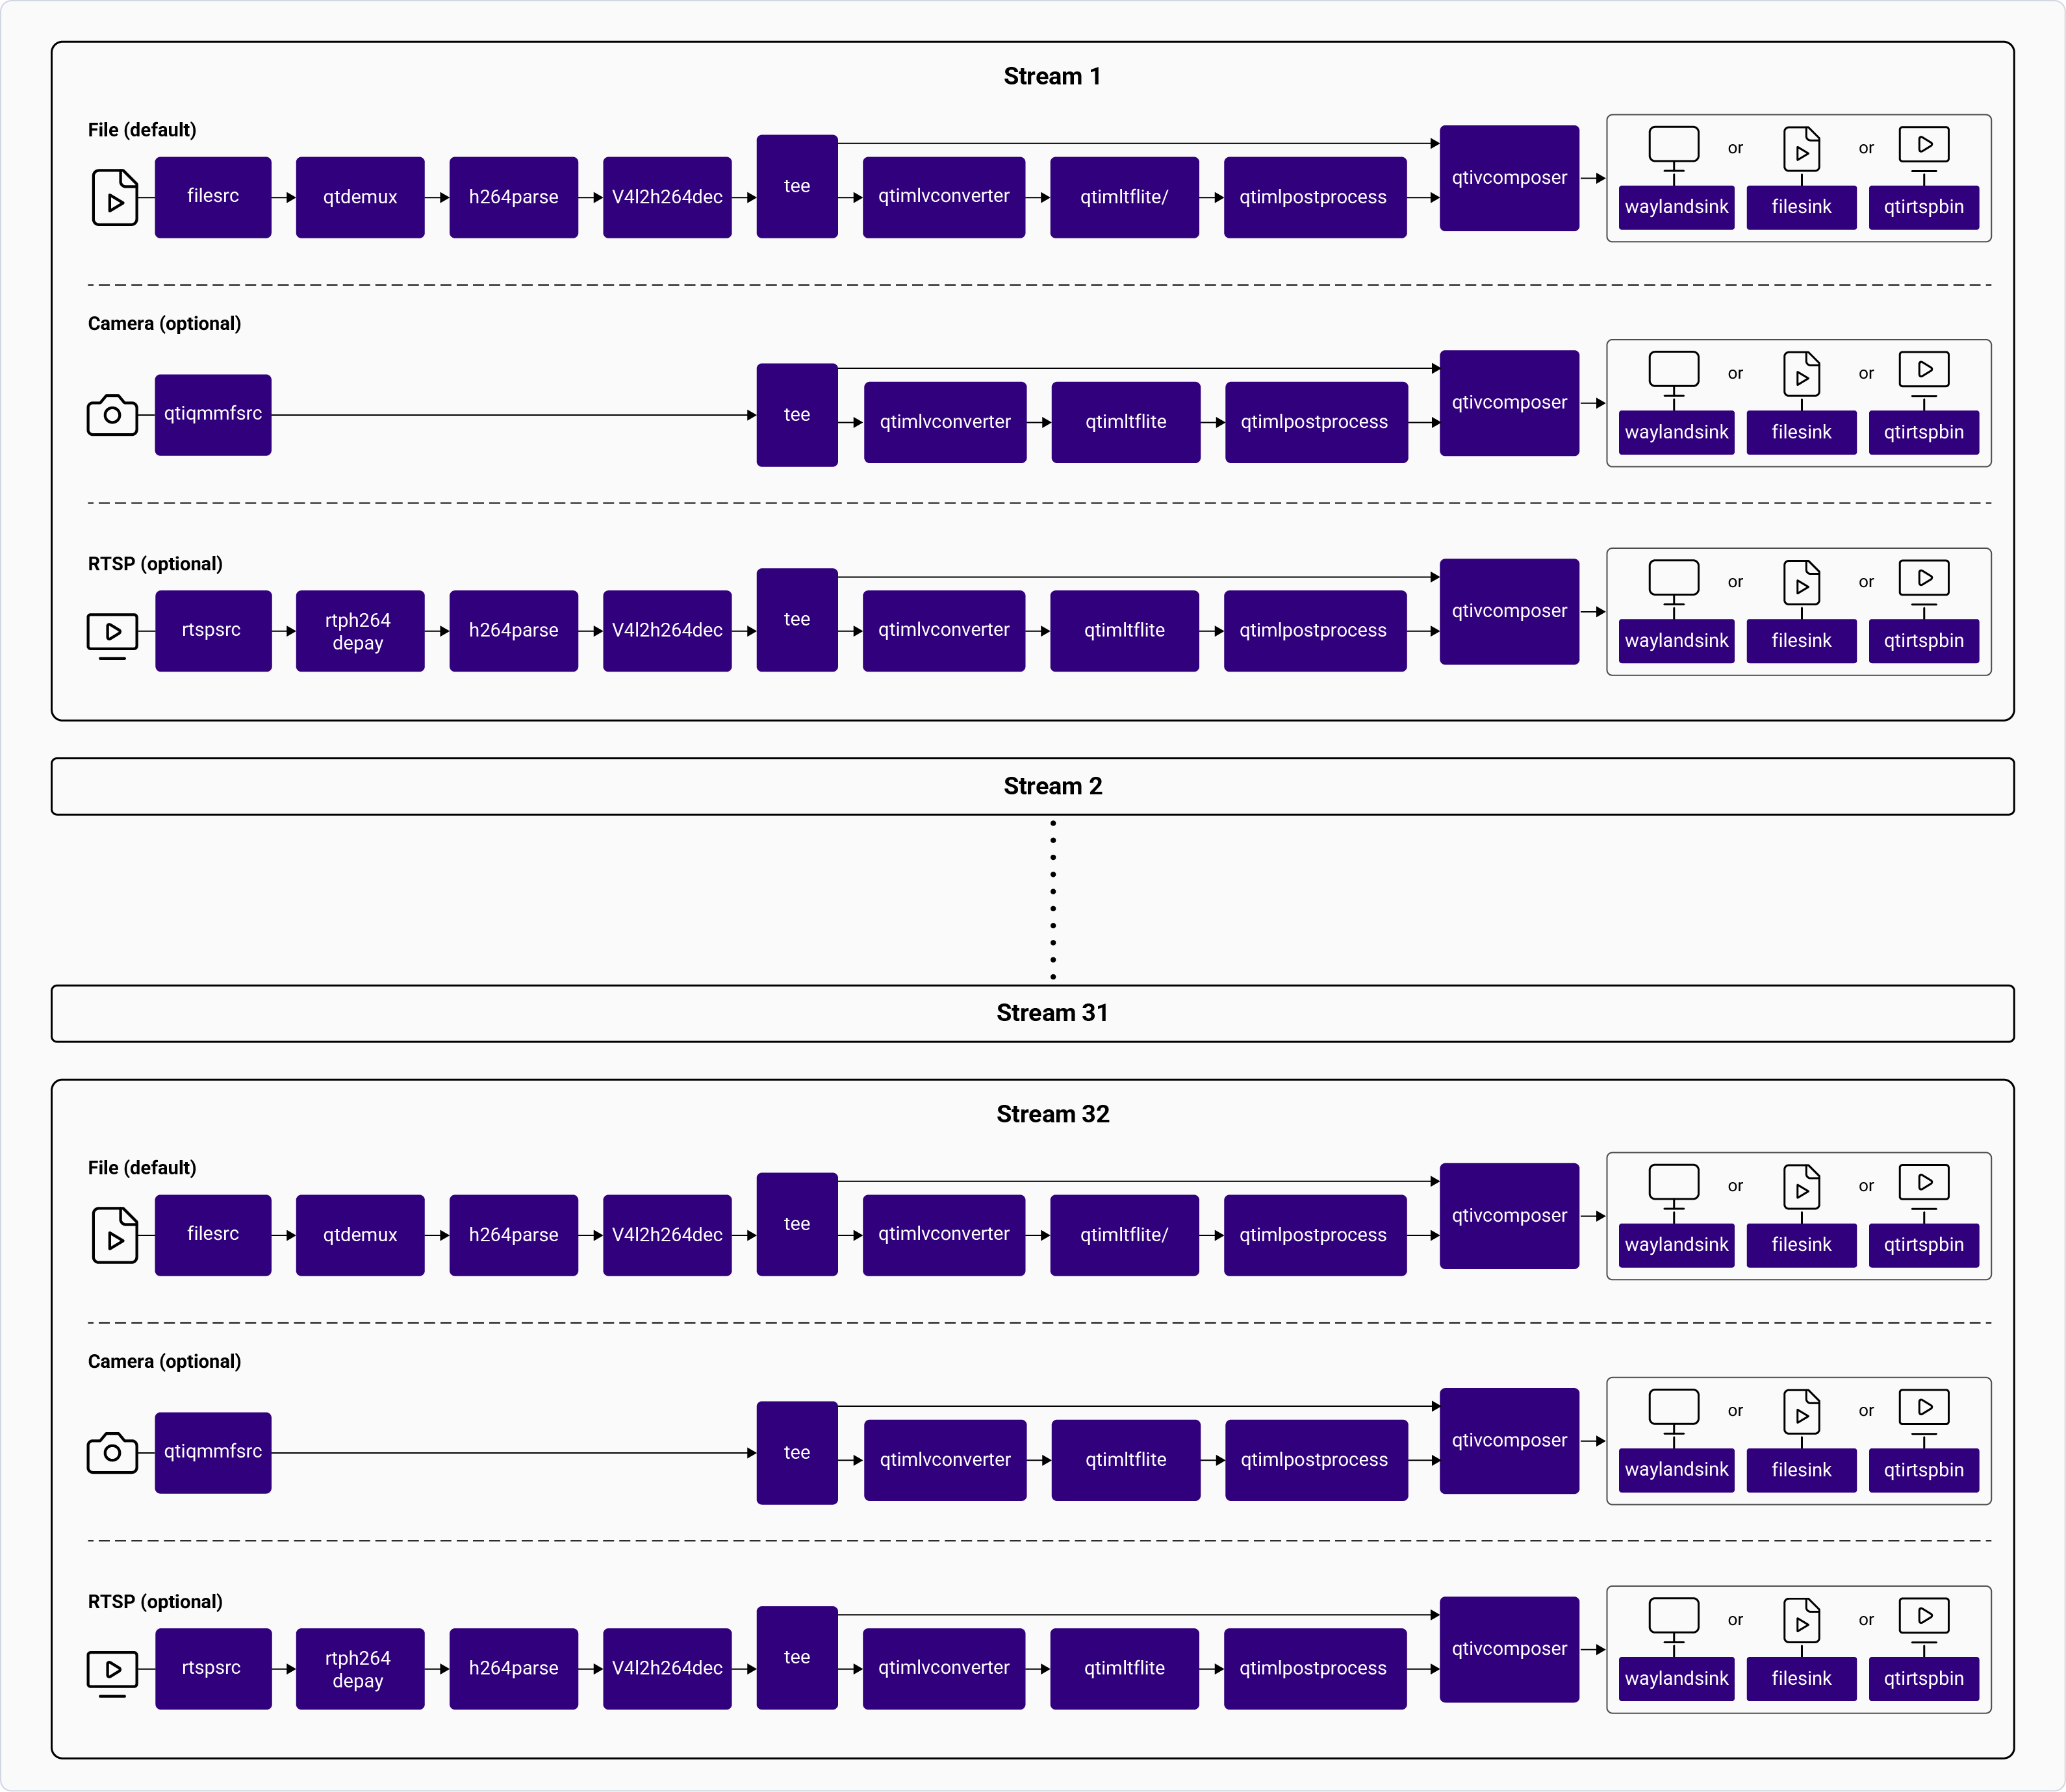
gst-ai-multistream-inference
Try me
Try me
Input and Output Capabilities
Sample Model and Label Files
Run the application on the target device
Download artifacts
Prerequisites. This downloads all required artifacts to the target device.Run the application
/etc/configs/config-multistream-inference.json file to read the input parameters.To display all available options:Configurations
The gst-ai-multistream-inference application uses the/etc/configs/config-multistream-inference.json file. Update its properties to match your model, input stream, and output. See Config JSON Field Description for all fields.Available configurations
Available configurations
- Config #2
Expected Output
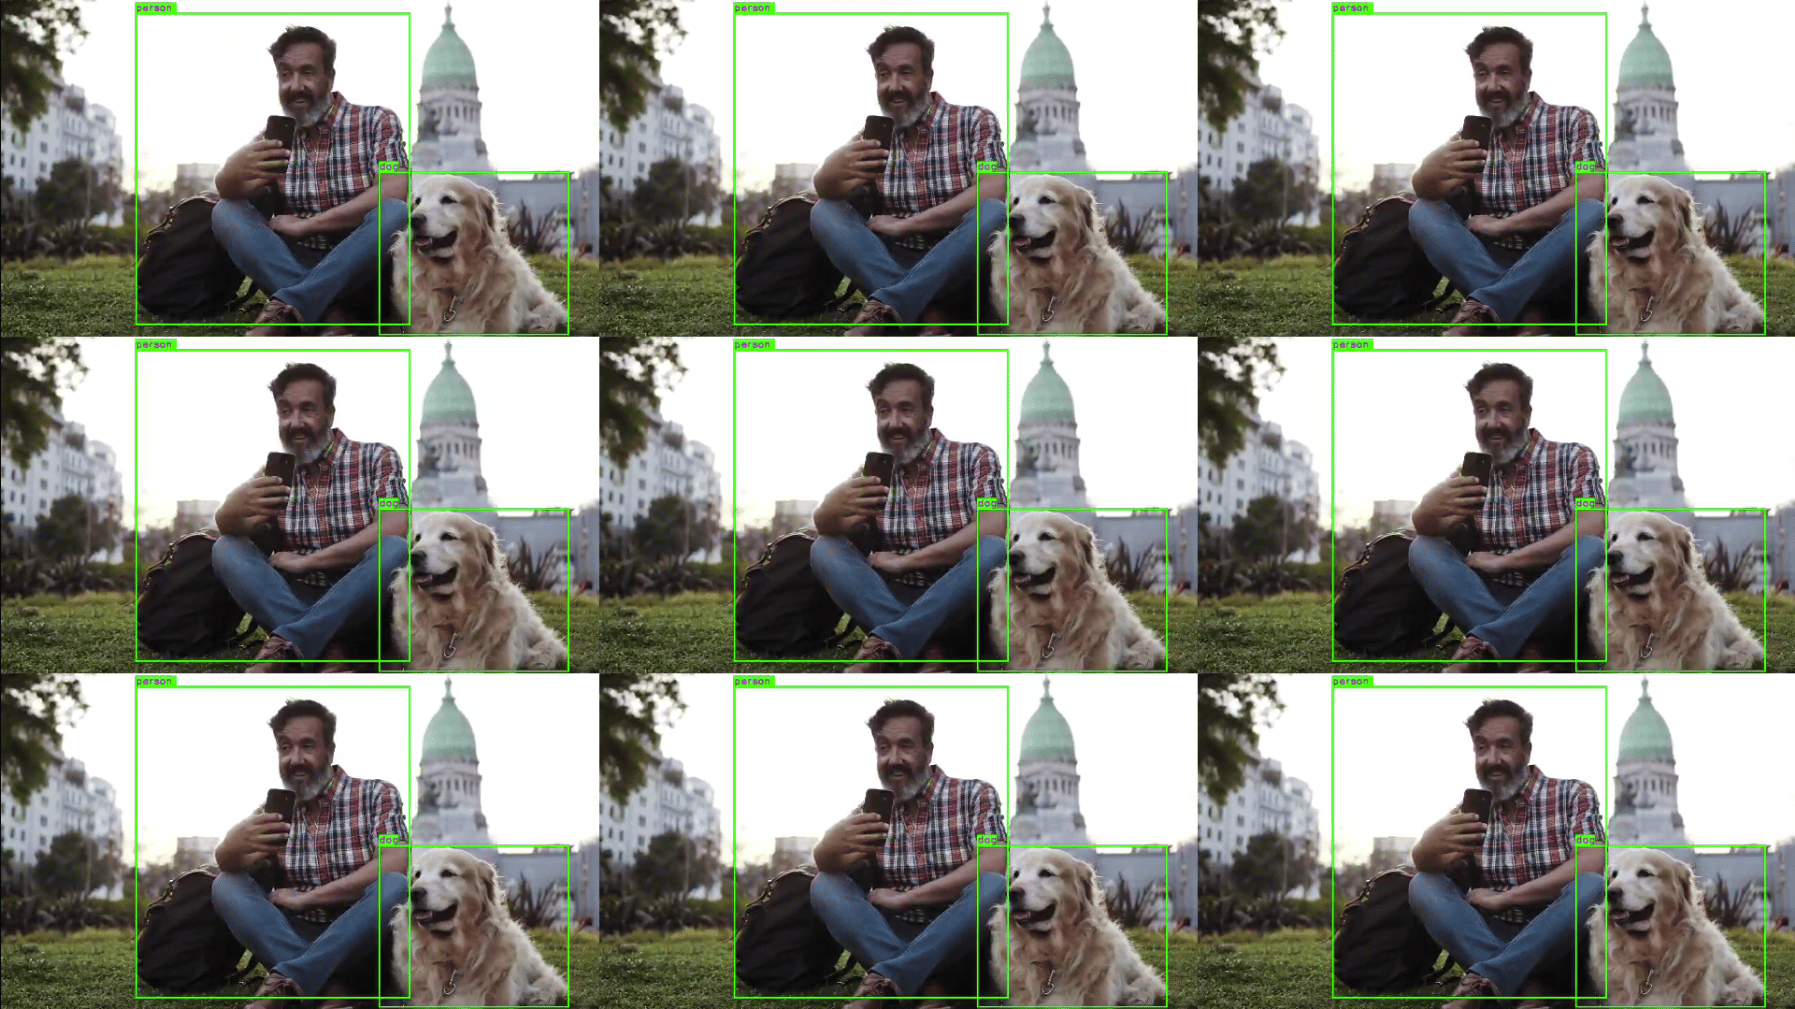
Pipeline Flow
The following table lists the plugins used in the metadata parser pipeline:Config JSON Field Description
Multi-Stream Batch Inference
The gst-ai-multistream-batch-inference application shows batched AI inference (object detection and segmentation) on up to 24 input streams from video files. The following figure shows the pipeline, which receives several input streams, preprocesses them, runs AI inferences, combines the streams with inference, and merges them into a single video output. The maximum number of input streams supported on each SoC are follows: QCS6490–8 Dragonwing IQ-8275–4 Dragonwing IQ-9075–4 The output is displayed either on an HDMI display or saved as an H.264 encoded MP4 file. For information about the plugins used in this pipeline, see Pipeline flow.Config #1 for the QLI 2.0 GA release
because CPU runtime is not supported.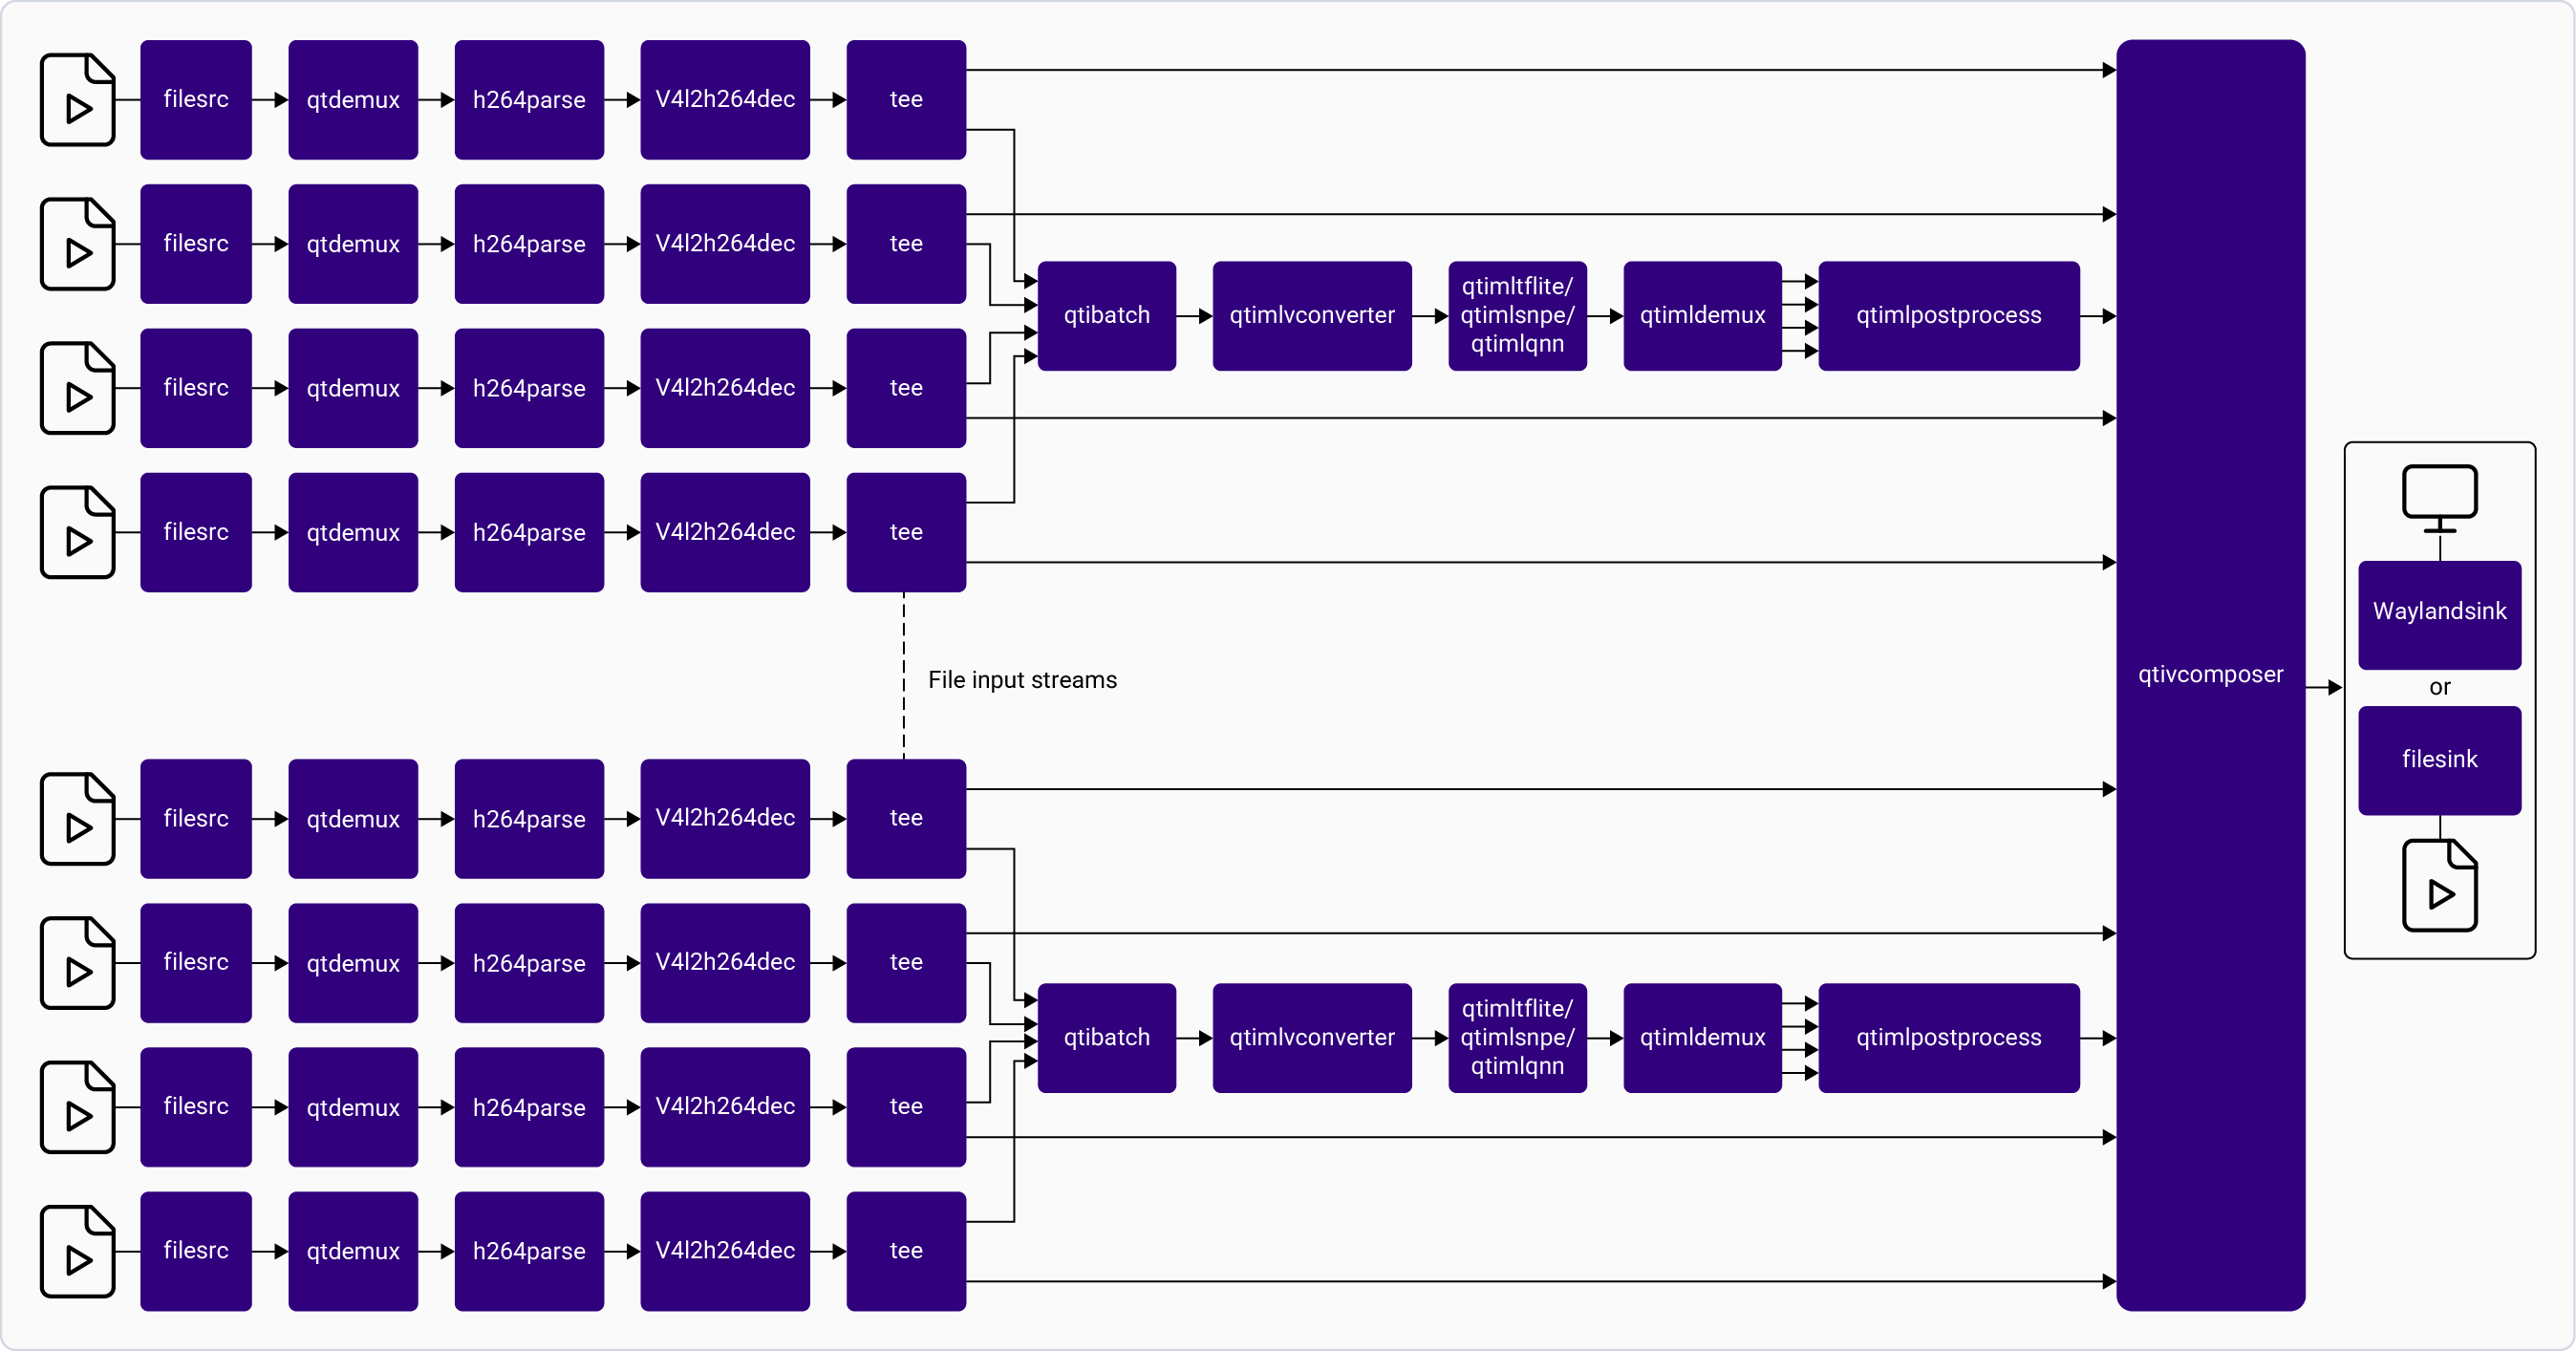
gst-ai-multistream-batch-inference
Try me
Try me
Input and Output Capabilities
Sample Model and Label Files
Run the application on the target device
Download artifacts
Prerequisites. This downloads all required artifacts to the target device.Run the application
/etc/configs/config-multistream-batch-inference.json file to read the input parameters.To display all available options:Configurations
The gst-ai-multistream-batch-inference application uses the/etc/configs/config-multistream-batch-inference.json file. Update its properties to match your model, input stream, and output. See Config JSON Field Description for all fields.pipeline-info parameter. The id parameter takes the values from 0 to 5 for each added batch.Available configurations
Available configurations
- Config #2
Expected Output
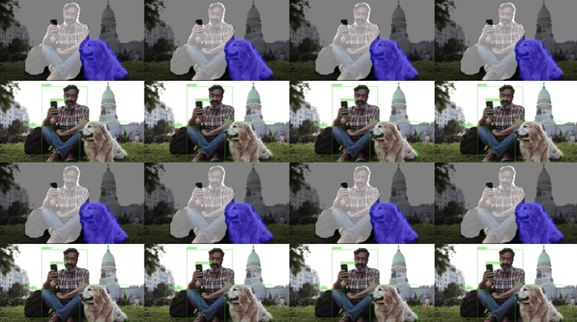
Pipeline Flow
The following table lists the plugins used in the metadata parser pipeline:Config JSON Field Description
Multi input/output object detection
The gst-ai-multi-input-output-object-detection application allows you to perform object detection, object classification, pose detection, and image segmentation on an input stream from different sources such as a camera, a file, or an RTSP network. The use cases implement the LiteRT models for object detection, image segmentation, classification, and pose detection. The following figure shows the pipeline workflow, which captures video streams for inferencing from different sources such as camera, file, or RTSP. For information about the plugins used in the pipeline, see Pipeline flow.Config #1 for the QLI 2.0 GA release
because CPU runtime is not supported.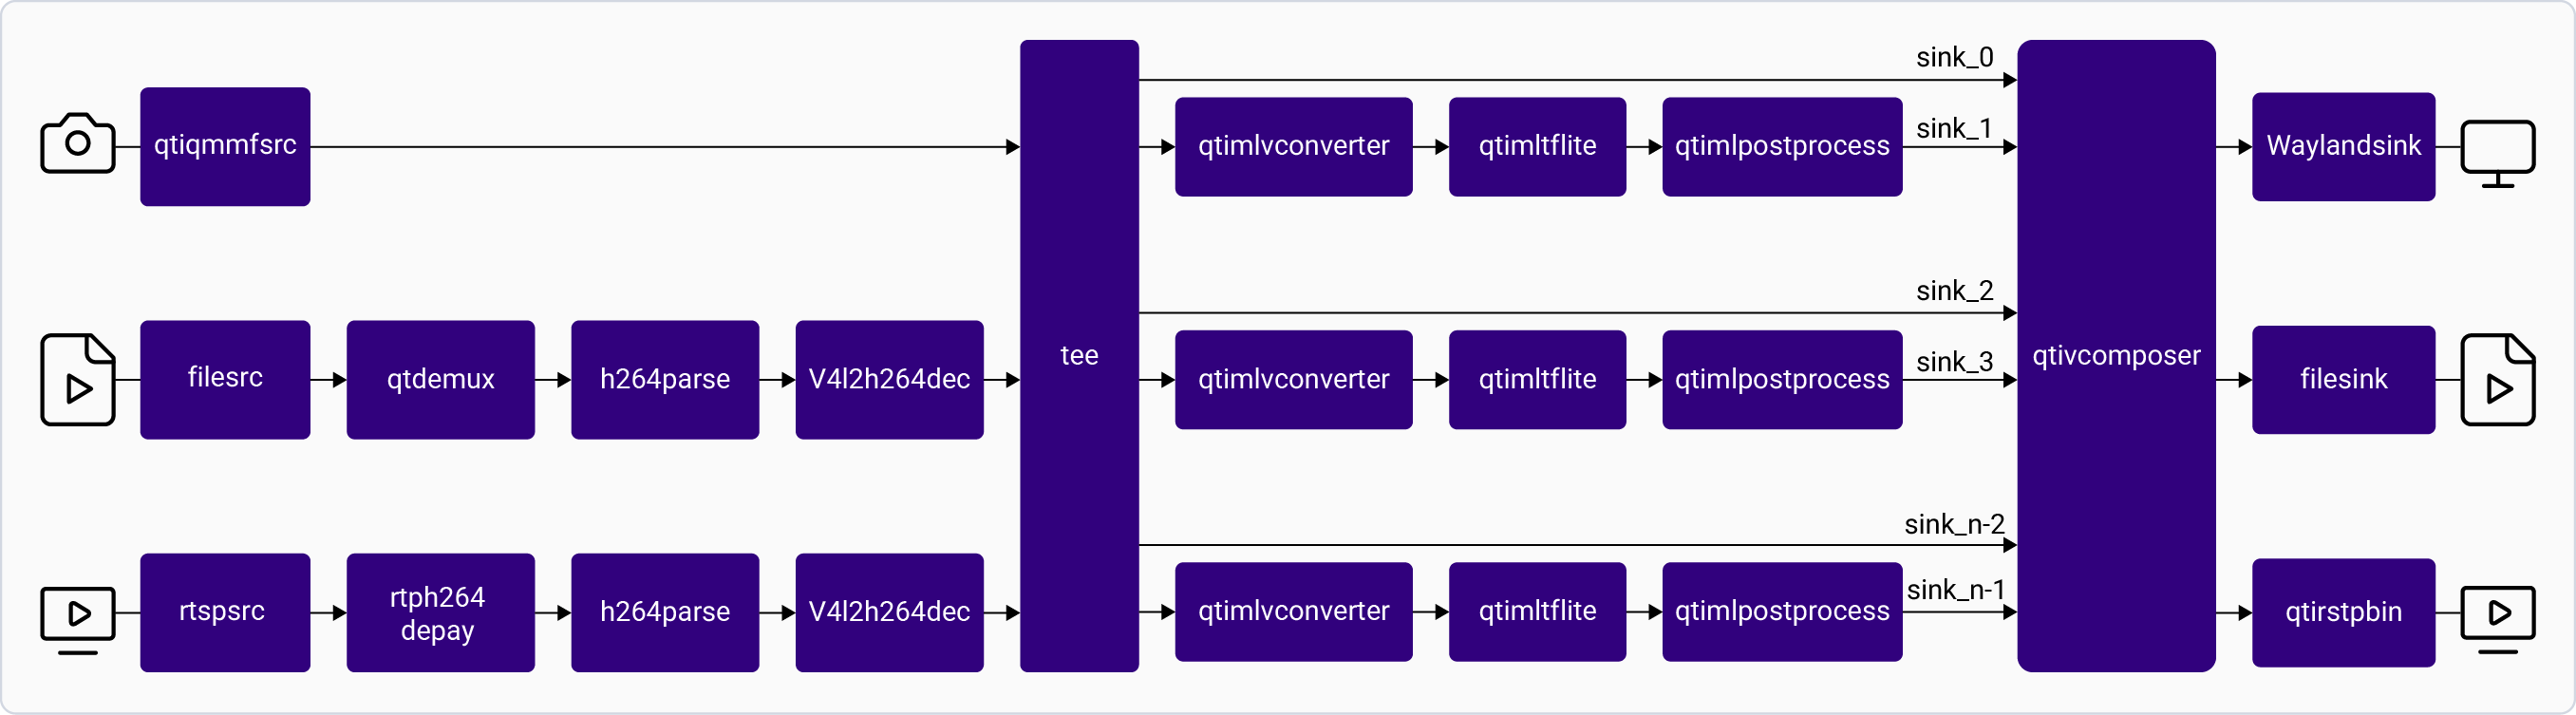
gst-ai-multi-input-output-object-detection
Try me
Try me
Input and Output Capabilities
Sample Model and Label Files
Prerequisites
- Create the Python 3.8 virtual environment:
- Generate the
yolov5.tflitemodel:
- In the terminal of the host computer, run the following command to push the model to the target device:
- In the terminal of the host computer, run the following command to push the model files to the target device:
Run the application on the target device
Download artifacts
Prerequisites. This downloads all required artifacts to the target device.Run the application
/etc/configs/config-multi-input-output-object-detection.json file to read the input parameters.To display all available options:- Pull the files from the target device, once you are done running the application:
Configurations
The gst-ai-multi-input-output-object-detection application uses the/etc/configs/config-multi-input-output-object-detection file. Update its properties to match your model, input stream, and output. See Config JSON Field Description for all fields.file-path and rtsp-ip-port are not present in the configuration file, then the camera input is selected.Available configurations
Available configurations
- Config #2
Expected Output
Based on the use case, the results are either displayed on an HDMI screen, saved as an H.264 encoded MP4 file, or streamed over the RTSP server.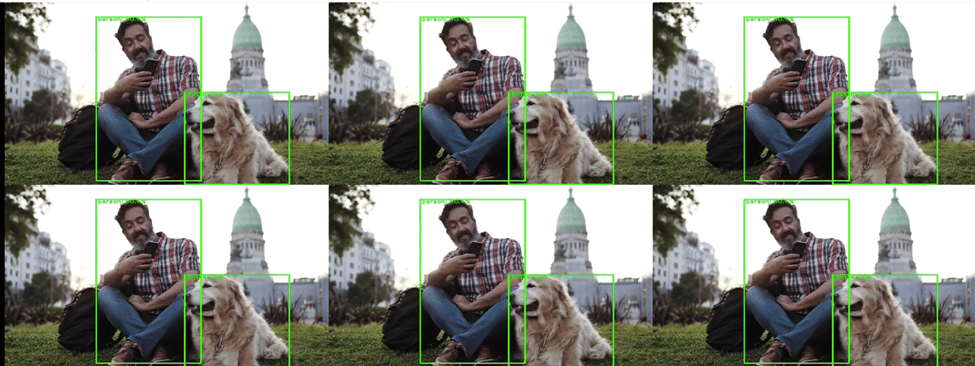
Pipeline Flow
The following table lists the plugins used in the metadata parser pipeline:Config JSON Field Description
Parallel Inferencing
The gst-ai-parallel-inference application allows you to perform object detection, object classification, pose detection, and image segmentation on an input stream from different sources such as a camera, a file, or an RTSP network. The use cases implement the LiteRT models for object detection, image segmentation, classification, and pose detection. The following figure shows the pipeline, which receives input streams from a camera, file, or an RTSP stream, performs the parallel inferencing for the four use cases, and displays the results side by side on the screen.Config #1 for the QLI 2.0 GA release
because CPU runtime is not supported.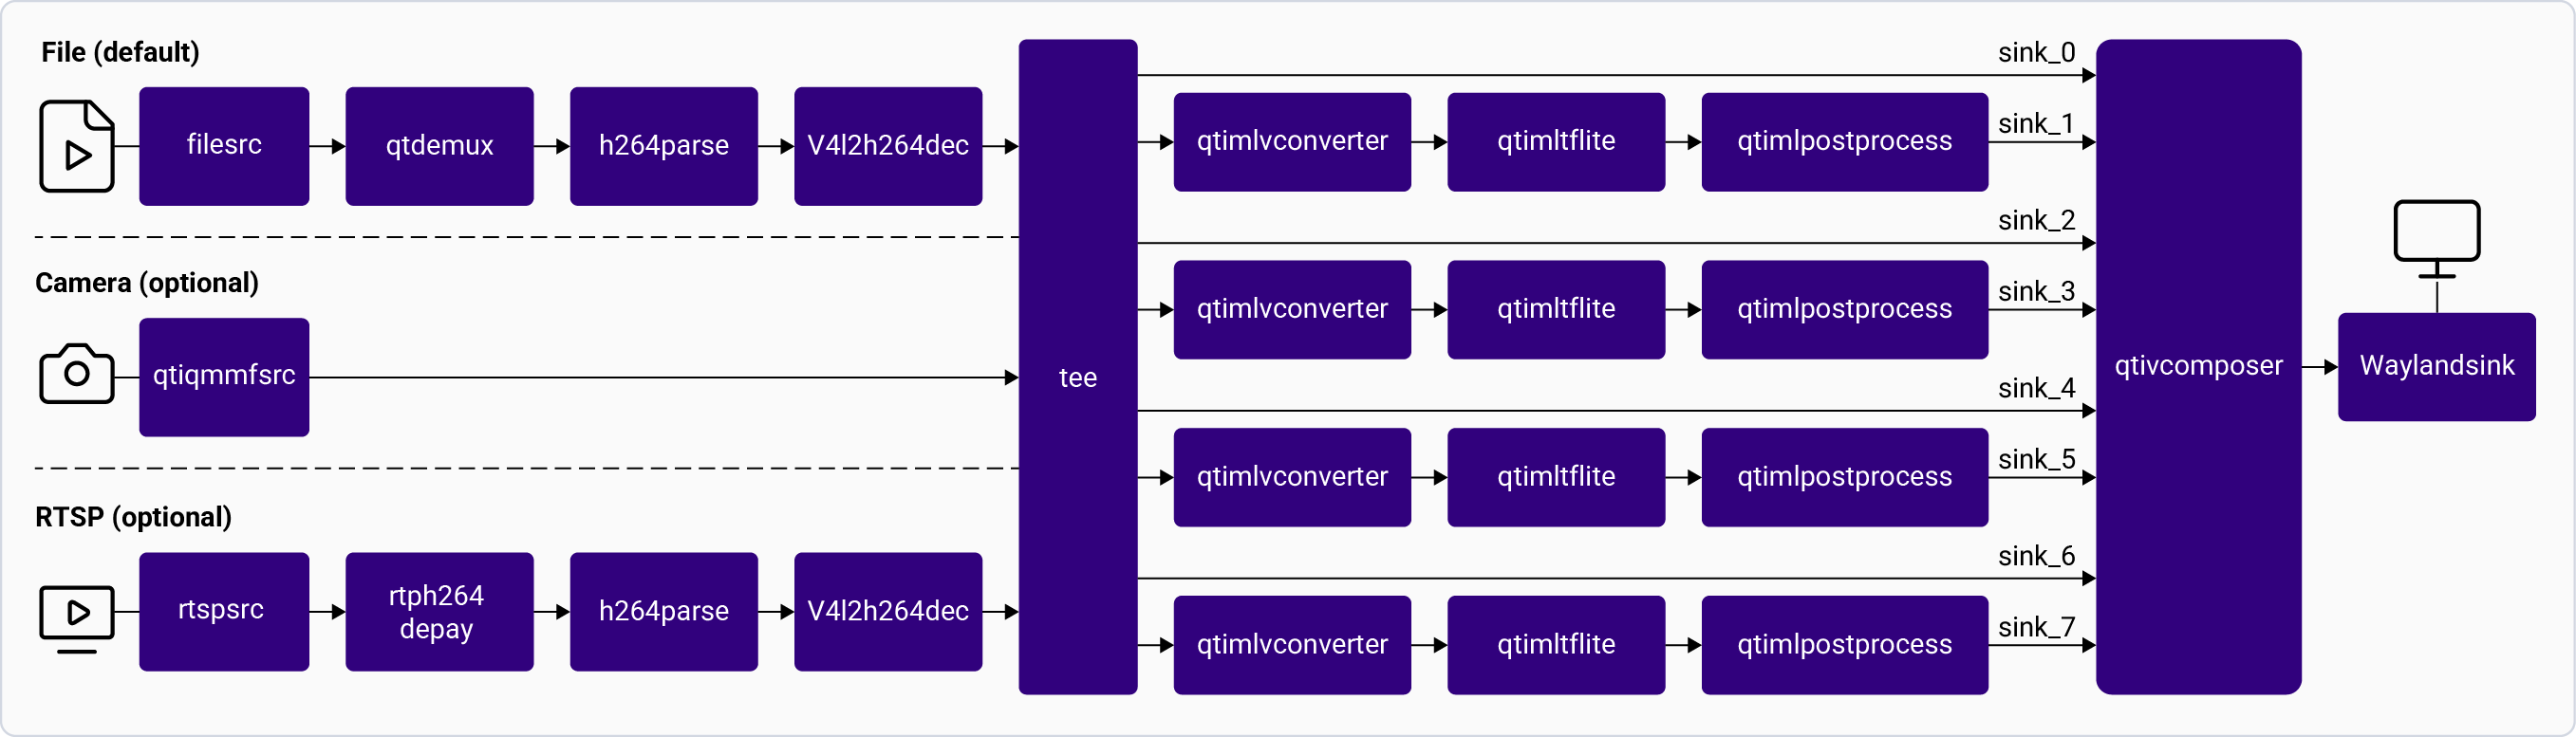
gst-ai-parallel-inference
Try me
Try me
Input and Output Capabilities
Sample Model and Label Files
Run the application on the target device
Download artifacts
Prerequisites. This downloads all required artifacts to the target device.Run the application
/etc/configs/config-parallel-inference.json file to read the input parameters.To display all available options:Configurations
The gst-ai-parallel-inference application uses the/etc/configs/config-parallel-inference.json file. Update its properties to match your model, input stream, and output. See Config JSON Field Description for all fields.file-path and rtsp-ip-port are not present in the configuration file, then the camera input is selected.Available configurations
Available configurations
- Config #2
Expected Output
After performing the four parallel inferences, the results are displayed side by side on the screen.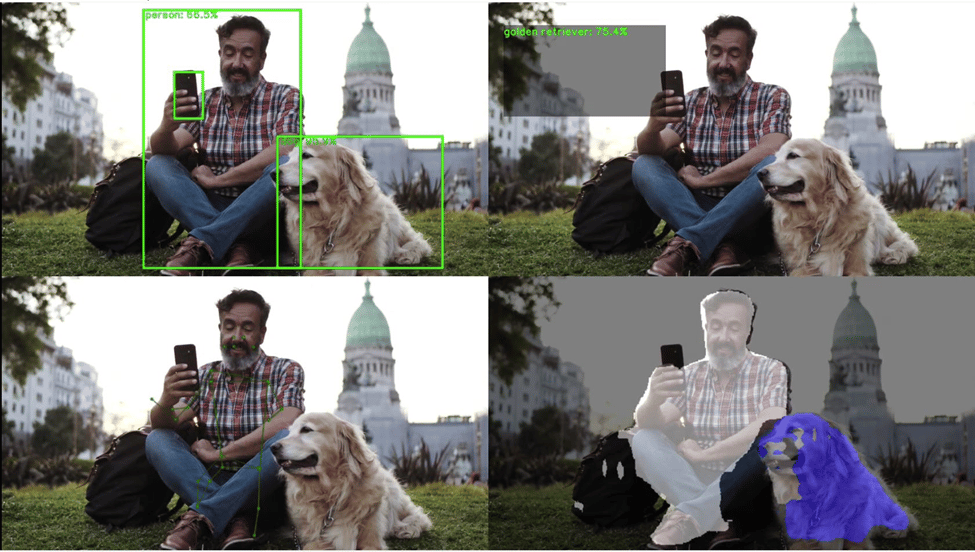
Pipeline Flow
The following table lists the plugins used in the metadata parser pipeline:Config JSON Field Description
Hardware benchmarking application
The hardware benchmarking application monitors the device hardware usage for a defined set of sample applications to capture metrics such as CPU/GPU/NPU usage and device thermals. These metrics explain the resource usage and throttling, which help to tune your AI use cases according to the requirements. The following figure shows the pipeline, which processes the input from a set of USB cameras to generate various outputs.Config #1 for the QLI 2.0 GA release
because CPU runtime is not supported.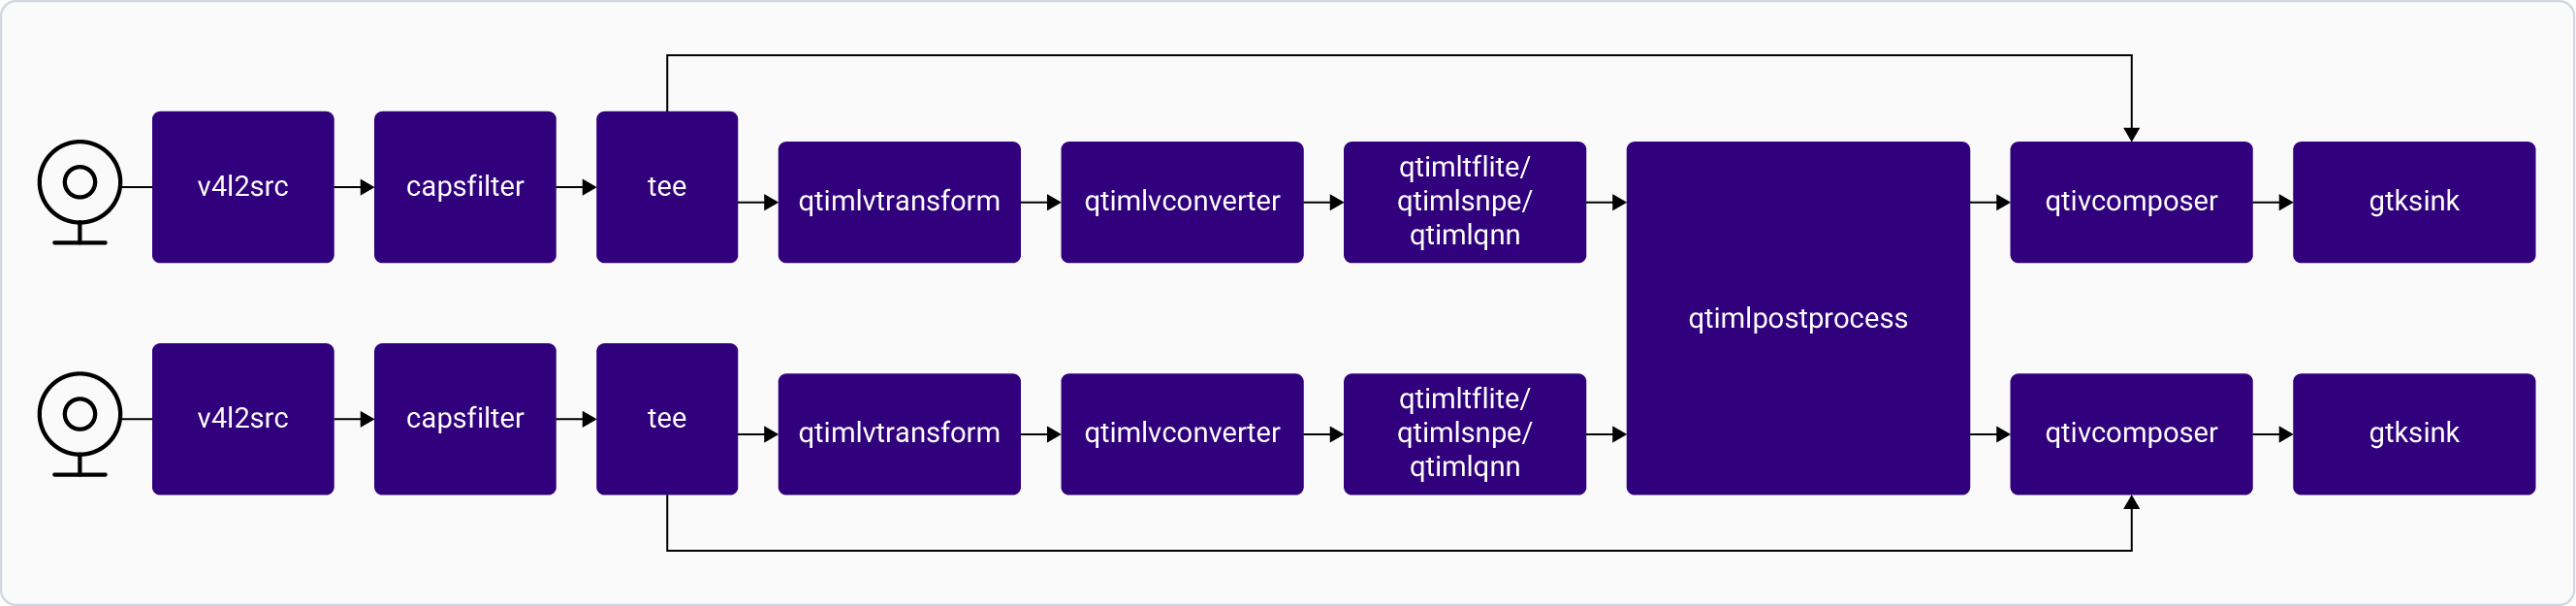
Try me
Try me
Sample Model and Label Files
Setup the target device
InstallerLE from the following locations:- For Linux:
- For Windows:
Run the application on the target device
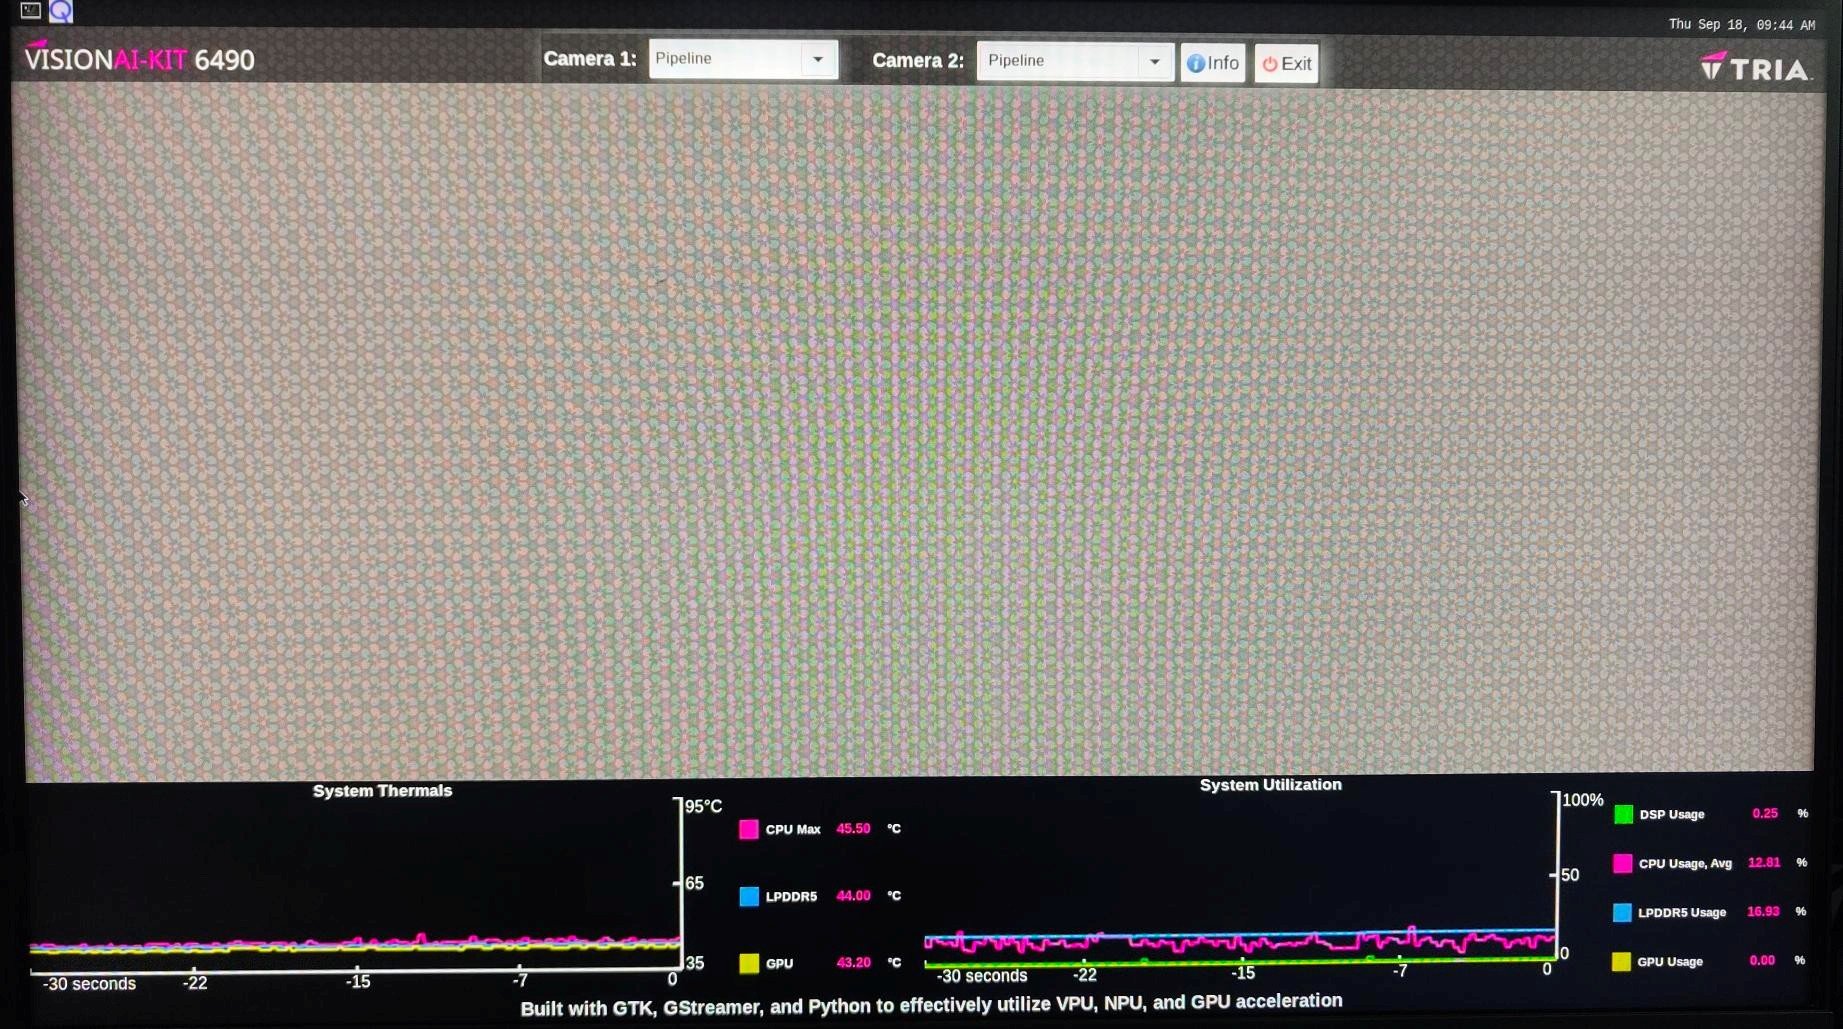
- Example 1: Choose the Camera option from Camera 1 and Camera 2 drop-down lists to observe the preview streams on the screen.
-
Example 2: Choose any sample application from Camera 1 and Camera 2 drop-down lists to observe the AI inferencing camera streams on the screen.
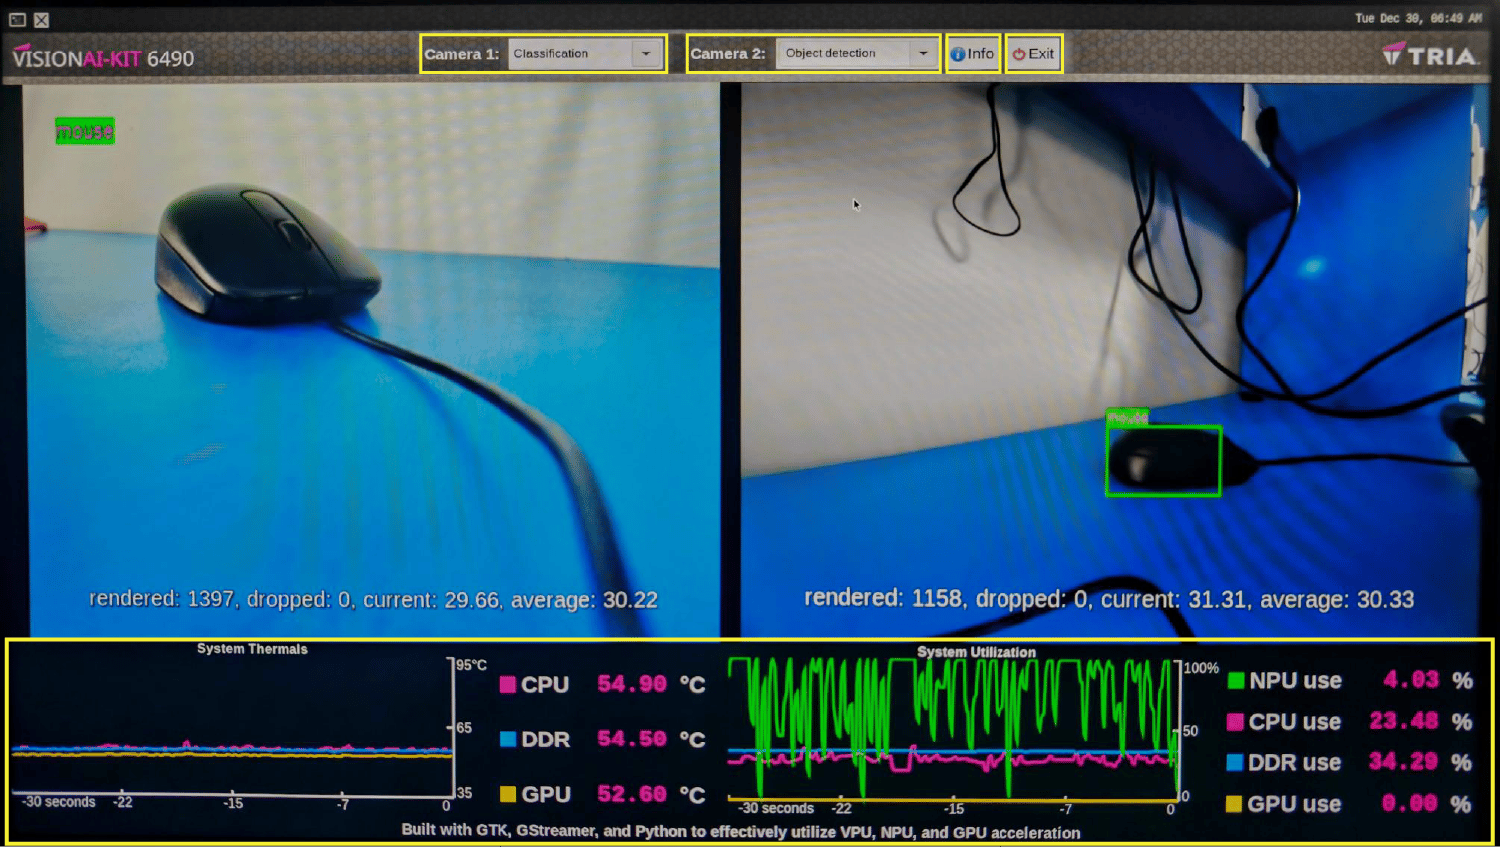
Pipeline Flow
The following table lists the plugins used in the metadata parser pipeline:Troubleshooting
Model not available after running the download script?
Model not available after running the download script?
Running sample applications from the UART shell
Running sample applications from the UART shell
Cannot locate the qticamsrc plugin?
Cannot locate the qticamsrc plugin?
GStreamer logging and debugging
GStreamer logging and debugging