Overview
The qtimlvconverter element is an essential component of the AI pipeline, responsible for AI preprocessing—specifically, preparing video frame data for neural network inference. It efficiently processes incoming buffers in YUV or RGB formats and converts them into tensors that are compatible with machine learning models.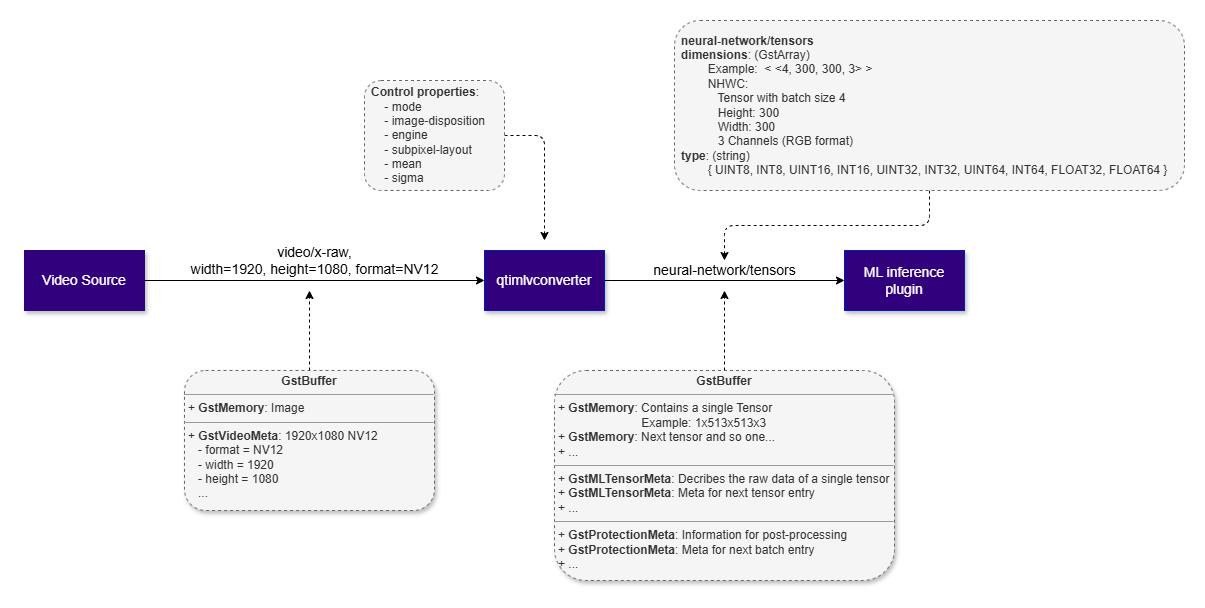
- Cropping: Selects a specific region of the input frame to focus on. This uses provided ROI metadata to determine the crop region for each frame.
- Rescaling: Adjusts the spatial dimensions of input frames to match the expected tensor size for the target model to ensure compatibility and consistent performance.
- Format Conversion: Translates pixel data between supported formats (e.g., YUV to RGB) to meet the input requirements of the target model.
- Batching: Aggregates multiple frames or images into batches to optimize inference throughput and leverage parallel processing capabilities.
- Normalization: Applies pixel value scaling and normalization techniques (such as mean subtraction and standard deviation division) to standardize input data for improved model accuracy.
- Temporal Batching: Prepares input tensors with shape NDHWC by stacking multiple temporally consecutive frames along the depth dimension. This enables compatibility with video-based models, which require temporal context across frames.
Example Pipeline
Download Required Files
| File | Download | Save as |
|---|---|---|
| YOLOX W8A8 model | Qualcomm AI Hub — YOLOX | yolo_x_w8a8.tflite |
| Detection labels | yolov8.json | yolov8.json |
| Sample video | Input video | ai_demo_sample.mp4 |
If any downloaded file is a
.zip archive, extract it on your host machine before copying:
unzip filename.zipHierarchy
GObjectGstObject
GstElement
GstBaseTransform
qtimlvconverter
Pad Templates
sink
| Capabilities | |
|---|---|
video/x-raw | format: { RGBA, BGRA, ABGR, ARGB, RGBx, BGRx, xRGB, xBGR, BGR, RGB, GRAY8, NV12, NV21, YUY2, UYVY, NV12_Q08C } width: [1, 32767] height: [1, 32767] framerate: [0/1, 255/1] |
| Availability: Always | |
| Direction: sink |
src
| Capabilities | |
|---|---|
neural-network/tensors | format: { INT8, UINT8, INT16, UINT16, INT32, UINT32, INT64, UINT64, FLOAT16, FLOAT32 } width: [1, 32767] height: [1, 32767] framerate: [0/1, 255/1] |
| Availability: Always | |
| Direction: source |
Element Properties
| Property | Description |
|---|---|
engine | Engine backend used for the conversion operations.Type: Enum Default: 2, "gles"Range:(0): none - No backend used(2): gles - Use OpenGLES based video converter(3): fev - Use FastCV based video converter(4): ocv - Use OpenCV based video converterFlags: readable/writable |
image-disposition | Aspect ratio and placement of the image inside the output tensor.Type: Enum Default: 0, "top-left"Range:(0): top-left - Preserve aspect ratio during resize and place it in the top-left corner of the output tensor(1): centre - Preserve aspect ratio during resize and place it in the centre of the output tensor(2): stretch - Ignore aspect ratio and if required stretch it's AR in order to fit completely inside the output tensor(3): centre-crop - Ignore the aspect ratio and if required crop the source around its center to fit completely inside the output tensor Flags: readable/writable |
mean | Channel mean subtraction values for FLOAT tensors such as {R, G, B}, {R, G, B, A}, or {<G>}.Type: GstValueArray of type gdoubleDefault: "< >" Flags: readable/writable |
mode | Conversion mode.Type: Enum Default: 0, "image-batch-non-cumulative"Range:(0): image-batch-non-cumulative - ROI metadata is ignored.Immediately process incoming buffers irrelevant of whether there are enough image memory blocks to fill the requested tensor batch size.(1): image-batch-cumulative - ROI metadata is ignored. Accumulate buffers until there are enough image memory blocks to fill the requested tensor batch size. Accumulation is interrupted early if a GAP buffer is received.(2): roi-batch-non-cumulative - Use only ROI metas to fill tensor batch size. Immediately process incoming buffers irrelevant of whether there are enough ROI metas to fill the requested tensor batch size. In case no ROI meta is present a GAP buffer will be produced.(3): roi-batch-cumulative - Use only ROI metas to fill tensor batch size. Accumulate buffers until there are enough ROI metas to fill the requested tensor batch size. Accumulation is interrupted early if a GAP buffer is received or if there are no ROI metas present inside the received buffer.Flags: readable/writable |
sigma | Channel divisor values for FLOAT tensors such as {R, G, B}, {R, G, B, A}, or {<G>}.Type: GstValueArray of type gdoubleDefault: "< >" Flags: readable/writable |
subpixel-layout | Arrangement of the image pixels in the output tensor.Type: Enum Default: 0, "regular"Range:(0): regular - RGB, RGBA, RGBx(1): reverse - BGR, BGRA, BGRxFlags: readable/writable |
Image/Video Tensor Characteristics
An image or video tensor has several key characteristics that define how data is represented and processed in machine learning pipelines:-
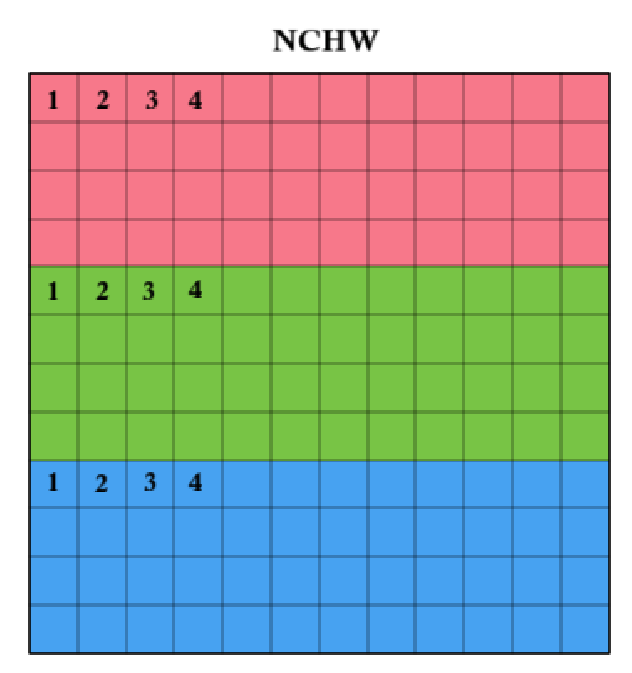
NCHW (Batch, Channels, Height, Width):
All pixels for one channel are stored contiguously. Preferred by many deep learning frameworks (e.g., PyTorch, Caffe) because it optimizes convolution operations on GPUs.
For example, in RGB:
- First all Red values for the entire image
- Then all Green values
- Then all Blue values
-
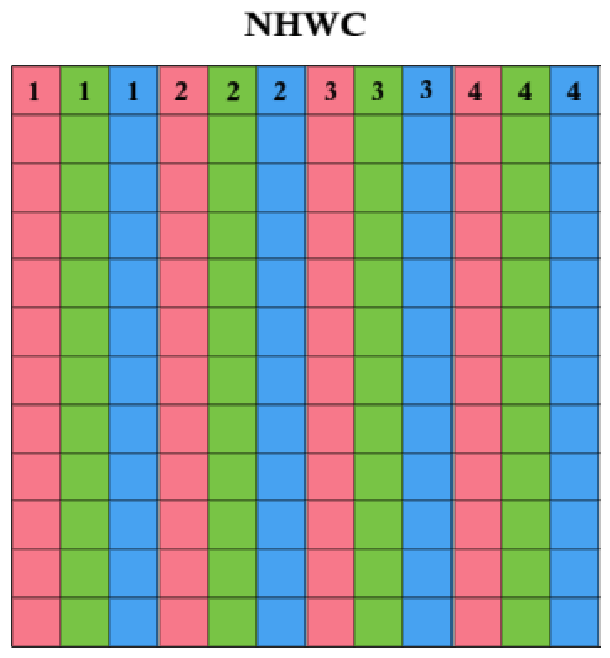
NHWC(Batch, Height, Width, Channels)
Channels are interleaved per pixel. Common in TensorFlow and IM SDK because it aligns better with memory access patterns for certain hardware accelerators.
For example, in RGB:
- Pixel 1: R, G, B
- Pixel 2: R, G, B
- and so on
-
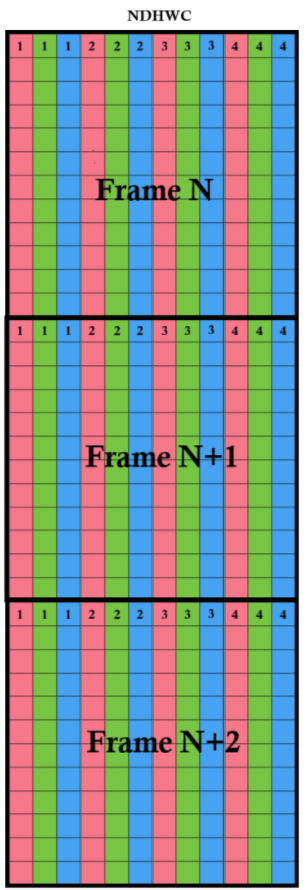
NDHWC (Batch,Depth,Height,Width,Channels)
This format extends the NHWC layout by adding a Depth (D) dimension, making it suitable for video sequences or volumetric data (e.g., temporal stacks for action recognition).
Frames are stored sequentially, and within each frame, pixels are arranged in NHWC order (interleaved channels per pixel).
For example:
- Frame 1: R,G,B for each pixel
- Frame 2: R,G,B for each pixel
- and so on.
- 0-255 - Typical for raw UINT8 image data
- -128-127 - Typical for raw INT8 image data
- 0.0-1.0 - Common for normalized floating-point data for FLOAT16 and FLOAT32 tensors
- -1.0-1.0 - Used in some models that expect centered data, the user must explicitly configure normalization parameters(offset and scale)
- Custom ranges may be used depending on the model’s training setup
- RGB – Red, Green, Blue (standard format for most models)
- BGR – Blue, Green, Red (used by some OpenCV-based models)
- Grayscale – Single-channel format for monochrome images
| Property | Description |
|---|---|
| Tensor Shape | NHWC, NCHW, NDHWC |
| Data Format | uint8, int8, float32, float16 |
| Data Range | any |
| Color Format | RGB, BGR, Grayscale |
Image Placement Matters in Model Performance
When working with computer vision models, we often focus on the content of the image - but where the image is placed inside the input tensor can also make a big difference. By default, it maintains the original aspect ratio, ensuring that geometric shapes of the objects remain undistorted in the output. If the input frame’s aspect ratio differs from that of the target tensor, the resized frame is positioned in the top-left corner, and any remaining area is filled with a black background. This method ensures that the entire tensor is populated, preserves the integrity of the original image content, and avoids cropping or distortion, making it well-suited for models that require consistent spatial representation.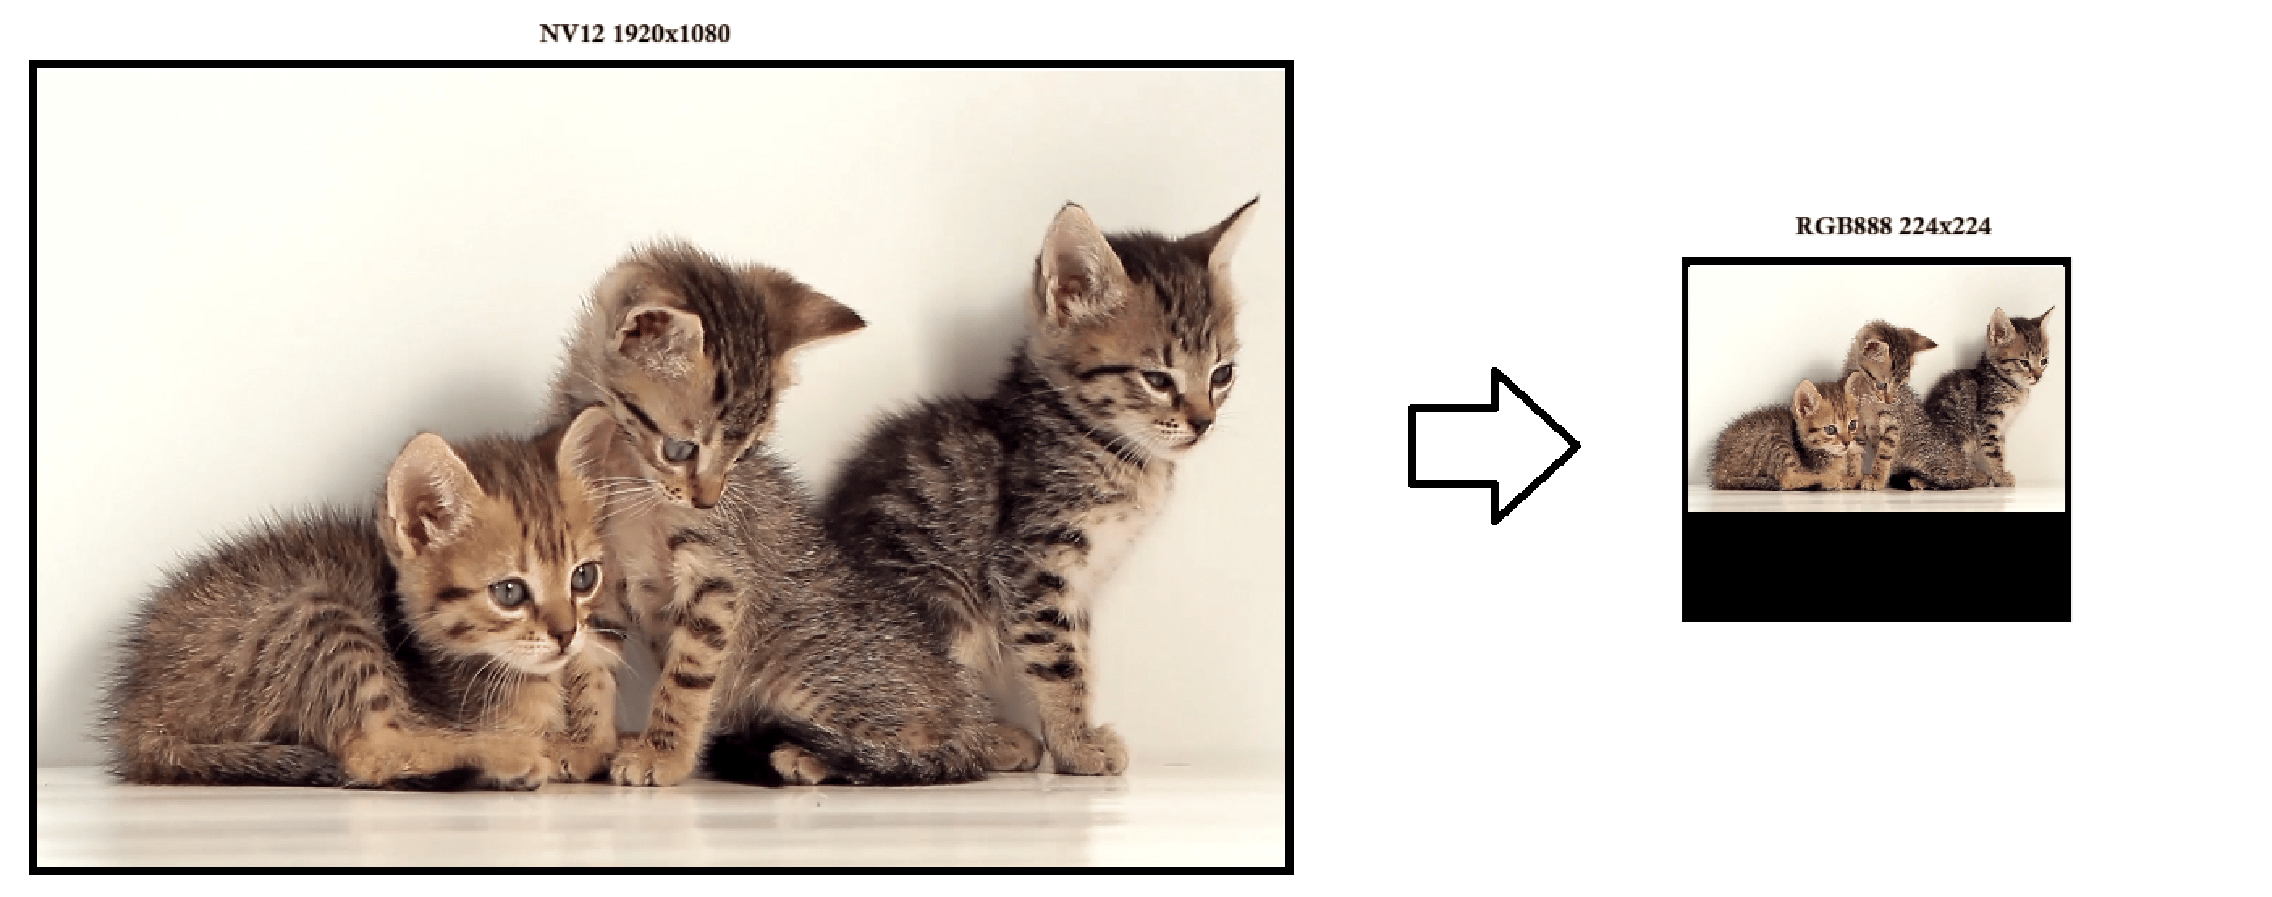
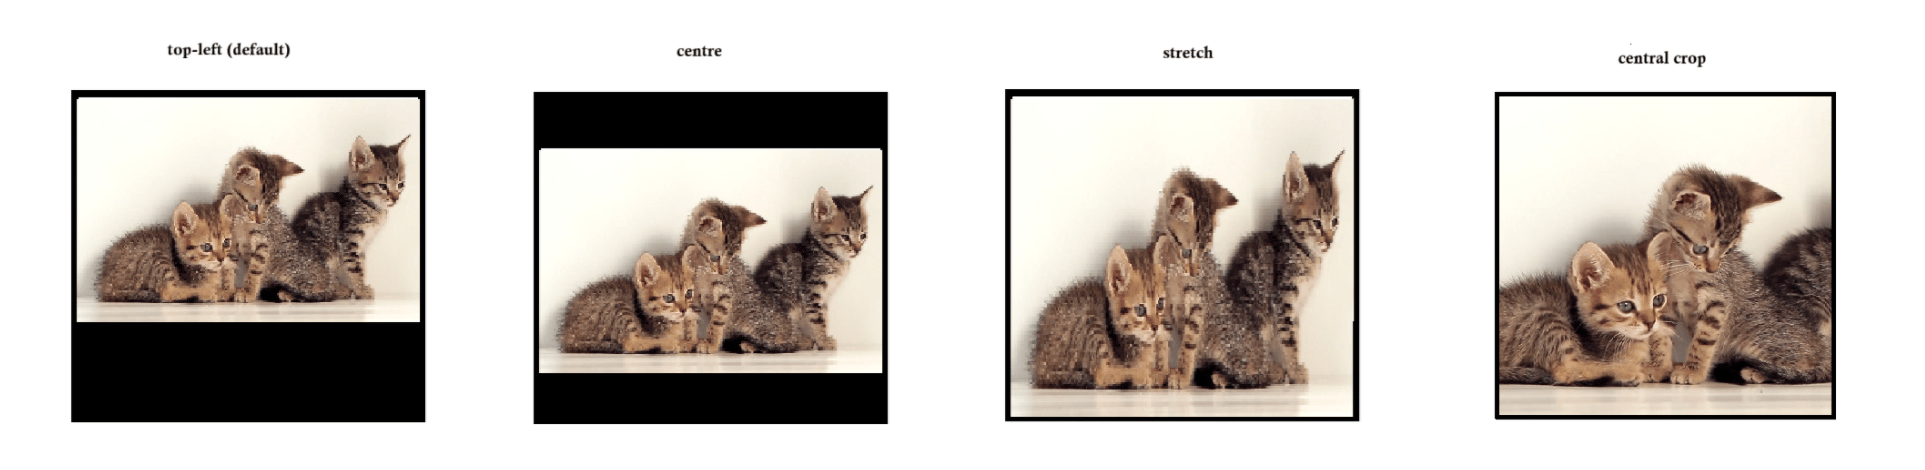
- top-left (default) - Keeps the original aspect ratio of the image and places it in the top-left corner of the output tensor.
- centre - Also preserves the aspect ratio, but centers the image within the tensor. This is a common choice for models that expect the main object to be in the middle.
- stretch - Ignores the original aspect ratio and stretches the image to completely fill the tensor. This can introduce distortion but ensures full coverage, which some models require
- centre-crop - Ignore the source image AR (Aspect Ratio) and if required crop the source around its center to fit completely inside the output tensor.

- source : This is your input stream.
- qtivtransform: This stage allows you to apply transformations to the image, such as cropping, resizing, or rotating. In this context, you can define a crop region via properties passed directly to qtivtransform, enabling you to extract a specific part of the input image before it reaches the model.
- qtimlvconverter: After cropping, this component prepares the image for inference. It handles scaling, color conversion, normalization and positioning based on the image-disposition property (e.g., top-left, centre, stretch)
- sink - This is the next element where the tensor is passed
Normalization
Normalization of pixel values is performed automatically, tailored to the negotiated tensor data type. For floating-point tensor types (FLOAT16, FLOAT32), pixel values are normalized to the range (0,1). For signed and unsigned integer types (such as INT8, UINT8, INT16, UINT16), normalization is applied according to the full value range of each type - for example, INT8 is normalized to [−128 , 127], UINT8 to [0 , 255], and INT16 to [−32,768 , 32,767]. Beyond this automatic normalization, the plugin provides further customization through the mean and sigma properties, enabling per-channel normalization using the following formula:Batching
Batching is a key optimization technique in AI inference pipelines, allowing multiple frames to be processed simultaneously. This improves throughput and enables parallel execution on hardware accelerators. In the context of qtimlvconverter, incoming video buffers may originate from:- A single source (e.g., one camera or video file), where each GstBuffer contains a single GstMemory block.
- A multiplexed stream (e.g., multiple cameras or video files), where each GstBuffer contains multiple GstMemory blocks. This configuration is enabled via the qtibatch plugin, which aggregates frames from different sources into a single batched buffer.
- Each GstMemory block in the buffer represents one frame
- *qtimlvconverter iterates over all memory blocks and applies preprocessing steps (cropping, resizing, format conversion, normalization) to each frame individually.
- The processed frames are then packed into a single tensor with shape [N, H, W, C] or [N, C, H, W], depending on the selected layout.
- The batch size N is inferred from the number of memory blocks in the buffer.
- Parallel Inference: Enables models to process multiple frames simultaneously, improving throughput and latency.
- Efficient GPU Utilization: Reduces per-frame overhead and maximizes hardware acceleration.
- Flexible Input Handling: Supports both single-stream and multi-stream scenarios without requiring manual configuration.
- NHWC: Interleaved layout (e.g., [4, 480, 640, 3] for batch size 4, RGB).
- NCHW: Planar layout (e.g., [4, 3, 480, 640]), often used in CNNs.
- NDHWC: For models requiring temporal depth (e.g., [1, 4, 480, 640, 3]), where D represents history frames.
Temporal Batching
Temporal batching extends the concept of standard batching by grouping multiple frames from the same stream over time into a single tensor. This approach is essential for models that require temporal context, such as:- Action recognition (e.g., detecting gestures or activities across consecutive frames).
- Object tracking (e.g., maintaining identity across frames).
- 3D CNNs or RNN-based vision models that process sequences rather than single images.
- Instead of aggregating frames from different sources, temporal batching collects D consecutive frames from the same stream.
- These frames are packed into a tensor with shape:
- NDHWC: [N, D, H, W, C]
- N = batch size(number of sequences processed together)
- D = depth(number of frames per sequence)
- H,W = spatial dimensions
- C = channels(e.g.,RGB)
- NDHWC: [N, D, H, W, C]
- qtimlvconverter automatically handles:
- Frame accumulation based on the configured depth (D).
- Preprocessing for each frame (resize, normalization, format conversion).
- Tensor assembly in the correct layout for the model.
- Preserves temporal continuity, enabling models to learn motion patterns.
- Improves inference accuracy for tasks that depend on frame-to-frame relationships.
- Fully utilizes GPU resources by processing sequences in parallel.
- For a model expecting 4-frame sequences:
- Tensor shape: [1, 4, 480, 640, 3] (batch size = 1, depth = 4, RGB).
- Frames are normalized and resized individually, then stacked in temporal order.
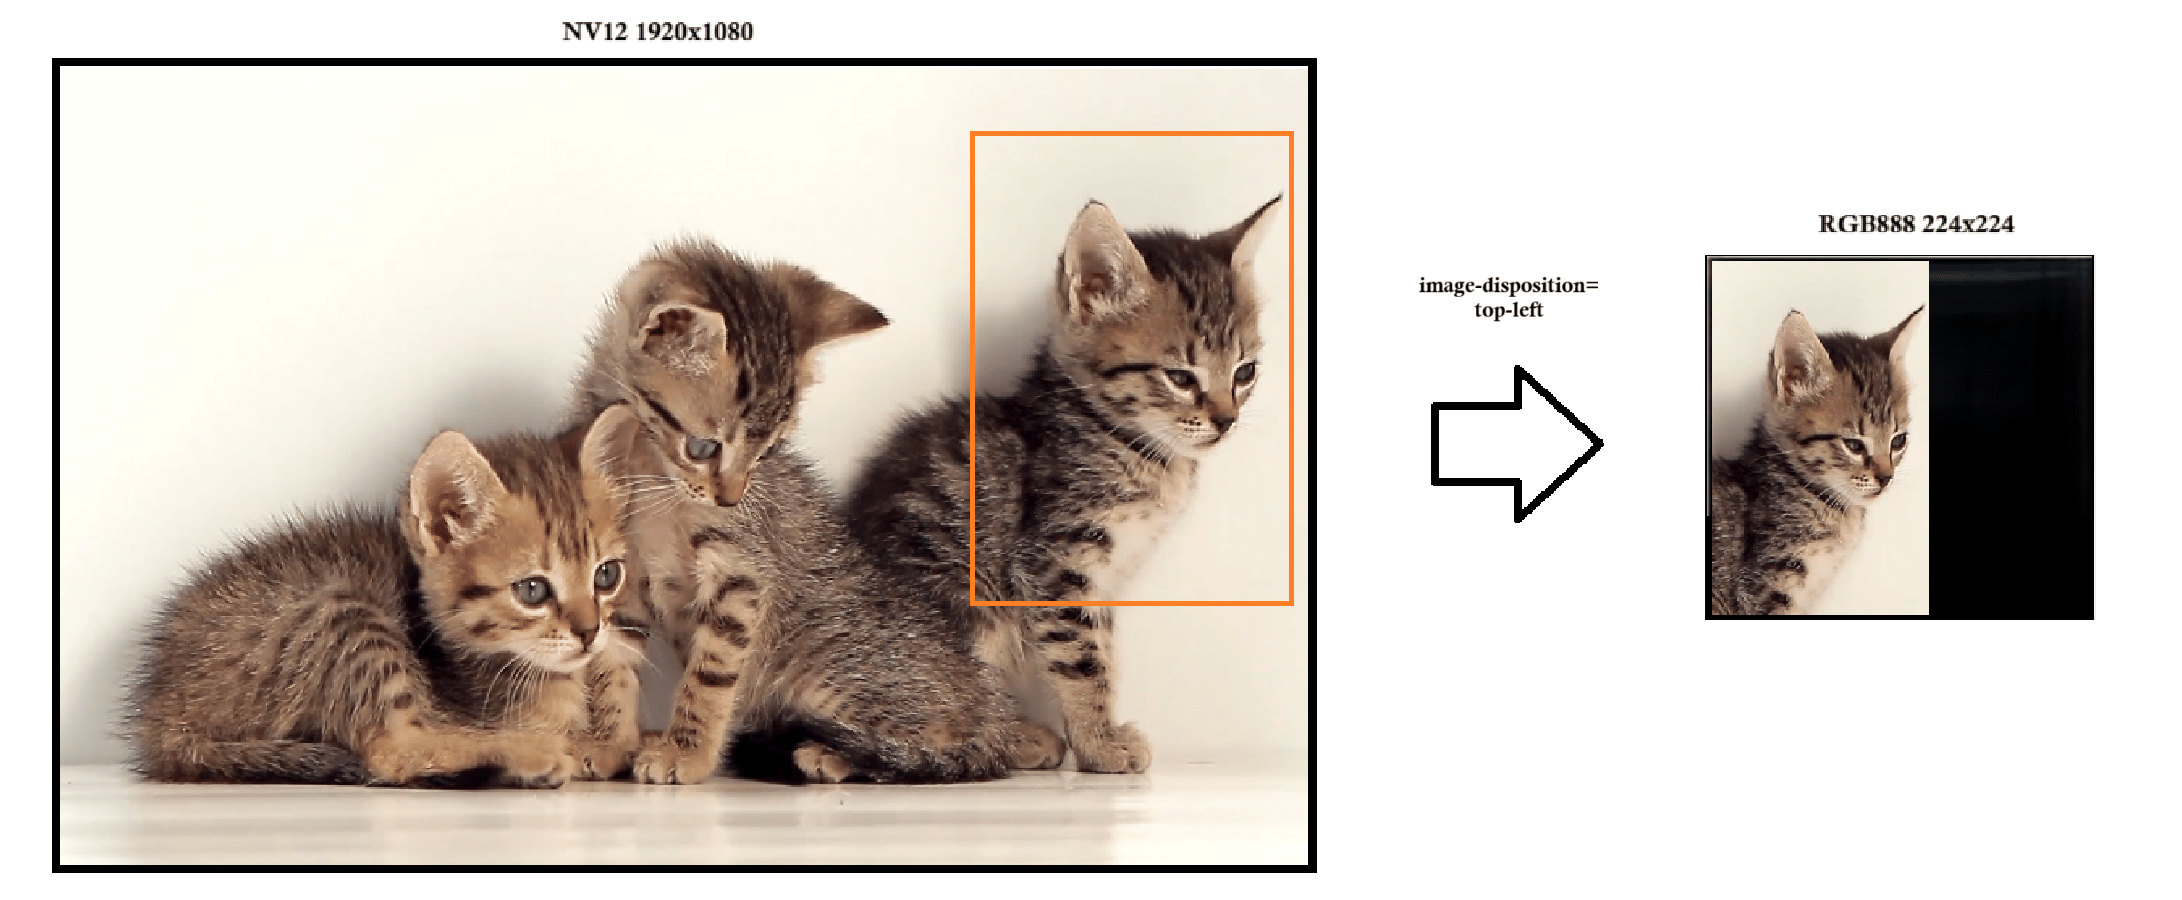
Multi-Stage Inference Pipelines with ROI-Based Processing
In advanced AI pipelines, inference is often performed in multiple stages - each consisting of preprocessing, inference, and postprocessing. These stages may operate on the full image or on specific regions of interest (ROIs) identified by earlier stages. To support this, qtimlvconverter can process buffers containing multiple GstVideoRegionOfInterestMeta entries. These ROIs are typically generated by upstream ML components or custom plugins and represent targeted regions within the input frame that require further analysis. By default, qtimlvconverter processes the entire image, ignoring any ROI metadata. However, when configured via the mode property, it can switch to ROI-based processing, enabling selective transformation of only the regions marked for further inference. ROI Processing Modes The mode property defines how input regions are handled and batched before being converted into tensors. There are two main categories:- Image batch mode:
- image-batch-non-cumulative: Processes each buffer immediately, regardless of batch size.
- image-batch-cumulative: Accumulates full-frame inputs until batch size is met.
- ROI Batch Modes:
- roi-batch-non-cumulative: Processes ROI metadata immediately, discarding excess entries.
- roi-batch-cumulative: Accumulates ROI entries until batch size is met.
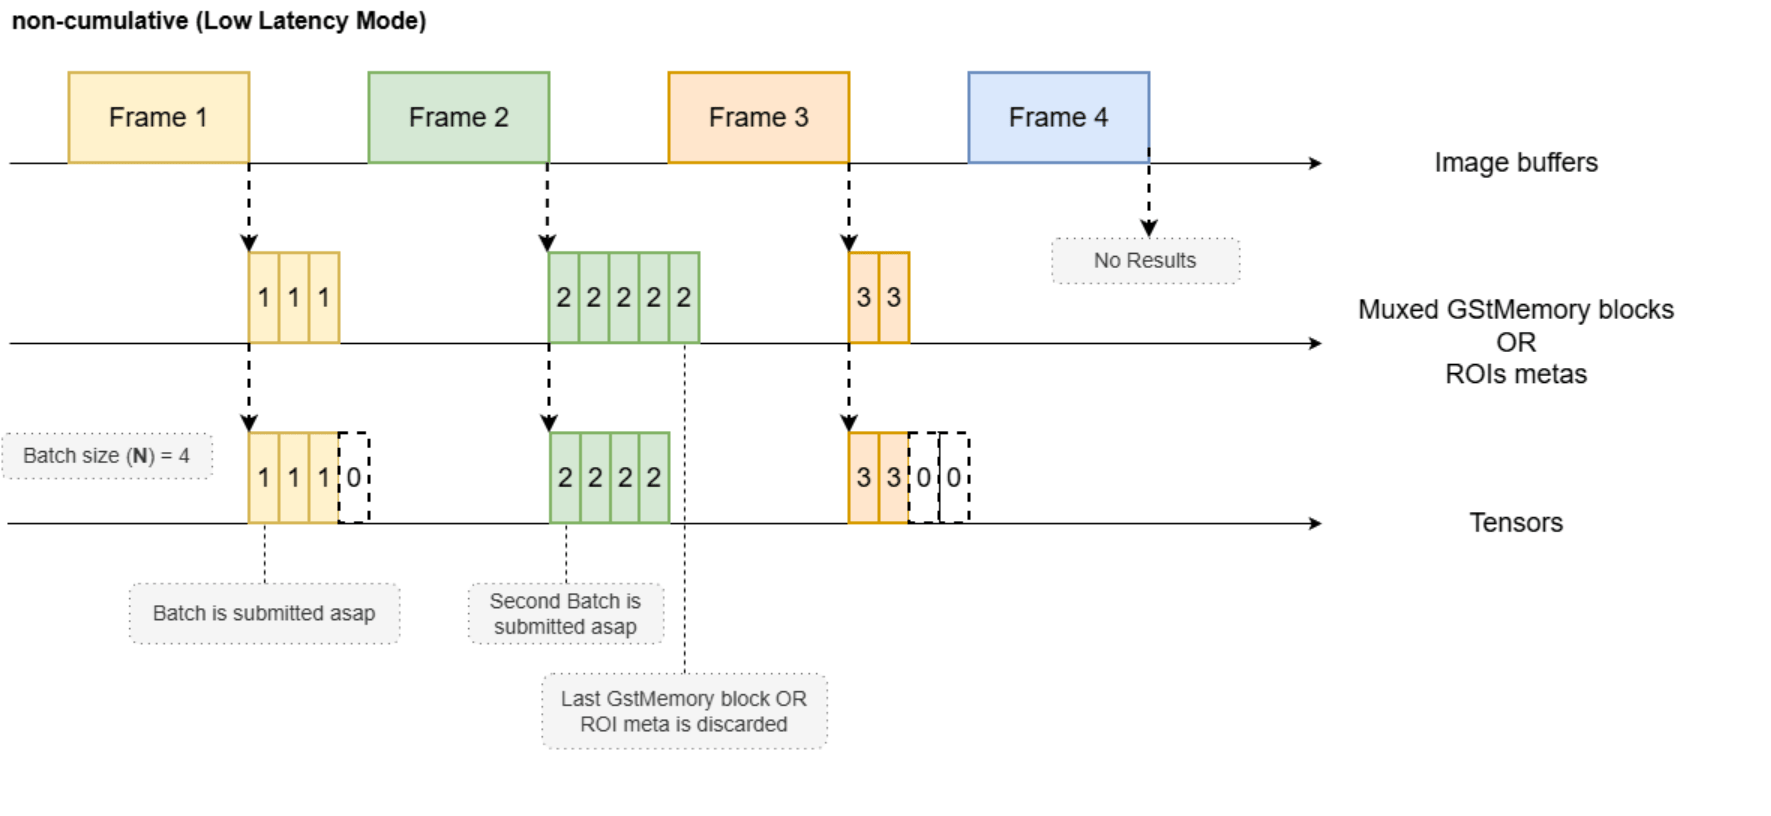
- Non-Cumulative: In non-cumulative submode, incoming buffers are processed immediately upon receipt, regardless of whether the number of image memory blocks or ROI metadata entries meets the model’s specified tensor batch size (N). This approach is recommended when the number of multiplexed streams and/or ROI metadata is not expected to exceed the batch size (N) of the model. Any ROI metadata or multiplexed GstMemory blocks exceeding the batch size (N) are discarded. A potential drawback of this submode is that if the batch is not fully populated - for example, if the batch size is set to N=4 but only three positions are filled - the inference plugin will still process the entire batch, resulting in resource inefficiency due to unutilized positions. However, the primary advantage of non-cumulative submode is the elimination of processing latency: buffers are not held back to accumulate additional inputs to fulfill the batch size requirement. This ensures prompt processing and rapid generation of prediction results, making it suitable for real-time applications where minimal delay is critical.
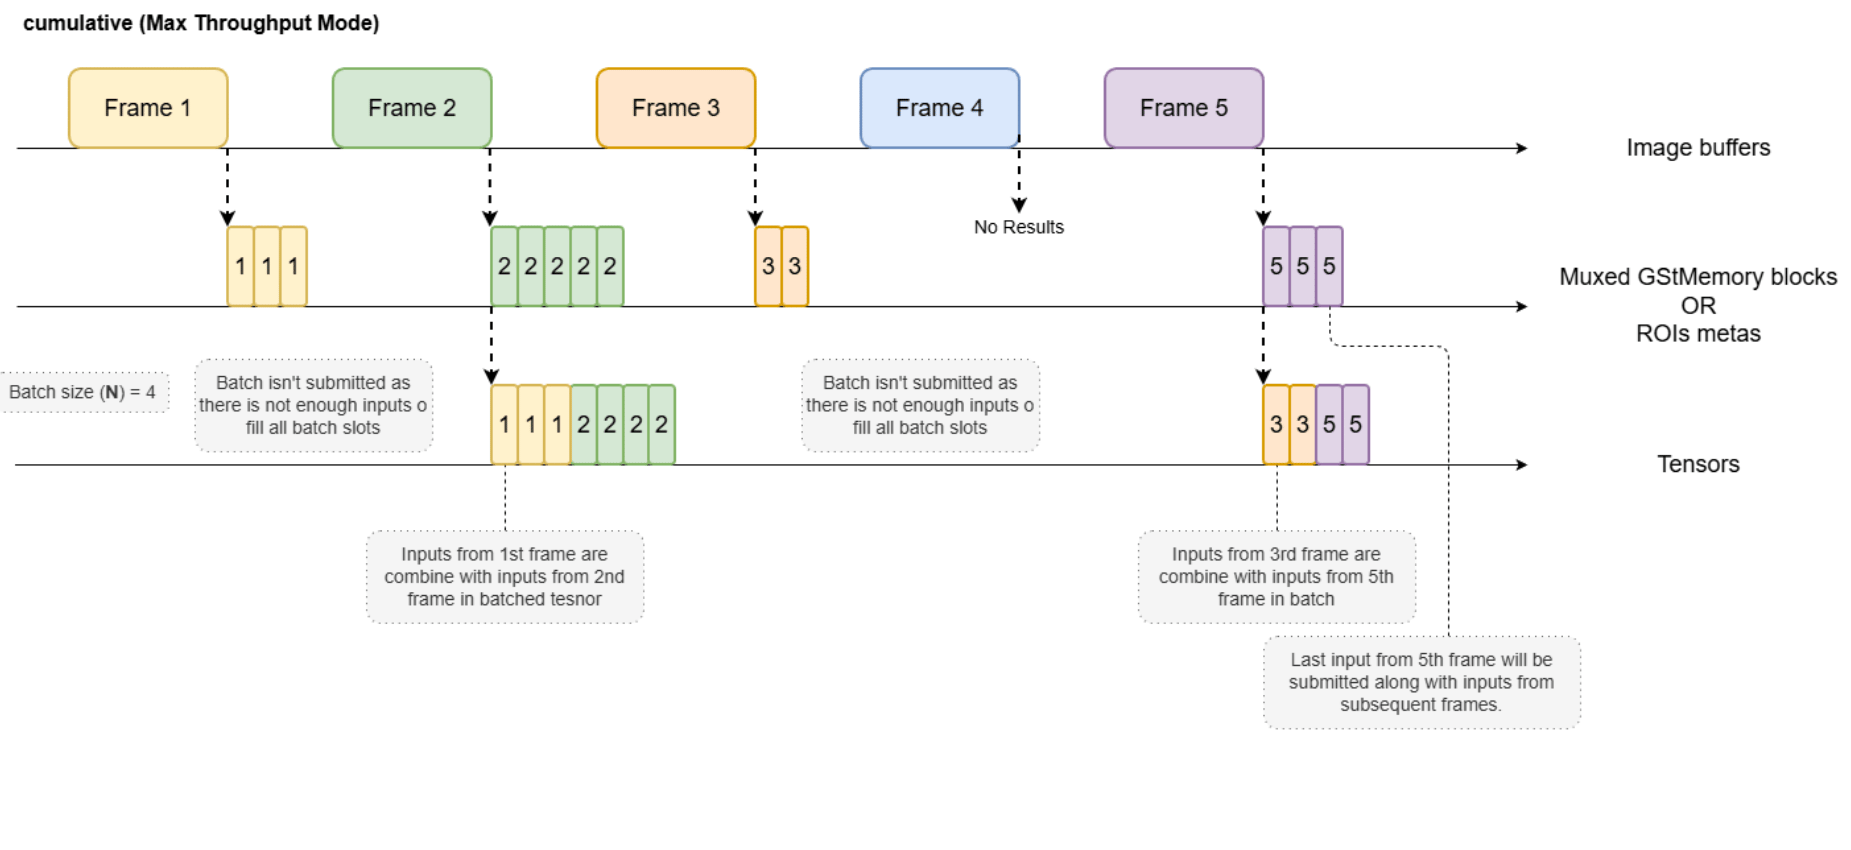
- Cumulative: In cumulative submode, incoming buffers are aggregated until the number of ROI metadata entries and/or multiplexed GstMemory blocks meets the model’s required tensor batch size (N). Accumulation may be interrupted prematurely if a GAP buffer is received, or, in ROI batch modes, if the incoming buffer contains no ROI metadata. This accumulation strategy introduces variable latency into the processing pipeline, influenced by factors such as frame production intervals and the number of ROIs or multiplexed images received per buffer. The principal advantage of cumulative submode is that all incoming ROI metadata and multiplexed GstMemory blocks are processed, ensuring that none are discarded due to batch size constraints. This mode is particularly recommended when the model’s batch size (N) exceeds one and inference processing time is sufficiently low, allowing for efficient utilization of resources and comprehensive processing of available input regions.
Preprocessing Metadata
In some cases, post-processing requires information about how each input frame was pre-processed - such as its placement within the input tensor, its dimensions, or which frames in a batch are valid. To support this, qtimlvconverter attaches metadata describing the preprocessing details to each tensor using GstProtectionMeta. The inference plugin then propagates this metadata from its input to its output, enabling the post-processing plugin to access the necessary information about how each frame was handled during preprocessing. The GstProtectionMeta includes the following fields:- Input Tensor Dimensions:
- input-tensor-width [G_TYPE_UINT] - Specifies the width (in pixels) of the tensor that the frame was mapped into. This is the final width after any resizing operations performed by qtimlvconverter.
- input-tensor-height [G_TYPE_UINT] - Specifies the height (in pixels) of the tensor after preprocessing. This value reflects the target model’s expected input dimensions.
- Region Occupied by Actual Data within the Input Tensor:
- input-region-x [G_TYPE_INT] - The X-coordinate (horizontal offset) of the region within the tensor where the actual image data is placed. Useful for determining padding or positioning when aspect ratio is preserved.
- input-region-y [G_TYPE_INT] - The Y-coordinate (vertical offset) of the region within the tensor where the image data starts.
- input-region-width [G_TYPE_INT] - The width of the actual image content inside the tensor. This may differ from input-tensor-width if padding was applied.
- input-region-height [G_TYPE_INT] - The height of the actual image content inside the tensor. Indicates how much of the tensor is occupied by real image data.
- Batch Sequence Information:
- sequence-index [G_TYPE_UINT] - The index of this entry within the current batch. For example, in a batch of size 4, valid values are 0–3.
- sequence-num-entries [G_TYPE_UINT] - The total number of entries in the batch. This helps post-processing plugins understand the batch context.
- Timestamp of the buffer:
- timestamp [G_TYPE_UINT64] - The timestamp of the buffer when it was processed by qtimlvconverter. Used for synchronization and latency measurements.
- The stream ID from which this batch entry was produced:
- stream-id [G_TYPE_INT] [Optional] - Identifies the source stream that produced this batch entry. Useful in multi-stream pipelines for correlating inference results with their origin.
- Timestamp of the stream buffer from which this batch entry was produced:
- stream-timestamp [G_TYPE_UINT64] [Optional] - The original timestamp of the frame from the source stream before preprocessing. Preserves temporal context for tracking or analytics.
- The ID of the ROI meta from which this batch entry was produced:
- source-region-id [G_TYPE_INT] [Optional] - If the frame was derived from an ROI, this field contains the ID of the GstVideoRegionOfInterestMeta entry that defined the crop region. Enables downstream components to link inference results back to the original ROI.
Usage
Single Camera Stream — Save Tensors to File
Single camera stream with manually set UINT8 ML GstCaps and output tensors saved in separate files. Common data types:UINT8— typical for quantized models, range 0–255INT8— used in signed quantized models, range −128 to 127FLOAT16/FLOAT32— for models requiring high precision, normalized to 0.0–1.0 or −1.0–1.0 (requires offset and scale)

Two-Stage Person Detection and Pose Estimation on Live Camera Stream
Demo pipeline with 2 ML stages running on a live camera stream. The first stage performs person detection and attaches the results to each frame.qtiobjtracker then associates detected persons across frames and adds persistent tracking IDs. The second stage uses ROI-based preprocessing to crop each tracked person and runs pose estimation, producing skeleton keypoints overlaid on the display.

Download Required Files
| File | Download | Save as |
|---|---|---|
| Person foot detection model | Qualcomm AI Hub — Person Foot Detection | foot_track_net_w8a8.tflite |
| Person detection labels | foot_track_net.json | foot_track_net.json |
| Foot track net settings | foot_track_net_settings.json | foot_track_net_settings.json |
| HRNet pose model | Qualcomm AI Hub — HRNet Pose | hrnet_pose_w8a8.tflite |
| Pose labels | hrnet.json | hrnet.json |
| HRNet settings | hrnet_settings.json | hrnet_settings.json |
If any downloaded file is a
.zip archive, extract it on your host machine before copying:
unzip filename.zipFour-Source Batched Object Detection with Compositor
Demo pipeline with batching of 4 sources. A detection inference is run and the results are overlaid via composer on the screen.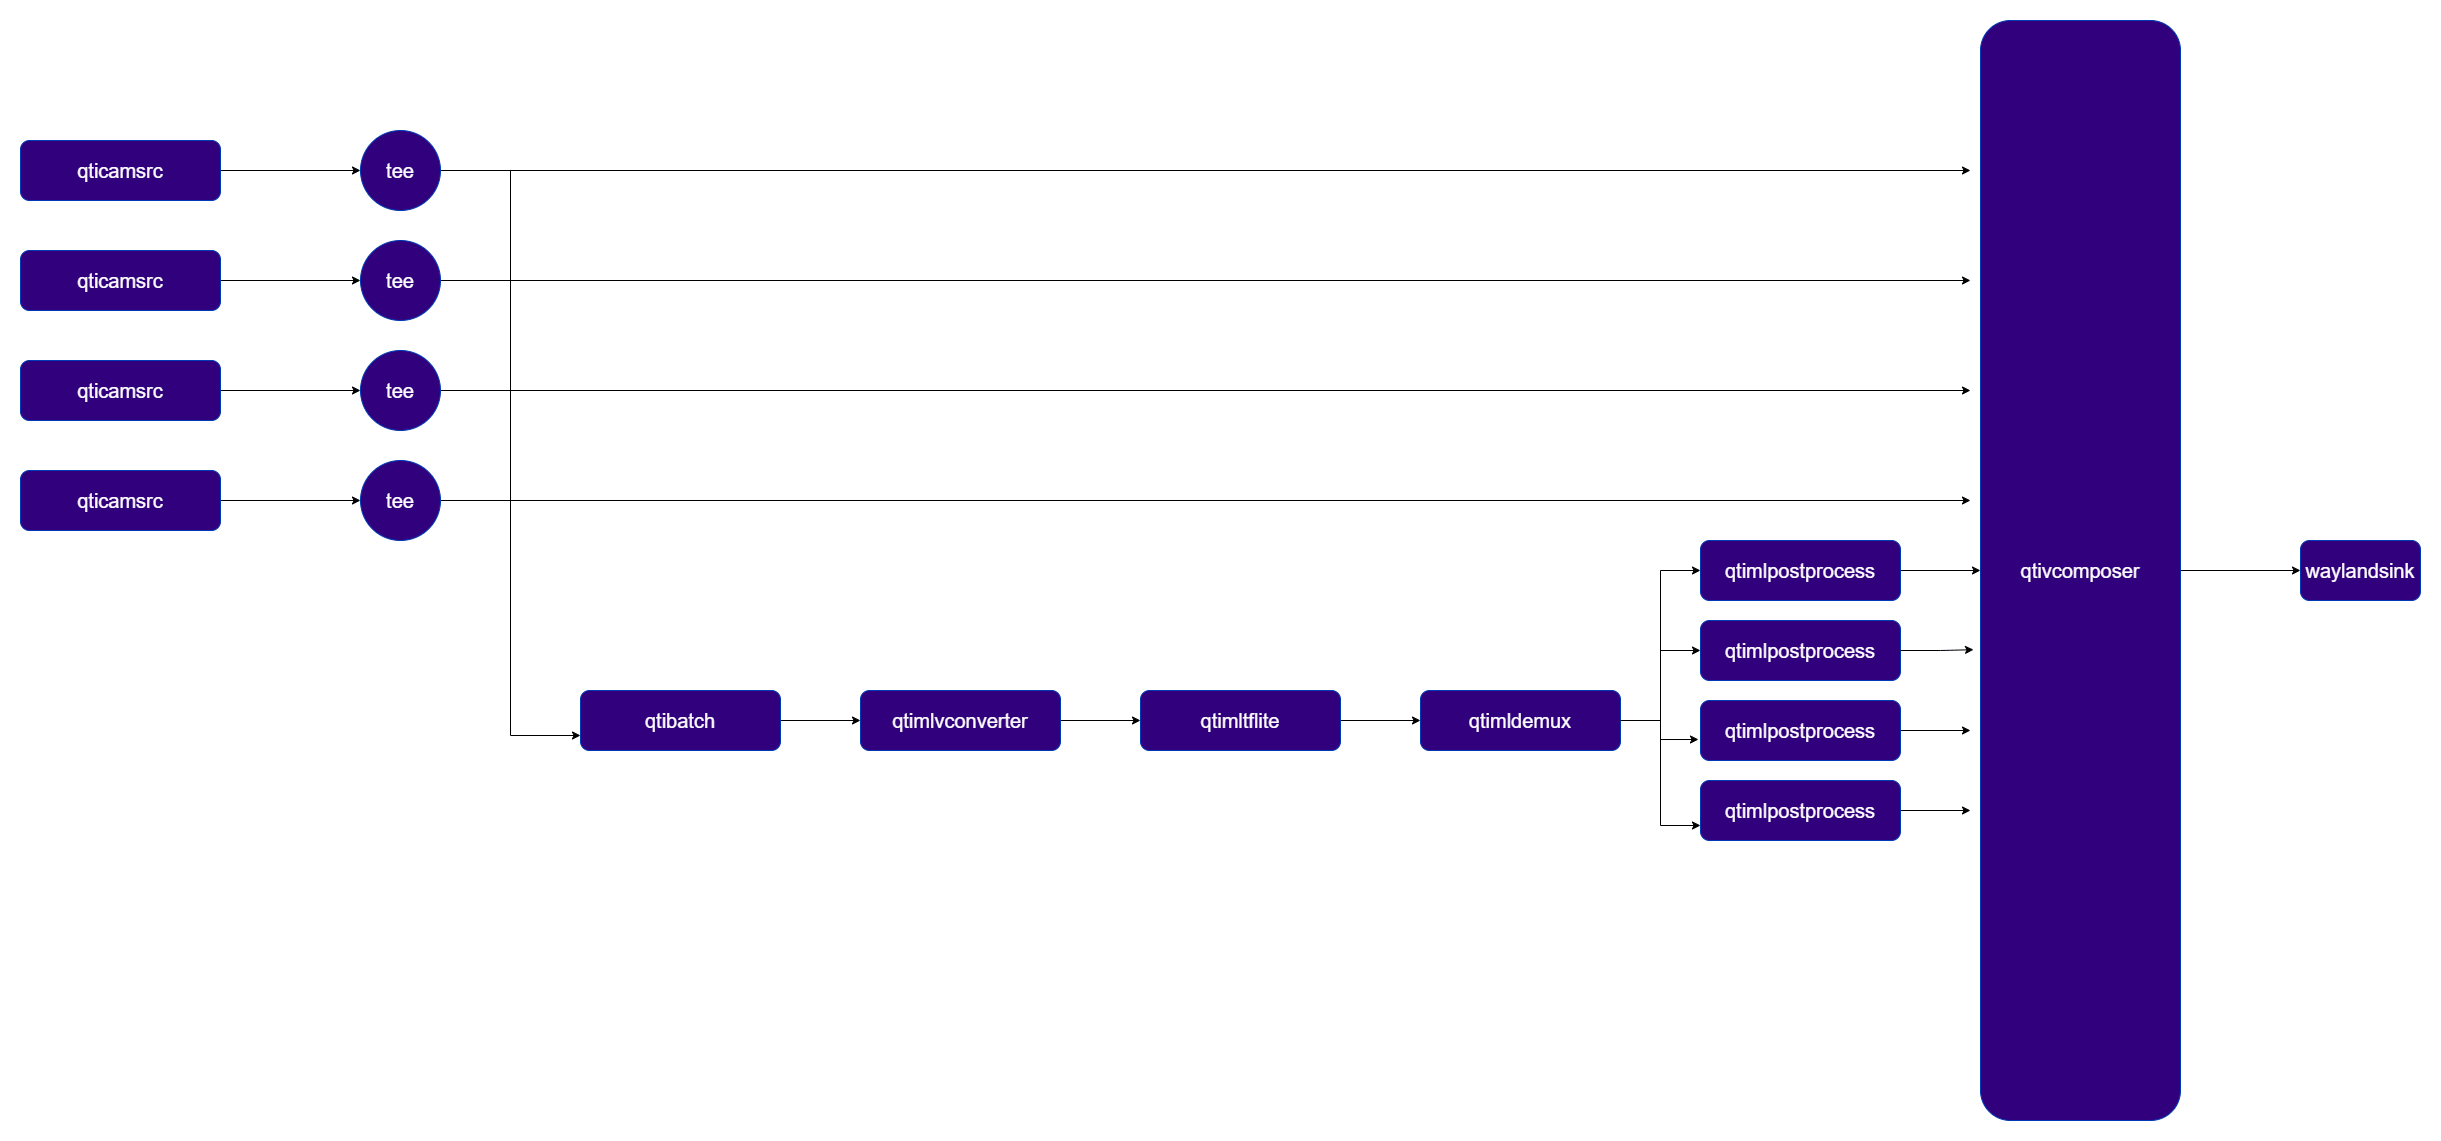
Download Required Files
| File | Download | Save as |
|---|---|---|
| Yolov8 Detection W8A8 Batch 4 model | Export from Qualcomm AI Hub | yolov8_det_w8a8_batch_4.tflite |
| Detection labels | yolov8.json | yolov8.json |
| Sample video | Input video | ai_demo_sample.mp4 |