

Overview
Output tensors produced by inference models typically require post-processing to make the results usable for downstream components or interpretable by applications. For example:- Image classification outputs are arrays of confidence scores that need interpretation, such as selecting the top classes exceeding a specified threshold.
- Object detection outputs should be converted into a set of bounding boxes with associated labels.
- Pose estimation outputs should be transformed into a set of keypoints and connections between them.
- Image segmentation outputs should be converted into RGBA image masks that can be overlaid on the original frame.
- Raw tensor data may require conversion into formats expected by subsequent plugins or processing stages.
Example Pipeline
1
Download Required Files
2
Copy files to device
3
Connect to device
4
Set environment variables
Run below command on your device
5
Run the pipeline
Element Properties
Label File Examples
Newline-separated format
JSON format
Settings Example (Pose Estimation)
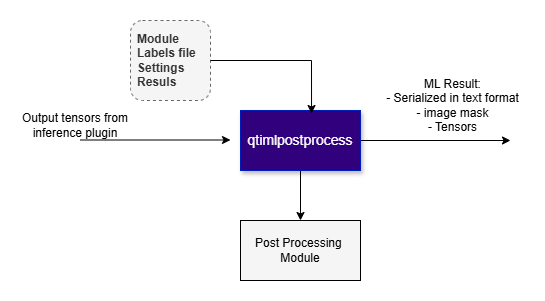
- text - The post-processing plugin serializes ML metadata to text. This metadata can either be used as-is by other plugins or attached to the source stream using qtimetamuxer.
- image mask - The post-processing plugin can generate an image mask with overlaid text, bounding boxes, dots, lines, and other visual elements. This is a transparent frame that contains only ML results. For example, if the post-processing type is object detection, the plugin will draw bounding boxes with labels. The image mask can then be blitted onto the source video stream using the qtivcomposer plugin.
- tensor - The post-processing plugin can generate tensors. This is useful when the output tensor from one inference stage needs to be passed to the next stage, but the tensor shapes don’t match exactly. For example, the first stage might produce four output tensors, while the next stage might require only three of them.
Post Processing Callback
Theprocess-* signals enable external post-processing: instead of loading a built-in module, the application parses the inference output tensors itself. This path is engaged only when both conditions are met:
- The
moduleproperty is not set, so no built-in module claims the tensors, and - A handler is connected to one of the
process-*signals.
process-* signals share the same callback layout, differing only in the type of the result container passed as the third parameter:
The available signals, the result container passed as the third argument, and the entry type you append to it:
Flags: Run Last
For the result-structure field reference and C/C++ and Python examples, see Guidelines for Writing an External Post-Processing Callback below.
Post Processing Module
The post processing module is solely responsible for tensor parsing and outputs a list of predictions. Each post-processing module implements parsing logic tailored to a specific class of models. For example, a single module is responsible for all variants of YoloV8 detection models. The plugin manages the execution of the module, the generation of outputs (ML metadata or image mask), batching, chained AI models, and other related tasks. The post processing module currently supports the following output data types:- object-detection
- image-classification
- image-segmentation
- depth-estimation
- super-resolution
- pose-estimation
- audio-classification
- tensor
Image Classification
Image Classification
mobilenet-softmaxmobilenetocr-recognizerocrqfr-softmaxqfr
Object Detection
Object Detection
easy-textdteasy-ocr-detectormediapipe-poseqfdqpdssd-mobilenetyolo-nasyolov5yolov8palmd
Semantic Segmentation
Semantic Segmentation
deeplab-argmaxyolov8-seg
Depth Estimation
Depth Estimation
midas-v2
Pose Estimation
Pose Estimation
hrnetlite-3dmmposenethlandmarkmediapipe-pose-landmark
Super Resolution
Super Resolution
srnet
Audio Classification
Audio Classification
wave2vecyamnet
Tensor Generation
Tensor Generation
tensor
- yolov8 module can be used for both YoloV8 and YoloX models, because both Yolo models have the same output and need the same post processing implementation. The same applies to YoloV3 and YoloV5.
- mobilenet module can be used for MobileNet, ResNet and other Image Classification ML models because classification post processing is very common across ML models.
- 1, (21–42840), 4
- 1, (21–42840)
- 1, (21–42840)
- 1, 4, (21–42840)
- 1, (1–1001), (21–42840)
- 1, (5–1005), (21–42840)
Batching & Daisy Chaining
QIM SDK supports advanced features such as batched models and daisy chaining (executing models sequentially). These complex tasks are handled automatically by the SDK, allowing the post-processing module code to remain generic and focused solely on core post-processing logic. Examples:- If a model has a batch size of 4, the qtimlpostprocess element will execute the post-processing module four times—once for each item in the batch. This means the same module can be used in both simple scenarios (processing one frame at a time) and more complex ones (processing multiple sources in parallel).
- In a sequential model setup, where the first model detects objects and the second performs pose estimation, the second model is executed for each detected object from the first model. In this case, QIM SDK manages the complexity of invoking the post-processing module for each inference result and mapping the output back to the original frame.
Overview of AI Post Processing use cases
QIM SDK (Qualcomm Intelligent multimedia SDK) is a framework that provides necessary building blocks to construct AI, Multimedia, and CV pipelines for end application. To build AI workflow three components/ GStreamer plugins are needed.
- The preprocess element converts the data stream into a tensor.
- The inference element performs inference on an AI model and eventually applies dequantization to the output tensor. There is no additional preprocessing or postprocessing involved, other than dequantization.
- The post-processing is a plugin that parses tensors and creates a buffer containing either ML metadata or an image mask. ML metadata can be handled by the QIM SDK in two different ways: it can either be attached to the source stream using qtimetamuxer, or used directly and streamed to RTSP, RTMP, Redis, etc. The image mask can be overlaid on the source video frame using qtivcomposer.



Guidelines for Writing an External Post-Processing Callback
External post-processing lets you decode a model’s raw output tensors directly in your application, instead of writing and deploying a separate C++ module. You connect a single function — the callback — to theqtimlpostprocess element, and from then on the SDK hands that function every inference result and takes care of everything around it: batching, daisy-chaining, and delivering your results to the downstream plugins. You only write the model-specific decoding in the middle.
This is the quickest way to bring up a new or custom model, and it can be done entirely in Python — no compilation or on-device deployment required.
To enable it, you only need to:
- Build the pipeline without setting the
moduleproperty, so no built-in module claims the tensors. - Connect a handler to the single
process-*signal that matches your model type (see Post Processing Callback for the full list).
Callback Signature
Whatever the model, the callback always has the same shape — it receives the same arguments and returns a boolean. Only the decoding logic in the middle changes. Using object detection as an example, the handler looks like this:- Python
- C/C++
And every callback follows the same four steps:
- Read the tensor(s) from
mlframe. - Decode them into predictions — this is your model-specific logic.
- Append one entry per prediction to the result container, filling in its fields (coordinates, label, confidence, …).
- Return
TRUE.
mlframe, mlparam) and the output containers in detail, and the Example at the end puts them together into a working handler.
ML Frame
This is the input to your callback — themlframe argument, of type GstMLFrame / GstQtiML.Frame. It holds the model’s raw output tensors, which you decode in step 2. A frame carries one or more tensors. For example, output from object-detection model may produce separate tensors for boxes, scores and class indices.
In C,
gst_ml_frame_get_tensor() returns a GstMLTensor wrapper for direct access to the tensor:
In Python,
mlframe.get_tensor(i) returns a zero-copy NumPy array already shaped to the tensor dimensions and typed to match the tensor’s data type, so it can be indexed and sliced directly.
ML Parameters
Alongside the tensors, each callback receives themlparam argument, a GstStructure of per-batch parameters describing how the input stream was fitted into the model input tensor. You need this because the stream resolution and aspect ratio often differ from the tensor shape: the frame is usually scaled and letter-boxed into the tensor, so a prediction’s position in the tensor must be mapped back to the original frame. These fields tell you how. The available fields:
ML Structures
This is the output of your callback. The last argument is an empty result container — an ordered, growable list. In step 3 you fill it with one entry per prediction, setting the entry’s fields (coordinates, label, confidence, and so on). Which entry type you use is fixed by the signal you connected — aprocess-object-detection handler fills Detection entries, process-pose-estimation fills Pose entries, and so on. Find your signal below and fill the matching fields; you only ever need the one that applies to your model. Coordinates are always relative (0.0–1.0), so they stay correct regardless of the source resolution.
Classification
Populated in process-image-classification and process-audio-classification.
Detection
Populated in
process-object-detection.
Keypoint
Used inside
Pose.keypoints and Detection.landmarks; not appended to a container on its own.
KeypointLink
Used inside
Pose.links to connect two keypoints; not appended to a container on its own.
Pose
Populated in
process-pose-estimation.
Segmentation
Populated in
process-segmentation.
The
labels and colors lists are stored row-major and contain n_rows × n_columns entries — one per cell.
DepthMap
Populated in process-depth-estimation.
The
values and colors lists are stored row-major and contain n_rows × n_columns entries — one per cell.
Example
The handler below puts the four steps together for an object-detection model: it reads the input tensor from themlframe, reads the fitting parameters from mlparam, decodes the tensor into boxes (the model-specific part, omitted here), and appends one Detection per box to the result container. The final lines show how the handler is connected to the element — note that the module property is not set.
- Python application
- C/C++ application
In Python the signals are available through GObject introspection, and the ML result types (
Detection, Pose, Classification, Keypoint, …) come from the GstQtiML overrides. The input tensor is exposed as a zero-copy NumPy array via Frame.get_tensor().Guidelines for Writing a Custom Post-Processing Module
If you cannot find a suitable post-processing module for your AI model, you can implement your own. You can build a post-processing module completely independently from the QIM SDK — all you need are the interface header files and a toolchain. Once the module is built, it should be deployed to the following location on the device: /usr/lib/gstreamer-1.0/ml/modules/. The post-processing plugin will automatically detect it, and users can select it in the GStreamer pipeline. Post processing module header file(s)Module/library naming
Post-processing module shared libraries must follow the naming convention: libml-postprocess-<module-name>.so. This is required to avoid duplication of post-processing module names. For example, the shared library for the YoloV8 module should be named libml-postprocess-yolov8.so. The same <module-name> is used when configuring the post-processing plugin, for example: module=yolov8.AI Post Processing Module Inference
- Constructor / Destructor - For initialization and cleanup.
- Caps - This function must return the module type (e.g., image classification, object detection), supported tensor dimensions, and supported data types (e.g., uint8, float32).
- Configuration - Called once during initialization. Handles label and configuration files.
- Process - Called after each inference. This is where the tensor is converted into a prediction result in one of the supported formats.
- object-detection
- image-classification
- image-segmentation
- depth-estimation
- super-resolution
- pose-estimation
- audio-classification
- tensor
- FLOAT32
- FLOAT16
- INT8
- UINT8
- INT16
- UINT16
- INT32
- UINT32
- INT64
- UINT64
- labels - (optional) а string that holds the path to a file containing labels. If the user does not provide a label file, the string remains empty. The label file can be in any format. The IM SDK includes parsers for both newline-separated labels and JSON-formatted labels.
- settings - (optional) a JSON string containing module-specific setting. These settings are provided by the user through the settings property of the post-processing GStreamer plugin. It will be empty if user does not provide any settings.
- object-detection
- image-classification
- image-segmentation
- depth-estimation
- super-resolution
- pose-estimation
- audio-classification
- tensors
Tensor output is a special case where the post-processing plugin and module generate tensors instead of predictions. This is used when two ML models are chained together and the output tensor from the first model needs to be modified before it is passed to the next model. If the output tensor does not require modification, then both inference plugins can be linked directly, one after the other, and the post-processing plugin is not needed in that case.
Understanding post processing module input
The input is split into two fields:- tensor – This field holds the inference output tensors and describes their structure. Each output tensor is represented as an entry in a vector. For example, in the case of YOLOv8, which produces three output tensors (boxes, scores, class indices), the vector will contain three entries.
- type – float, uint8, etc
- name - tensor name. This field is useful when two or more output tensors have the same shape. Tensor names are unique and guarantee that an exact tensor is selected.
- dimensions – this field describes the tensor’s shape. For example, YoloV8 with three output tensors: [1,8400,4], [1,8400], [1,8400]
- data – pointer to tensor
- mlparams – Additional parameters that may be required for tensor processing. These may not be applicable to all submodules. This field also provides information about how the input stream is processed, which is particularly important because the resolution and aspect ratio of the stream often do not match the shape of the input tensor. This field is a dictionary implemented using std::any. The module developer must know the expected key and its corresponding return type. The use of std::any ensures that the returned value matches the type associated with the given key. Example usage:
-
Key: “input-tensor-region”
Type: Region
Description: This parameter indicates which portion of the input tensor is filled with actual data from the stream. The remaining area is considered padding
-
Key: “input-tensor-dimensions”
Type: Resolution
Description: Specifies the size of the input tensor. This is useful when the post-processing algorithm produces output in absolute coordinates. Since post-processing modules are required to output relative coordinates, the input tensor size is needed to convert absolute values to relative ones.
Generating post processing module output
The output is array of array of results. Arrays are nested because of the batching case. Only inner array is filled if there is no batching. Inner array size match to number of found result. Results are always in relative dimension. Result type depends on module type:- Image/Audio Classification
- name – class label. Predicated category or class the image/audio belong to.
- confidence – class probability / confidence score
- color – RGBA8888 color for visualization in overlay plugin
- xtraparams – (optional) additional parameters in #Dictionary (key/value pair) which the user can export arbitrary extra results from the module and be passed downstream.
- Object Detection:
- left, top, right, bottom – bounding box coordinates
- name – class label. Predicated category or class the image/audio belong to.
- landmarks – (optional) list of key points. For example, face detection model can output face point along with bounding box.
- confidence – class probability / confidence score
- color – RGBA8888 color for visualization in overlay plugin
- xtraparams – (optional) additional parameters in #Dictionary (key/value pair) which the user can export arbitrary extra results from the module and be passed downstream.
- Pose Estimation:
- name – class label. Predicated category or class the image/audio belong to.
- confidence – class probability / confidence score
- keypoints – vector of key points
- Links – (optional) vector of links between key points.
- color – RGBA8888 color for visualization in overlay plugin
- xtraparams – (optional) additional parameters in #Dictionary (key/value pair) which the user can export arbitrary extra results from the module and be passed downstream.
- Image Segmentation:
- labels – list of class labels, one per cell (paxel) of the segmentation mask.
- color – list of RGBA8888 colors, one per cell, for visualization in the overlay plugin.
- n_rows / n_columns – dimensions of the segmentation mask produced for the processed region.
- xtraparams – (optional) additional parameters in #Dictionary (key/value pair) which the user can export arbitrary extra results from the module and be passed downstream.
- Depth Estimation:
- values – list of per-cell depth values for the processed region.
- color – list of RGBA8888 colors, one per cell, for visualization in the overlay plugin.
- n_rows / n_columns – dimensions of the depth map produced for the processed region.
- xtraparams – (optional) additional parameters in #Dictionary (key/value pair) which the user can export arbitrary extra results from the module and be passed downstream.
- Super Resolution:
- Output is image frame/mask
- Tensor
- list of tensors
Module helper tools
As part of interface header files we also provide label and JSON parsers. User is not obligated to use neither them. They are provided for convenience only. Developer can use any label and/or JSON parser but module must be linked statically with them. Label parser – This parser support two formats. Label parser takes path to file with labels and automatically detects formatting:- New line separated format. Line number is class id.
- JSON format. Class index, label, visualization color should be set in this format. This format is more flexible because user can pass only some classes. The rest of the classes will be automatically filtered out.
Logging
The post-processing module can output logs to the GStreamer log system without having a direct dependency on GStreamer. A logging object is passed to the module via its constructor. This object, along with a LOG macros, can be used to output logs directly to the GStreamer log. Supported log levels include: Error, Warning, Info, Debug, Trace, and Log.. LOG macro:How to Compile the Post-Processing Module standalone
Prerequisite: Ubuntu22.04 or Ubuntu24.04 PC- Install tools
- Put QIM SDK headers and module sources in one folder.
- Create a CMakeLists.txt file. Example:
Post-processing module shared libraries must follow the naming convention: libml-postprocess-<module-name>.so
For example, the shared library for the YoloV8 module should be named libml-postprocess-yolov8.so
- Create a toolchain file e.g. aarch64-toolchain.cmake. For example:
- Configure and build project
How to Deploy and Test the Post-Processing Module
- Deploy module on device
- Run GST inspect and check if your module appears in supported modules list. You have to see you post processing module in supported modules list along with supported tensors shape.
- Once you have the post-processing module, you need to build a GStreamer pipeline. You must select your post-processing module using the module property of the qtimlpostprocess plugin. If your module requires a label file or configuration, you must pass them accordingly via the label and settings properties.
Below is an example pipeline for running a YOLOv8 model. An offline video is used as the video source. The video is decoded to YUV format using the v4l2h264dec decoder. YUV frames are preprocessed by the qtimlvconverter plugin. The qtimltflite plugin is used to run inference with the TensorFlow Lite YOLOv8 model. The post-processing plugin loads the YOLOv8 module and passes a label file in JSON format. The ML results are saved to a file.