Converting video frames to tensors
Video sources frequently deliver frames in diverse formats, resolutions, and color spaces that may not align with the requirements of machine learning models. Since models are typically trained on data with fixed resolution, format, and normalization parameters, it is essential to preprocess incoming frames to ensure compatibility with the model’s expectations. Common preprocessing steps include:- Cropping: Select a specific region of the input frame to focus on. This uses provided ROI metadata to determine the crop region for each frame.
- Rescaling: Adjusts the spatial dimensions of input frames to match the expected tensor size for the target model to ensure compatibility and consistent performance.
- Format Conversion: Translates pixel data between supported formats (e.g., YUV to RGB) to meet the input requirements of the target model.
- Batching: Aggregates multiple frames or images into batches to optimize inference throughput and leverage parallel processing capabilities.
- Normalization: Applies pixel value scaling and normalization techniques (such as mean subtraction and standard deviation division) to standardize input data for improved model accuracy.
Displacement Modes
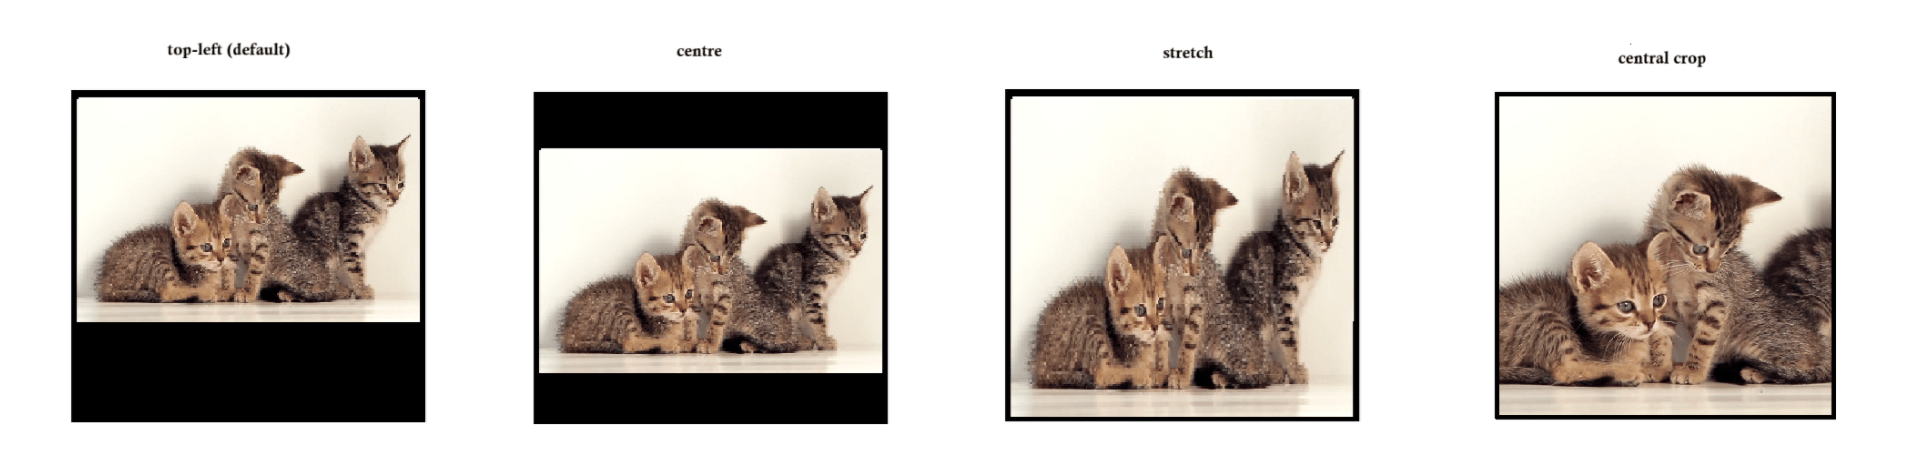
qtimlvconverter support three displacment modes:- top-left (default) - Keeps the original aspect ratio of the image and places it in the top-left corner of the output tensor.
- centre - Also preserves the aspect ratio, but centers the image within the tensor. This is a common choice for models that expect the main object to be in the middle.
- stretch - Ignores the original aspect ratio and stretches the image to completely fill the tensor. This can introduce distortion but ensures full coverage, which some models require.
- centre-crop - Ignore the source image AR (Aspect Ratio) and if required crop the source around its center to fit completely inside the output tensor.
Supported Tensor Layouts
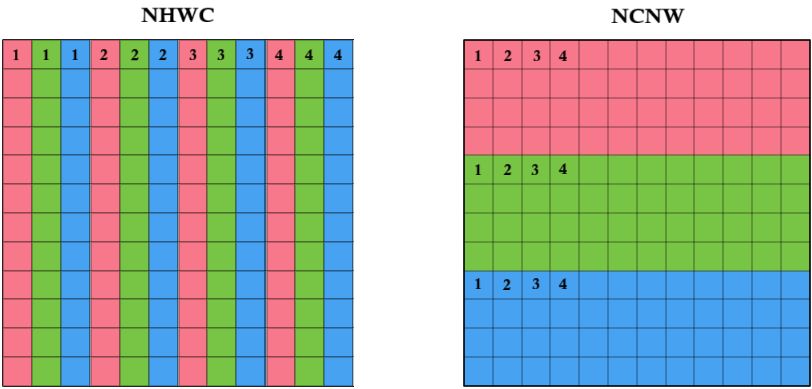
At the final stage of preprocessing, the output tensor must be arranged in a specific layout format. The qtimlvconverter element supports the following tensor dimension layouts:- NHWC — most commonly used by the QIM SDK for video AI models
- NCHW - contains the same data as NHWC but organized differently
- NDHWC - represent sequences of video frames, where each tensor includes multiple consecutive frames processed together for temporal analysis
- N — Batch size (number of frames or images on which inference is performed)
- D — Depth (e.g., number of consecutive frames in a video stream)
- H — Height
- W — Width
- C — Channels (e.g., 3 for RGB/BGR, 1 for grayscale)
- In NHWC layout, the Red, Green, and Blue values for each pixel are stored sequentially in the buffer — one pixel at a time.
- In NCHW layout, all Red pixel values are stored first, followed by all Green values, and then all Blue values.
| Tensor Shape | NHWC, NCHW, NDNWC |
| Data Format | uint8, int8, uint16, int16, uint32, int32, float32, float16 |
| Data Range | any |
| Color Format | RGB, BGR, Grayscale |
For more technical details and advanced features, please refer to the qtimlvconverter documentation.
Preprocessing Sample
This example demonstrates how qtimlvconverter can be used in Python to convert video frames into tensors.
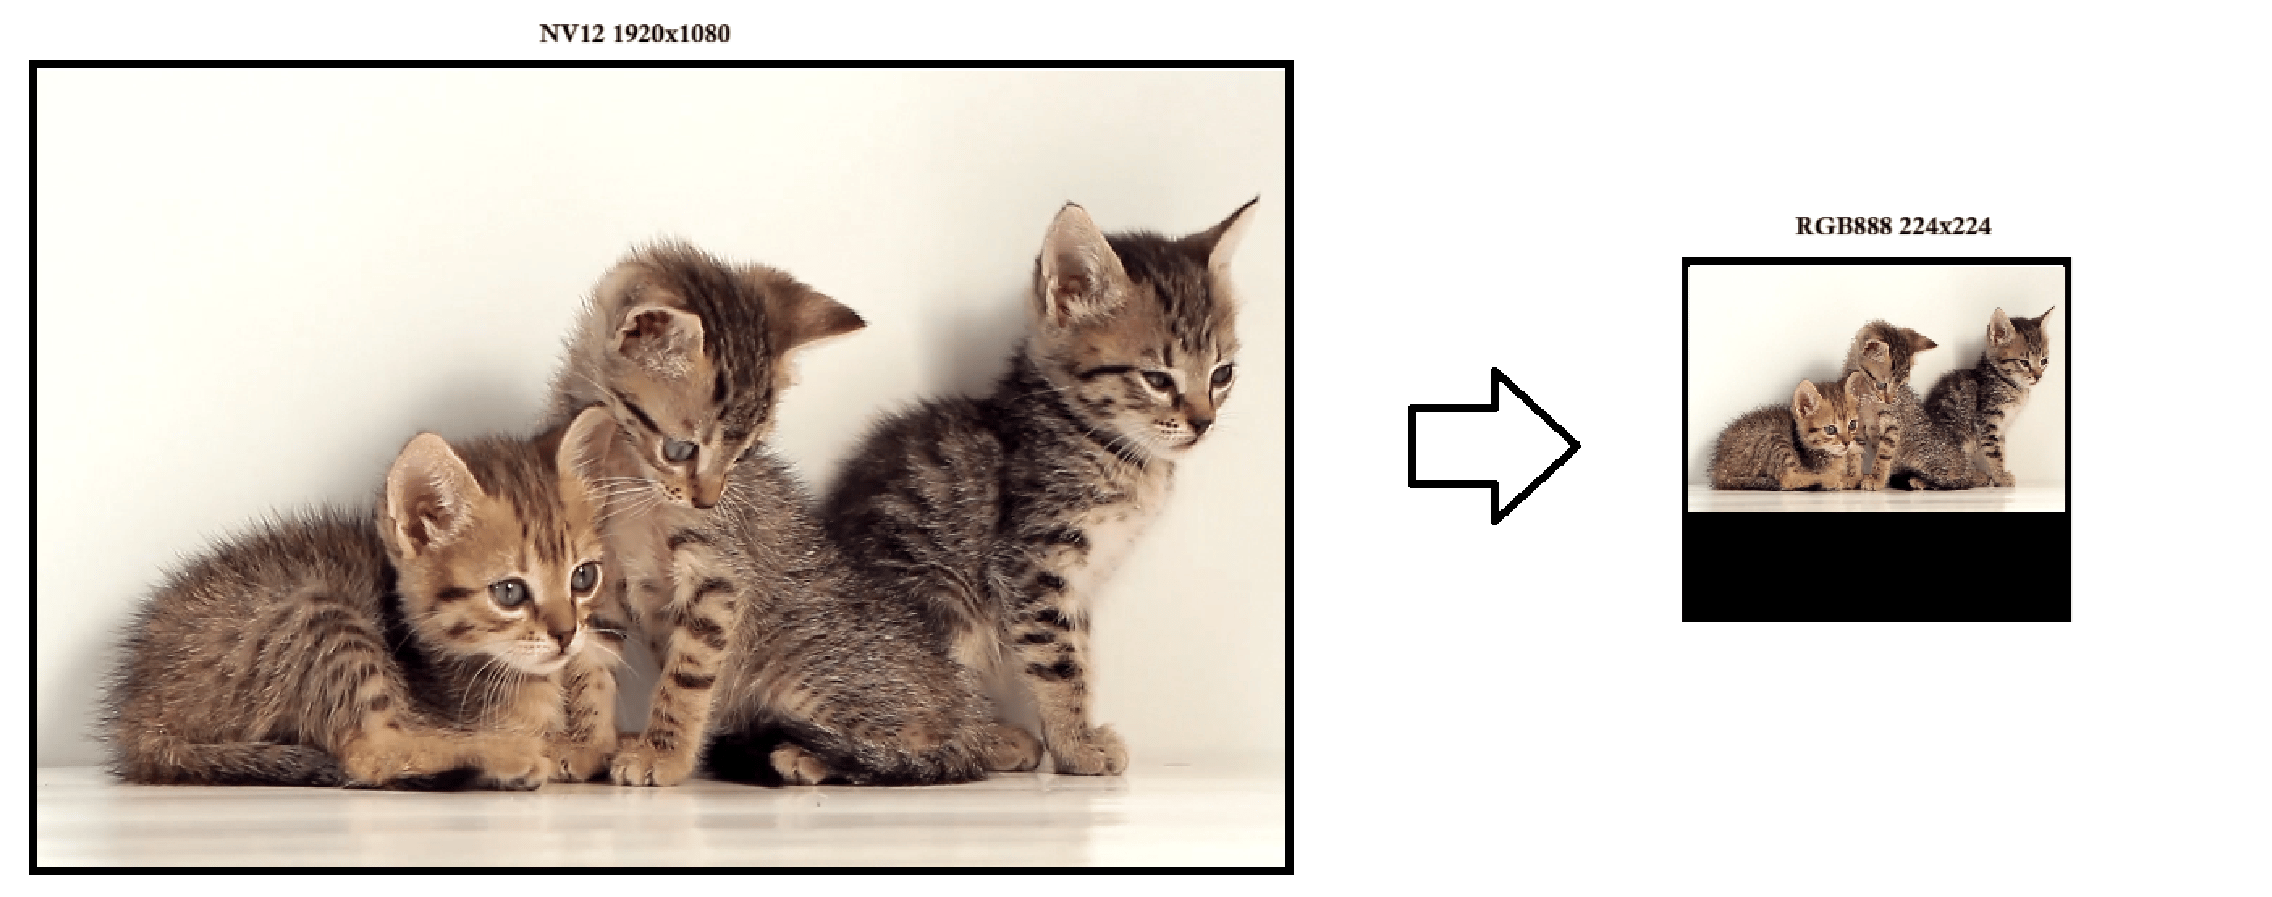
- The video source supplies frames in NV12 (YUV) format at a resolution of 1920×1080 (1080p).
- The qtimlvconverter element is configured to generate a quantized tensor of type uint8 with shape [1, 224, 224, 3], corresponding to an RGB888 image. By default, qtimlvconverter preserves the aspect ratio of the input frame. In this scenario, the original 16:9 frame is downscaled to 224×126 pixels to fit within the target tensor dimensions, ensuring that the field of view remains intact and free from cropping or distortion. The frame is then converted from NV12 to RGB888 format. As the model in this example will be quantized to accept uint8 data, no further normalization is necessary; the RGB888 format directly matches the model’s input requirements. The resulting RGB888 frame, with a resolution of 224×126, is positioned in the top-left corner of the output tensor. The remaining area—unused rows beneath the image—is filled with black pixels, ensuring the tensor is fully populated while maintaining the original aspect ratio.
- To access the tensor within a python application, the appsink element is utilized.
- In this example, the Python script receives tensors for further processing. However, for demonstration purposes, we simply store the tensor as a file in the file system. The script does not save each tensor to a separate file—instead, it overwrites the same file repeatedly to avoid memory flooding and excessive disk usage.
Run example on device
Download Required Files
| File | Download | Save as |
|---|---|---|
| Sample video | Input video | ai_demo_sample.mp4 |
If any downloaded file is a
.zip archive, extract it on your host machine before copying:
unzip filename.zipExpected output
During execution, timing information is displayed in the console to provide insight into processing performance. The Python script saves the output tensor to the file $HOME/media/tensor.bin. Given that the tensor has a shape of [1, 224, 224, 3] and a data type of uint8, it effectively represents an RGB888 image. As a result, the tensor can be opened and viewed using any image viewer that supports the RGB888 format.AI preprocessing with custom crop
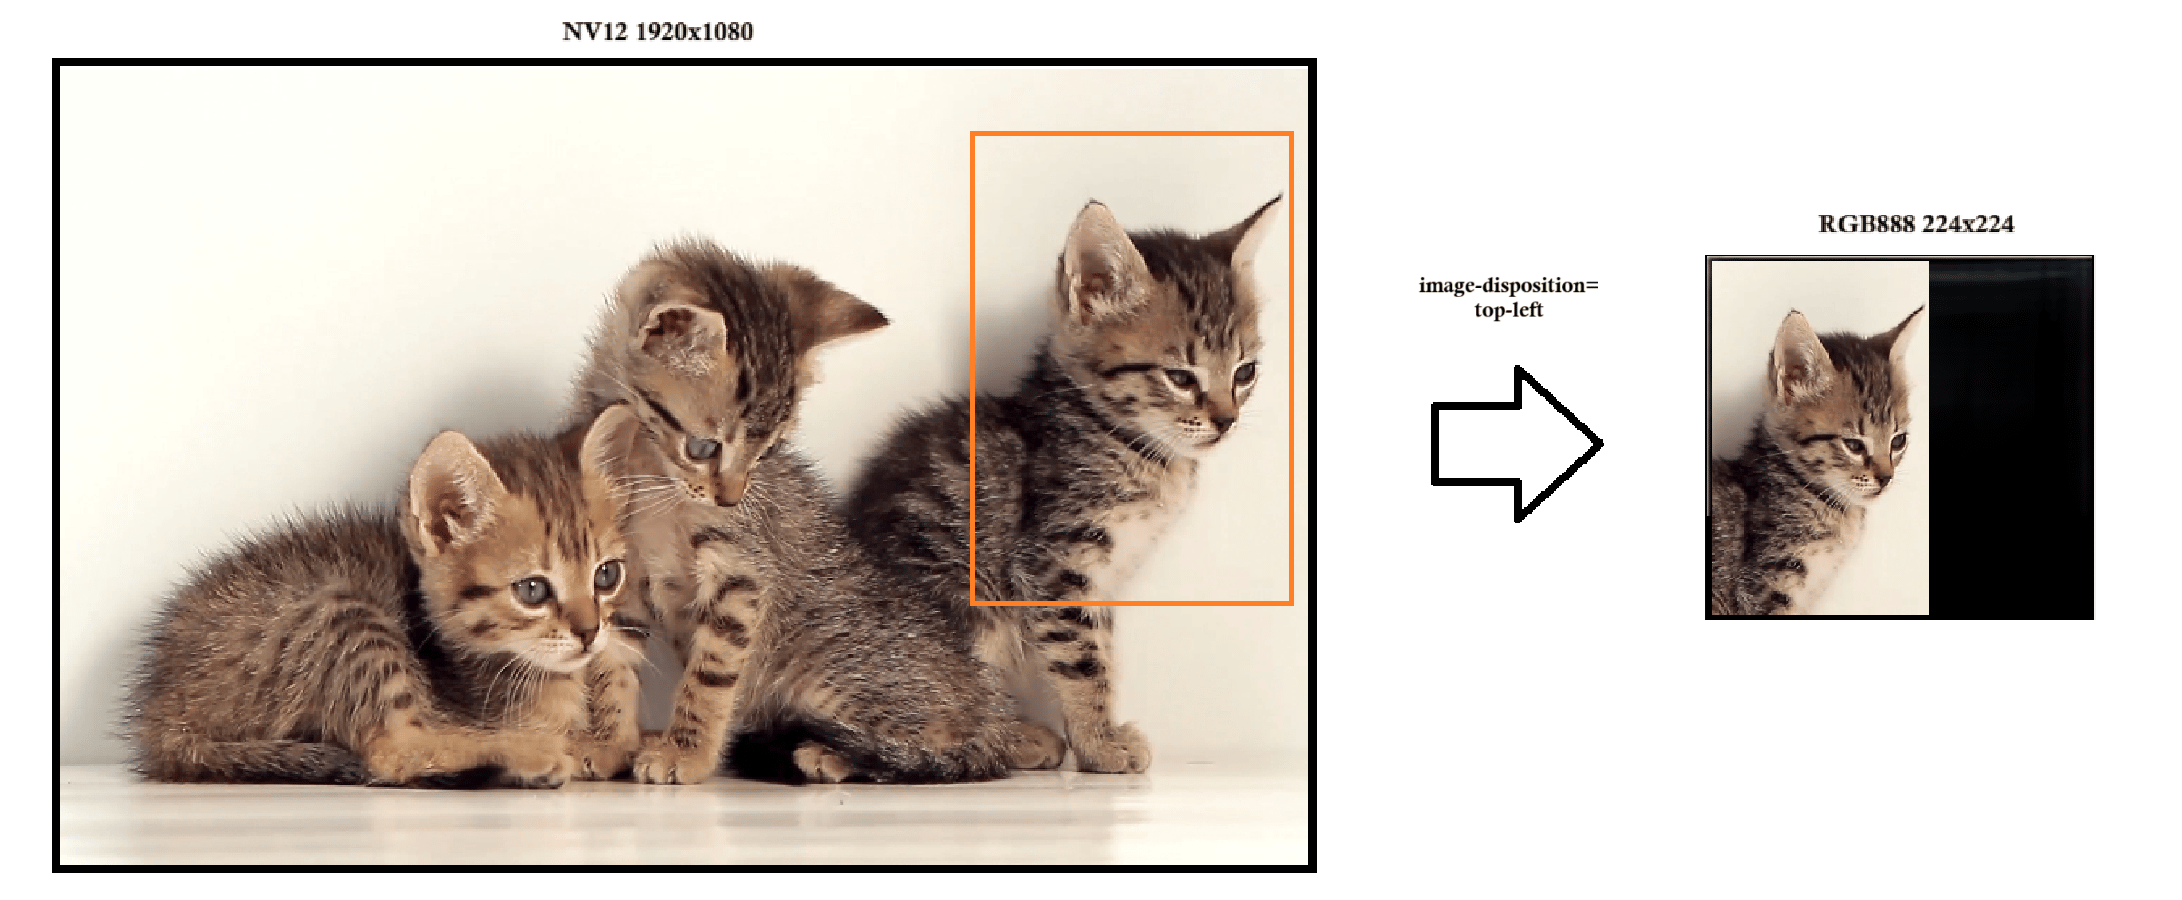
In some cases, instead of resizing or repositioning the entire image within the input tensor, you may need to crop a specific region and feed only that portion to the model. This approach is useful when we are interested in analyzing only a specific part of the field of view (FOV), rather than the entire image. While the image-disposition property of qtimlvconverter helps with placement and aspect ratio handling, cropping is a separate preprocessing step that gives you more control over which part of the image the model processes. To perform cropping, you can insert a qtivtransform step before qtimlvconverter. This element allows you to crop the input image before it reaches the converter, giving you precise control over the region of interest used for inference.
- source - this is your input stream.
- qtivtransform - this stage allows you to apply transformations to the image, such as cropping, resizing, or rotating. In this context, you can define a crop region via properties passed directly to qtivtransform, enabling you to extract a specific part of the input image before it reaches the model.
- qtimlvconverter - After cropping, this element prepares the image for inference. It handles scaling, color convert, normalization and positioning based on the image-disposition property (e.g., top-left, centre, stretch).
- appsink - This is the final stage where the tensor is passed to the application
Run example on device
Download Required Files
| File | Download | Save as |
|---|---|---|
| Sample video | Input video | ai_demo_sample.mp4 |
If any downloaded file is a
.zip archive, extract it on your host machine before copying:
unzip filename.zipExpected output
This example showcases how to convert a predefined region. During execution, timing information is displayed in the console to provide insight into processing performance. The Python script saves the output tensor to the file$HOME/media/tensor.bin. Given that the tensor has a shape of [1, 224, 224, 3] and a data type of uint8, it effectively represents an RGB888 image. As a result, the tensor can be opened and viewed using any image viewer that supports the RGB888 format.
While qtivtransform supports runtime crop window updates, this solution is not always scalable. In more advanced use cases, qtimlvconverter can perform cropping on its own, without relying on qtivtransform. For instance, if you have two models working sequentially (ex. a detection model followed by a pose estimation model) qtimlvconverter can automatically crop and generate a tensor for each bounding box detected by the first stage.
For more technical details and advanced features, please refer to the qtimlvconverter documentation.