

Multimedia Pipeline
Before running any of the applications below, create the sample directory tree on the target device:USB Camera Preview
USB (UVC) cameras are handled by thev4l2src node. Each USB camera comes with its own format and frame constraints. Because of this, we always place qtivcomposer right after the USB camera to ensure that the rest of the pipeline receives a hardware-friendly NV12 (Semi-planar YUV420) video format. However, qtivcomposer will automatically operate in passthrough mode if the USB camera already supports NV12, so you don’t need to worry about any performance overhead.
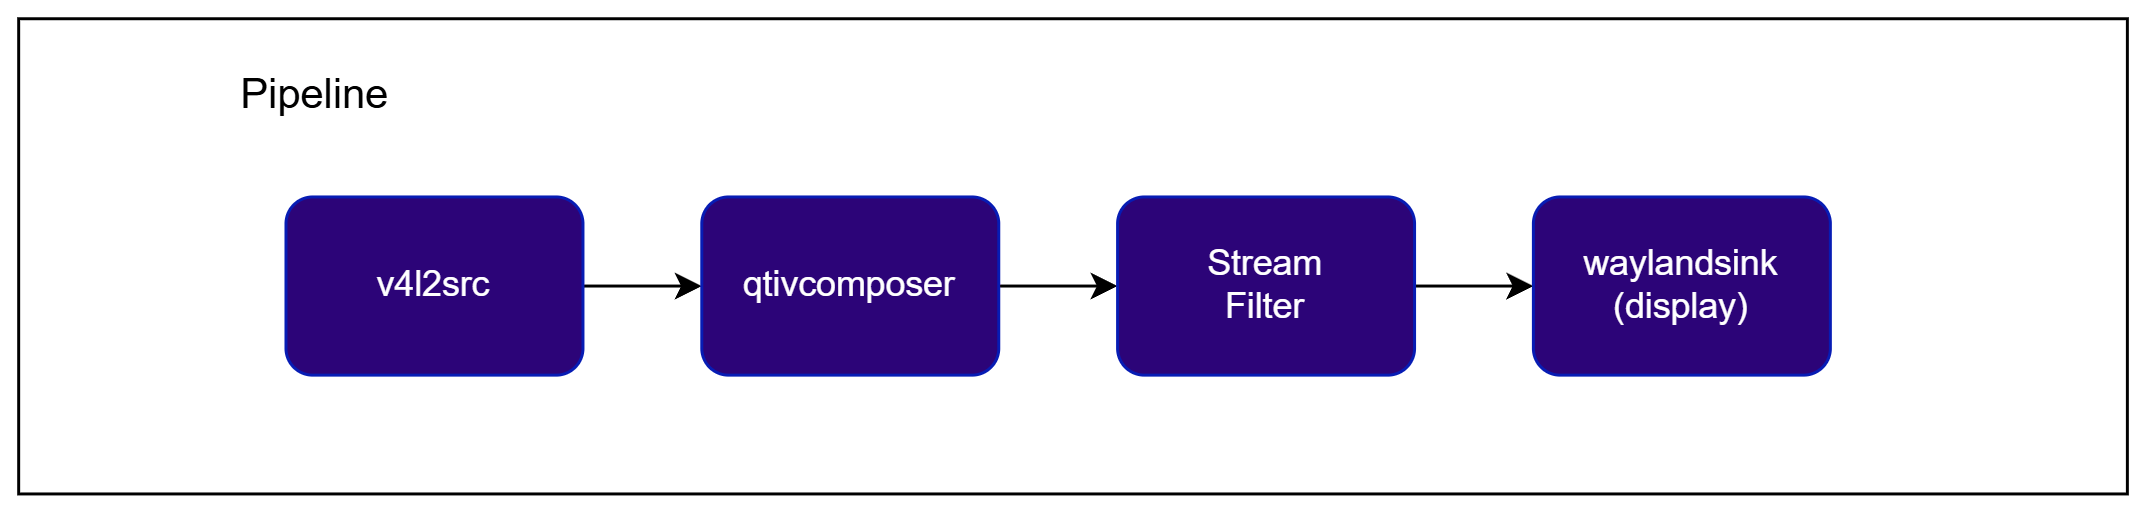
Try me
Try me
- Explicit coding style
- Implicit coding style
- YAML config style
qimsdk_ref_usb_camera.pyPre-built application on device: /usr/bin/qimsdk_ref_usb_camera.pyConnect a USB camera
/dev/video2 (update the pipeline’s device property if your camera is exposed on a different node).Run the application
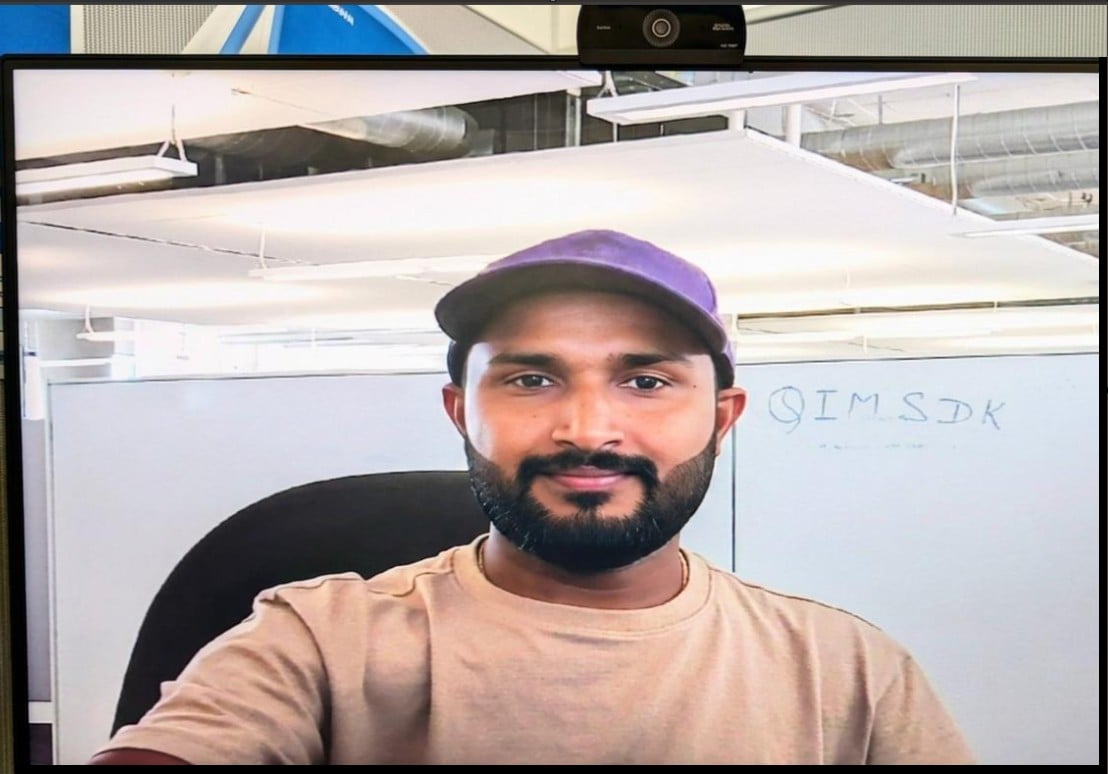
Expected Output
Built-in Camera Preview
This pipeline includes a built-in camera node, a stream filter, and a display node. If the device has more than one built-in camera, you can specify which one to use by providing the camera’s unique ID. The stream filter defines the camera’s output format, resolution, and framerate. You can also configure the display settings, such as enabling fullscreen rendering.libcamera to qticamsrc.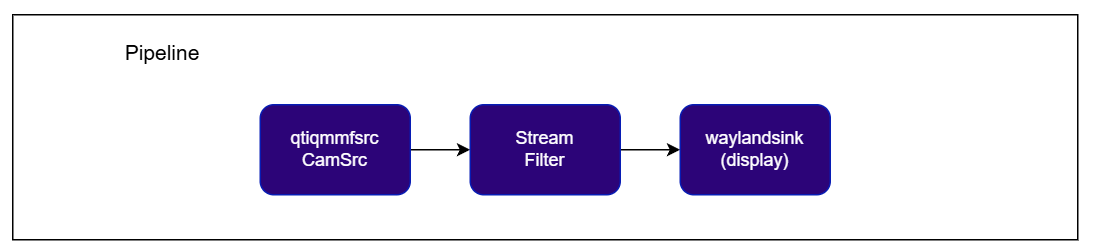
Try me
Try me
- Explicit coding style
- Implicit coding style
qimsdk_ref_camera.pyPre-built application on device: /usr/bin/qimsdk_ref_camera.pyRun the application
Expected Output
Built-in Camera Preview with Still Capture
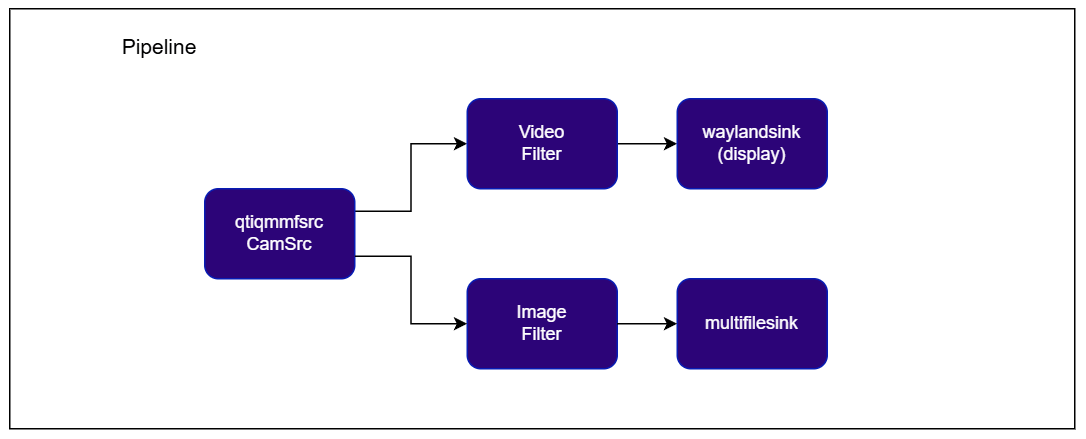
Try me
Try me
qimsdk_ref_camera_and_capture.pyPre-built application on device: /usr/bin/qimsdk_ref_camera_and_capture.pyRun the application
~/media/image_%d.jpeg.Expected Output
~/Downloads/qimsdk_samples/media/image_%d.jpeg. The application then exits automatically.Camera Recording to MP4
This pipeline captures frames from the built-in camera, encodes them into an H.264 stream using the hardware encoder, parses the bitstream, muxes it into an MP4 container, and writes the resulting file to disk.
Try me
Try me
qimsdk_ref_camera_encoder.pyPre-built application on device: /usr/bin/qimsdk_ref_camera_encoder.pyRun the application
~/Downloads/qimsdk_samples/media/encoder_output.mp4.Expected Output
~/Downloads/qimsdk_samples/media/encoder_output.mp4, which you can copy off the device and play back to verify the recording.To stop the application, press CTRL + C.MP4 File Playback
This pipeline ingests an MP4 file, demultiplexes it to extract the video track, decodes the compressed stream (e.g., H.264/H.265) into raw frames, converts (or directly negotiates) the output to NV12 — a hardware-friendly YUV 4:2:0 semi-planar format — and then renders the frames to the display using a sink that supports zero-copy or hardware buffers.
Try me
Try me
qimsdk_ref_qtdemux_decode_display.pyPre-built application on device: /usr/bin/qimsdk_ref_qtdemux_decode_display.pyDownload Required Files
location property to point to it.Copy the video file to the device
Run the application
Expected Output

Transport Stream (.ts) File Playback
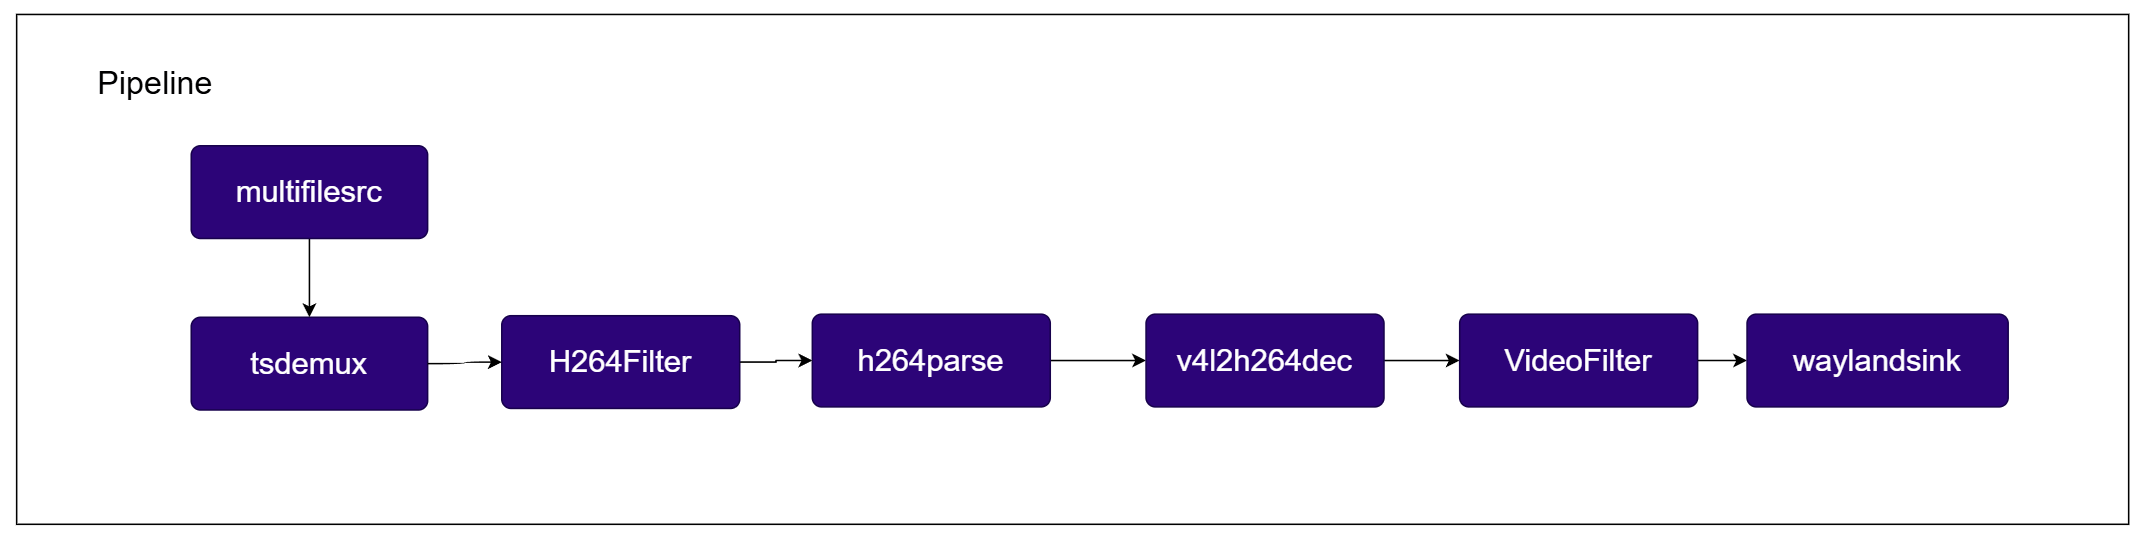
This pipeline is similar to the Offline Video Source pipeline, but ingests an MPEG transport stream (.ts) file instead of an MP4 container. It demultiplexes the transport stream using tsdemux to extract the video track, decodes the compressed H.264 stream into raw frames, converts (or directly negotiates) the output to NV12, and renders the frames to the display.
Try me
Try me
qimsdk_ref_tsdemux_decode_display.pyPre-built application on device: /usr/bin/qimsdk_ref_tsdemux_decode_display.pyDownload Required Files
Copy the transport stream file to the device
Run the application
Expected Output
Synthetic Test Pattern (VideoFilter API)
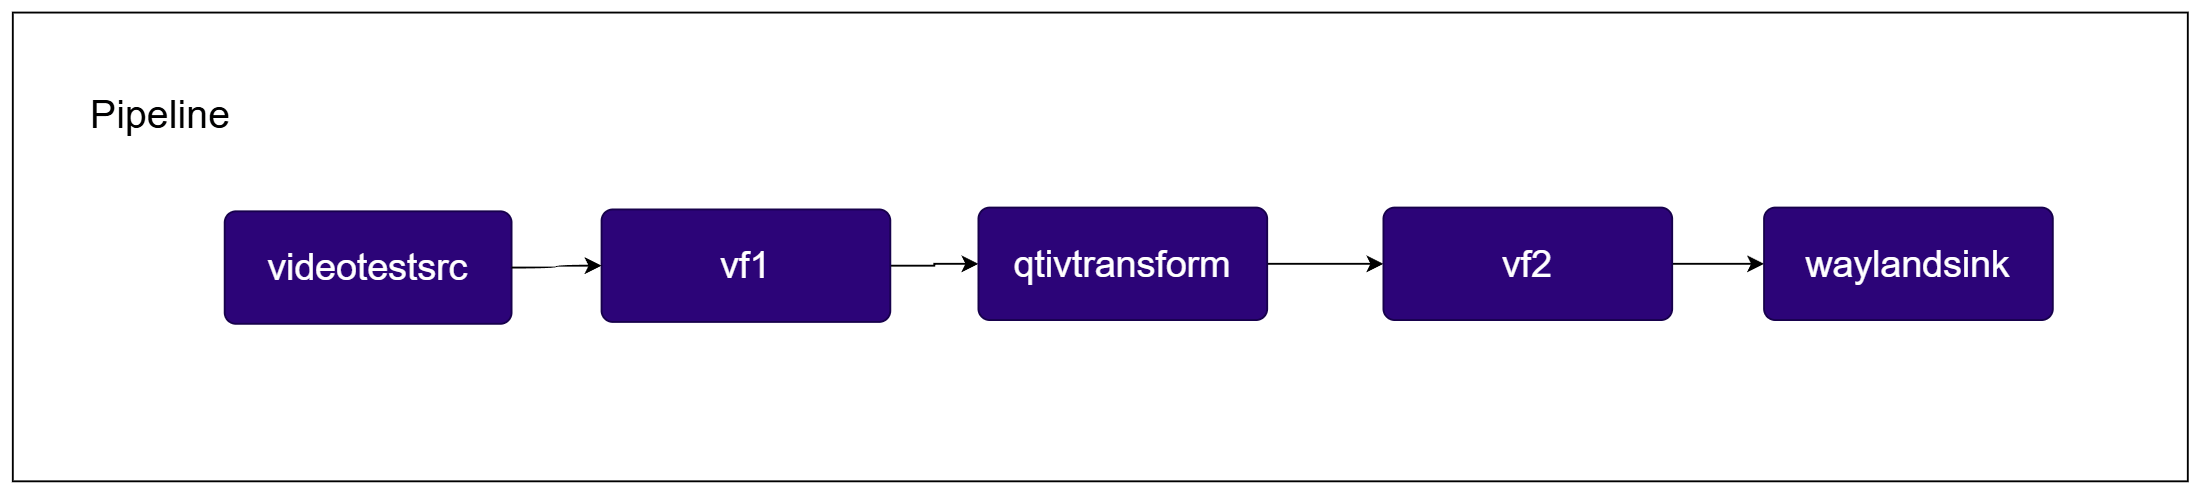
This pipeline generates synthetic test video frames usingvideotestsrc (a bouncing ball pattern), instead of reading from a camera or file. The frames are restricted to NV12/1080p/30fps, rotated 180 degrees by qtivtransform, downscaled to 1280x720 by a second stream filter, and rendered to the display. This is a useful pipeline for testing display and transform stages without any camera or media file dependency.
Try me
Try me
qimsdk_ref_videotestsrc_videofilter_display.pyPre-built application on device: /usr/bin/qimsdk_ref_videotestsrc_videofilter_display.pyRun the application
Expected Output
Synthetic Test Pattern (Raw Caps StreamFilter)
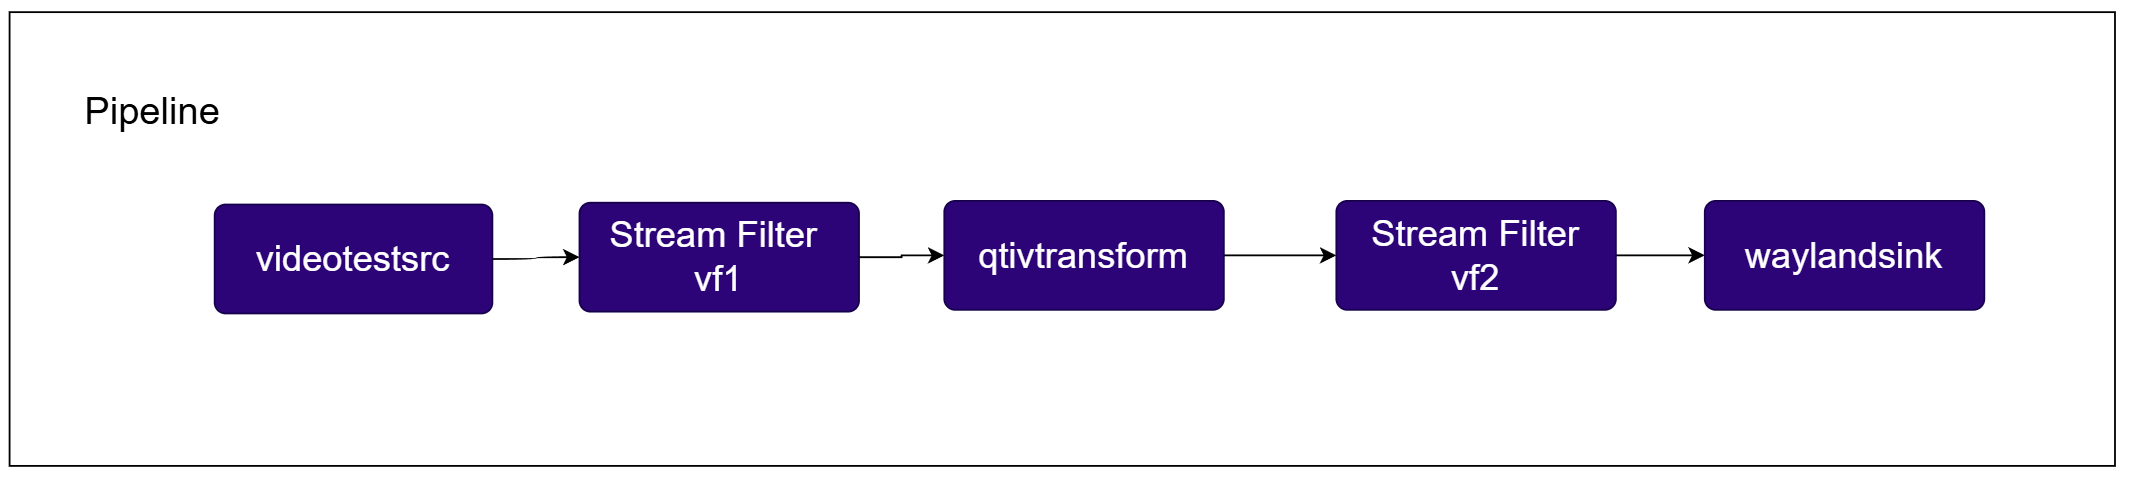
This pipeline is functionally identical to the previous example, but it defines its stream constraints using raw GStreamer caps strings viaStreamFilter (e.g. "video/x-raw,format=NV12,width=1920,height=1080,framerate=30/1"), instead of the structured VideoFilter builder API. This is useful when you need to express filter capabilities that aren’t covered by the structured builder, or when porting caps strings directly from existing GStreamer pipelines.
Try me
Try me
qimsdk_ref_videotestsrc_streamfilter_display.pyPre-built application on device: /usr/bin/qimsdk_ref_videotestsrc_streamfilter_display.pyRun the application
Expected Output
VideoFilter API example above.To stop the application, press CTRL + C.RTSP Camera Stream Playback
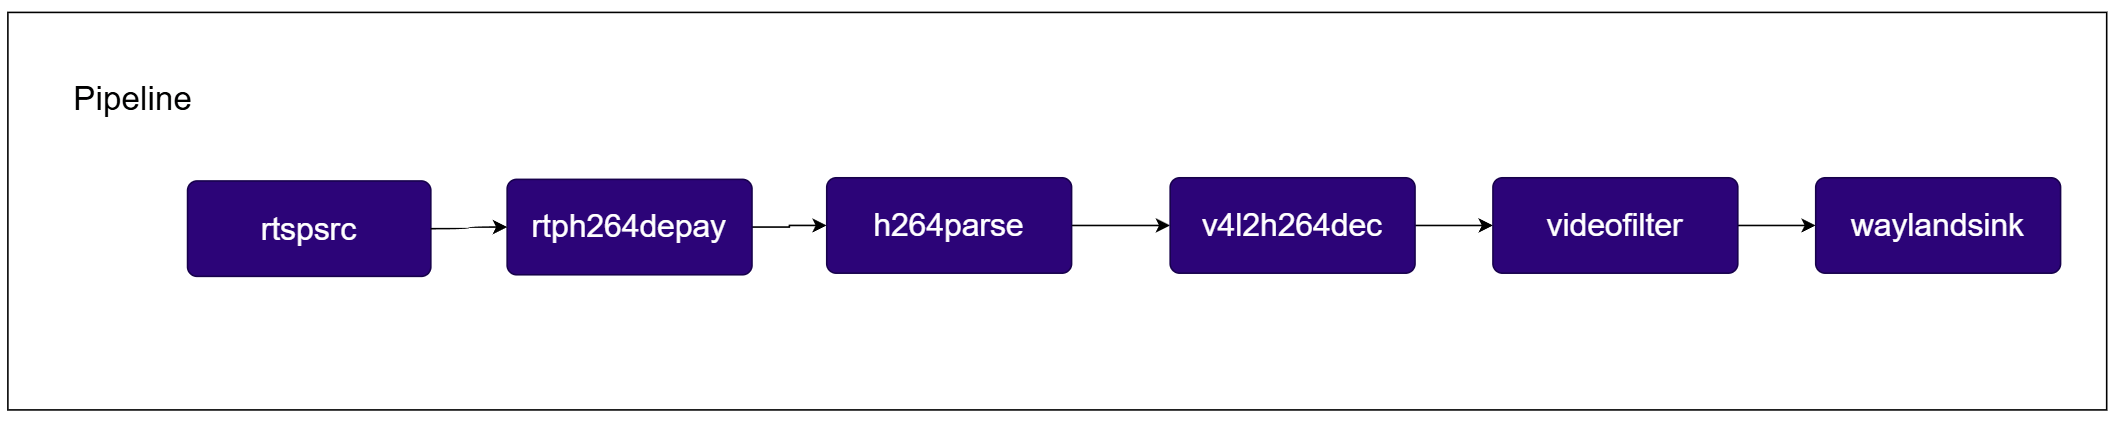
This pipeline connects to a network RTSP camera stream instead of a local (USB/built-in) camera or file.rtspsrc establishes the RTSP session and negotiates the H.264 RTP stream, a caps filter restricts it to H.264 video, rtph264depay extracts the H.264 payload from the RTP packets, h264parse prepares the bitstream for the hardware decoder, and the decoded frames are converted to NV12 and rendered to the display.
Try me
Try me
qimsdk_ref_yml.pyYAML configuration saved on device: /etc/qimsdk/qimsdk_ref_rtsp_camera.yamlUpdate the RTSP camera credentials
/etc/qimsdk/qimsdk_ref_rtsp_camera.yaml and update the location property with your RTSP camera’s username, password, IP address, and stream path.Run the application
Expected Output
AI Pipeline
Video-to-Tensor Dump (Offline Preprocessing)
This pipeline ingests an MP4 file, demultiplexes it to extract the video track, decodes the compressed stream (e.g., H.264/H.265) into raw frames, converts (or directly negotiates) the output to NV12 — a hardware-friendly YUV 4:2:0 semi-planar format — and then goes throughqtimlvconverter (ML preprocessing). The TensorFilter stream filter describes the tensor format and shape as UINT8 with dimensions [1, 520, 520, 3] (batch, height, width, channels). Finally, multifilesink writes the preprocessed tensors out as sequential .rgb files to ~/Downloads/qimsdk_samples/media/tensor_520_520_%d.rgb, rolling after every 10 files.

Try me
Try me
qimsdk_ref_tensor_dump.pyPre-built application on device: /usr/bin/qimsdk_ref_tensor_dump.pyDownload Required Files
location property to point to it.Copy Files to Device
Run the application
~/Downloads/qimsdk_samples/media/tensor_520_520_%d.rgb.Expected Output
.rgb tensor files are written to ~/Downloads/qimsdk_samples/media/, rolling after every 10 files, which you can inspect offline for use in other ML pipelines.To stop the application, press CTRL + C.Live Camera YOLOv8 Detection (Manual Chain)
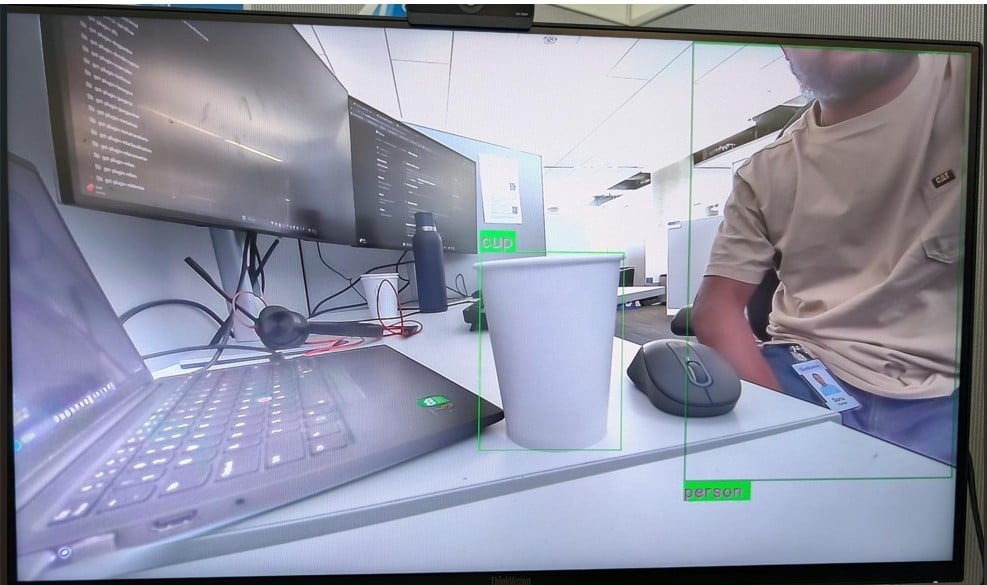
This pipeline captures live video from the on-device camera, then drives a full detection-and-visualization loop in real time: the raw NV12 stream is normalized and preprocessed into one or more tensors, fed to a TFLite inference stage (running on the external QNN delegate for efficient hardware execution), and the resulting tensors are postprocessed into semantic detections (classes, boxes, confidences). Those results are converted into QIM SDK-friendly metadata and attached back to the original video timeline, so the visual stream and its ML annotations stay synchronized. A parallel branch from the early tee ensures the original frames are available to a metadata muxer, which merges the detections with the video. Finally, the overlay stage renders the boxes/labels directly on the live frames, and the composed output is presented fullscreen to the display. In short, the graph turns a live camera feed into actionable on-screen insights by (1) creating a tensor view of the stream, (2) running detection, (3) translating inference outputs into QIM SDK metadata, (4) fusing metadata with the original frames, and (5) drawing the results on top of the video for low-latency, on-screen visualization.
Try me
Try me
- Explicit coding style
- YAML config style
qimsdk_ref_camera_yolov8.pyPre-built application on device: /usr/bin/qimsdk_ref_camera_yolov8.pyDownload Required Files
.zip archive, extract it on your host machine before copying: unzip filename.zipSome AI Hub models require running the AI Hub export/optimize step for your target runtime before the downloaded file is usable — download alone isn’t always sufficient.Copy Files to Device
Run the application
Expected Output
Live Camera YOLOv8 Detection (ML Bin)
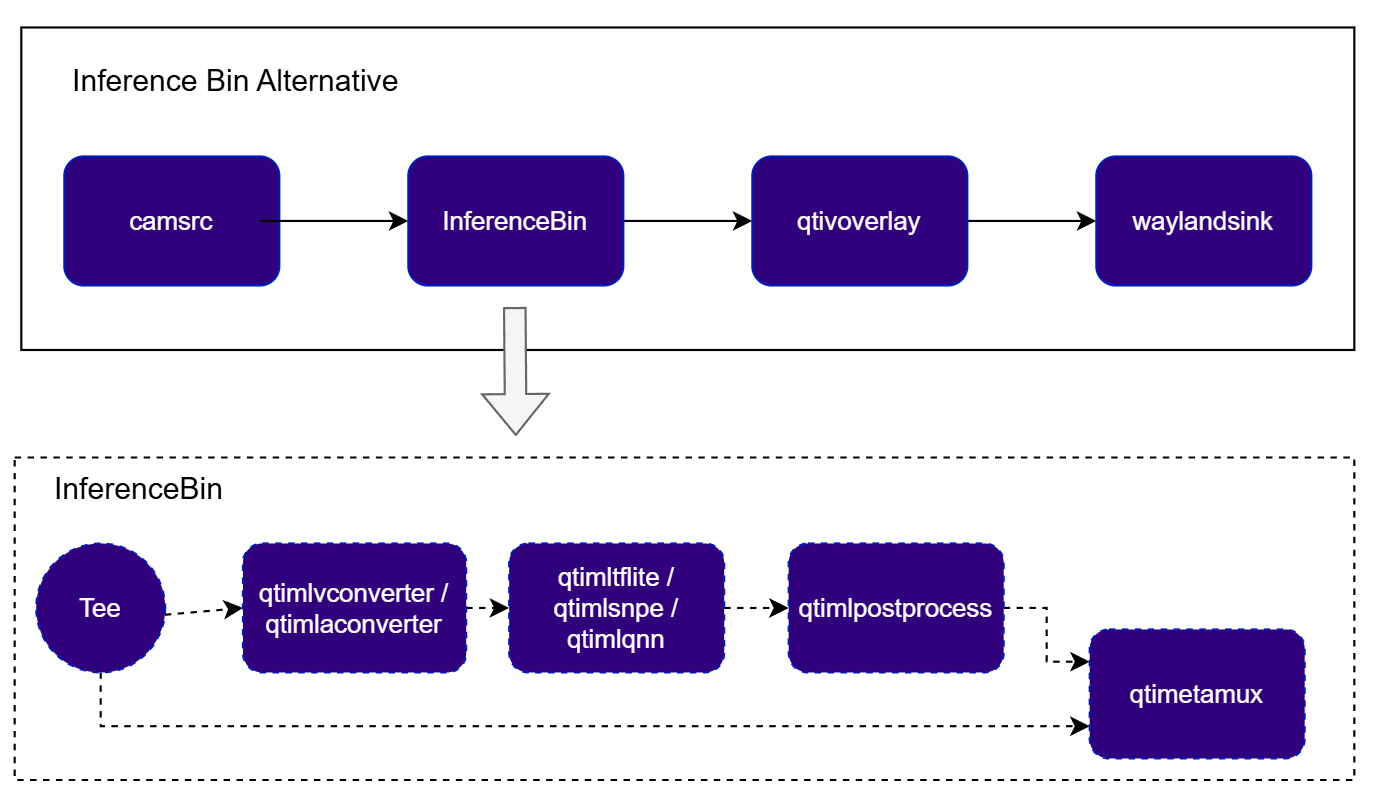
This solution is identical to the previous one. The only difference is that here we useqtimlvideotflitebin instead of manually linking the preprocessing, inference, postprocessing, and ML muxer components, which simplifies the pipeline.
Try me
Try me
- Explicit coding style
- YAML config style
qimsdk_ref_camera_yolov8_mlbin.pyPre-built application on device: /usr/bin/qimsdk_ref_camera_yolov8_mlbin.pyDownload Required Files
.zip archive, extract it on your host machine before copying: unzip filename.zipSome AI Hub models require running the AI Hub export/optimize step for your target runtime before the downloaded file is usable — download alone isn’t always sufficient.Copy Files to Device
Run the application
Expected Output
Offline Video YOLOv8 Detection (Manual Chain, Metamux Overlay)
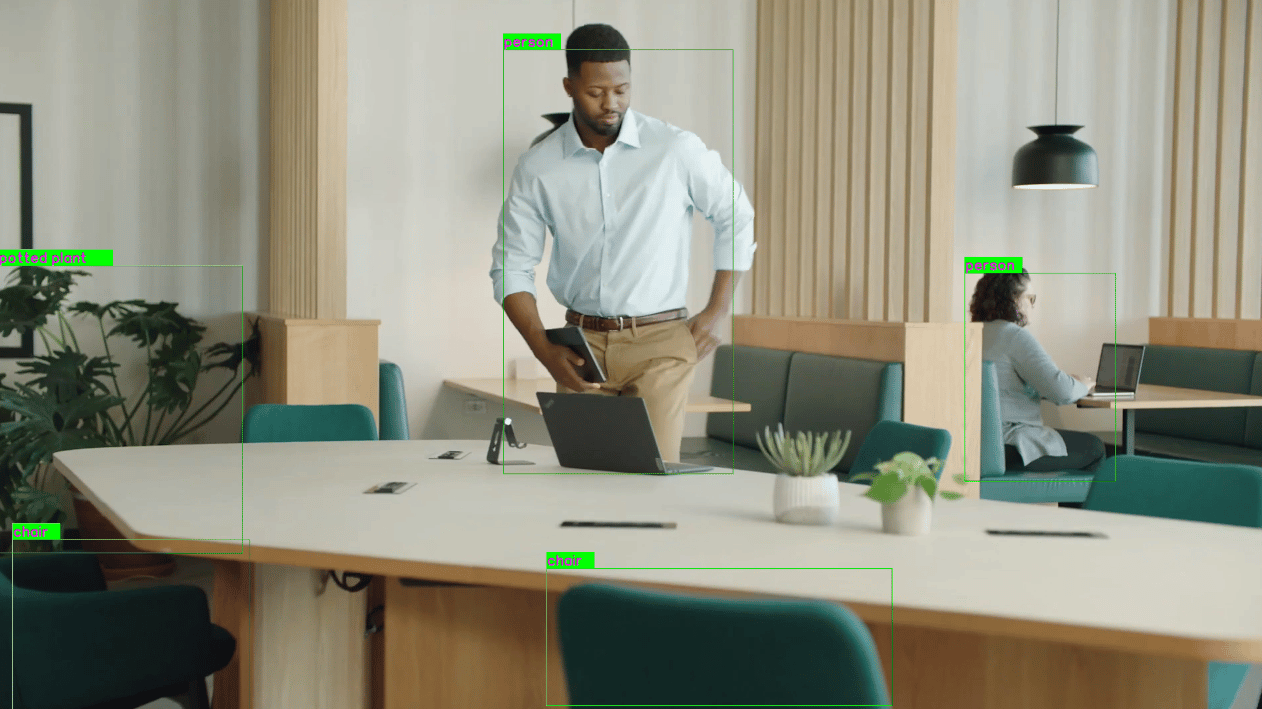
This pipeline is the offline-video counterpart to Live Camera YOLOv8 Detection (Manual Chain): instead of a live camera feed, an MP4 file is demuxed and decoded, then split by atee into a display branch and an ML branch. The ML branch runs preprocessing, inference, and postprocessing manually, and the resulting detections are attached back onto the original frame via qtimetamux before being overlaid and rendered. This Metamux-based approach is more flexible than the video composer approach (it allows chaining additional ML models or streaming metadata separately), whereas the composer overlay approach used in the next example offers better performance.

Try me
Try me
qimsdk_ref_yolov8_metamux_overlay.pyPre-built application on device: /usr/bin/qimsdk_ref_yolov8_metamux_overlay.pyDownload Required Files
.zip archive, extract it on your host machine before copying: unzip filename.zipSome AI Hub models require running the AI Hub export/optimize step for your target runtime before the downloaded file is usable — download alone isn’t always sufficient.Copy Files to Device
Run the application
qtimetamux, and overlays the results, rendering them fullscreen.Expected Output
Customize application
Offline Video YOLOv8 Detection (ML Bin, Composer Overlay)
The AI output can be overlaid directly on top of the frame instead of attaching AI metadata to the main frame. This approach provides better performance, whereas the Metamux solution is more flexible and can be used for chaining AI models or streaming AI metadata separately.
Try me
Try me
qimsdk_ref_yolov8_composer_overlay.pyPre-built application on device: /usr/bin/qimsdk_ref_yolov8_composer_overlay.pyDownload Required Files
.zip archive, extract it on your host machine before copying: unzip filename.zipSome AI Hub models require running the AI Hub export/optimize step for your target runtime before the downloaded file is usable — download alone isn’t always sufficient.Copy Files to Device
Run the application
Expected Output
Customize application
Gesture Recognition
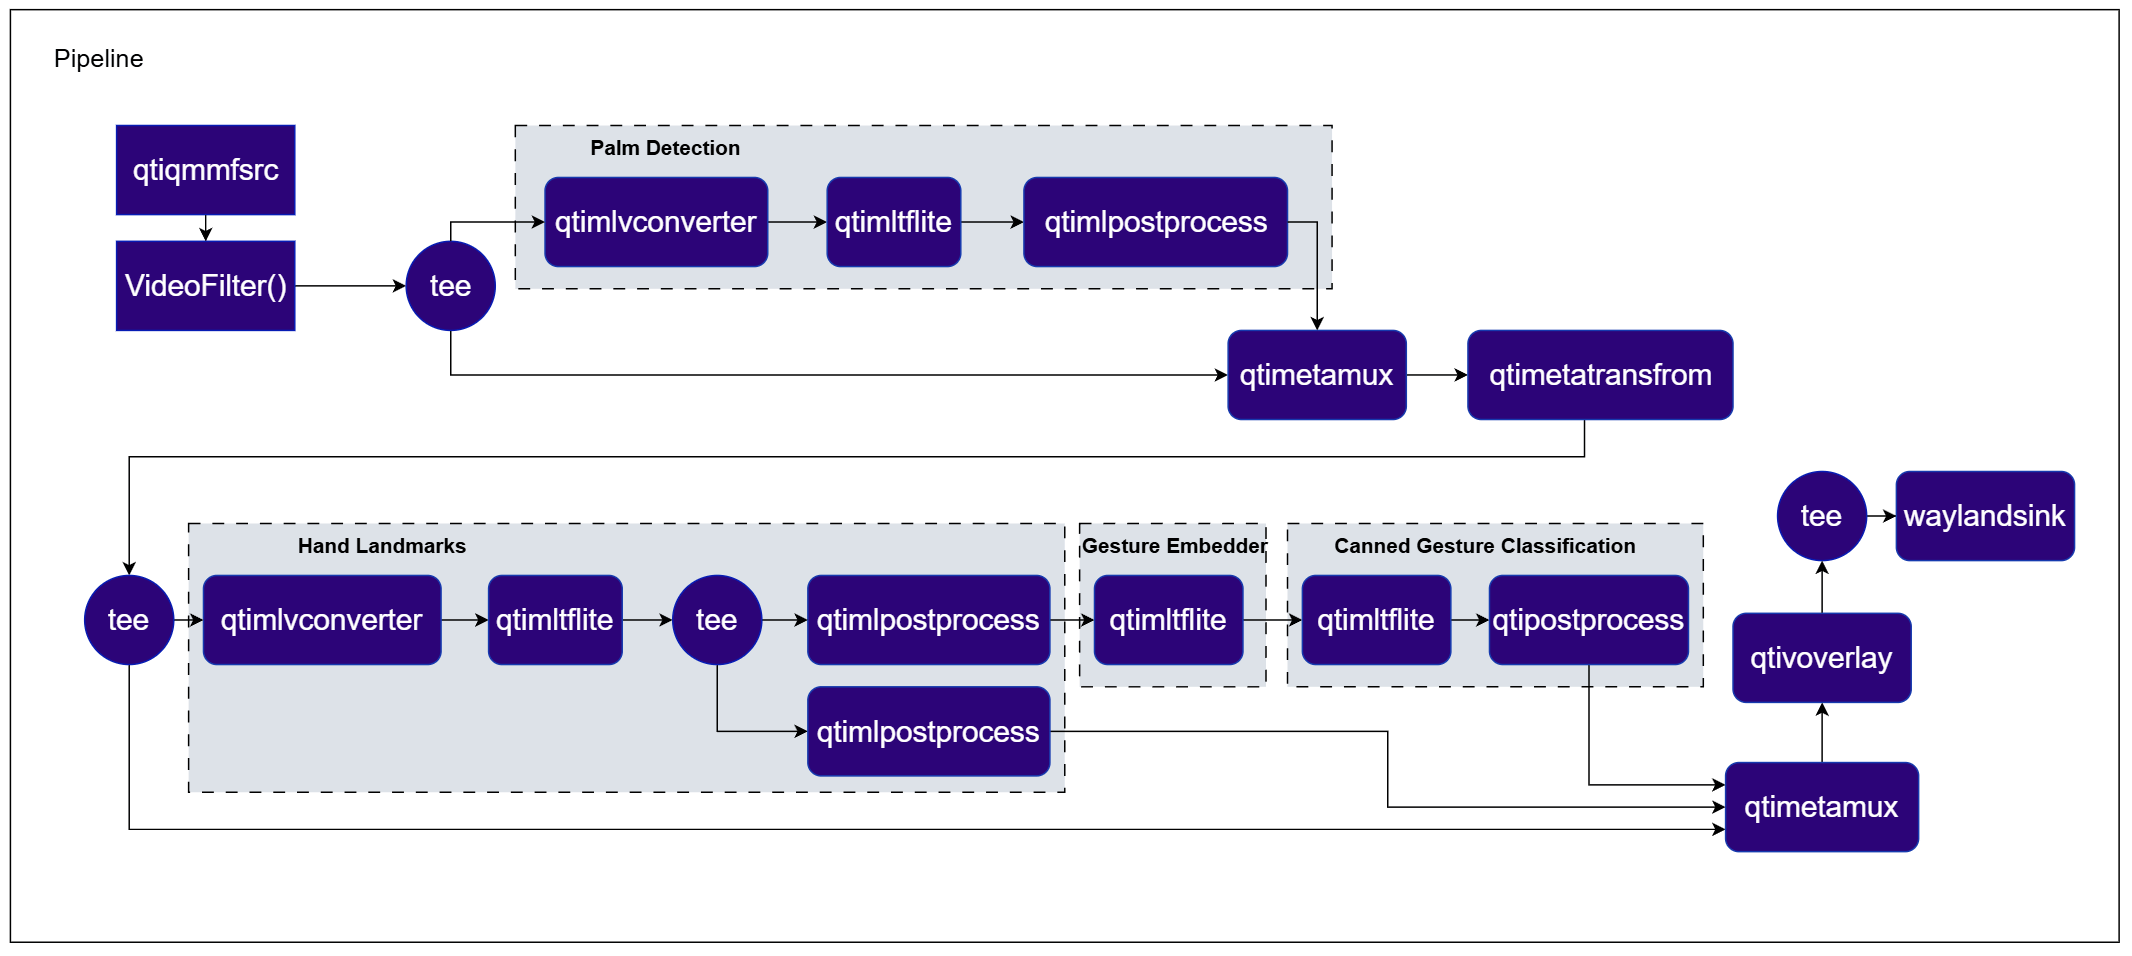
This pipeline demonstrates a daisy-chained, multi-model gesture recognition graph built entirely from standard SDK elements (qtimlvconverter, qtimltflite, qtimlpostprocess, qtimetamux, qtimetatransform) rather than a custom postprocessing callback. Palm detection locates the hand region in the live camera frame; that region is transformed and fed into hand landmark detection; the resulting landmarks are passed through a gesture embedder followed by a canned gesture classifier to decode the recognized gesture. Two parallel qtimetamux merge points combine metadata from each stage back onto the original frame before the final overlay is rendered to the display.
Try me
Try me
- Explicit coding style
- YAML config style
qimsdk_ref_gesture_recognition.pyPre-built application on device: /usr/bin/qimsdk_ref_gesture_recognition.pyDownload Required Files
Download the gesture recognizer task bundle from Google MediaPipe to obtain the palm detection, hand landmark, gesture embedder, and canned gesture classifier models:.zip archive, extract it on your host machine before copying: unzip filename.zipCopy Files to Device
Run the application
Expected Output
PPE & Person/Foot Detection (ML Bin)
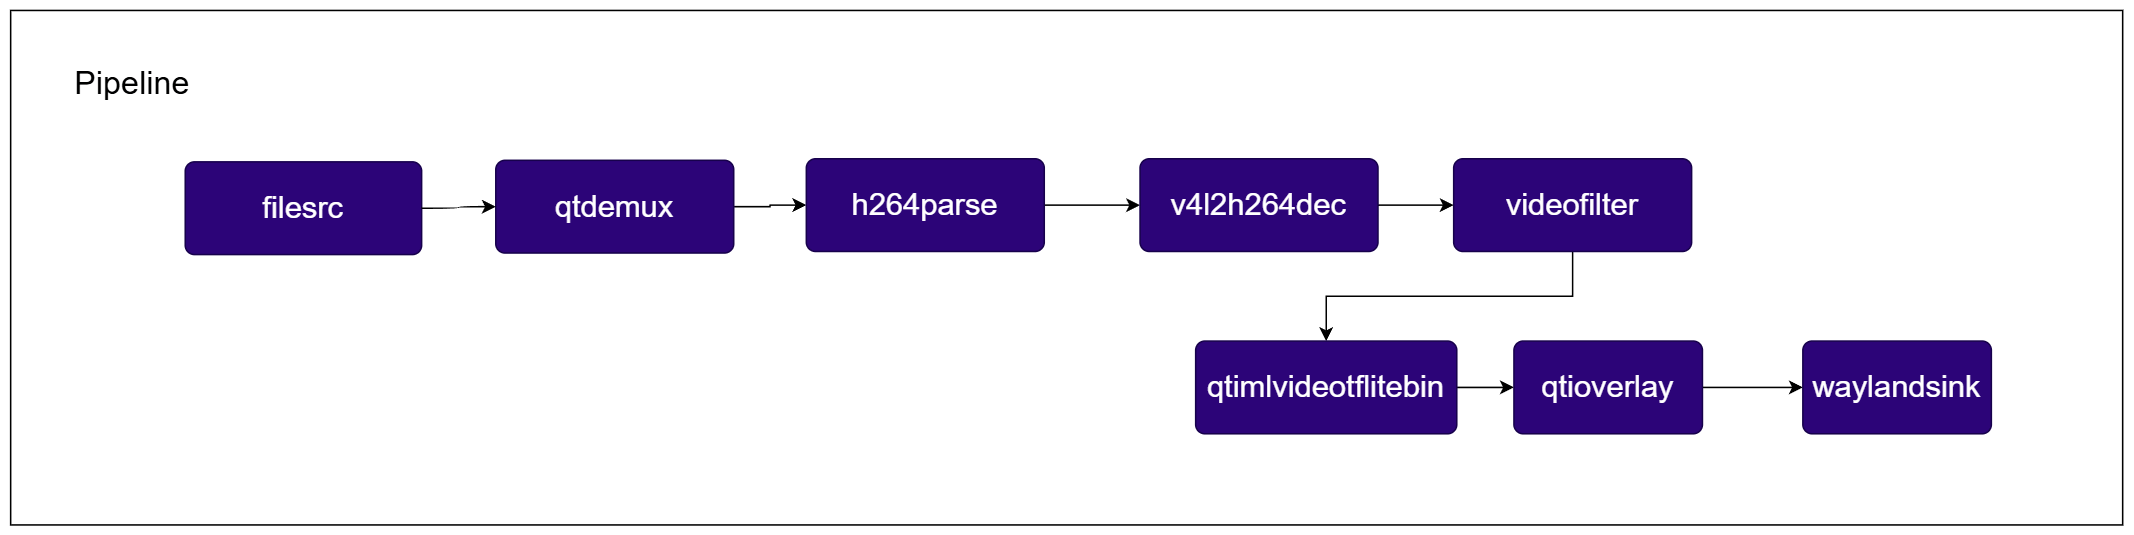
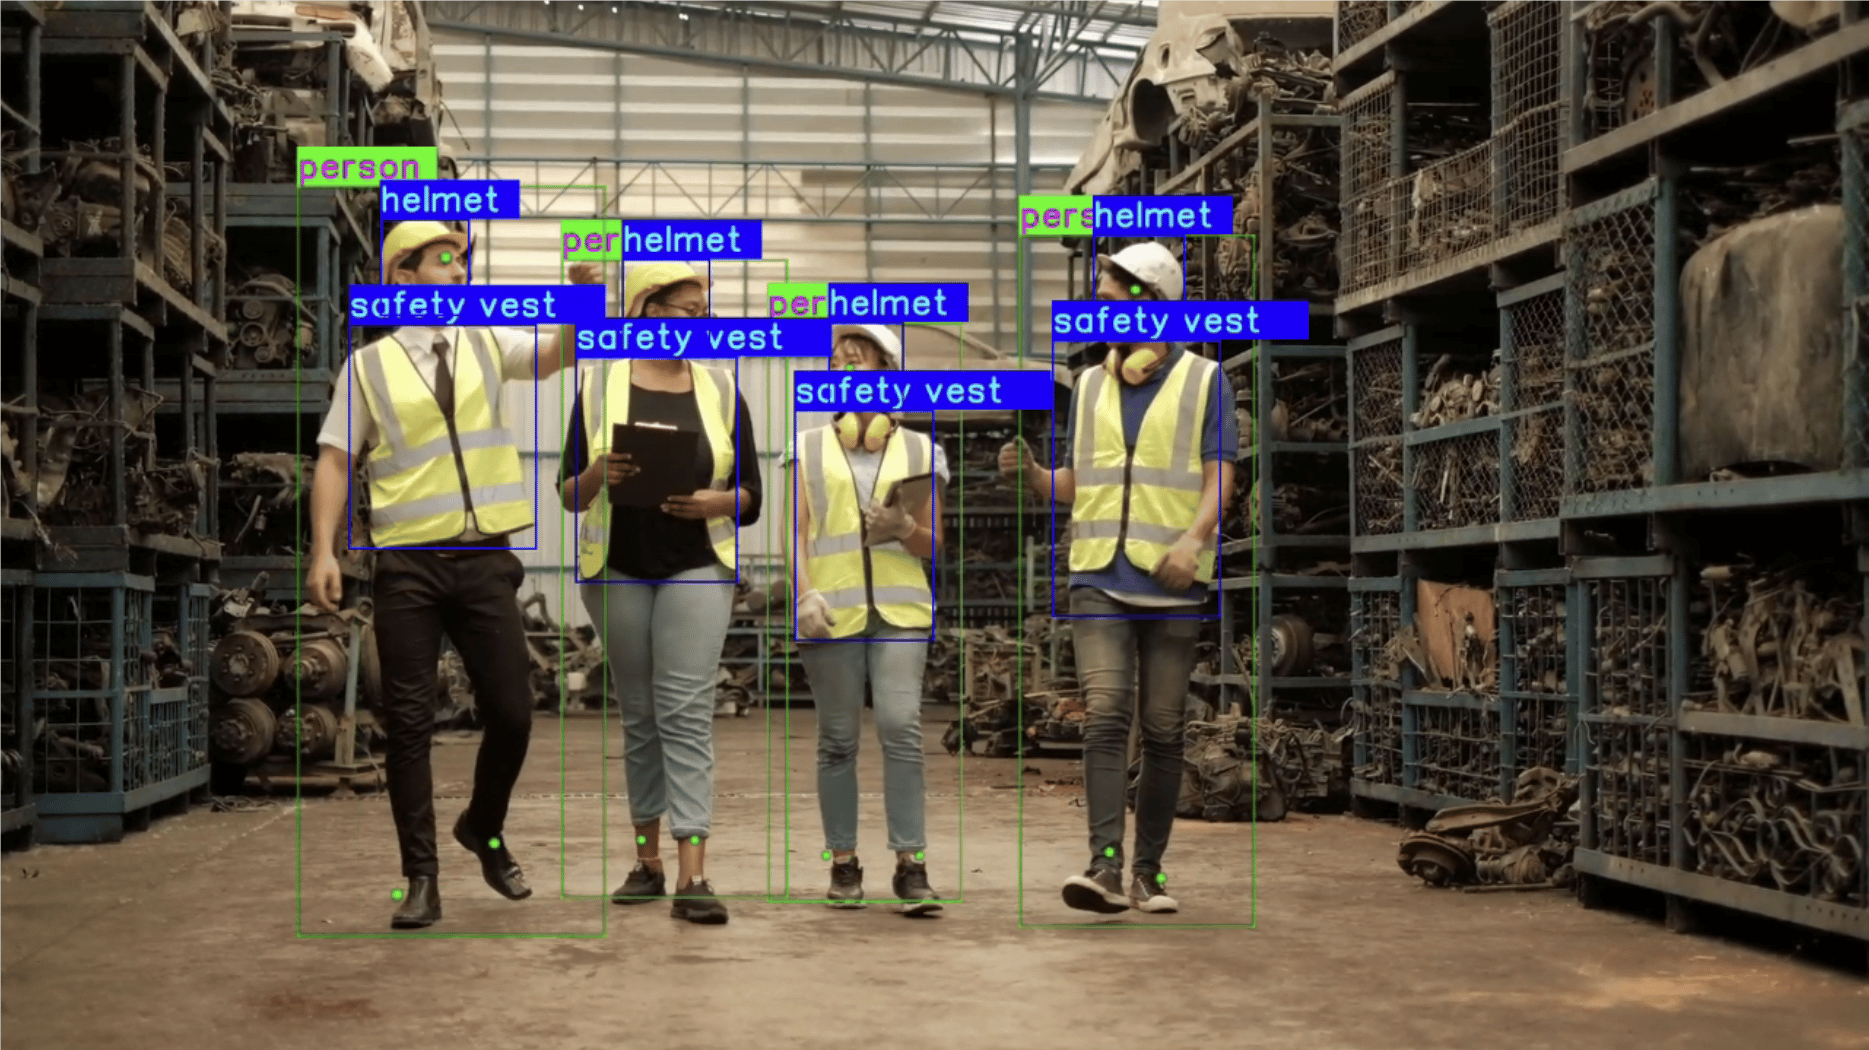
This pipeline demonstrates a two-model ML bin pipeline for personal protective equipment (PPE) and person/foot detection:foot_track_net detects persons and their feet in the frame, while gear_guard_net detects PPE gear. Both models run through qtimlvideotflitebin, which internally handles preprocessing, inference, and postprocessing, simplifying the pipeline compared to manually chaining each stage.
Try me
Try me
- Explicit coding style
- YAML config style
qimsdk_ref_mlbin_ppe.pyPre-built application on device: /usr/bin/qimsdk_ref_mlbin_ppe.pyDownload Required Files
.zip archive, extract it on your host machine before copying: unzip filename.zipSome AI Hub models require running the AI Hub export/optimize step for your target runtime before the downloaded file is usable — download alone isn’t always sufficient.Copy Files to Device
Run the application
foot_track_net and PPE gear with gear_guard_net, overlaying the resulting detections on the video and rendering it fullscreen.Expected Output
YOLOv8 Detection (ML Bin)
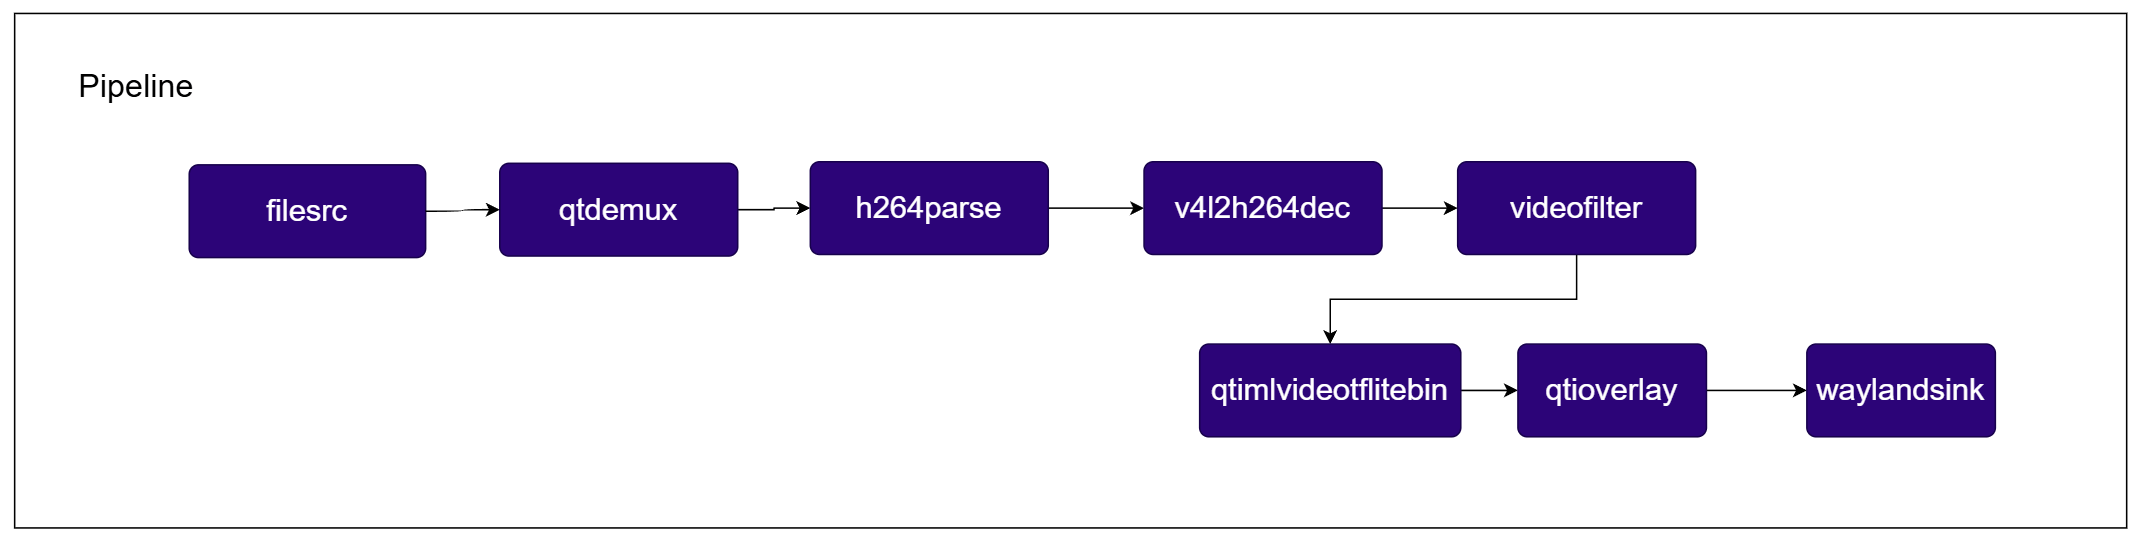
This pipeline reads an MP4/H.264 file, decodes it through the hardware decoder, and runs YOLOv8 object detection usingqtimlvideotflitebin, which internally handles preprocessing, inference, and postprocessing. The detected objects are then overlaid on the video and displayed.
Try me
Try me
- Explicit coding style
- YAML config style
qimsdk_ref_mlbin_yolov8.pyPre-built application on device: /usr/bin/qimsdk_ref_mlbin_yolov8.pyDownload Required Files
.zip archive, extract it on your host machine before copying: unzip filename.zipSome AI Hub models require running the AI Hub export/optimize step for your target runtime before the downloaded file is usable — download alone isn’t always sufficient.Copy Files to Device
Run the application
qtimlvideotflitebin, and overlays the detected objects on the video, rendering it fullscreen.Expected Output
Customize application
AppSink and AppSrc
Try me
Try me
qimsdk_ref_appsrc_and_appsink.pyPre-built application on device: /usr/bin/qimsdk_ref_appsrc_and_appsink.pyRun the application
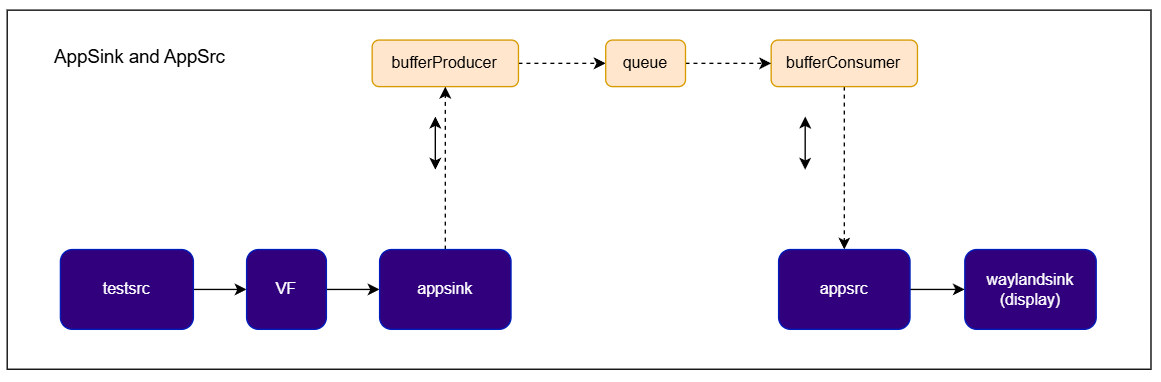
AppSink/AppSrc bridge, and renders the resulting stream fullscreen on the display.Expected Output
AppSink/AppSrc bridge are rendered fullscreen on the display, confirming the buffers passed through application code unmodified.To stop the application, press CTRL + C.Custom Pre and Post Processing
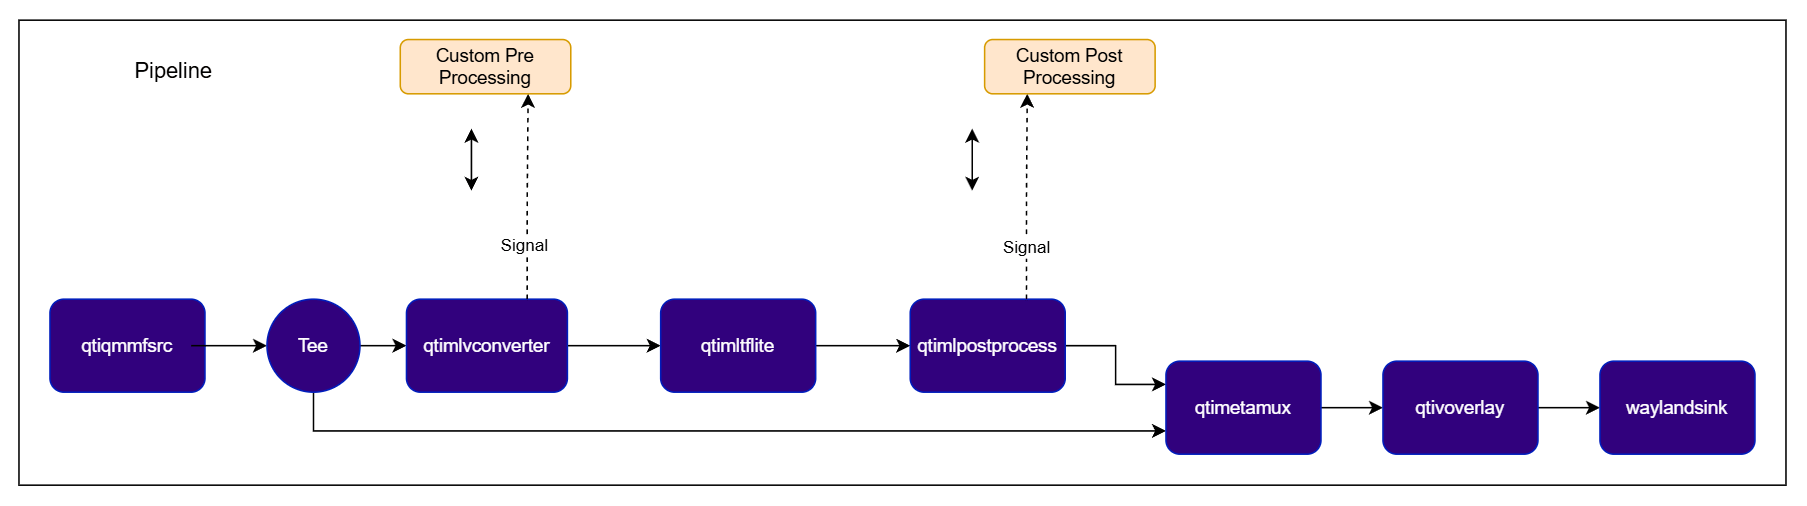
Custom Preprocessing for YOLOv8 (Detection)
QIM SDK plugin support different backend: GLES, OpenCV, etc. This level of interface could be exposed to application. This API takes all input and output at once in case of batching or daisy for example. It can be simplified by calling application implementation for every input. Advantage of this approach is that all complexity of batching, depth, daisy chain support remains hidden in the plugin and application will do only pre-processing on a single frame/tensor at once.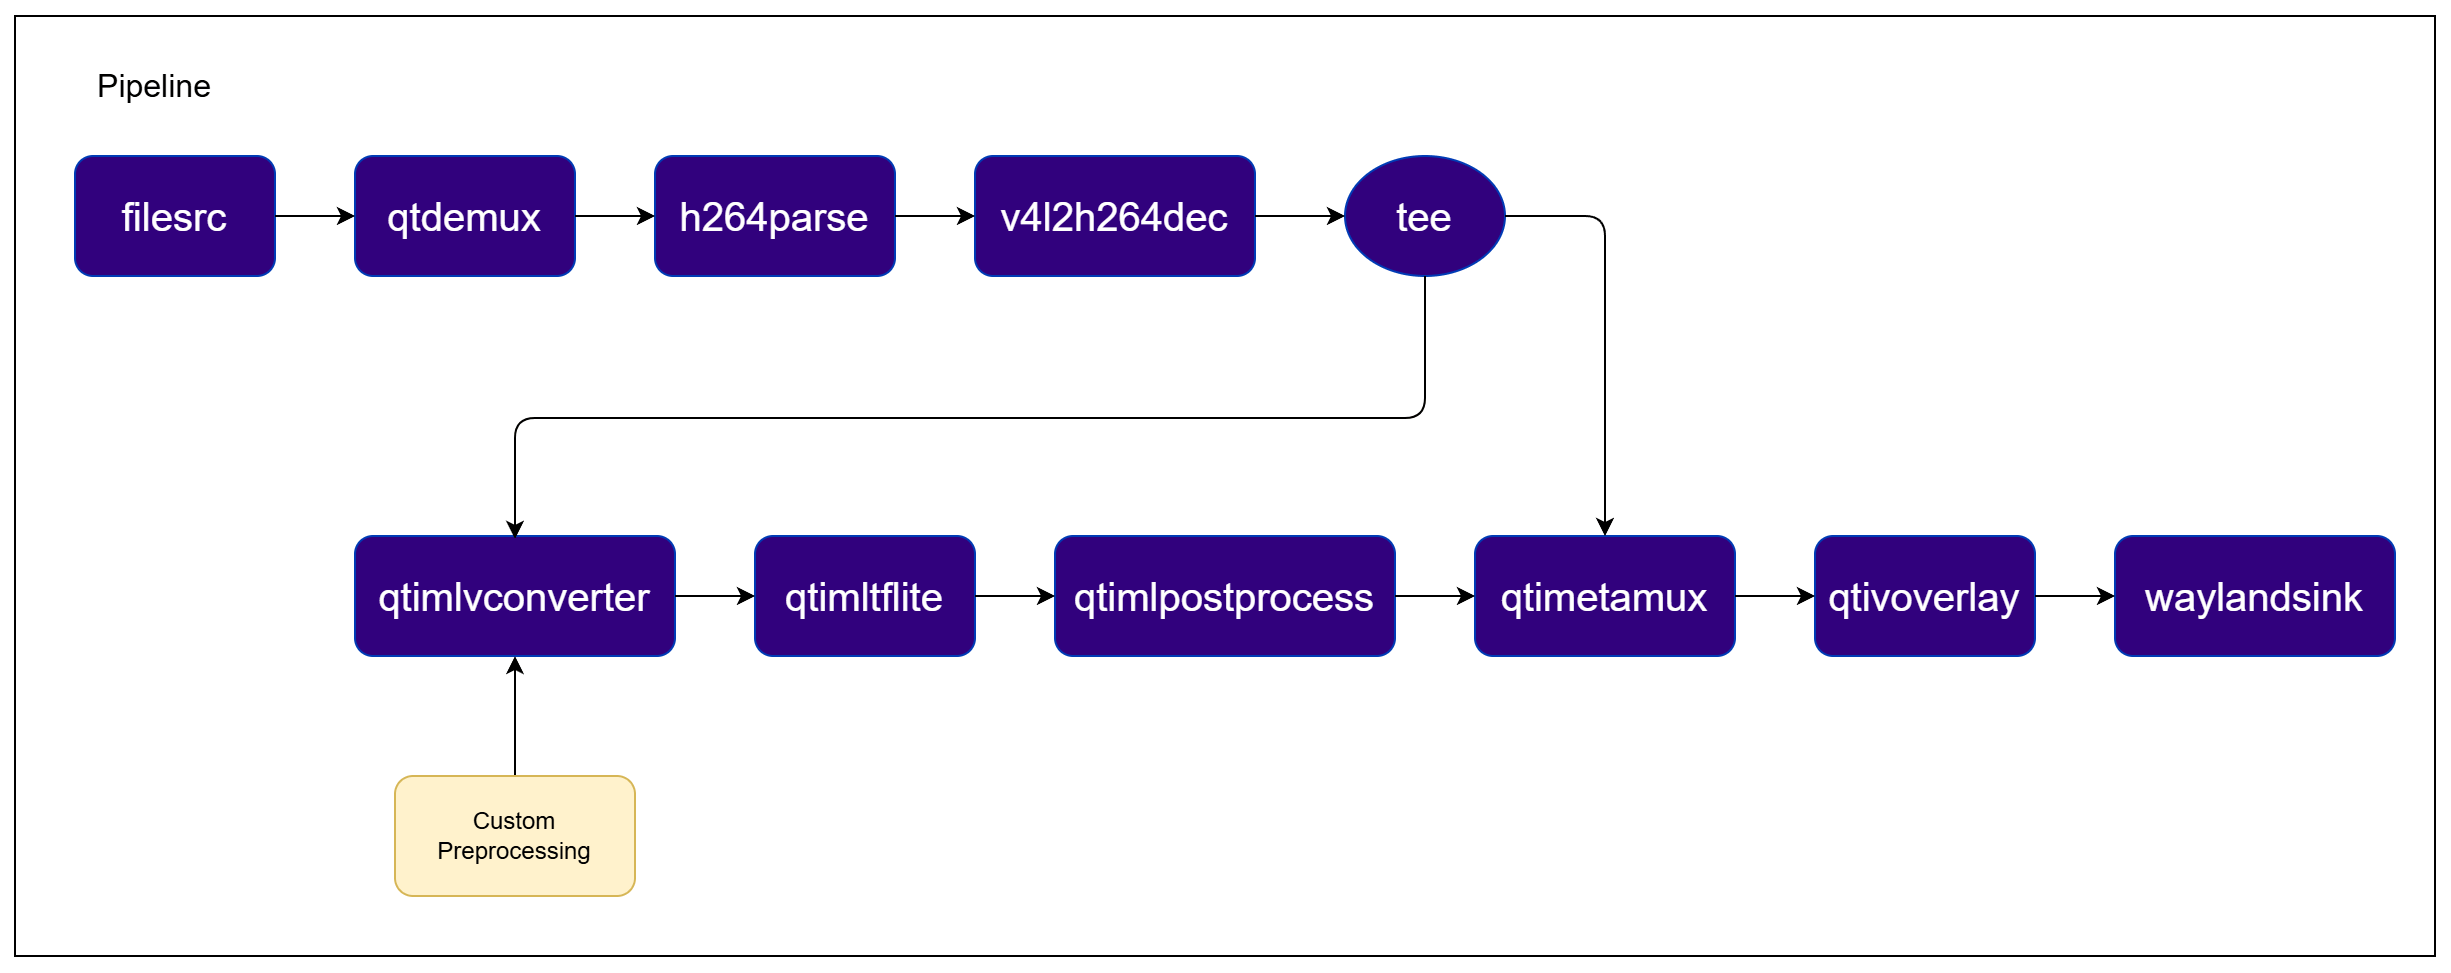
Try me
Try me
qimsdk_ref_external_preprocess_detection_yolov8.pyPre-built application on device: /usr/bin/qimsdk_ref_external_preprocess_detection_yolov8.pyDownload Required Files
.zip archive, extract it on your host machine before copying: unzip filename.zipSome AI Hub models require running the AI Hub export/optimize step for your target runtime before the downloaded file is usable — download alone isn’t always sufficient.Copy Files to Device
Run the application
Expected Output
Customize application
Custom Preprocessing for YOLOv8 (ML Bin variant)
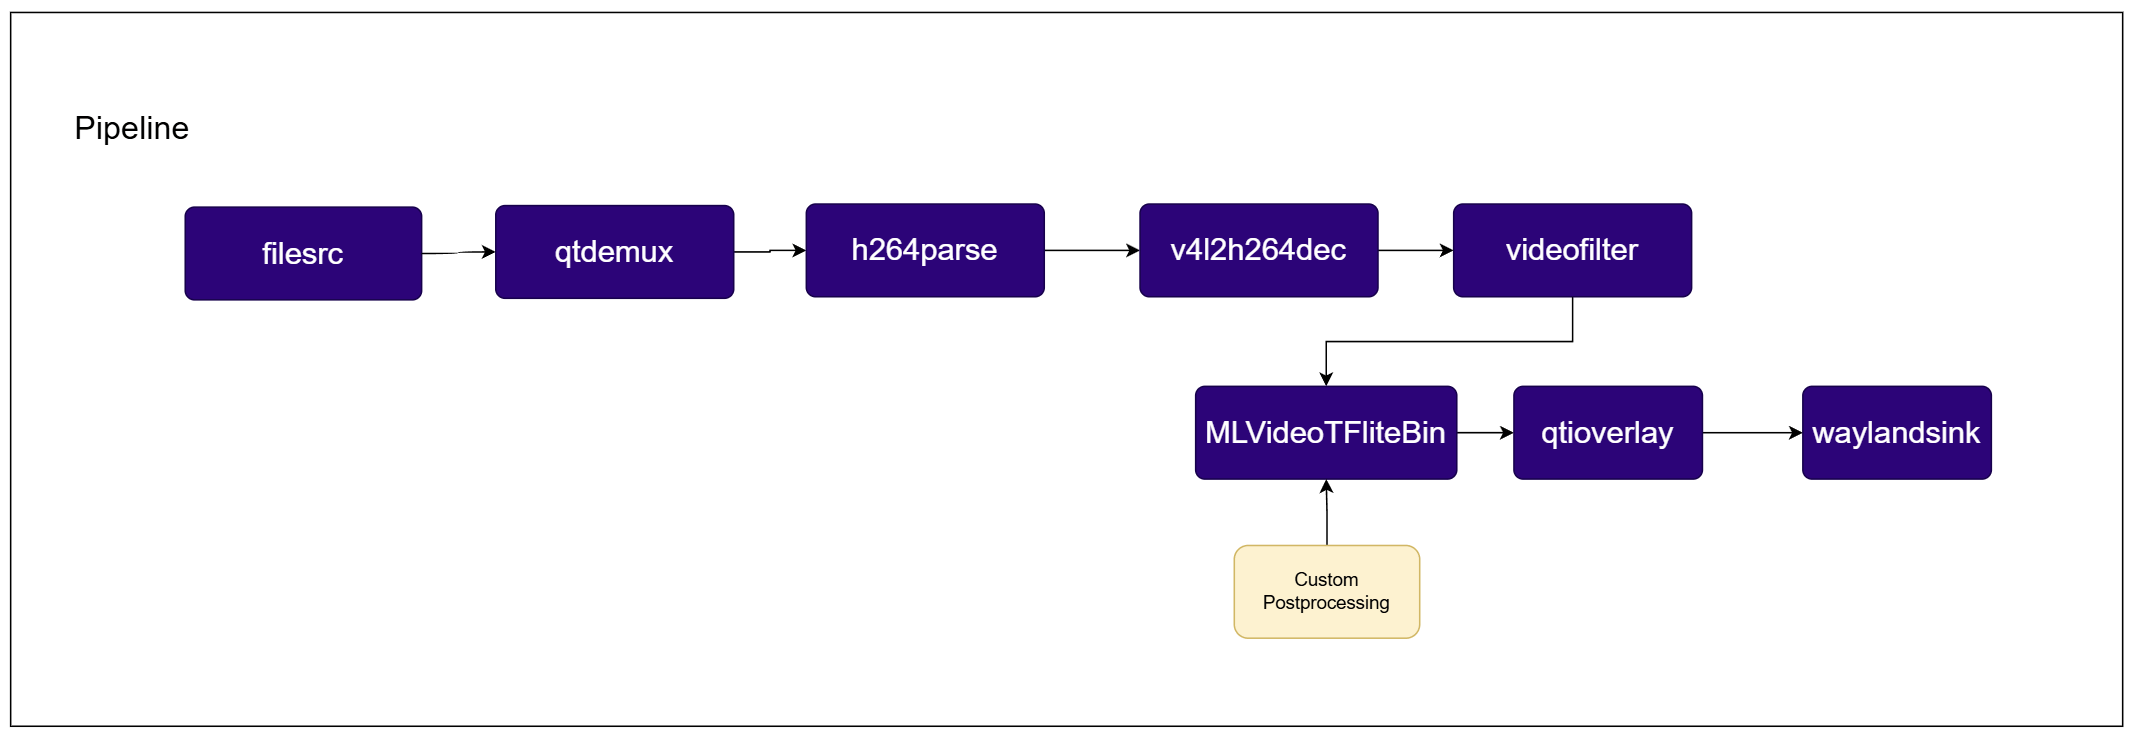
This example demonstrates external preprocessing support insideMLVideoTFLiteBin. Registering a callback via MLVideoTFLiteBin.set_preprocess_handler(...) disables the bin’s internal preprocessing path (the SDK sets preprocess-engine=none on the bin’s internal mlpreprocess element automatically) and hands frame-to-tensor conversion off to an application-defined Python callback. The callback receives the decoded NV12 blit(s) as NumPy-backed buffers and writes directly into the bin’s output tensor (a writable, in-place NumPy view), converting each pixel to the quantized int8 NHWC layout expected by the YOLOv8 model, with letterbox padding for any area the blit doesn’t cover. Inference and postprocessing then run inside the same bin, and the detected objects are overlaid on the video and displayed.
Try me
Try me
qimsdk_ref_external_preprocess_detection_mlbin_yolov8.pyPre-built application on device: /usr/bin/qimsdk_ref_external_preprocess_detection_mlbin_yolov8.pyDownload Required Files
.zip archive, extract it on your host machine before copying: unzip filename.zipSome AI Hub models require running the AI Hub export/optimize step for your target runtime before the downloaded file is usable — download alone isn’t always sufficient.Copy Files to Device
Run the application
mlbin to convert NV12 frames into the quantized int8 tensor expected by YOLOv8, then runs inference and postprocessing, overlaying the detected objects and rendering the result fullscreen.Expected Output
Customize application
Custom Preprocessing with Lightweight Face Detection
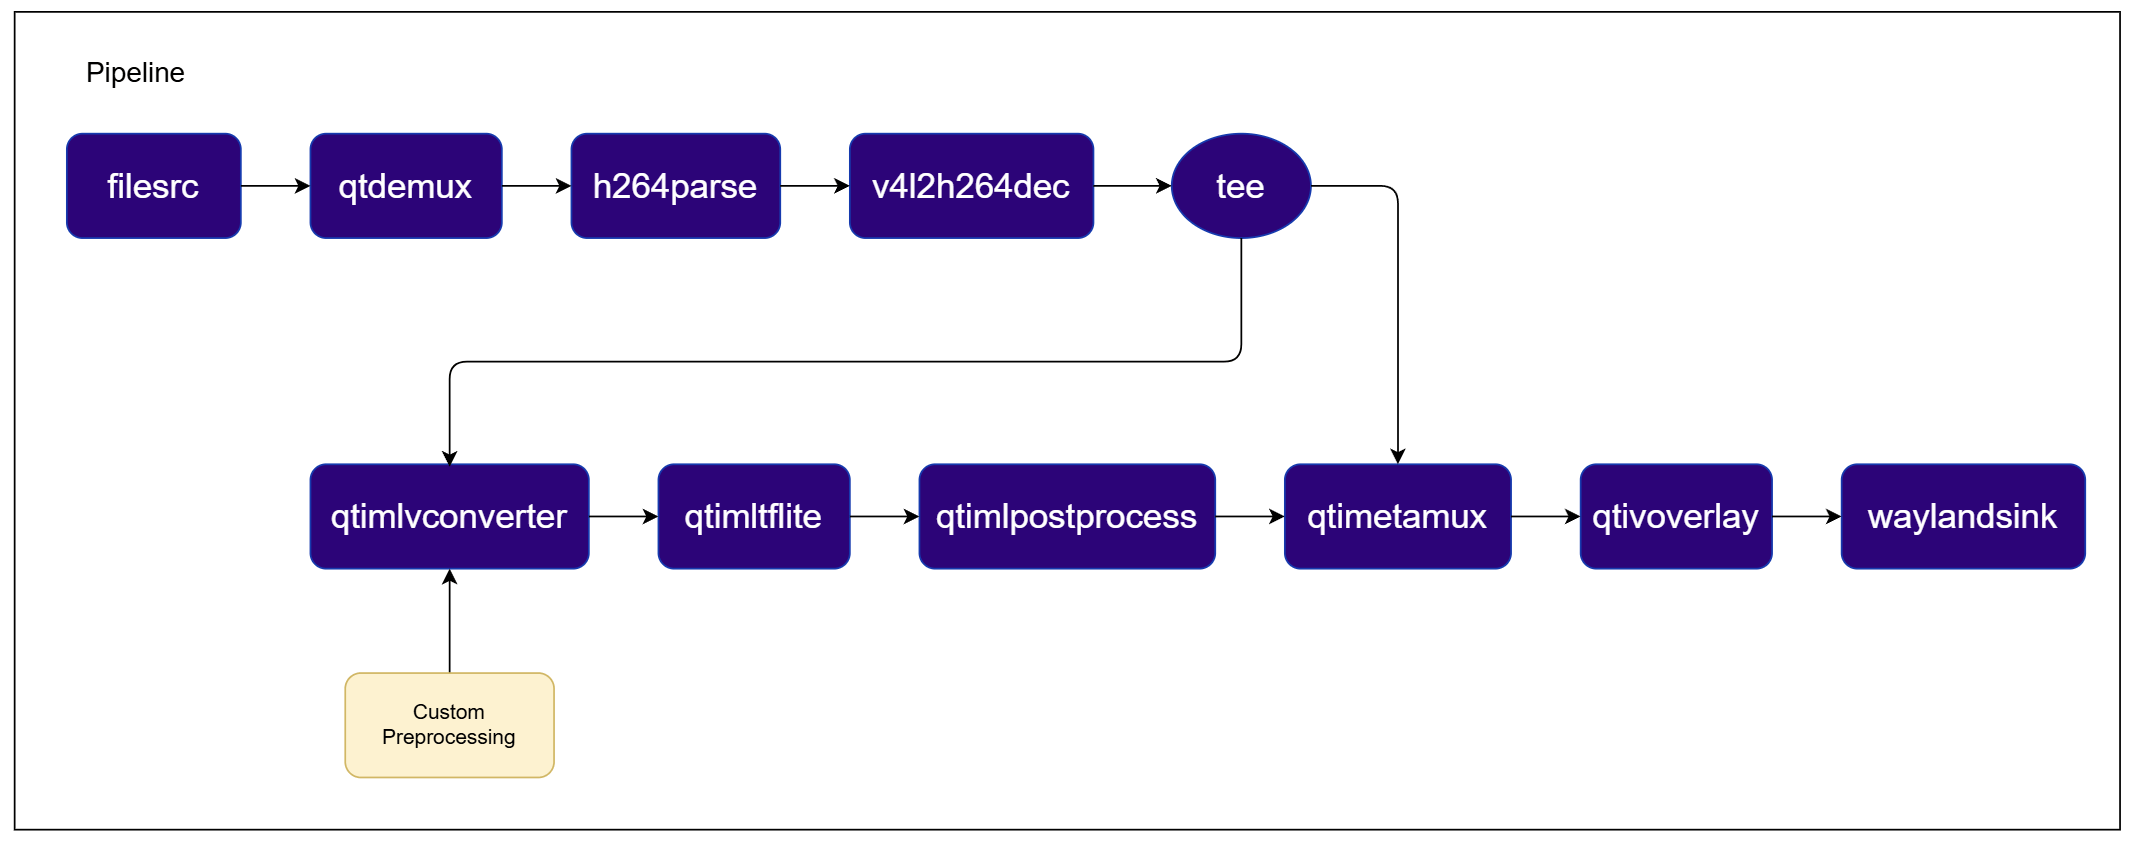
This example demonstrates external preprocessing withMLVConverter (rather than MLVideoTFLiteBin), so the pipeline links preprocessing, inference, and postprocessing manually through explicit queues, and merges the detections back onto the original frame via qtimetamux before overlaying. Setting engine to "none" on the MLVConverter element disables its internal preprocessing path and hands frame-to-tensor conversion off to an application-defined callback registered via MLVConverter.set_handler(...). Unlike the YOLOv8 example, the face_det_lite_w8a8.tflite model consumes raw uint8 grayscale, so the callback resizes only the NV12 luma (Y) plane into a single-channel [1, H, W, 1] NumPy tensor, skipping color conversion and normalization entirely and leaving the chroma plane unread. A tee right after decoding splits the stream into a display branch and an ML branch, and a queue on each branch (including the display one) keeps the two branches from stalling each other on a shared thread.
Try me
Try me
qimsdk_ref_external_preprocess_lightweight_face_detect.pyPre-built application on device: /usr/bin/qimsdk_ref_external_preprocess_lightweight_face_detect.pyDownload Required Files
.zip archive, extract it on your host machine before copying: unzip filename.zipSome AI Hub models require running the AI Hub export/optimize step for your target runtime before the downloaded file is usable — download alone isn’t always sufficient.Copy Files to Device
Run the application
qtimetamux, overlaying them, and rendering the result fullscreen.Expected Output
Custom Preprocessing with Palm Detection
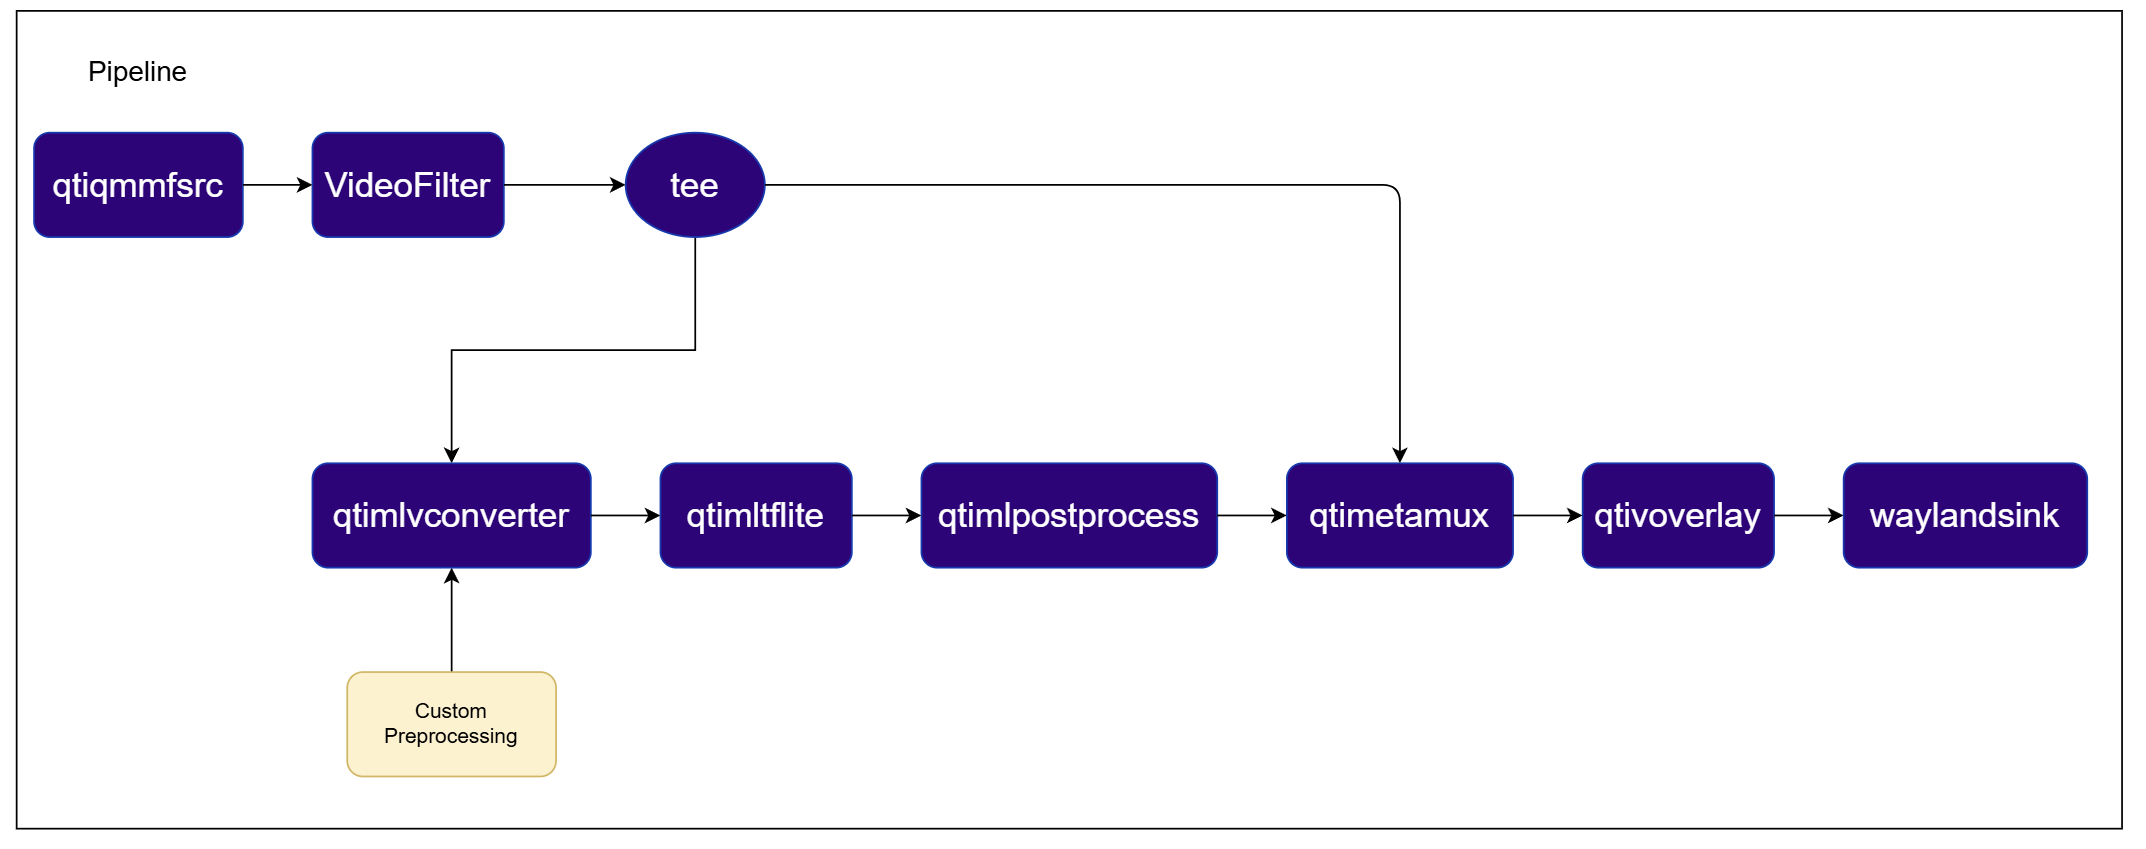
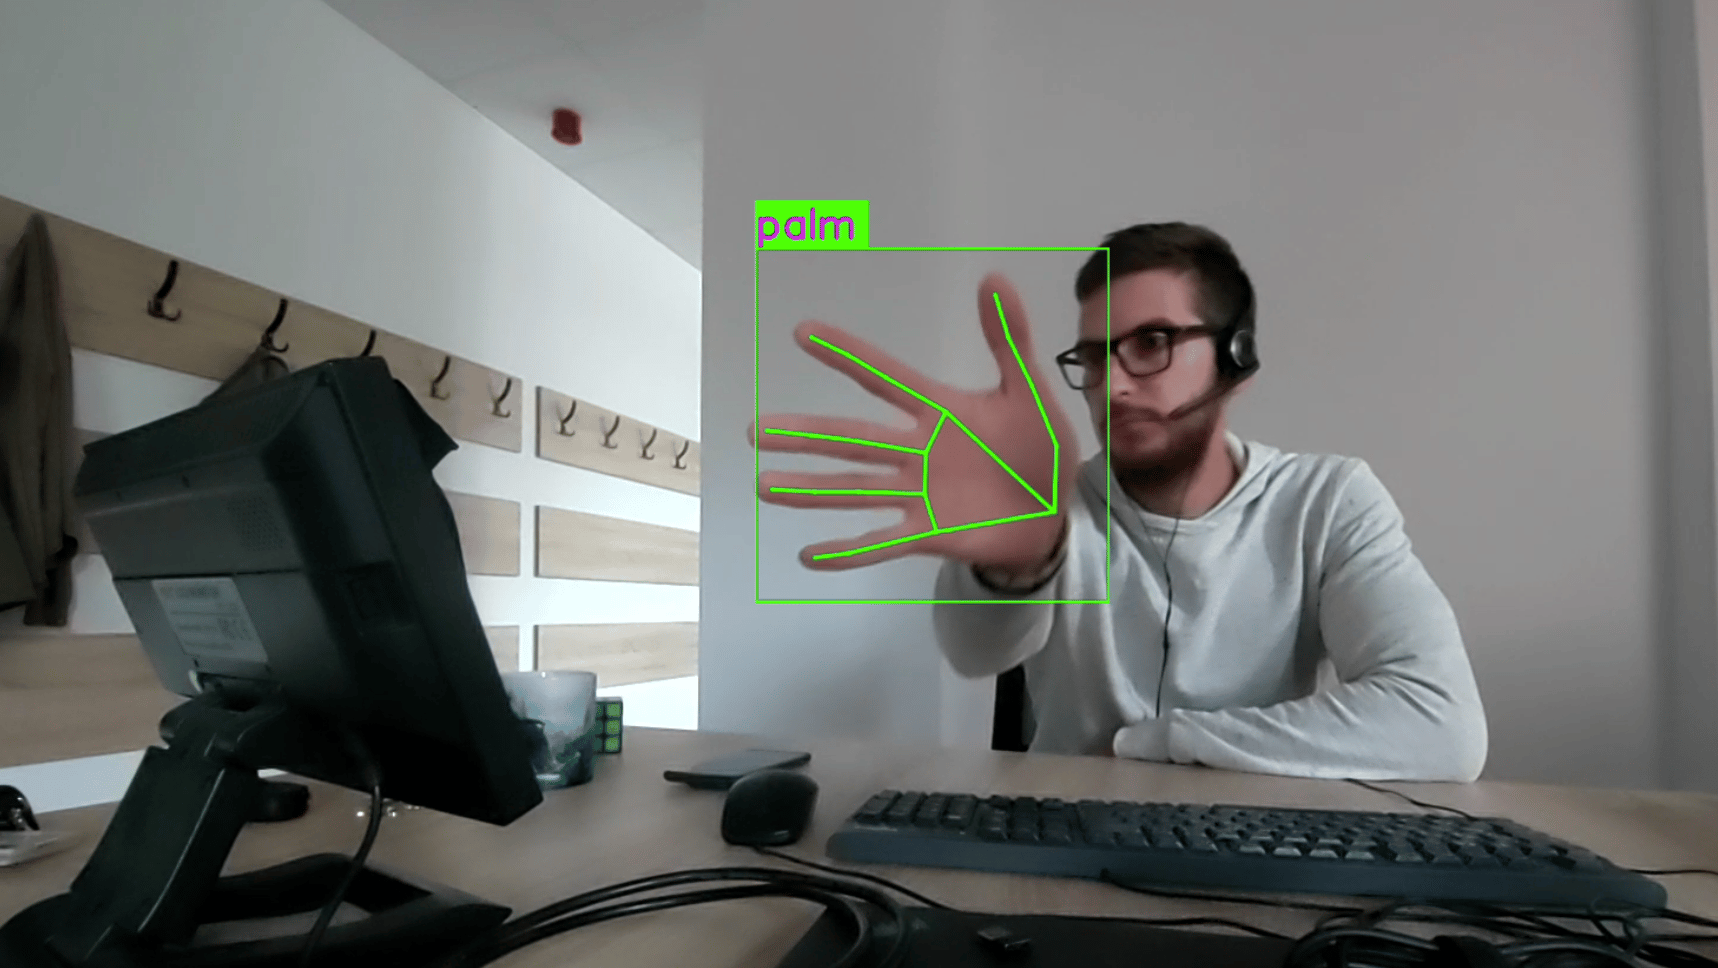
This example is the live-camera counterpart to the lightweight face detection pipeline:CamSrc captures frames directly instead of decoding a file, but the branching structure is otherwise identical — a tee right after the stream filter splits the pipeline into a display branch and an ML branch, each guarded by its own queue, and qtimetamux merges the ML branch’s detections back onto the original frame before overlay. Setting engine to "none" on the MLVConverter element disables its internal preprocessing path and hands frame-to-tensor conversion off to an application-defined callback registered via MLVConverter.set_handler(...). Unlike the grayscale face-detection example, palm_detection_full.tflite expects a [1, H, W, 3] float32 RGB tensor normalized to [0, 1], so the callback converts the full NV12 image (both luma and chroma planes) to RGB using NumPy and scales each channel into that range, with letterbox padding for any area the blit doesn’t cover.
Try me
Try me
qimsdk_ref_external_preprocess_palm_detect.pyPre-built application on device: /usr/bin/qimsdk_ref_external_preprocess_palm_detect.pyDownload Required Files
Download the gesture recognizer task bundle from Google MediaPipe to obtain the palm detection model:.zip archive, extract it on your host machine before copying: unzip filename.zipCopy Files to Device
Run the application
qtimetamux, overlaying them, and rendering the result fullscreen.Expected Output
Custom Postprocessing with YOLOv5 (Detection)
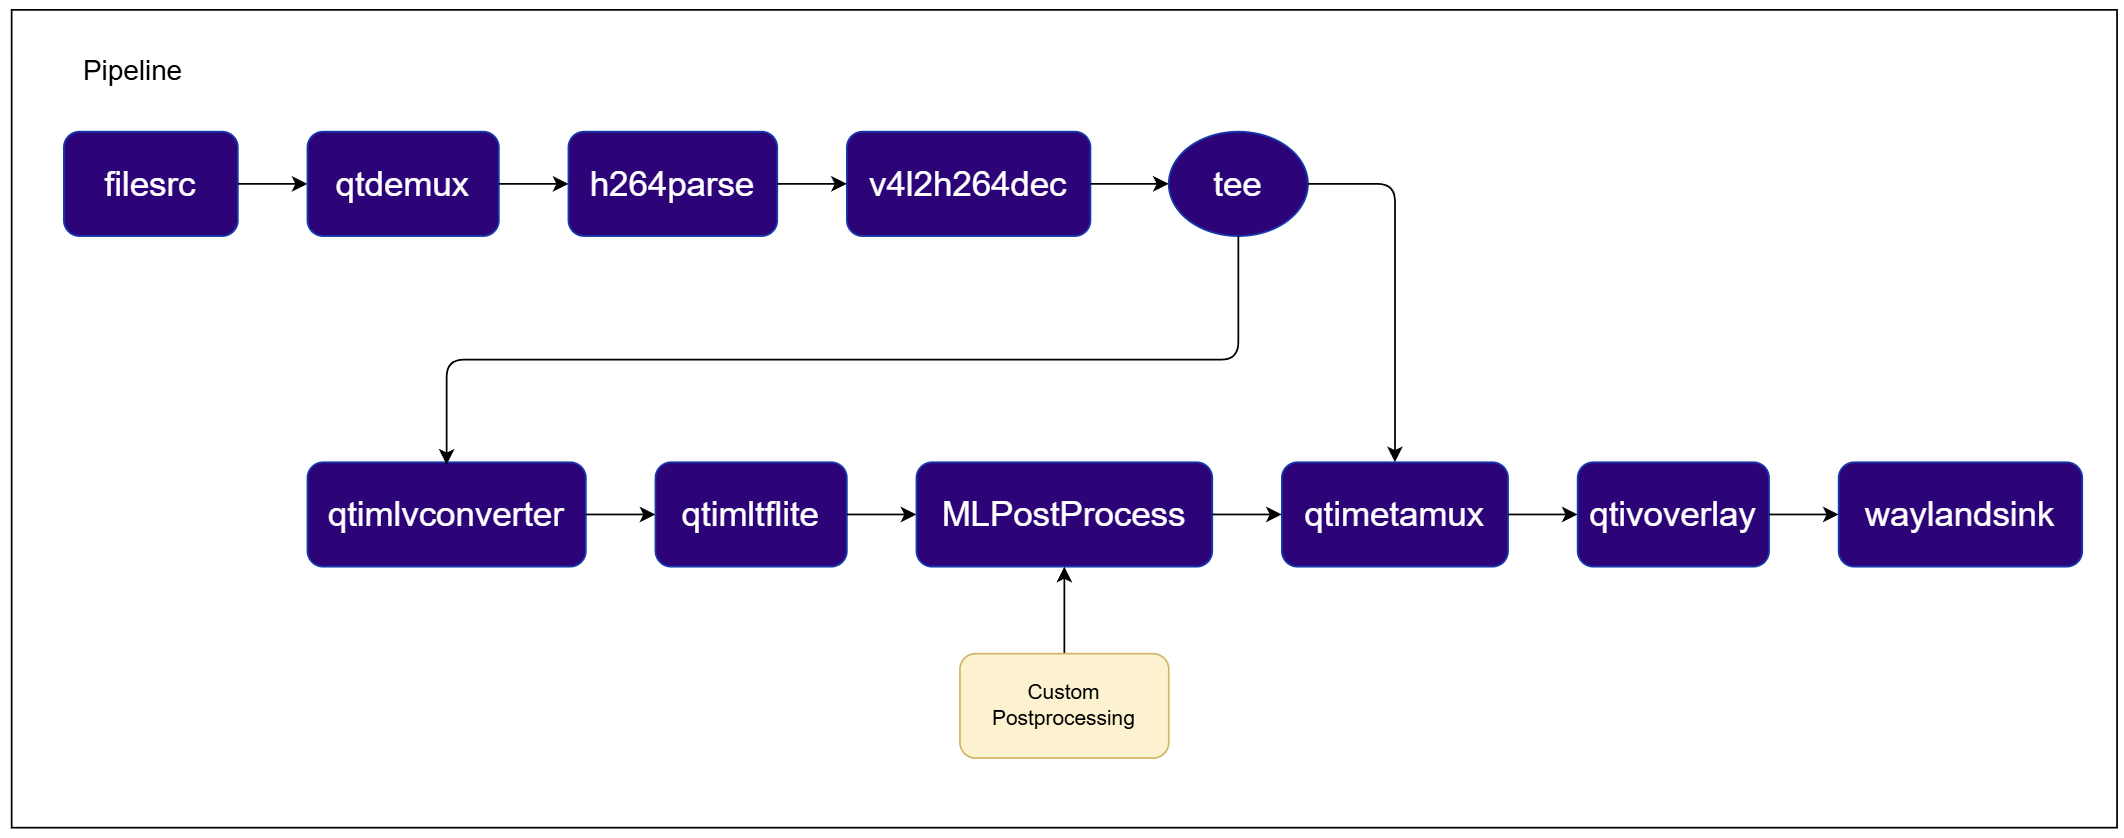
This example demonstrates the object detection postprocessing callback (ObjectDetectionPostprocessCallback) using a YOLOv5 model. Preprocessing and inference are handled by the SDK, and the raw output tensors are decoded into bounding boxes, class names, and confidence scores by an application-defined callback, which are then overlaid on the video and displayed.
Try me
Try me
qimsdk_ref_external_postprocess_detection_yolov5.pyPre-built application on device: /usr/bin/qimsdk_ref_external_postprocess_detection_yolov5.pyDownload Required Files
.zip archive, extract it on your host machine before copying: unzip filename.zipSome AI Hub models require running the AI Hub export/optimize step for your target runtime before the downloaded file is usable — download alone isn’t always sufficient.Copy Files to Device
Run the application
Expected Output
Customize application
Custom Post processing with ML Bin
Try me
Try me
qimsdk_ref_external_postprocess_mlbin_yolov8.pyPre-built application on device: /usr/bin/qimsdk_ref_external_postprocess_mlbin_yolov8.pyDownload Required Files
.zip archive, extract it on your host machine before copying: unzip filename.zipSome AI Hub models require running the AI Hub export/optimize step for your target runtime before the downloaded file is usable — download alone isn’t always sufficient.Copy Files to Device
Run the application
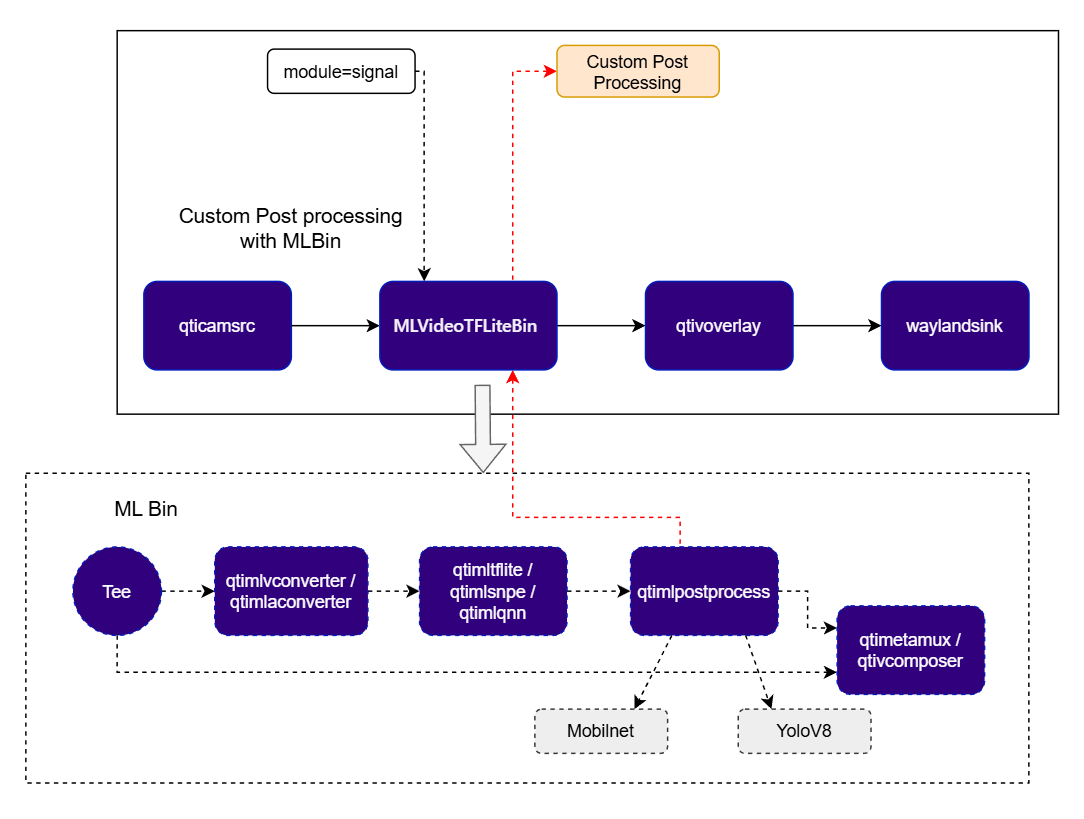
mlbin, overlaying the resulting detections on the video and rendering it fullscreen.Expected Output
Customize application
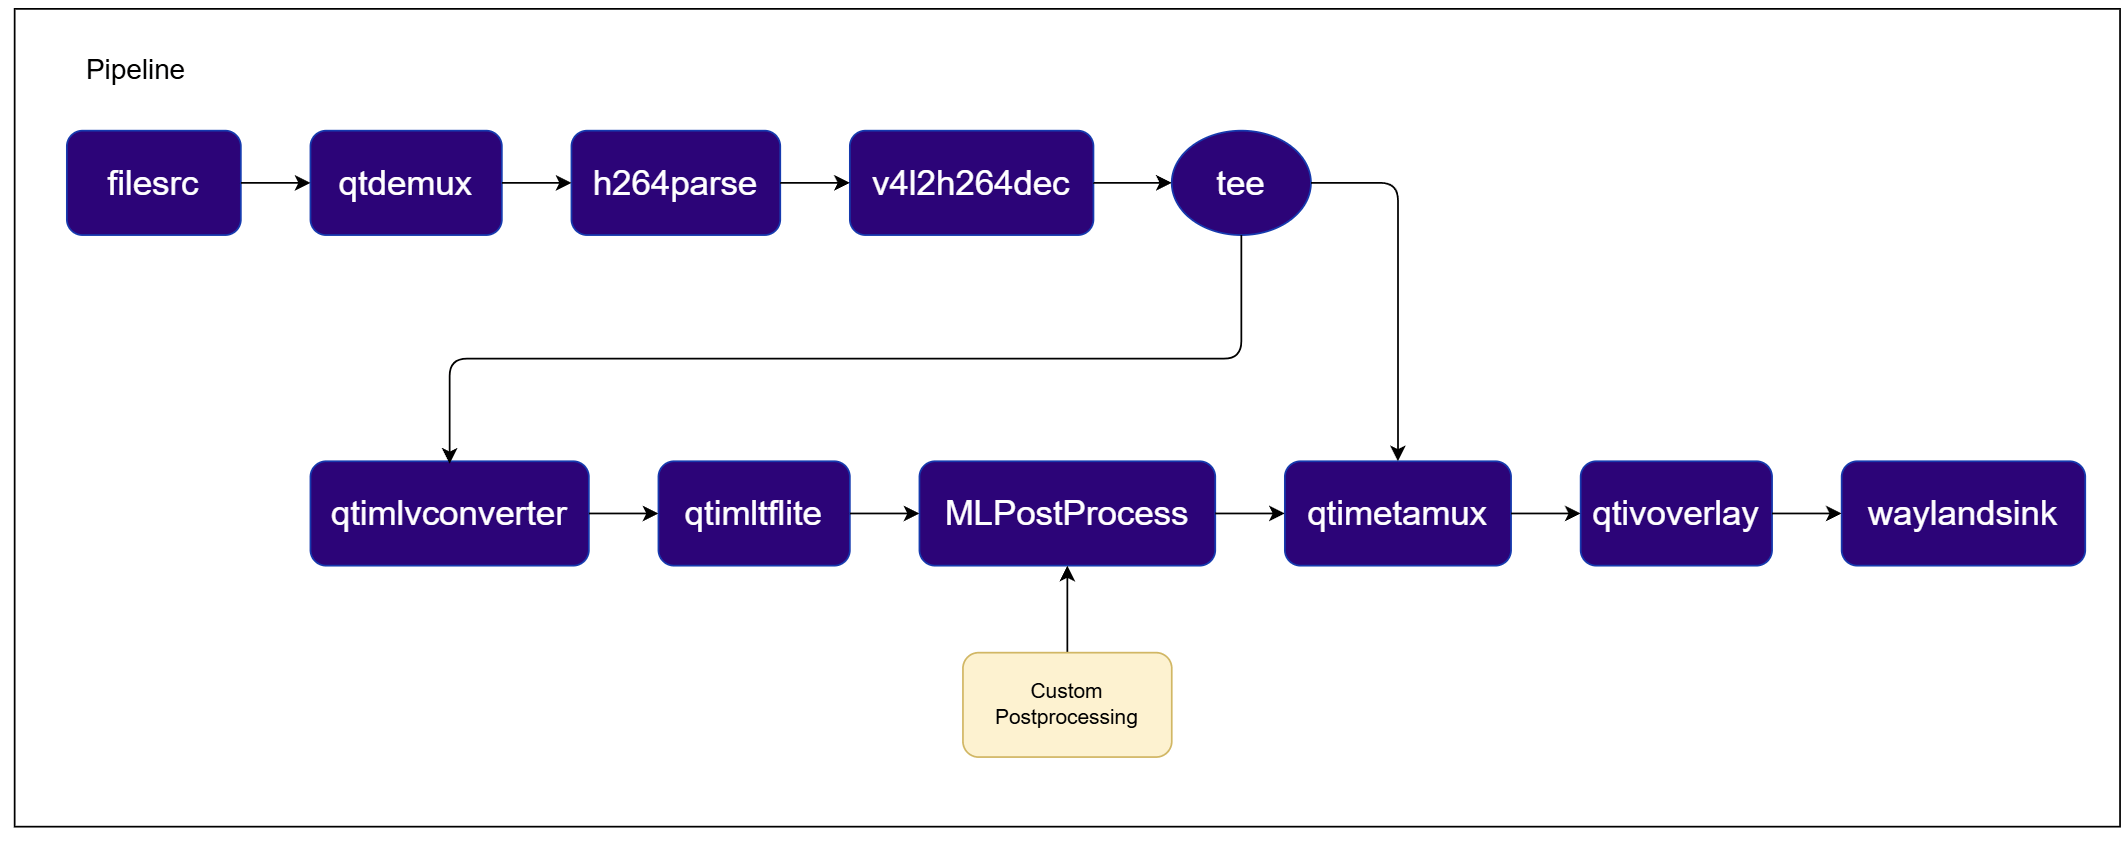
Custom Postprocessing with ResNet101 (Classification)
This example demonstrates the classification postprocessing callback (ClassificationPostprocessCallback). Preprocessing and inference are handled by the SDK, and the raw output tensors from a ResNet101 model are decoded into labeled classification results (name and confidence) by an application-defined callback.
Try me
Try me
qimsdk_ref_external_postprocess_classification_resnet101.pyPre-built application on device: /usr/bin/qimsdk_ref_external_postprocess_classification_resnet101.pyDownload Required Files
.zip archive, extract it on your host machine before copying: unzip filename.zipSome AI Hub models require running the AI Hub export/optimize step for your target runtime before the downloaded file is usable — download alone isn’t always sufficient.Copy Files to Device
Run the application
Expected Output
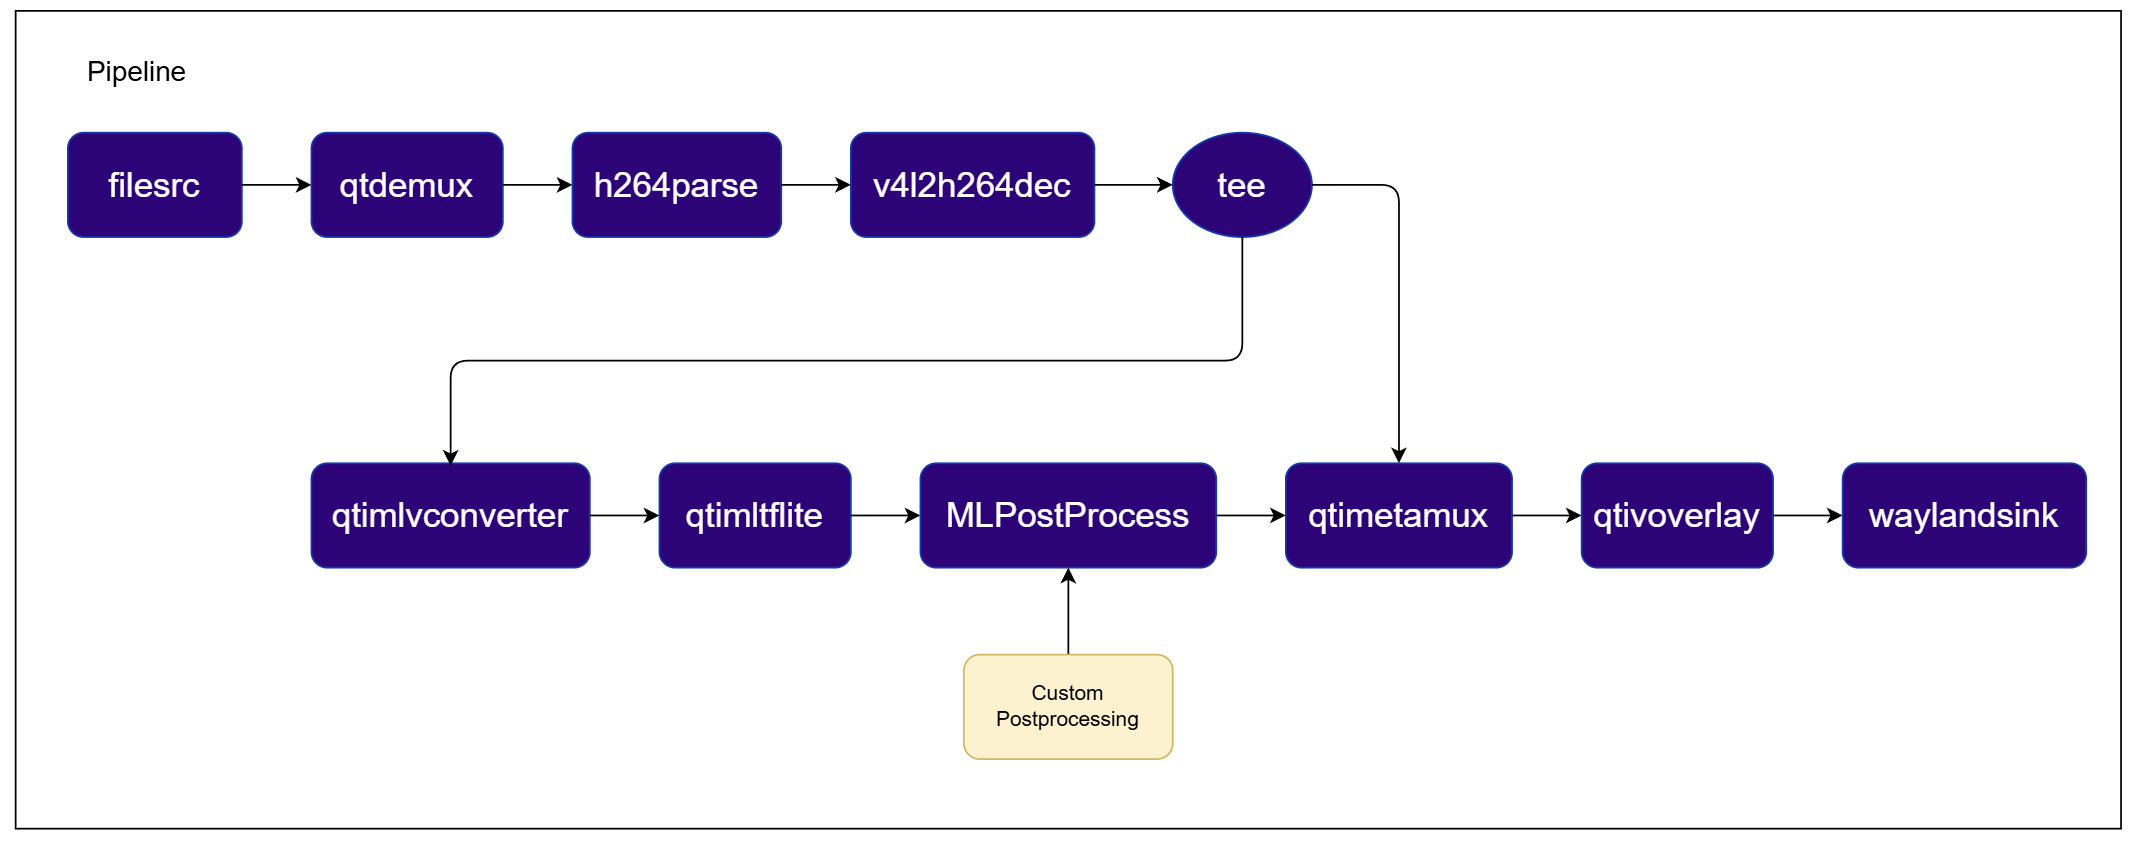
Custom Postprocessing with MiDaS v2 (Depth Estimation)
This example demonstrates the depth estimation postprocessing callback (DepthEstimationPostprocessCallback). Preprocessing and inference are handled by the SDK, and the raw output tensors from a MiDaS v2 model are decoded by an application-defined callback into a per-pixel depth map (values and pseudo-color) for downstream visualization.
Try me
Try me
qimsdk_ref_external_postprocess_depth_estimation_midasv2.pyPre-built application on device: /usr/bin/qimsdk_ref_external_postprocess_depth_estimation_midasv2.pyDownload Required Files
.zip archive, extract it on your host machine before copying: unzip filename.zipSome AI Hub models require running the AI Hub export/optimize step for your target runtime before the downloaded file is usable — download alone isn’t always sufficient.Copy Files to Device
Run the application
Expected Output
Custom Postprocessing with Gesture Recognition
This example demonstrates gesture recognition using a daisy-chained, multi-model pipeline: palm detection locates the hand region, hand landmark detection extracts keypoints from that region, and a gesture embedder followed by a canned gesture classifier decode the landmarks into a recognized gesture. Preprocessing and inference are handled by the SDK, and the raw output tensors are decoded by an application-defined postprocessing callback. The pipeline uses the on-device camera as its source.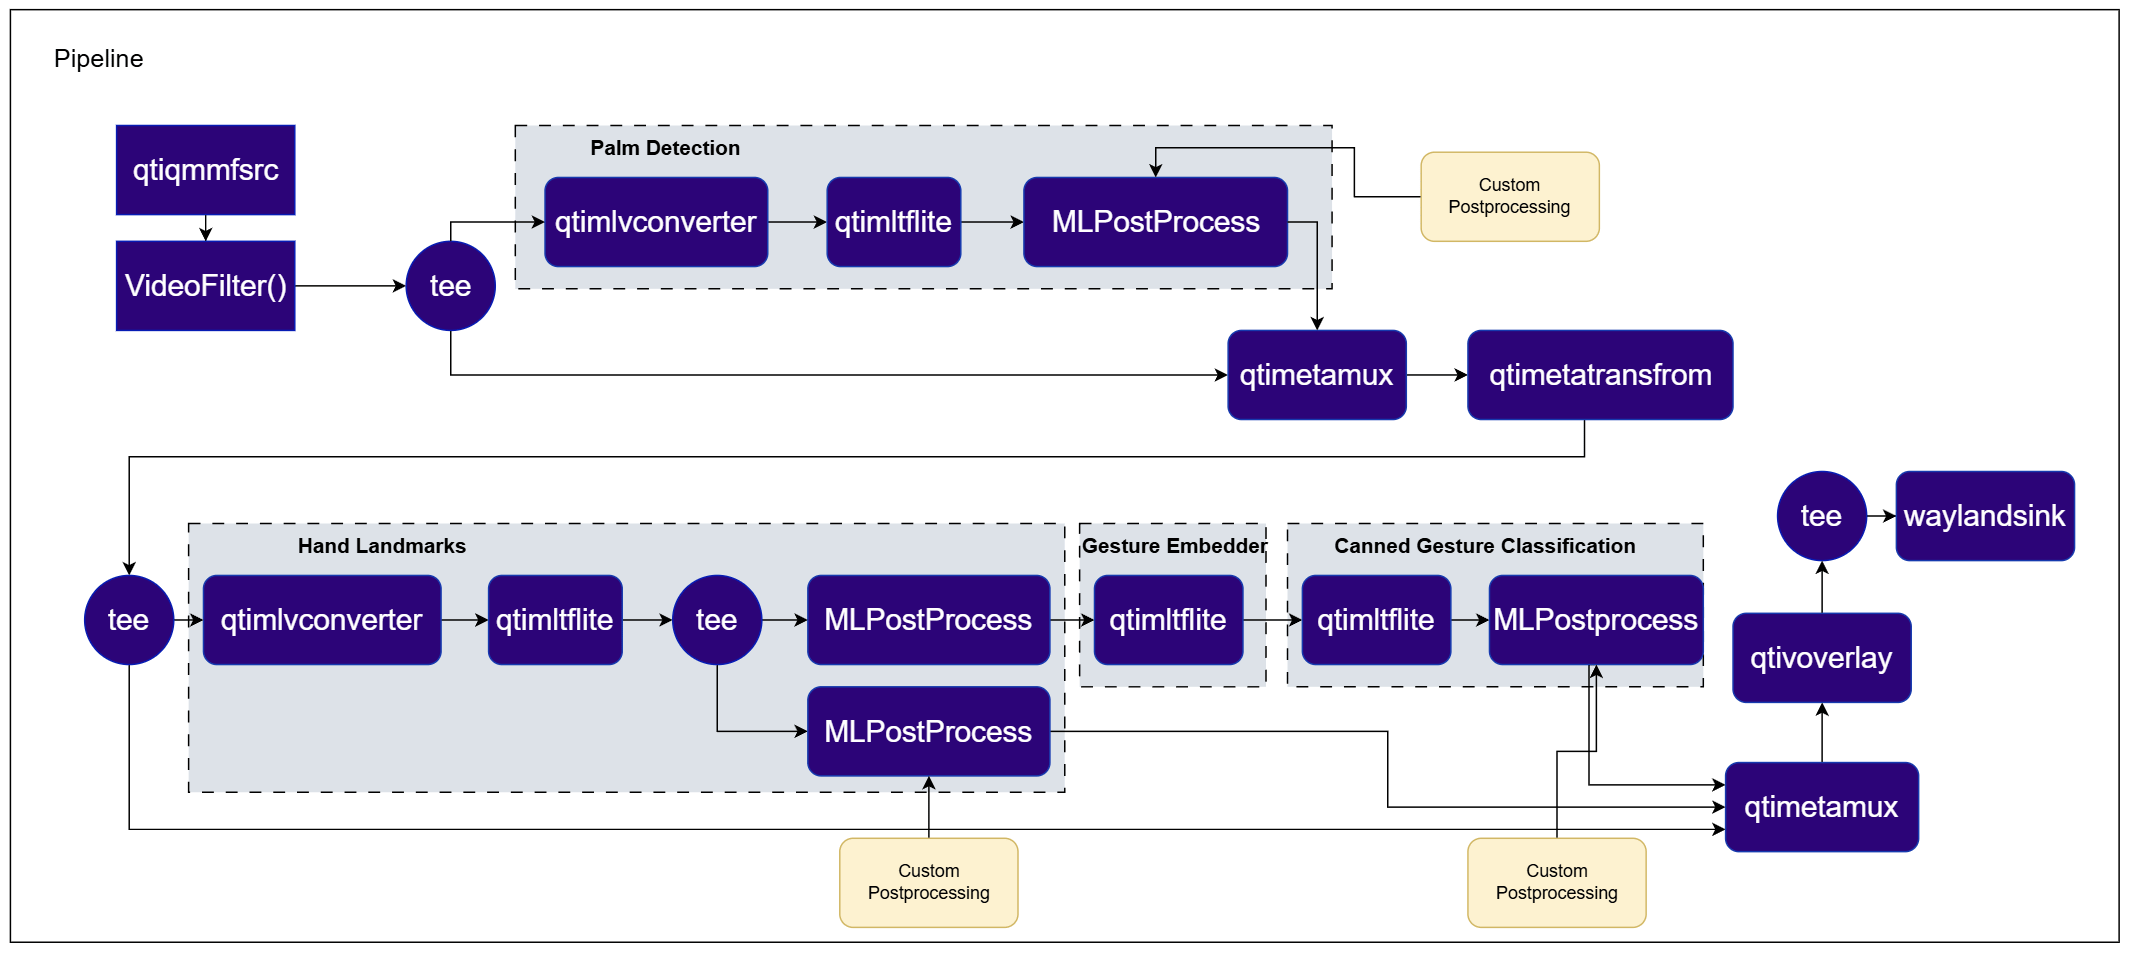
Try me
Try me
qimsdk_ref_external_postprocess_gesture_recognition.pyPre-built application on device: /usr/bin/qimsdk_ref_external_postprocess_gesture_recognition.pyDownload Required Files
Download the gesture recognizer task bundle from Google MediaPipe to obtain the palm detection, hand landmark, gesture embedder, and canned gesture classifier models:.zip archive, extract it on your host machine before copying: unzip filename.zipCopy Files to Device
Run the application
Expected Output
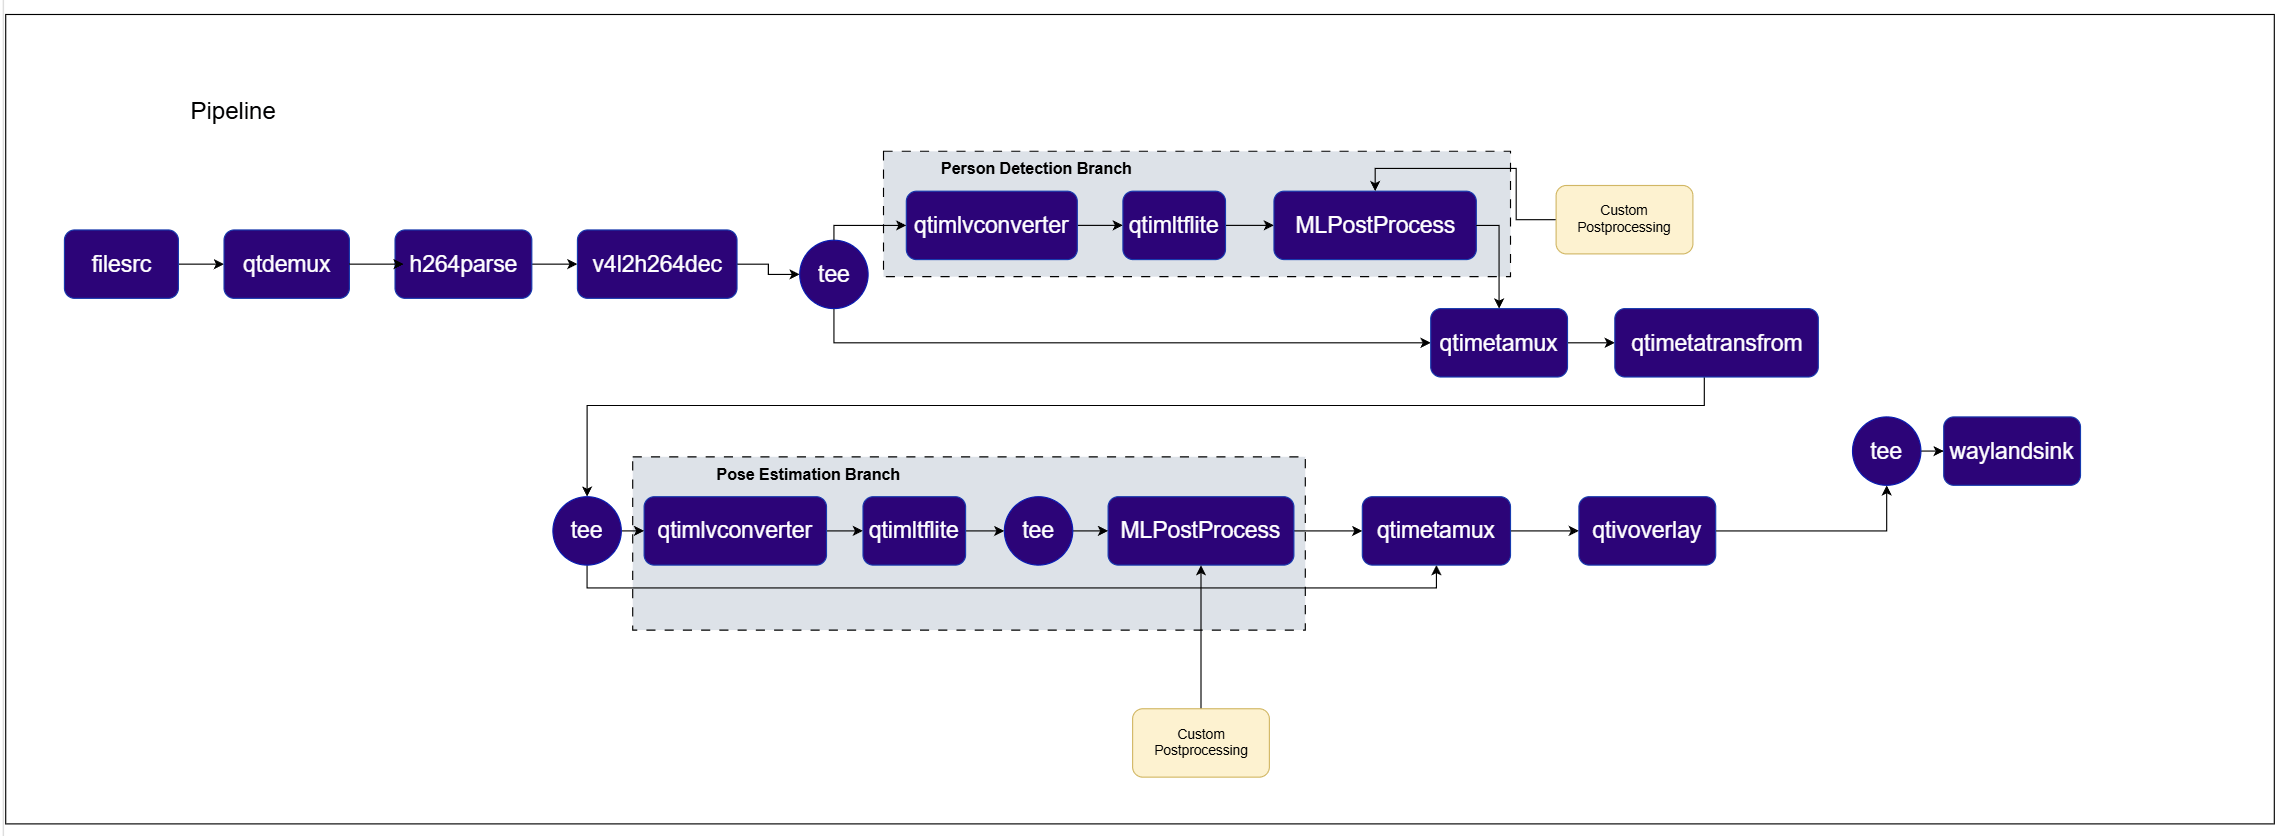
Custom Postprocessing with HRNet (Pose Estimation)
This example demonstrates the pose estimation postprocessing callback (PoseEstimationPostprocessCallback) using a two-stage pipeline: a YOLOv5 model detects persons in the frame, and an HRNet model estimates keypoints for each detected person. Preprocessing and inference are handled by the SDK, and the raw output tensors are decoded into keypoints and skeleton links by an application-defined callback, which are then overlaid on the video and displayed.
Try me
Try me
qimsdk_ref_external_postprocess_pose_estimation_hrnet.pyPre-built application on device: /usr/bin/qimsdk_ref_external_postprocess_pose_estimation_hrnet.pyDownload Required Files
.zip archive, extract it on your host machine before copying: unzip filename.zipSome AI Hub models require running the AI Hub export/optimize step for your target runtime before the downloaded file is usable — download alone isn’t always sufficient.Copy Files to Device
Run the application
Expected Output
Custom Postprocessing with DeepLabv3 (Segmentation)
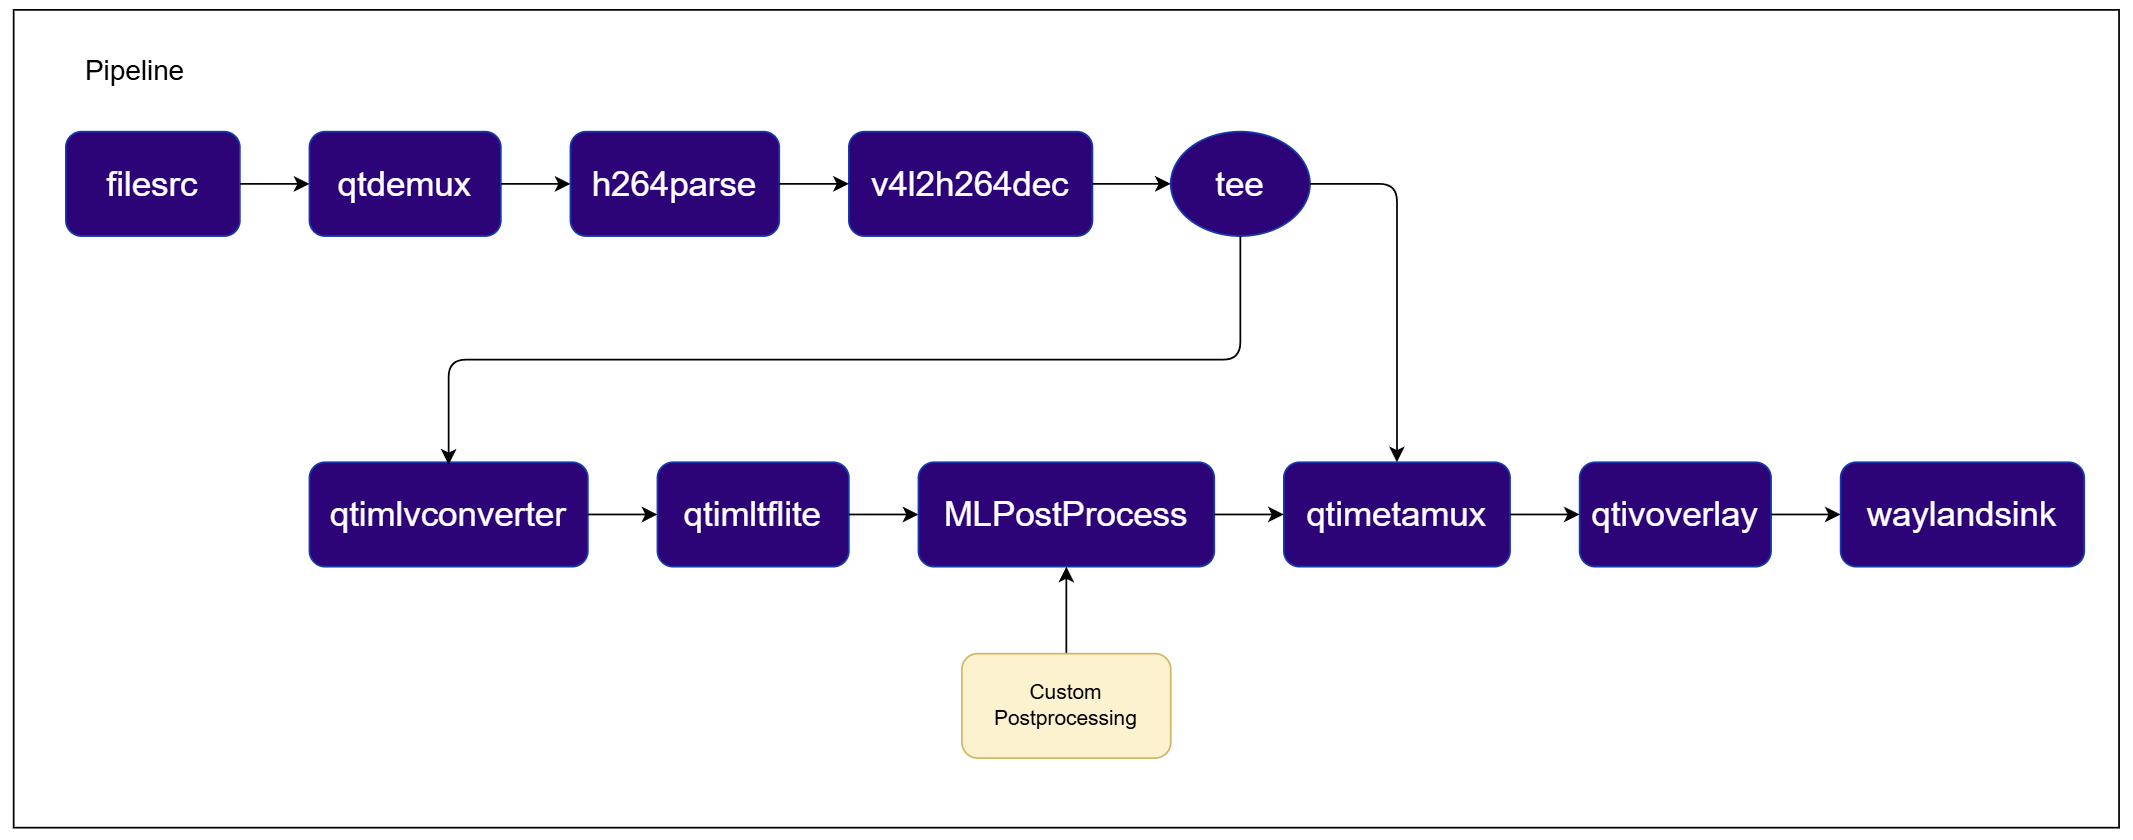
This example demonstrates the segmentation postprocessing callback (SegmentationPostprocessCallback) using a DeepLabv3 model. Preprocessing and inference are handled by the SDK, and the raw output tensors are decoded into per-pixel semantic labels and colors by an application-defined callback, which are then overlaid on the video and displayed.
Try me
Try me
qimsdk_ref_external_postprocess_segmentation_deeplab.pyPre-built application on device: /usr/bin/qimsdk_ref_external_postprocess_segmentation_deeplab.pyDownload Required Files
.zip archive, extract it on your host machine before copying: unzip filename.zipSome AI Hub models require running the AI Hub export/optimize step for your target runtime before the downloaded file is usable — download alone isn’t always sufficient.Copy Files to Device
Run the application
Expected Output