

What is the Python App Builder Skill?
The QIM SDK Python App Builder is an AI coding skill that generates Python applications usingQIM SDK Python API. You describe the pipeline behavior and configuration in natural language, and the agent produces a ready-to-run main.py built on the QIM SDK Python API — along with a README.md that documents information about the generated application.
Flow
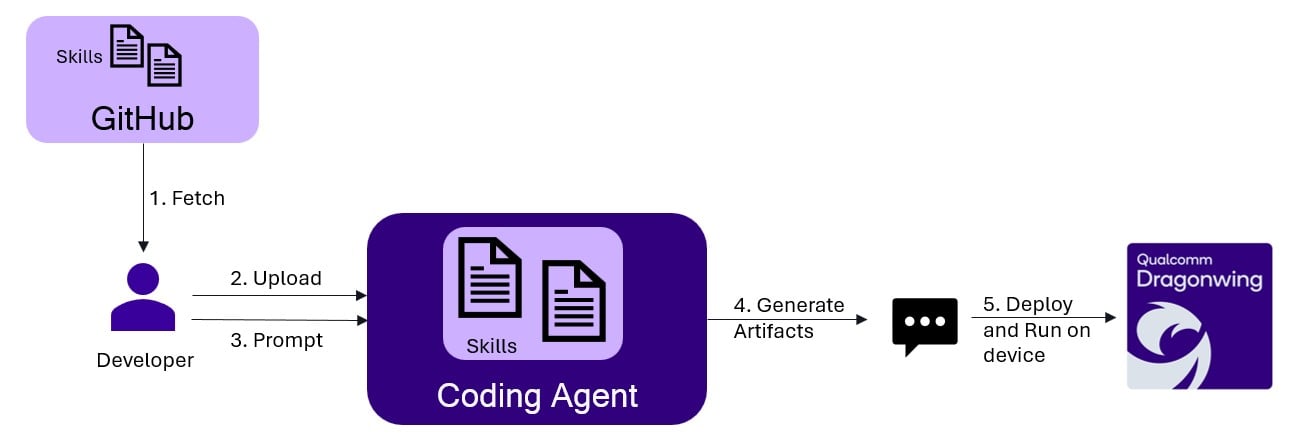
qimsdk-python-<name>/ containing:
main.py— a complete, runnable Python application using qimsdk python package, including pipeline construction, element wiring, stream filters, and ML inference configurationREADME.md— a detailed document covering:- Purpose and pipeline behavior summary
- Configuration placeholders (input, model, labels, output paths)
- A step-by-step pipeline flow (text summary + Mermaid diagram)
- Steps to run the app on device
A YAML config file— only when you request declarative YAML pipeline mode
Prerequisites
For generating code
Qualcomm dev kits are not needed for code generation.
This skill is designed to work well even with low-reasoning / smaller models.Eg: A Sonnet 4.5 model is sufficient.
For deploying and running apps
The target devices where QIM SDK is supported (see QIM SDK Installation Guide)How to Use
Step 1: Get the skill
Clone the skill repository to your host machine, then copy the QIM SDK Python App Builder skill into your coding agent’s skills directory. Also copy the qimsdk-deploy skill, which deploys and runs the generated app on device (see Step 4):The skills directory is agent-specific — Claude Code uses
~/.claude/skills/. Check your coding agent’s documentation for its skills location. You can also scope skills to a single workspace (e.g. Claude Code supports <project>/.claude/skills/).Step 2: Load the skill
Restart (or reload) your coding agent after placing the skills so it picks them up. They will appear automatically in the/skills list.
To verify, open the agent panel and run:
qimsdk-python-app-builder and qimsdk-deploy listed.
Step 3: Generate the application
Describe your pipeline to the agent. It will automatically activate the skill and generate a completemain.py and README.md.
Sample Prompt
Prompt format — describe pipeline behavior and configuration:Generated README.md
The README documents the generated app in full:
- Purpose — a plain-English summary of what the pipeline does
- Files — lists
main.pyandREADME.mdwith descriptions - Assumptions — codec format, quantization requirements, camera defaults, output directory pre-conditions
- Configuration — all user-supplied paths (
INPUT_FILE,MODEL_PATH,LABELS_PATH,OUTPUT_FILE) with instructions on where to change them - Placeholders to Fill — any values you still need to supply, or a note that none remain when the request was fully specified
- Pipeline Flow — a
Text Summarywalkthrough of every element plus aMermaid Diagramof the full pipeline - Steps to Run — exact commands to run on device
README.md
README.md
QIM SDK Python App — Single-Stream YOLOX Object Detection (MP4 → MP4)
Purpose
Decode an MP4 file with the Qualcomm hardware decoder, run YOLOX object detection on full frames using the TFLite external delegate on the HTP/NPU, merge the detection metadata with the video stream, overlay bounding boxes and class labels, then hardware-encode the annotated video to an output MP4 file. Headless (no display branch).Files
main.py— the qimsdk pipeline appREADME.md— this file
Assumptions
- Input is H.264-in-MP4, decoded with
v4l2h264dec(capture-io-mode=4,output-io-mode=4— file source decoded through the hardware decoder). - YOLOX (
yolox_w8a8.tflite) uses theyolov8postprocess module with theyolov8.jsonlabels, per the model catalog. - Confidence threshold is applied as inline postprocess settings
{"confidence": 51.0}. - No display: the annotated stream is encoded and written straight to the
output MP4 (
v4l2h264enc→h264parse→mp4mux→filesink). pipeline.eos(True)is set somp4muxfinalizes the container on EOS.
Configuration (fixed constants in main.py)
$HOME is expanded in Python (os.environ['HOME']) before being passed to any
element property, so the element receives a fully-resolved absolute path.Placeholders to Fill
None. All paths, model, labels, confidence, and delegate options are concrete.Pipeline Flow
Text Summary
filesrc reads the MP4 and qtdemux extracts the H.264 elementary stream,
which h264parse prepares and v4l2h264dec hardware-decodes. A queue
(q_dec) decouples the decoder thread, then a VideoFilter constrains the
stream to NV12. A tee (split) branches:- Passthrough / video branch →
qtimetamux(obj_mux). - AI branch →
queue→qtimlvconverter(preprocess to model tensor) →queue→qtimltflite(YOLOX, external delegate, HTP/NPU) →queue→qtimlpostprocess(module=yolov8, labels,{"confidence": 51.0}) →TextFilter→queue→qtimetamux(obj_mux).
qtimetamux merges the detection metadata back onto the video frames,
qtivoverlay draws the bounding boxes and class labels, and the annotated NV12
stream is hardware-encoded by v4l2h264enc, prepared by h264parse, muxed by
mp4mux, and written by filesink to the output MP4.Mermaid Diagram
Steps to Run
First ensure all referenced files — the input MP4, theyolox_w8a8.tflite
model, and the yolov8.json labels — are already present on the device at the
paths configured in main.py.$HOME/Downloads/qimsdk_samples/media/ai_demo_sample.mp4 on the device, and the
output directory ($HOME/Downloads/qimsdk_samples/media/) must be writable so
the app can create obj_detect_out.mp4. The app runs to end-of-file, finalizes
the MP4, and exits.Generated main.py
- The generated application constructs a tee-split pipeline: decoded frames are split into a passthrough branch and an AI branch.
- The AI branch runs
qtimlvconverter(preprocess) →qtimltflite(YOLOX inference via HTP/NPU) →qtimlpostprocess→TextFilter, then merges back intoqtimetamuxwith the passthrough video. qtivoverlaydraws bounding boxes, and the result is hardware-encoded and written to an MP4 file viafilesink.- Pipeline construction and
pipeline.execute()live insidecreate_and_execute_pipeline();main()handles logging setup and calls it. - All paths use
$HOMEexpansion viaos.environ['HOME']— element properties do not perform shell expansion.
main.py
main.py
Step 4: Running the applications
1
Download Required Files
If the downloaded model file is a
.zip archive, extract it on your host machine before copying: unzip filename.zip2
Copy the assets to the device
The input video, model, and labels must be present on the device before running — regardless of how you run the app. Copy them to the paths
main.py expects:3
Run the application
With the assets in place, you have two options to deploy and run the agent-generated
main.py:Option A — Use the QIM SDK Deploy skill (Recommended):The qimsdk-deploy skill pushes main.py and runs it directly on the target device over SSH. It copies only main.py — the assets from the previous step must already be on the device.Option B — Follow the generated README:Follow the steps to run in the generated README.md to manually copy main.py to device and run the app: