> ## Documentation Index
> Fetch the complete documentation index at: https://imsdkdocs.qualcomm.com/llms.txt
> Use this file to discover all available pages before exploring further.
# Image Segmentation
Segmentation tasks differ fundamentally from classification and detection. While classification and detection models output discrete results — class labels, bounding boxes, confidence scores — segmentation models generate pixel-wise masks that delineate object boundaries within each frame. This example uses the [DeepLabV3+ MobileNet](https://aihub.qualcomm.com/iot/models/deeplabv3_plus_mobilenet) model from Qualcomm AI Hub.
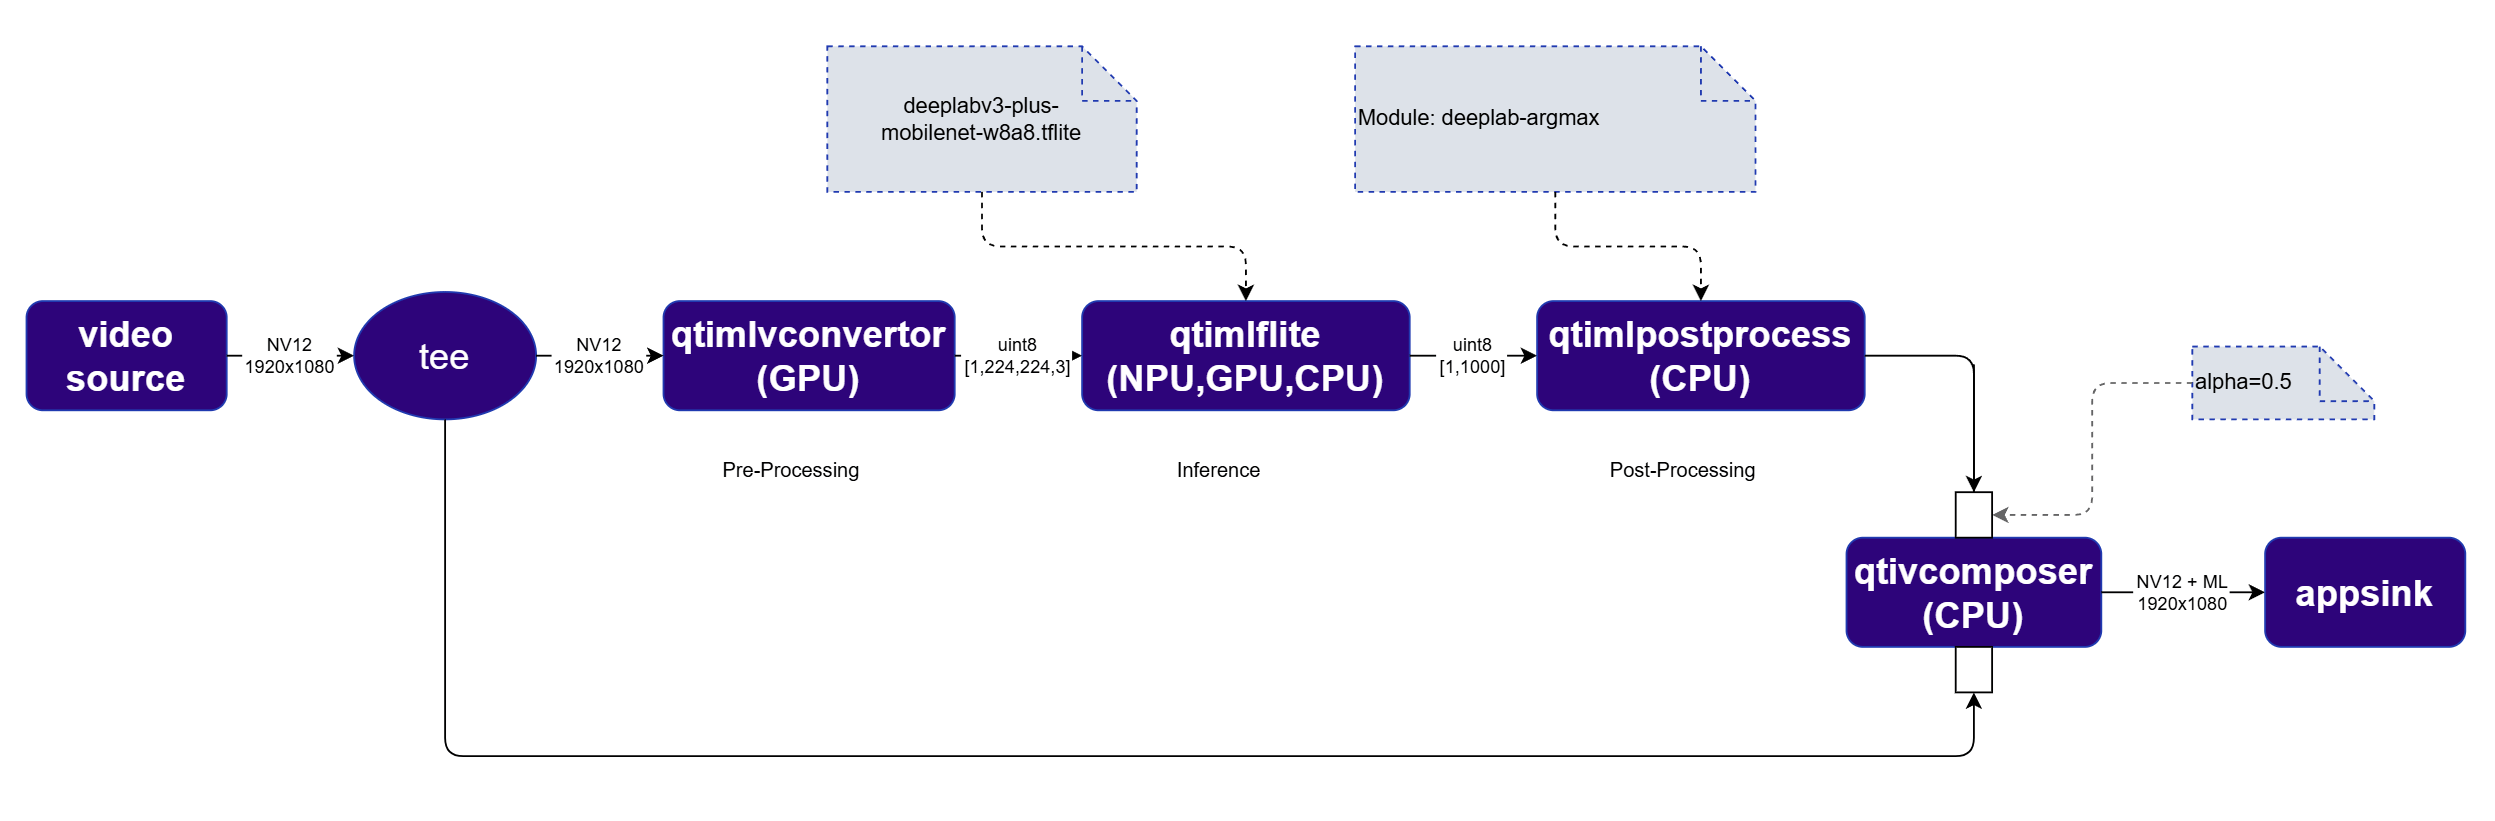 For segmentation, the [`qtimlpostprocess`](../plugin-reference/qtimlpostprocess) plugin outputs an RGBA image mask rather than structured metadata. This mask is blended with the original video frame using [`qtivcomposer`](../plugin-reference/qtivcomposer) with `sink_1::alpha=0.5`. The [`qtivoverlay`](../plugin-reference/qtivoverlay) plugin is not needed for segmentation.
The order of inputs to [`qtivcomposer`](../plugin-reference/qtivcomposer) matters — the video frame must be connected first, and the segmentation mask second, so the mask is correctly composited on top.
## Run example on device
| File | Download | Save as |
| ------------------------------- | ------------------------------------------------------------------------------------------------------------------------------------------------------ | --------------------------------- |
| DeepLabV3+ MobileNet W8A8 model | [Qualcomm AI Hub — DeepLabV3+](https://aihub.qualcomm.com/iot/models/deeplabv3_plus_mobilenet) | `deeplabv3_plus_mobilenet.tflite` |
| Segmentation labels | dv3-argmax.json | `dv3-argmax.json` |
| Sample video | Input video | `ai_demo_sample.mp4` |
If any downloaded file is a `.zip` archive, extract it on your host machine before copying:
`unzip filename.zip`
Create the required directories and transfer the downloaded files to your device.
```bash SCP (SSH) theme={null}
# Run from your host machine — replace and
ssh @ "mkdir -p $HOME/{models,labels,media,media/output}"
scp deeplabv3_plus_mobilenet.tflite @:$HOME/models/
scp dv3-argmax.json @:$HOME/labels/
scp ai_demo_sample.mp4 @:$HOME/media/
```
```bash SCP (SSH) theme={null}
ssh @
```
```bash theme={null}
export MODEL_NAME=deeplabv3_plus_mobilenet.tflite
export LABELS_NAME=dv3-argmax.json
export SRC_VIDEO_NAME=ai_demo_sample.mp4
export VIDEO_SOURCE="filesrc location=$HOME/media/$SRC_VIDEO_NAME ! qtdemux ! h264parse ! v4l2h264dec capture-io-mode=4 output-io-mode=4 ! video/x-raw,format=NV12"
```
```bash theme={null}
gst-launch-1.0 $VIDEO_SOURCE ! \
tee name=t \
t. ! queue ! mixer. \
t. ! qtimlvconverter name=preprocess ! queue ! \
qtimltflite name=inference delegate=external \
external-delegate-path=libQnnTFLiteDelegate.so \
external-delegate-options="QNNExternalDelegate,backend_type=htp;" \
model=$HOME/models/$MODEL_NAME ! queue ! \
qtimlpostprocess name=postprocess module=deeplab-argmax \
labels=$HOME/labels/$LABELS_NAME ! mixer. \
qtivcomposer name=mixer sink_1::alpha=0.5 ! video/x-raw,format=NV12 ! \
waylandsink sync=true fullscreen=true
```
* **Python source code:** [gst-ai-video-segmentation.py](https://github.com/qualcomm/gst-plugins-imsdk/tree/main/gst-python-examples/gst-ai-video-segmentation.py)
* **Run:**
```bash theme={null}
python3 gst-ai-video-segmentation.py -s "$VIDEO_SOURCE" -o display
```
* **Application source code:** [gst-ai-video-segmentation](https://github.com/qualcomm/gst-plugins-imsdk/tree/main/gst-sample-apps/gst-ai-video-segmentation)
* **Build your application:**
Steps to build custom application
Steps to build custom application
* **Run:**
```bash theme={null}
gst-ai-video-segmentation -s "$VIDEO_SOURCE" -o display
```
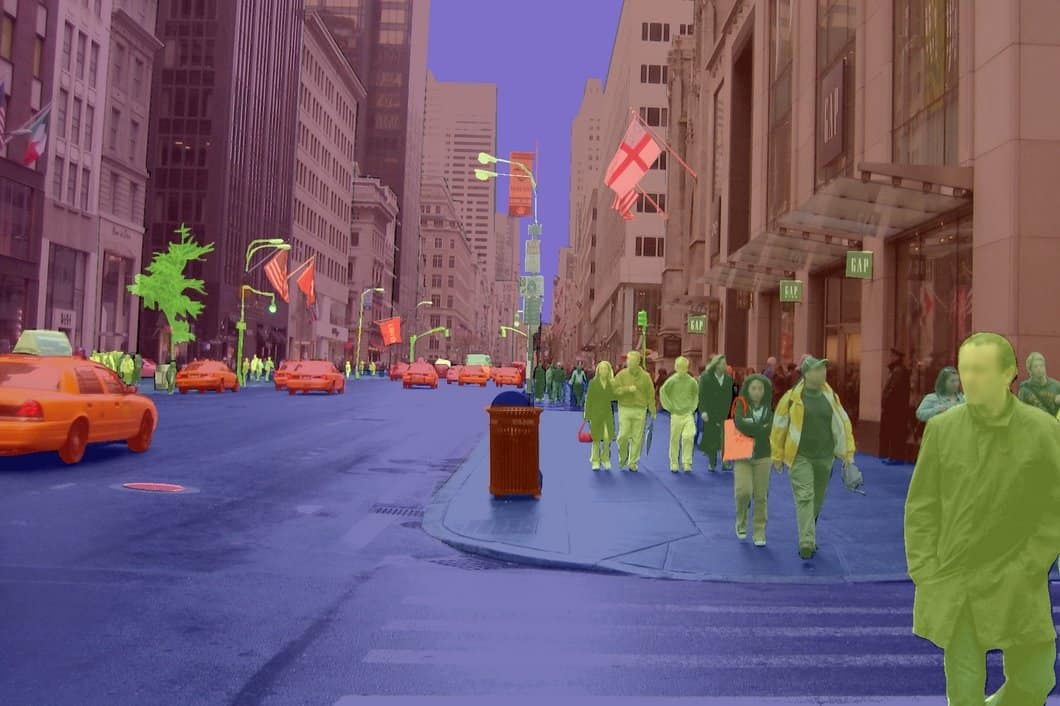
## Expected output
The segmentation mask is blended on top of the original video frame in real time.
For segmentation, the [`qtimlpostprocess`](../plugin-reference/qtimlpostprocess) plugin outputs an RGBA image mask rather than structured metadata. This mask is blended with the original video frame using [`qtivcomposer`](../plugin-reference/qtivcomposer) with `sink_1::alpha=0.5`. The [`qtivoverlay`](../plugin-reference/qtivoverlay) plugin is not needed for segmentation.
The order of inputs to [`qtivcomposer`](../plugin-reference/qtivcomposer) matters — the video frame must be connected first, and the segmentation mask second, so the mask is correctly composited on top.
## Run example on device
| File | Download | Save as |
| ------------------------------- | ------------------------------------------------------------------------------------------------------------------------------------------------------ | --------------------------------- |
| DeepLabV3+ MobileNet W8A8 model | [Qualcomm AI Hub — DeepLabV3+](https://aihub.qualcomm.com/iot/models/deeplabv3_plus_mobilenet) | `deeplabv3_plus_mobilenet.tflite` |
| Segmentation labels | dv3-argmax.json | `dv3-argmax.json` |
| Sample video | Input video | `ai_demo_sample.mp4` |
If any downloaded file is a `.zip` archive, extract it on your host machine before copying:
`unzip filename.zip`
Create the required directories and transfer the downloaded files to your device.
```bash SCP (SSH) theme={null}
# Run from your host machine — replace and
ssh @ "mkdir -p $HOME/{models,labels,media,media/output}"
scp deeplabv3_plus_mobilenet.tflite @:$HOME/models/
scp dv3-argmax.json @:$HOME/labels/
scp ai_demo_sample.mp4 @:$HOME/media/
```
```bash SCP (SSH) theme={null}
ssh @
```
```bash theme={null}
export MODEL_NAME=deeplabv3_plus_mobilenet.tflite
export LABELS_NAME=dv3-argmax.json
export SRC_VIDEO_NAME=ai_demo_sample.mp4
export VIDEO_SOURCE="filesrc location=$HOME/media/$SRC_VIDEO_NAME ! qtdemux ! h264parse ! v4l2h264dec capture-io-mode=4 output-io-mode=4 ! video/x-raw,format=NV12"
```
```bash theme={null}
gst-launch-1.0 $VIDEO_SOURCE ! \
tee name=t \
t. ! queue ! mixer. \
t. ! qtimlvconverter name=preprocess ! queue ! \
qtimltflite name=inference delegate=external \
external-delegate-path=libQnnTFLiteDelegate.so \
external-delegate-options="QNNExternalDelegate,backend_type=htp;" \
model=$HOME/models/$MODEL_NAME ! queue ! \
qtimlpostprocess name=postprocess module=deeplab-argmax \
labels=$HOME/labels/$LABELS_NAME ! mixer. \
qtivcomposer name=mixer sink_1::alpha=0.5 ! video/x-raw,format=NV12 ! \
waylandsink sync=true fullscreen=true
```
* **Python source code:** [gst-ai-video-segmentation.py](https://github.com/qualcomm/gst-plugins-imsdk/tree/main/gst-python-examples/gst-ai-video-segmentation.py)
* **Run:**
```bash theme={null}
python3 gst-ai-video-segmentation.py -s "$VIDEO_SOURCE" -o display
```
* **Application source code:** [gst-ai-video-segmentation](https://github.com/qualcomm/gst-plugins-imsdk/tree/main/gst-sample-apps/gst-ai-video-segmentation)
* **Build your application:**
Steps to build custom application
Steps to build custom application
* **Run:**
```bash theme={null}
gst-ai-video-segmentation -s "$VIDEO_SOURCE" -o display
```
## Expected output
The segmentation mask is blended on top of the original video frame in real time.