> ## Documentation Index
> Fetch the complete documentation index at: https://imsdkdocs.qualcomm.com/llms.txt
> Use this file to discover all available pages before exploring further.
# AI
> Ready-to-run Python AI applications demonstrating QIM SDK inference capabilities using GObject Introspection (GI) bindings
This section covers Python-based AI sample applications that demonstrate vision and multi-model inference on Qualcomm platforms.
***
Prerequisites
Some of the steps in the pre-requisties will be removed from future releases once the necessary fixes are mainlined.
Connect to the Wireless Access Point (Wi-Fi Router):
```bash theme={null}
nmcli dev wifi connect password
```
Check the connection and device status:
```bash theme={null}
nmcli -p device
```
**Login to the target device**
Locate the IP address of the device according to the type of network connection,
using the UART console on the Linux host:
For Ethernet:
```bash theme={null}
ip address show eth2
```
For Wi-Fi:
```bash theme={null}
ip address show wlp1s0
```
Use the IP address from the Linux host to establish an SSH connection to the device:
```bash theme={null}
ssh root@
```
Example:
```bash theme={null}
ssh root@192.168.0.222
```
Connect to the SSH shell using the following password:
```bash theme={null}
oelinux123
```
On the target device, obtain the `download_artifacts.sh` script, set executable
permissions, and run it to download the model, media, and label files:
```bash theme={null}
cd /tmp/
curl -L -O https://raw.githubusercontent.com/qualcomm/sample-apps-for-qualcomm-linux/refs/heads/main/qualcomm-linux/scripts/download_artifacts.sh
chmod +x download_artifacts.sh
./download_artifacts.sh
```
In the terminal of the target device, run the following command to enable the
`qticamsrc` on Config #2:
```bash theme={null}
echo -n "camx" > /var/data
efivar -n 882f8c2b-9646-435f-8de5-f208ff80c1bd-VendorDtbOverlays -w -f /var/data
efivar -n 882f8c2b-9646-435f-8de5-f208ff80c1bd-VendorDtbOverlays -p
sync
reboot
```
In the terminal of the target device, run the following command to enable audio:
```bash theme={null}
systemctl stop pipewire wireplumber pipewire.socket pipewire-manager.socket
chmod 777 /dev/dma_heap/system
adsprpcd audiopd &
systemctl start pipewire wireplumber
wpctl status
```
To set the default devices for sink and source, get the device numbers from
`wpctl status` and run the following command:
```bash theme={null}
wpctl set-default
```
In the terminal of the target device, run the following command to enable the
GPU delegate and backend:
```bash theme={null}
mount -o rw,remount /
```
```bash theme={null}
export OCL_ICD_FILENAMES=/usr/lib/libOpenCL_adreno.so.1
```
## AI Applications
### Object detection and display
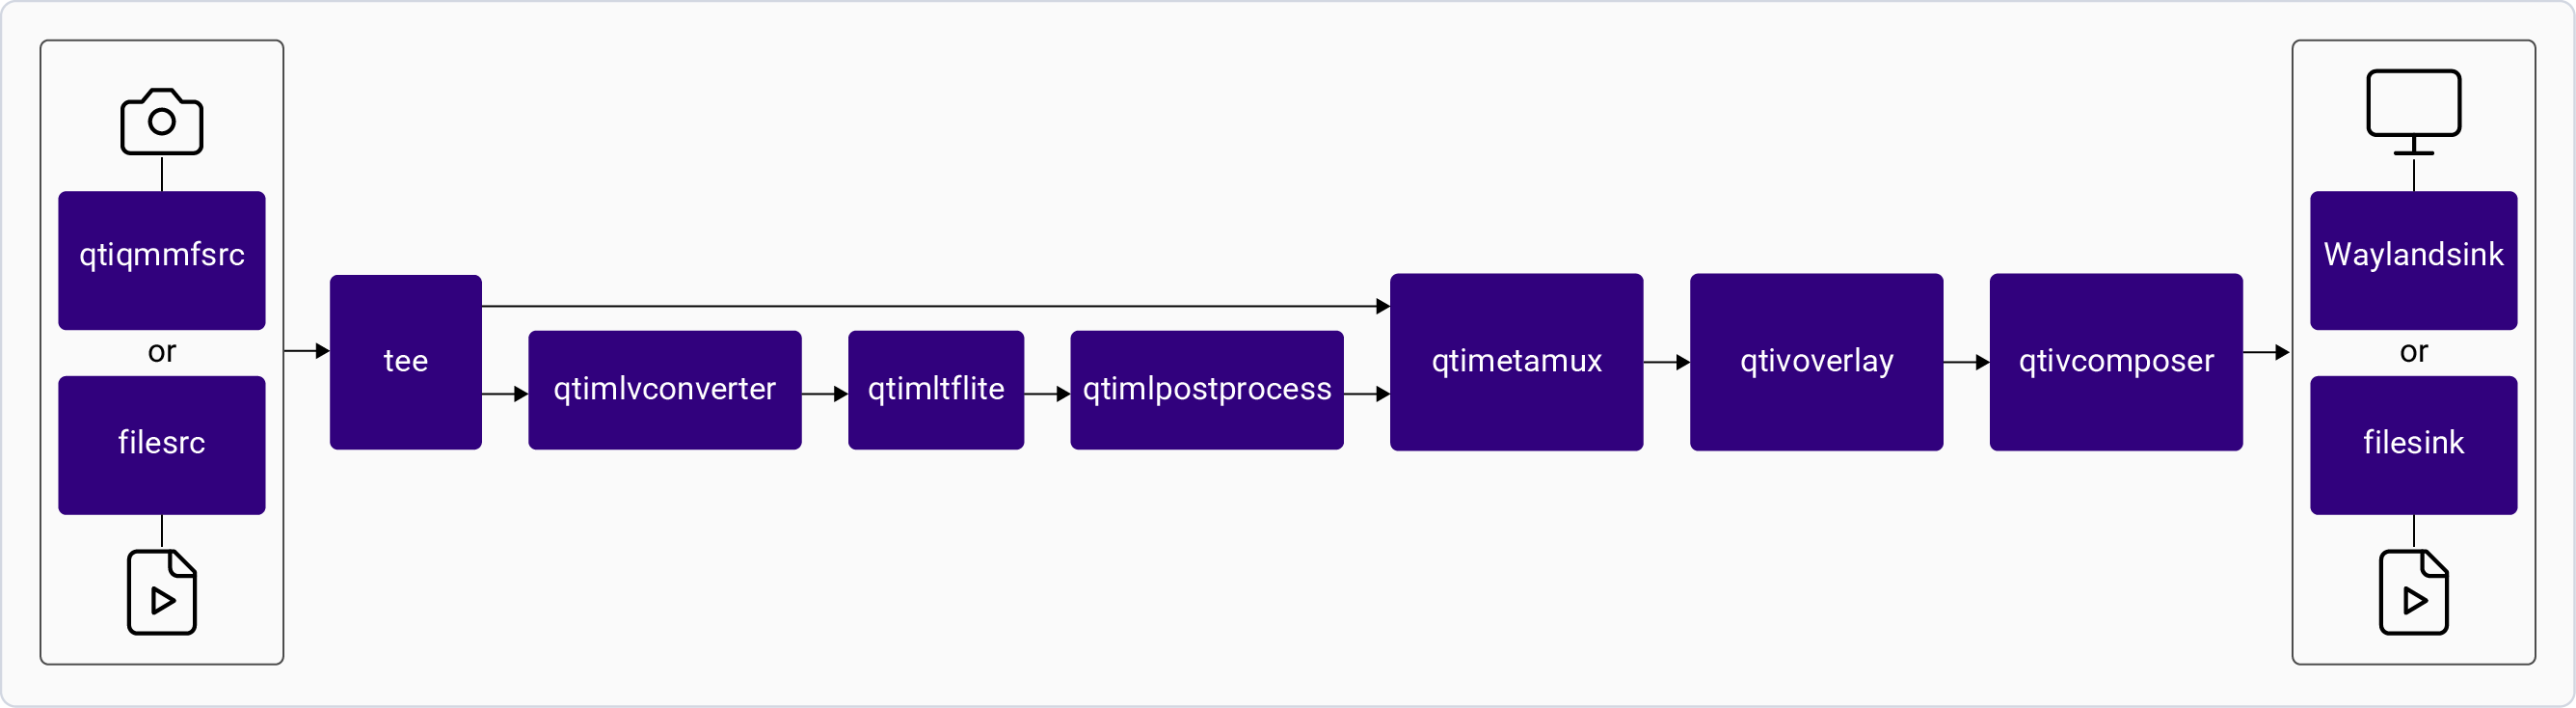
The [**gst-ai-object-detection.py**](https://github.com/qualcomm/gst-plugins-imsdk/blob/main/gst-python-examples/gst-ai-object-detection.py) script receives an RTSP stream as a source, decodes it, uses YOLOv8 LiteRT model to identify the object in a scene from the camera stream and overlay the bounding boxes over the detected objects. The results are shown on the display.
For information about the plugins used in this pipeline, see [**Pipeline flow**](#object-detection-pipeline-flow).
This application isn't supported in the Config #1 of the QLI 2.0 GA release.
**Application:** [`gst-ai-object-detection.py`](https://github.com/qualcomm/gst-plugins-imsdk/blob/main/gst-python-examples/gst-ai-object-detection.py)
 #### Sample Model and Label Files
| Runtime | Model file | Label file |
| ------------------------------ | ------------------------------------------------------- | --------------------------- |
| LiteRT | `yolov8_det_quantized.tflite`, `yolox_quantized.tflite` | `yolov8.json`, `yolox.json` |
| Qualcomm Neural Processing SDK | `yolonas.dlc` | `yolonas.json` |
#### Run the application on the target device
Ensure that you complete the [`Prerequisites`](#prerequisites). This downloads all required artifacts to the target device.
Run any of the following use cases:
* Display with the primary and secondary cameras respectively:
```bash theme={null}
gst-ai-object-detection.py -c 0 -f 2 -m /etc/models/yolox_quantized.tflite -l /etc/labels/yolox.json -ml "yolov8"
```
```bash theme={null}
gst-ai-object-detection.py -c 1 -f 2 -m /etc/models/yolox_quantized.tflite -l /etc/labels/yolox.json -ml "yolov8"
```
* Display with input from a video file:
```bash theme={null}
gst-ai-object-detection.py -s /etc/media/video.mp4 -f 2 -m /etc/models/yolox_quantized.tflite -l /etc/labels/yolox.json -ml "yolov8"
```
* YOLO-NAS with Qualcomm Neural Processing SDK runtime:
```bash theme={null}
gst-ai-object-detection.py -f 1 -m /etc/models/yolonas.dlc -l /etc/labels/yolonas.json -ml "yolo-nas" --tensors="885,877"
```
* YOLOv8 with LiteRT:
```bash theme={null}
gst-ai-object-detection.py -f 2 -m /etc/models/yolov8_det_quantized.tflite -l /etc/labels/yolov8.json -ml "yolov8"
```
Both `yolox_quantized.tflite` and `yolov8_det_quantized.tflite` model files use the `Yolov8` module.
To display all available options:
```bash theme={null}
gst-ai-object-detection.py -h
```
To stop the use case, press **CTRL + C**.
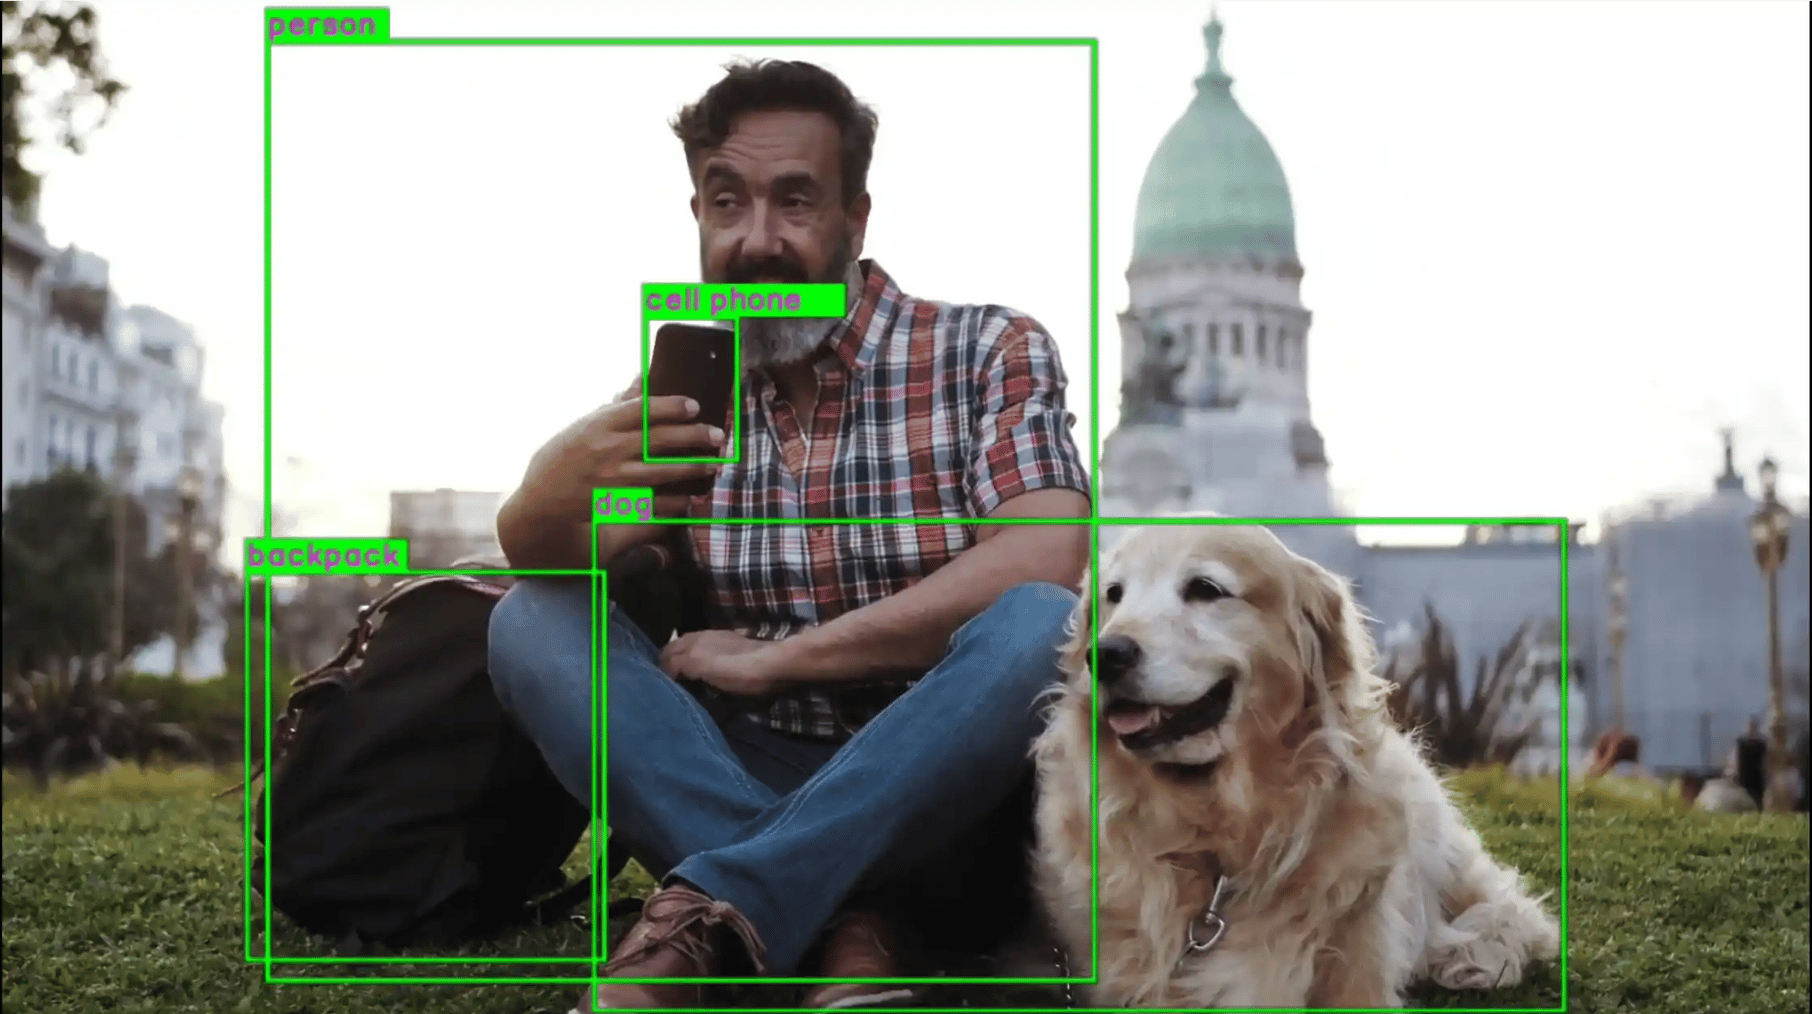
#### Expected Output
Detected objects with bounding boxes and labels are overlaid on the video and displayed on the local display.
#### Sample Model and Label Files
| Runtime | Model file | Label file |
| ------------------------------ | ------------------------------------------------------- | --------------------------- |
| LiteRT | `yolov8_det_quantized.tflite`, `yolox_quantized.tflite` | `yolov8.json`, `yolox.json` |
| Qualcomm Neural Processing SDK | `yolonas.dlc` | `yolonas.json` |
#### Run the application on the target device
Ensure that you complete the [`Prerequisites`](#prerequisites). This downloads all required artifacts to the target device.
Run any of the following use cases:
* Display with the primary and secondary cameras respectively:
```bash theme={null}
gst-ai-object-detection.py -c 0 -f 2 -m /etc/models/yolox_quantized.tflite -l /etc/labels/yolox.json -ml "yolov8"
```
```bash theme={null}
gst-ai-object-detection.py -c 1 -f 2 -m /etc/models/yolox_quantized.tflite -l /etc/labels/yolox.json -ml "yolov8"
```
* Display with input from a video file:
```bash theme={null}
gst-ai-object-detection.py -s /etc/media/video.mp4 -f 2 -m /etc/models/yolox_quantized.tflite -l /etc/labels/yolox.json -ml "yolov8"
```
* YOLO-NAS with Qualcomm Neural Processing SDK runtime:
```bash theme={null}
gst-ai-object-detection.py -f 1 -m /etc/models/yolonas.dlc -l /etc/labels/yolonas.json -ml "yolo-nas" --tensors="885,877"
```
* YOLOv8 with LiteRT:
```bash theme={null}
gst-ai-object-detection.py -f 2 -m /etc/models/yolov8_det_quantized.tflite -l /etc/labels/yolov8.json -ml "yolov8"
```
Both `yolox_quantized.tflite` and `yolov8_det_quantized.tflite` model files use the `Yolov8` module.
To display all available options:
```bash theme={null}
gst-ai-object-detection.py -h
```
To stop the use case, press **CTRL + C**.
#### Expected Output
Detected objects with bounding boxes and labels are overlaid on the video and displayed on the local display.

Pipeline Flow
The following table lists the plugins used in the object detection pipeline:
| Process | Description |
| ------------------ | ------------------------------------------------------------------------------------------------------------------------------------------------------------------------------------------------------------------------------------------- |
| `qticamsrc` | 1. Collects the video stream (source) and creates two copies of the source:
• One stream is sent to the `qtimetamux` plugin to retain the video stream.
• The other stream is sent to an ML inferencing pipeline. |
| `filesrc` | Reads the video data. |
| `qtimlvconverter` | 1. Receives the video stream on its sinkpad.
2. Performs preprocessing: color conversion, scaling, normalization.
3. Converts the video stream to a tensor stream on its source pad. |
| `qtimltflite` | Loads the object detection model, runs inference, and produces a tensor stream with detection results. |
| `qtimlpostprocess` | Converts inference tensors into bounding boxes and labels. Loads the YOLOv8 submodule and sends results to `qtimetamux`. |
| `qtimetamux` | Synchronizes video and bounding box metadata streams. Attaches bounding boxes as `GstVideoRegionOfInterest` metadata. |
| `qtivoverlay` | Overlays bounding boxes on the video frame using CL. |
| `waylandsink` | Renders the video stream on a local display via Weston. |
| `filesink` | Writes the video to a file. |
***
### Decode and object detection using RTSP stream
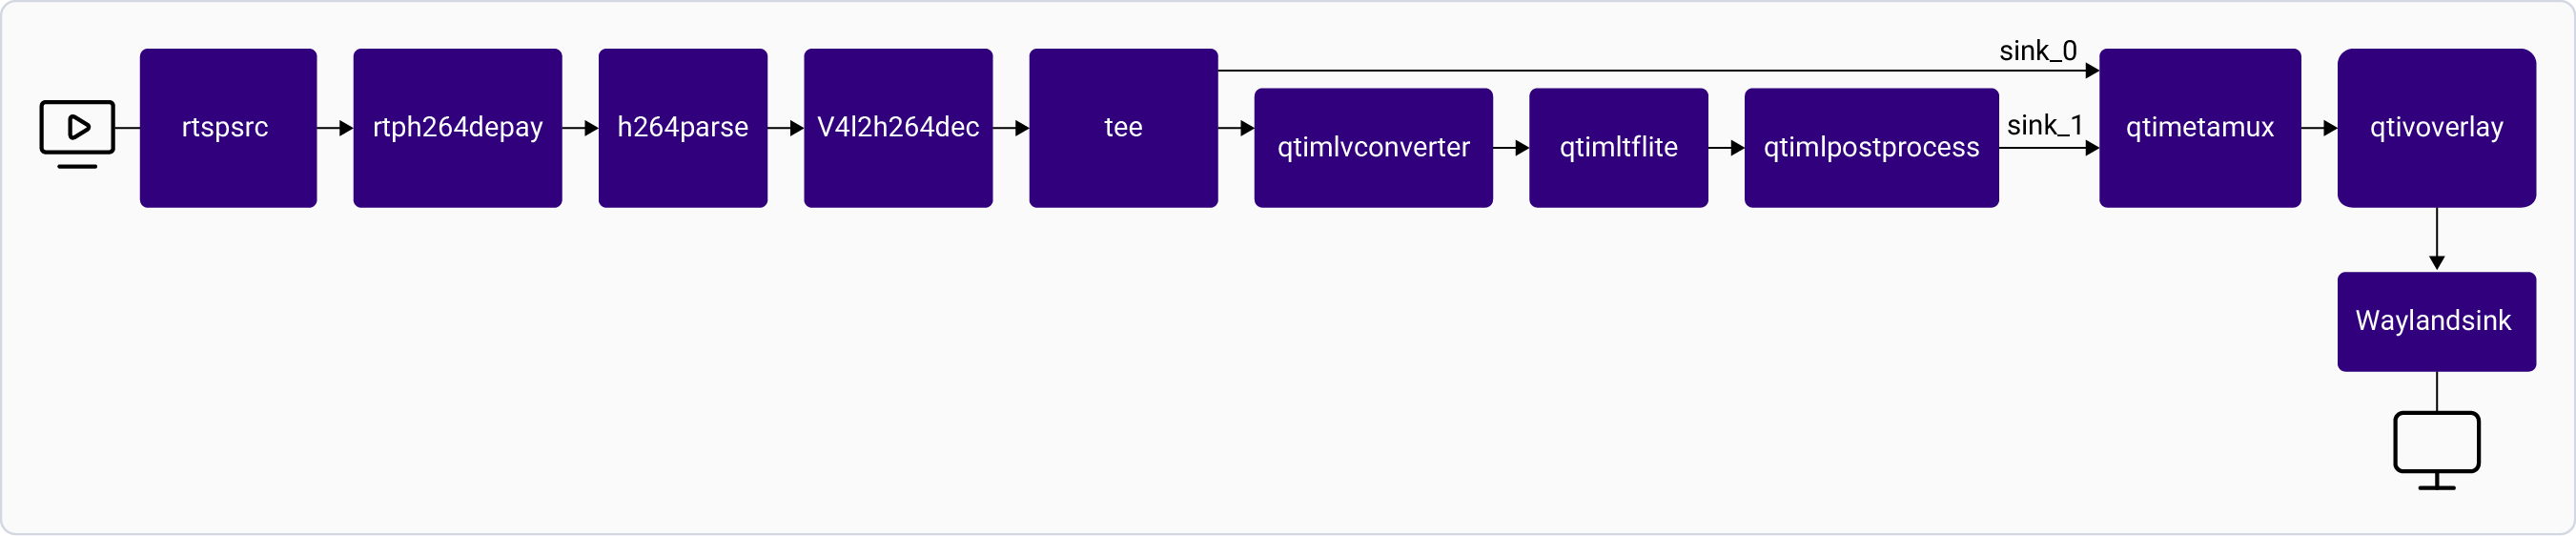
The [**gst-rtspsrc-detection-display.py**](https://github.com/qualcomm/gst-plugins-imsdk/blob/main/gst-python-examples/gst-rtspsrc-detection-display.py) script receives an RTSP stream as a source, decodes it, uses YOLOv8 LiteRT model to identify the object in a scene from the camera stream and overlay the bounding boxes over the detected objects. The results are shown on the display.
For information about the plugins used in this pipeline, see [**Pipeline flow**](#rtsp-detection-pipeline-flow).
This application isn't supported in the Config #1 of the QLI 2.0 GA release.
**Application:** [`gst-rtspsrc-detection-display.py`](https://github.com/qualcomm/gst-plugins-imsdk/blob/main/gst-python-examples/gst-rtspsrc-detection-display.py)
 #### Sample Model and Label Files
| Runtime | Model file | Label file |
| ------- | ------------------------ | ------------ |
| LiteRT | `yolox_quantized.tflite` | `yolox.json` |
#### Run the application on the target device
Ensure that you complete the [`Prerequisites`](#prerequisites). This downloads all required artifacts to the target device.
Run the object detection script on the target device:
Console 1 — start the RTSP server:
```bash theme={null}
gst-launch-1.0 -e qticamsrc camera=0 ! v4l2h264enc capture-io-mode=4 output-io-mode=5 ! h264parse config-interval=1 ! qtirtspbin
```
Console 2 — run the detection script:
```bash theme={null}
gst-rtspsrc-detection-display.py
```
To display all available options:
```bash theme={null}
gst-rtspsrc-detection-display.py -h
```
To stop the use case, press **CTRL + C**.
#### Expected Output
#### Sample Model and Label Files
| Runtime | Model file | Label file |
| ------- | ------------------------ | ------------ |
| LiteRT | `yolox_quantized.tflite` | `yolox.json` |
#### Run the application on the target device
Ensure that you complete the [`Prerequisites`](#prerequisites). This downloads all required artifacts to the target device.
Run the object detection script on the target device:
Console 1 — start the RTSP server:
```bash theme={null}
gst-launch-1.0 -e qticamsrc camera=0 ! v4l2h264enc capture-io-mode=4 output-io-mode=5 ! h264parse config-interval=1 ! qtirtspbin
```
Console 2 — run the detection script:
```bash theme={null}
gst-rtspsrc-detection-display.py
```
To display all available options:
```bash theme={null}
gst-rtspsrc-detection-display.py -h
```
To stop the use case, press **CTRL + C**.
#### Expected Output
Pipeline Flow
| Process | Description |
| ------------------ | --------------------------------------------------------------------------------------------- |
| `rtspsrc` | Receives the RTSP stream from `rtsp:///live`. |
| `rtph264depay` | Extracts the video data from the RTSP stream. |
| `h264parse` | Parses the H.264 video. |
| `v4l2h264dec` | Decodes the video. |
| `qtimlvconverter` | Preprocesses frames (color conversion, scaling, normalization) and converts to tensor stream. |
| `qtimltflite` | Runs object detection inference. |
| `qtimlpostprocess` | Converts inference tensors into bounding boxes and labels. |
| `qtimetamux` | Synchronizes video and metadata streams. |
| `qtivoverlay` | Overlays bounding boxes on the video frame. |
| `waylandsink` | Renders the video stream on a local display. |
***
### Object detection and classification
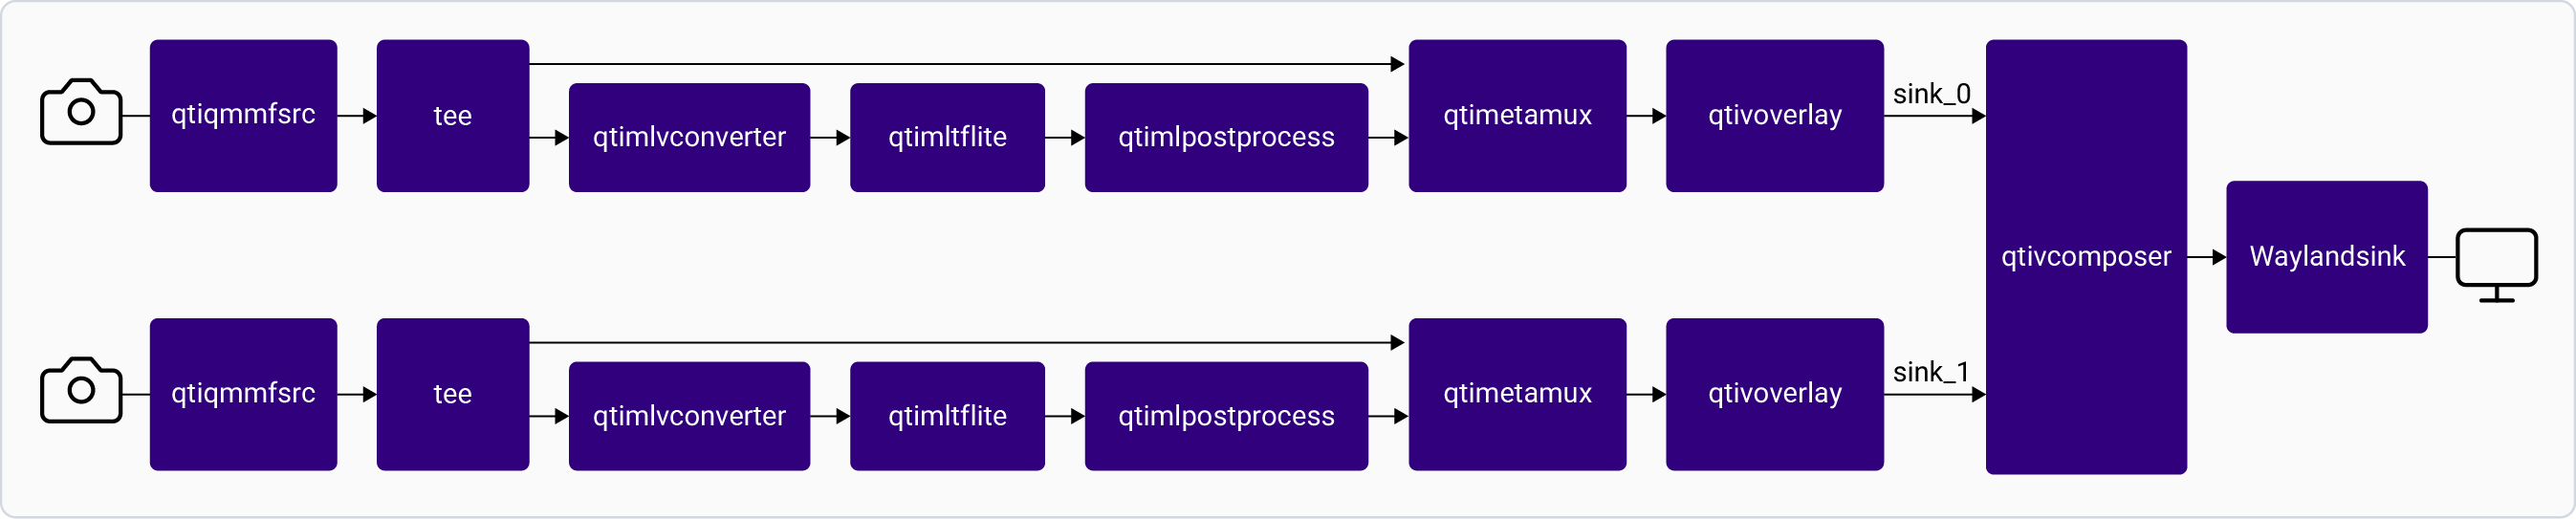
The [**gst-camera-two-stream-detection-and-classification-side-by-side.py**](https://github.com/qualcomm/gst-plugins-imsdk/blob/main/gst-python-examples/gst-camera-two-stream-detection-and-classification-side-by-side.py) application uses a YOLOX LiteRT model to detect and `inception_v3` to classify objects in the scene displayed by the AI overlay composer.
For information about the plugins used in this pipeline, see [**Pipeline flow**](#detection-and-classification-pipeline-flow).
This application isn't supported in the Config #1 of the QLI 2.0 GA release.
**Application:** [`gst-camera-two-stream-detection-and-classification-side-by-side.py`](https://github.com/qualcomm/gst-plugins-imsdk/blob/main/gst-python-examples/gst-camera-two-stream-detection-and-classification-side-by-side.py)
 #### Sample Model and Label Files
| Runtime | Model file | Label file |
| ------- | ---------------------------------------------------------------------------------------- | ------------------------------------------------------------------ |
| LiteRT | detection: `yolox_quantized.tflite`
#### Sample Model and Label Files
| Runtime | Model file | Label file |
| ------- | ---------------------------------------------------------------------------------------- | ------------------------------------------------------------------ |
| LiteRT | detection: `yolox_quantized.tflite`
classification: `inception_v3_quantized.tflite` | detection: `yolox.json`
classification: `classification.json` |
#### Run the application on the target device
Ensure that you complete the [`Prerequisites`](#prerequisites). This downloads all required artifacts to the target device.
```bash theme={null}
gst-camera-two-stream-detection-and-classification-side-by-side.py
```
To display all available options:
```bash theme={null}
gst-camera-two-stream-detection-and-classification-side-by-side.py -h
```
To stop the use case, press **CTRL + C**.
#### Expected Output
Detection and classification display are shown side-by-side.
Pipeline Flow
| Process | Description |
| ----------------------------------- | ---------------------------------------------------------------------------------------------- |
| `qticamsrc` | Collects two video streams — one for detection, one for classification — each split via `tee`. |
| `qtimlvconverter` | Preprocesses frames for each branch (color conversion, scaling, normalization). |
| `qtimltflite` | Runs detection (YOLOX) and classification (InceptionV3) inference sequentially. |
| `qtimlpostprocess` (detection) | Converts detection tensors to bounding boxes and labels. |
| `qtimlpostprocess` (classification) | Converts classification tensors to label overlay frames. |
| `qtimetamux` | Synchronizes video and metadata for the detection branch. |
| `qtivoverlay` | Overlays bounding boxes on the detection stream. |
| `qtivcomposer` | Composes the detection and classification streams side by side. |
| `waylandsink` | Renders the composed output on a local display. |
#### Known Issues
Output labels are blurred.
***
### Object detection, classification, and segmentation
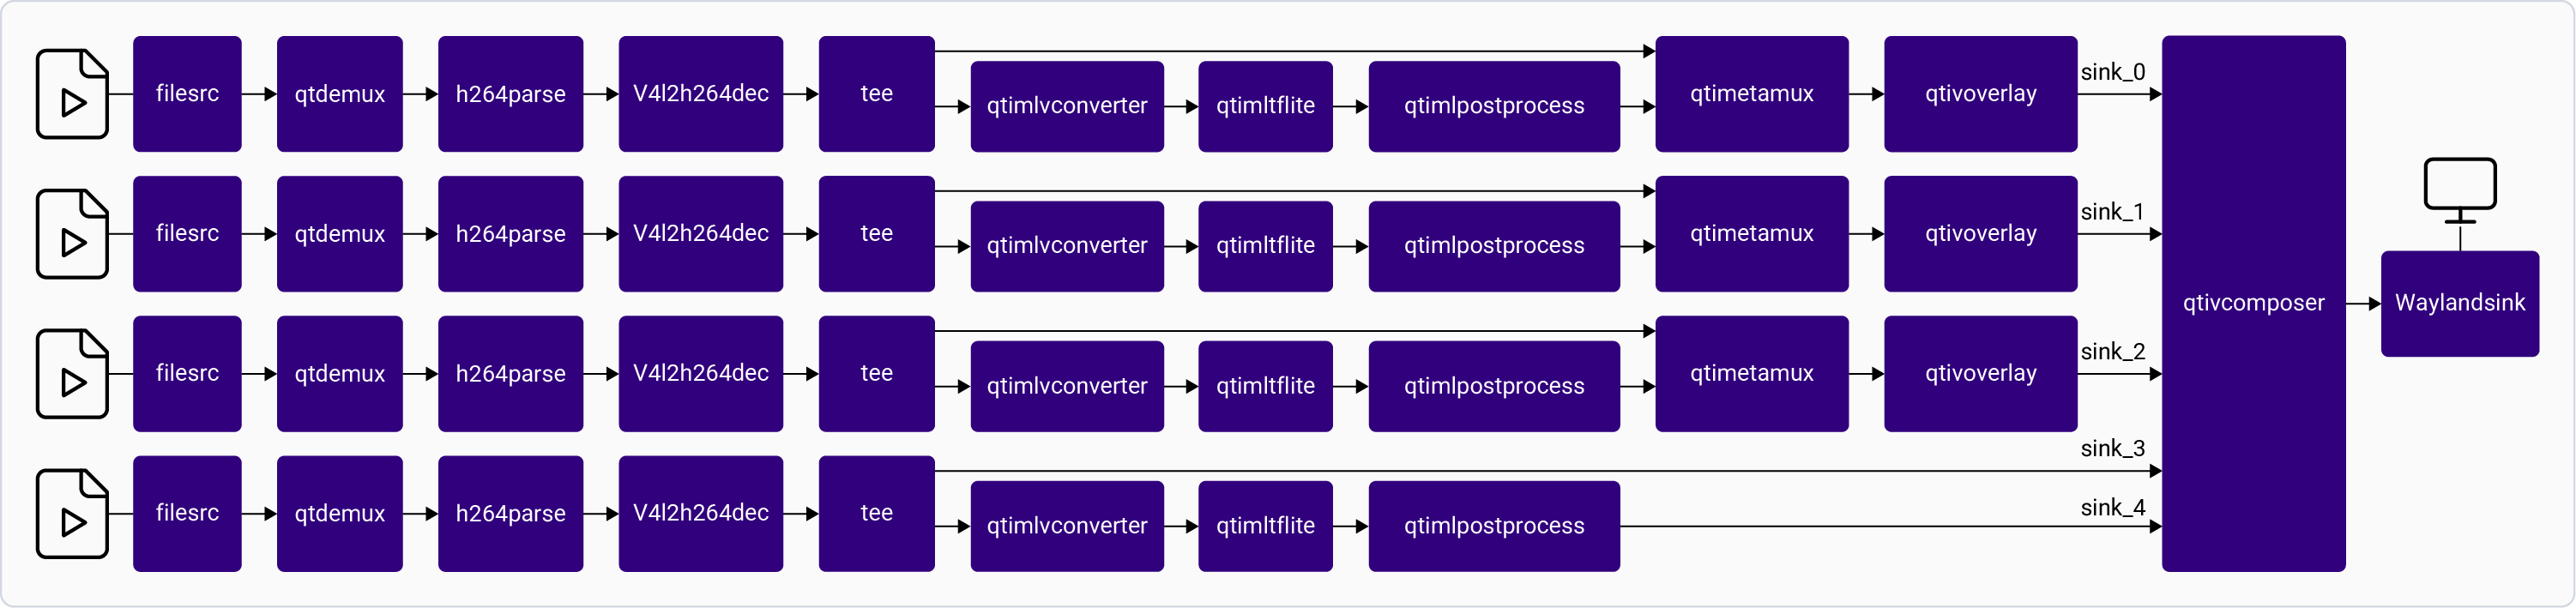
The [**gst-filesrc-2detection-classification-segmentation-side-by-side.py**](https://github.com/qualcomm/gst-plugins-imsdk/blob/main/gst-python-examples/gst-filesrc-2detection-classification-segmentation-side-by-side.py) script identifies objects, classifies scenes, and produces semantic segmentation from a video file. The output is displayed side by side.
For information about the plugins used in this pipeline, see [**Pipeline flow**](#detection-classification-segmentation-pipeline-flow).
This application isn't supported in the Config #1 of the QLI 2.0 GA release.
**Application:** [`gst-filesrc-2detection-classification-segmentation-side-by-side.py`](https://github.com/qualcomm/gst-plugins-imsdk/blob/main/gst-python-examples/gst-filesrc-2detection-classification-segmentation-side-by-side.py)
 #### Sample Model and Label Files
| Runtime | Model file | Label file |
| ------- | ------------------------------------------------------------------------------------------------------------------------------------------------------- | --------------------------------------------------------------------------------------------------------------- |
| LiteRT | detection: `yolox_quantized.tflite`
#### Sample Model and Label Files
| Runtime | Model file | Label file |
| ------- | ------------------------------------------------------------------------------------------------------------------------------------------------------- | --------------------------------------------------------------------------------------------------------------- |
| LiteRT | detection: `yolox_quantized.tflite`
classification: `inception_v3_quantized.tflite`
segmentation: `deeplabv3_plus_mobilenet_quantized.tflite` | detection: `yolox.json`
classification: `classification.json`
segmentation: `deeplabv3_resnet50.json` |
#### Run the application on the target device
Ensure that you complete the [`Prerequisites`](#prerequisites). This downloads all required artifacts to the target device.
```bash theme={null}
gst-filesrc-2detection-classification-segmentation-side-by-side.py
```
The default input video for classification, segmentation, and detection is at `/etc/media/video.mp4`.
To display all available options:
```bash theme={null}
gst-filesrc-2detection-classification-segmentation-side-by-side.py -h
```
To stop the use case, press **CTRL + C**.
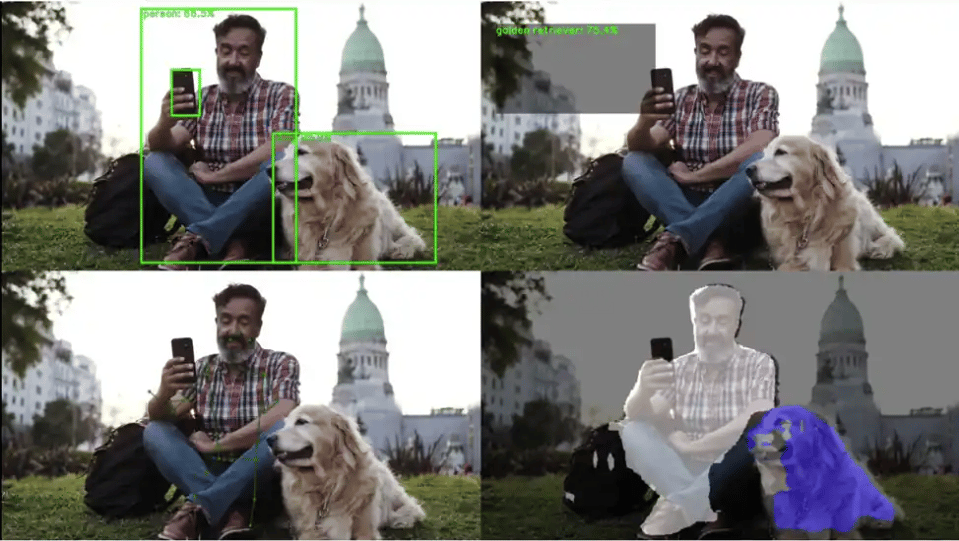
#### Expected Output
The four streams are previewed side by side on a local display.
Pipeline Flow
| Process | Description |
| ----------------------------------- | ----------------------------------------------------------- |
| `filesrc` | Reads the video data from a file. |
| `qtdemux` | Demultiplexes the video data. |
| `h264parse` | Parses H.264 video. |
| `v4l2h264dec` | Decodes the H.264 video. |
| `qtimlvconverter` | Preprocesses frames for each inference branch. |
| `qtimltflite` | Runs detection, classification, and segmentation inference. |
| `qtimlpostprocess` (detection) | Produces bounding boxes and labels. |
| `qtimlpostprocess` (classification) | Produces classification label frames. |
| `qtimlpostprocess` (segmentation) | Produces segmentation mask frames via `deeplab-argmax`. |
| `qtimetamux` | Synchronizes video and metadata for the detection branch. |
| `qtivoverlay` | Overlays bounding boxes on the detection stream. |
| `qtivcomposer` | Composes all four streams side by side. |
| `waylandsink` | Renders the composed output on a local display. |
***
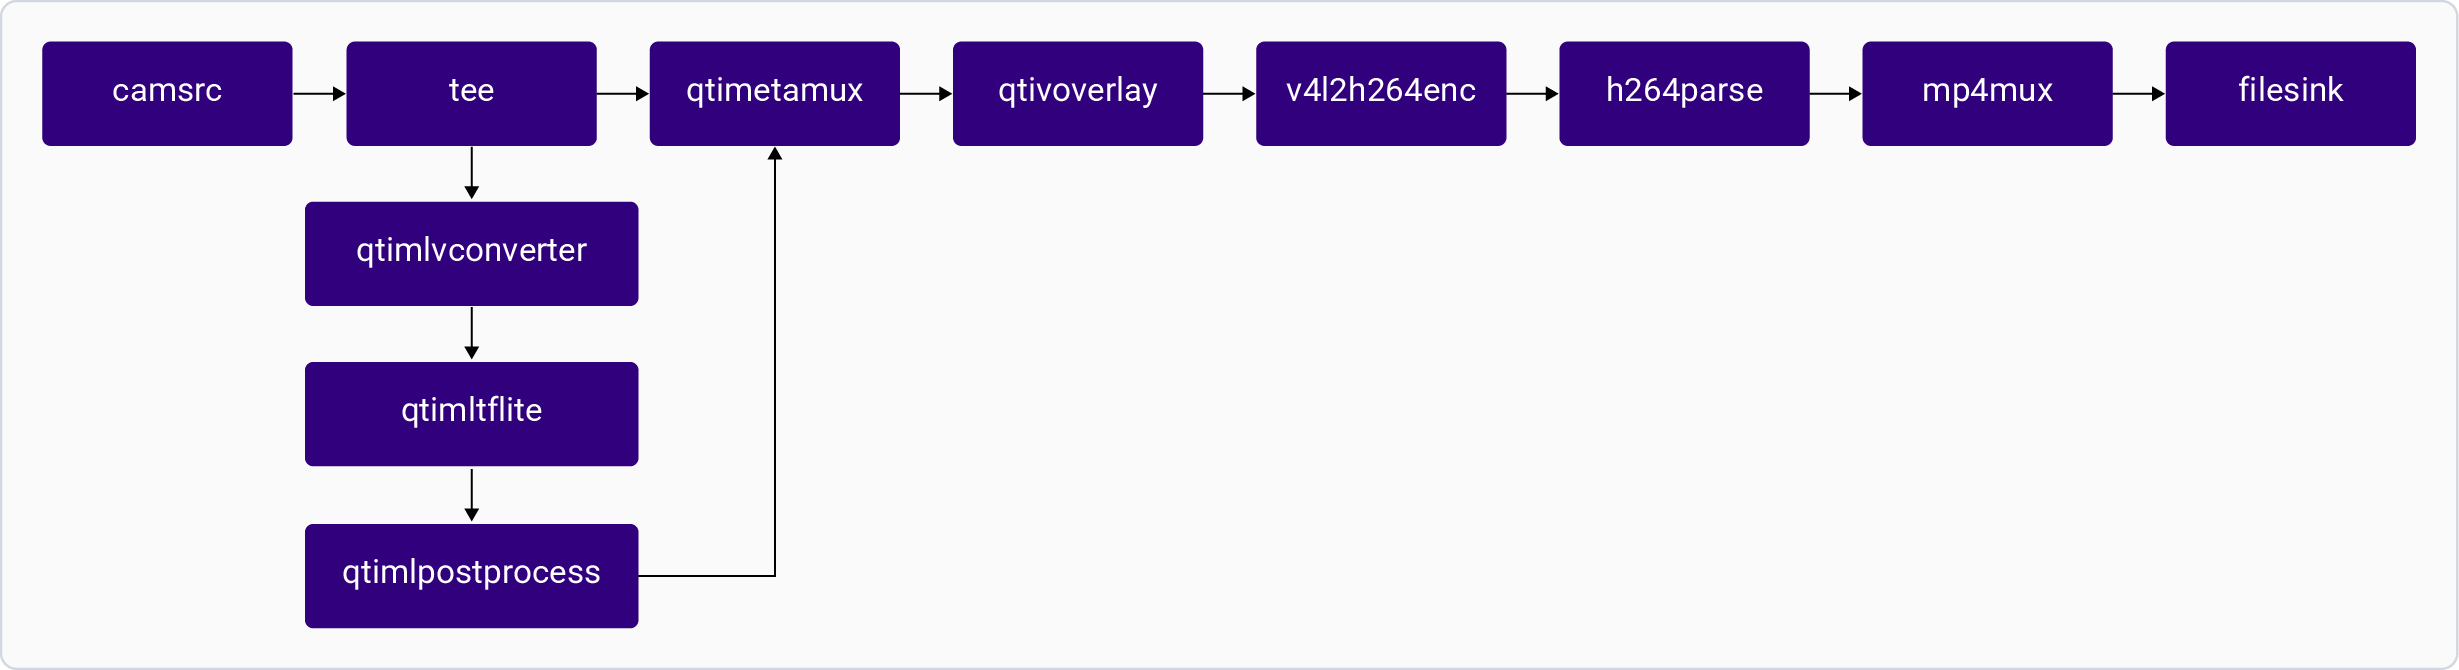
### Camera encode, object detection, and display
The [**gst-camera-two-stream-encode-file-detection-display.py**](https://github.com/qualcomm/gst-plugins-imsdk/blob/main/gst-python-examples/gst-camera-two-stream-encode-file-detection-display.py) application encodes the camera stream to a file while simultaneously running YOLOX object detection and displaying results.
For information about the plugins used in this pipeline, see [**Pipeline flow**](#camera-encode-detection-pipeline-flow).
This application isn't supported in the Config #1 of the QLI 2.0 GA release.
**Application:** [`gst-camera-two-stream-encode-file-detection-display.py`](https://github.com/qualcomm/gst-plugins-imsdk/blob/main/gst-python-examples/gst-camera-two-stream-encode-file-detection-display.py)
 #### Sample Model and Label Files
| Runtime | Model file | Label file |
| ------- | ------------------------ | ------------ |
| LiteRT | `yolox_quantized.tflite` | `yolox.json` |
#### Run the application on the target device
Ensure that you complete the [`Prerequisites`](#prerequisites). This downloads all required artifacts to the target device.
```bash theme={null}
gst-camera-two-stream-encode-file-detection-display.py
```
To display all available options:
```bash theme={null}
gst-camera-two-stream-encode-file-detection-display.py -h
```
To stop the use case, press **CTRL + C**.
#### Expected Output
The output is saved at `/etc/media/test.mp4`.
#### Sample Model and Label Files
| Runtime | Model file | Label file |
| ------- | ------------------------ | ------------ |
| LiteRT | `yolox_quantized.tflite` | `yolox.json` |
#### Run the application on the target device
Ensure that you complete the [`Prerequisites`](#prerequisites). This downloads all required artifacts to the target device.
```bash theme={null}
gst-camera-two-stream-encode-file-detection-display.py
```
To display all available options:
```bash theme={null}
gst-camera-two-stream-encode-file-detection-display.py -h
```
To stop the use case, press **CTRL + C**.
#### Expected Output
The output is saved at `/etc/media/test.mp4`.
Pipeline Flow
| Process | Description |
| ------------------ | ----------------------------------------------------------- |
| `qticamsrc` | Collects two streams — one for detection, one for encoding. |
| `v4l2h264enc` | Encodes H.264 video. |
| `h264parse` | Parses H.264 video. |
| `mp4mux` | Multiplexes video into MP4. |
| `qtimlvconverter` | Preprocesses frames for detection inference. |
| `qtimltflite` | Runs YOLOX object detection inference. |
| `qtimlpostprocess` | Produces bounding boxes and labels. |
| `qtimetamux` | Synchronizes video and metadata. |
| `qtivoverlay` | Overlays bounding boxes on the video frame. |
| `filesink` | Saves the encoded video to a file. |
| `waylandsink` | Renders the detection output on a local display. |
***
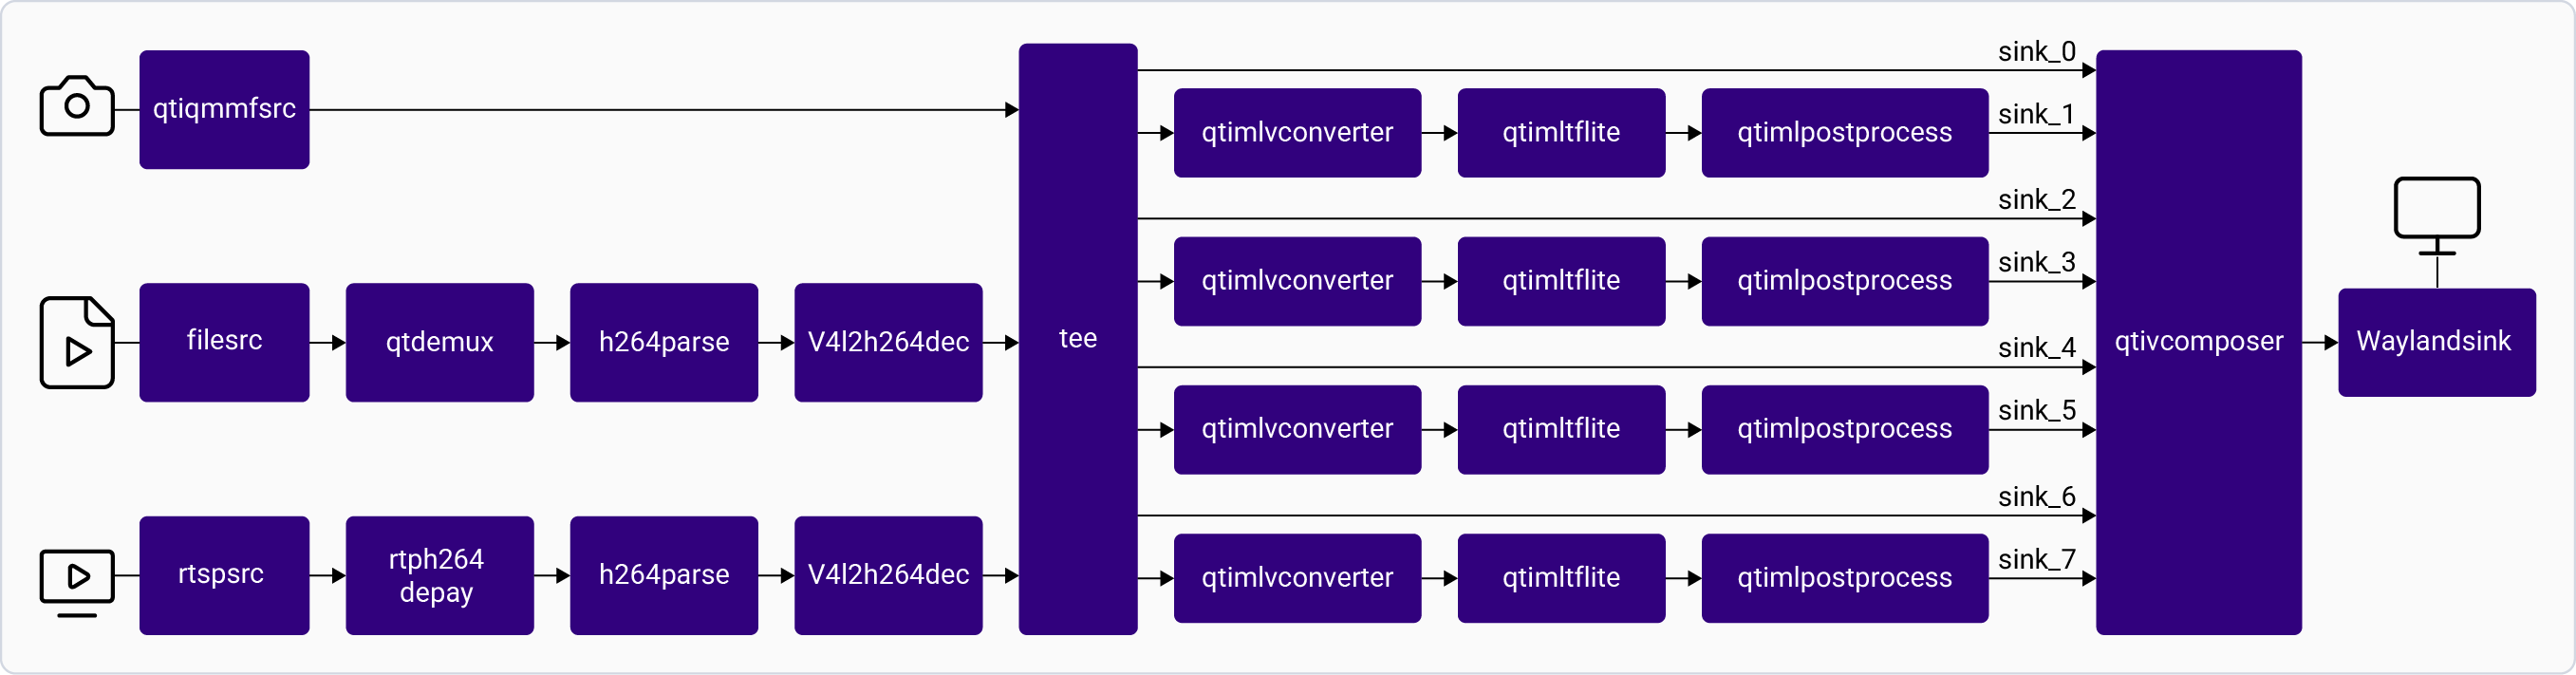
### Parallel inference using Python
The [**gst-parallel-inference.py**](https://github.com/qualcomm/gst-plugins-imsdk/blob/main/gst-python-examples/gst-parallel-inference.py) application receives a video input from a camera, file, or RTSP stream and runs four-channel parallel AI inference (classification, object detection, pose detection, and segmentation).
For information about the plugins used in this pipeline, see [**Pipeline flow**](#parallel-inference-pipeline-flow).
This application isn't supported in the Config #1 of the QLI 2.0 GA release.
**Application:** [`gst-parallel-inference.py`](https://github.com/qualcomm/gst-plugins-imsdk/blob/main/gst-python-examples/gst-parallel-inference.py)
 #### Sample Model and Label Files
| Runtime | Model file | Label file |
| ------- | ------------------------------------------------------------------------------------------------------------------------------------------------------------------------------------------------ | ------------------------------------------------------------------------------------------------------------------------------------------------------------------- |
| LiteRT | detection: `yolox_quantized.tflite`
#### Sample Model and Label Files
| Runtime | Model file | Label file |
| ------- | ------------------------------------------------------------------------------------------------------------------------------------------------------------------------------------------------ | ------------------------------------------------------------------------------------------------------------------------------------------------------------------- |
| LiteRT | detection: `yolox_quantized.tflite`
classification: `inception_v3_quantized.tflite`
segmentation: `deeplabv3_plus_mobilenet_quantized.tflite`
pose: `hrnet_pose_quantized.tflite` | detection: `yolox.json`
classification: `classification.json`
segmentation: `deeplabv3_resnet50.json`
pose: `hrnet_pose.json`, `hrnet_settings.json` |
#### Run the application on the target device
Ensure that you complete the [`Prerequisites`](#prerequisites). This downloads all required artifacts to the target device.
* Input from the camera:
```bash theme={null}
gst-parallel-inference.py --camera
```
* Input from a file:
```bash theme={null}
gst-parallel-inference.py --file "/etc/media/video.mp4"
```
* Input from an RTSP stream:
```bash theme={null}
gst-parallel-inference.py --rtsp "rtsp://:/"
```
To display all available options:
```bash theme={null}
gst-parallel-inference.py -h
```
To stop the use case, press **CTRL + C**.
#### Expected Output
The four inference results are displayed side by side on the screen.
Pipeline Flow
| Process | Description |
| ----------------------------------- | ----------------------------------------------------------------------------- |
| `qticamsrc` / `filesrc` / `rtspsrc` | Captures stream from camera, file, or RTSP. |
| `v4l2h264dec` | Decodes H.264 video. |
| `qtimlvconverter` | Preprocesses frames for each of the four inference branches. |
| `qtimltflite` | Runs detection, classification, segmentation, and pose inference in parallel. |
| `qtimlpostprocess` (detection) | Produces bounding boxes and labels. |
| `qtimlpostprocess` (classification) | Produces classification label frames. |
| `qtimlpostprocess` (segmentation) | Produces segmentation mask frames. |
| `qtimlpostprocess` (pose) | Produces pose key point frames via HRNet module. |
| `qtimetamux` | Synchronizes video and metadata for the detection branch. |
| `qtivoverlay` | Overlays bounding boxes on the detection stream. |
| `qtivcomposer` | Composes all four output streams side by side. |
| `waylandsink` | Renders the composed output on a local display. |
***
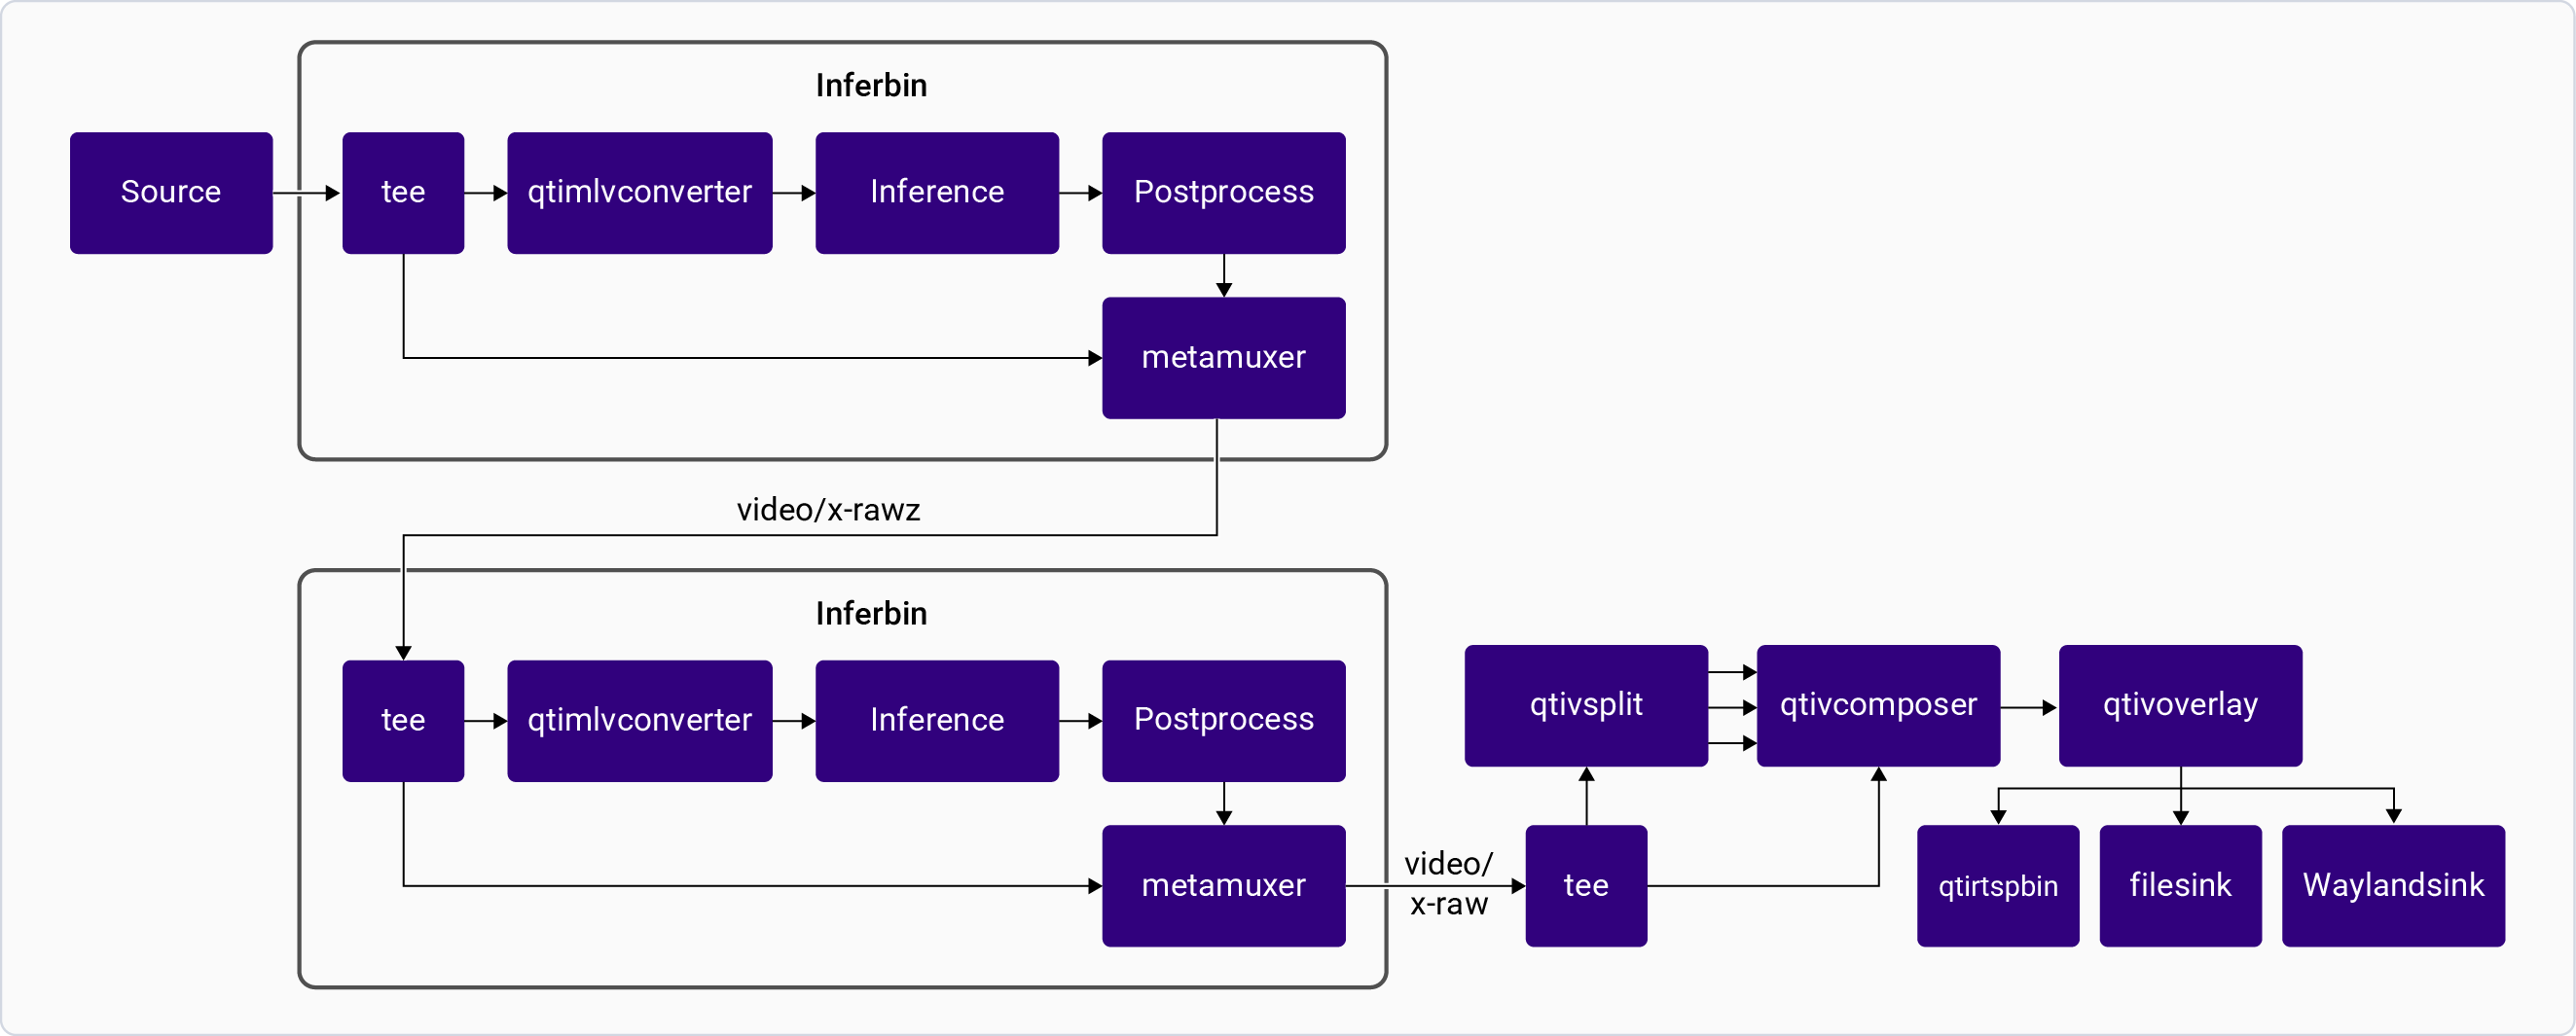
### Daisy chain detection and pose detection using Python
The [**gst-ai-daisychain-detection-pose.py**](https://github.com/qualcomm/gst-plugins-imsdk/blob/main/gst-python-examples/gst-daisychain-detection-pose.py) application performs cascaded object detection and pose detection with input from a camera, file, or RTSP stream.
For information about the plugins used in this pipeline, see [**Pipeline flow**](#daisychain-pose-pipeline-flow).
This application isn't supported in the Config #1 of the QLI 2.0 GA release.
**Application:** [`gst-ai-daisychain-detection-pose.py`](https://github.com/qualcomm/gst-plugins-imsdk/blob/main/gst-python-examples/gst-daisychain-detection-pose.py)
 #### Sample Model and Label Files
| Runtime | Model file | Label file |
| ------- | ---------------------------------------------------------------------------- | --------------------------------------------------------------------------- |
| LiteRT | detection: `yolox_quantized.tflite`
#### Sample Model and Label Files
| Runtime | Model file | Label file |
| ------- | ---------------------------------------------------------------------------- | --------------------------------------------------------------------------- |
| LiteRT | detection: `yolox_quantized.tflite`
pose: `hrnet_pose_quantized.tflite` | detection: `yolox.json`
pose: `hrnet_pose.json`, `hrnet_settings.json` |
#### Run the application on the target device
Ensure that you complete the [`Prerequisites`](#prerequisites). This downloads all required artifacts to the target device.
* Input from the camera:
```bash theme={null}
gst-daisychain-detection-pose.py --camera
```
* Input from a file:
```bash theme={null}
gst-daisychain-detection-pose.py --file /etc/media/video.mp4
```
* Input from an RTSP stream:
```bash theme={null}
gst-daisychain-detection-pose.py --rtsp "rtsp://:/"
```
To display all available options:
```bash theme={null}
gst-daisychain-detection-pose.py -h
```
To stop the use case, press **CTRL + C**.
#### Expected Output

Pipeline Flow
| Process | Description |
| ----------------------------------- | ---------------------------------------------------------------------------------- |
| `qticamsrc` / `filesrc` / `rtspsrc` | Captures stream from camera, file, or RTSP. |
| `v4l2h264dec` | Decodes H.264 video. |
| `qtivsplit` | Crops full frame into smaller frames based on detected bounding boxes (maximum 4). |
| `qtimlvconverter` | Preprocesses frames for detection (stage 1) and pose estimation (stage 2). |
| `qtimltflite` | Runs detection and pose inference sequentially. |
| `qtimlpostprocess` (detection) | Produces bounding boxes. Loads YOLOv8 submodule. |
| `qtimlpostprocess` (pose) | Produces pose key point frames. Loads HRNet module. |
| `qtimetamux` | Synchronizes video and metadata. |
| `qtivcomposer` | Composes the final output stream. |
| `waylandsink` | Renders the output on a local display. |
***
## Troubleshooting
If any model isn’t available after downloading the script file, you can download the model manually from [IoT — Qualcomm AI Hub](https://aihub.qualcomm.com)
and push it to the target device:
```bash theme={null}
scp root@:/etc/models
```
For example:
```bash theme={null}
scp mobilenet_v2_quantized.tflite root@:/etc/models
```
Remount the file system with read/write permissions:
For Qualcomm Linux:
```bash theme={null}
mount -o remount,rw /
```
If you cannot locate the qticamsrc plugin, ensure that the camera server is
running and clear the GStreamer cache using the following commands:
```bash theme={null}
ps -ef | grep cam-server
```
```bash theme={null}
rm ~/.cache/gstreamer-1.0/registry.aarch64.bin
```
To enable basic GStreamer logging, run the following before launching the
application:
```bash theme={null}
export GST_DEBUG=2
```
To increase verbosity for specific
plugins, use a comma-separated list with log levels (1–7):
```bash theme={null}
export GST_DEBUG=3,qticamsrc:5,qtimlvconverter:5,qtimltflite:5
```
To redirect logs to a file for offline analysis:
```bash theme={null}
export GST_DEBUG=3
export GST_DEBUG_FILE=/tmp/gst_classification_debug.log
```