> ## Documentation Index
> Fetch the complete documentation index at: https://imsdkdocs.qualcomm.com/llms.txt
> Use this file to discover all available pages before exploring further.
# Daisy Chaining
> Daisy Chaining AI Models
Daisy chaining refers to the sequential execution of multiple machine learning models, where each model specializes in a particular task. This example chains a [YoloX](https://aihub.qualcomm.com/iot/models/yolox) object detection model with an [HRNet Pose](https://aihub.qualcomm.com/iot/models/hrnet_pose) estimation model — YoloX first detects people in the frame, then HRNet estimates the pose of each detected person.
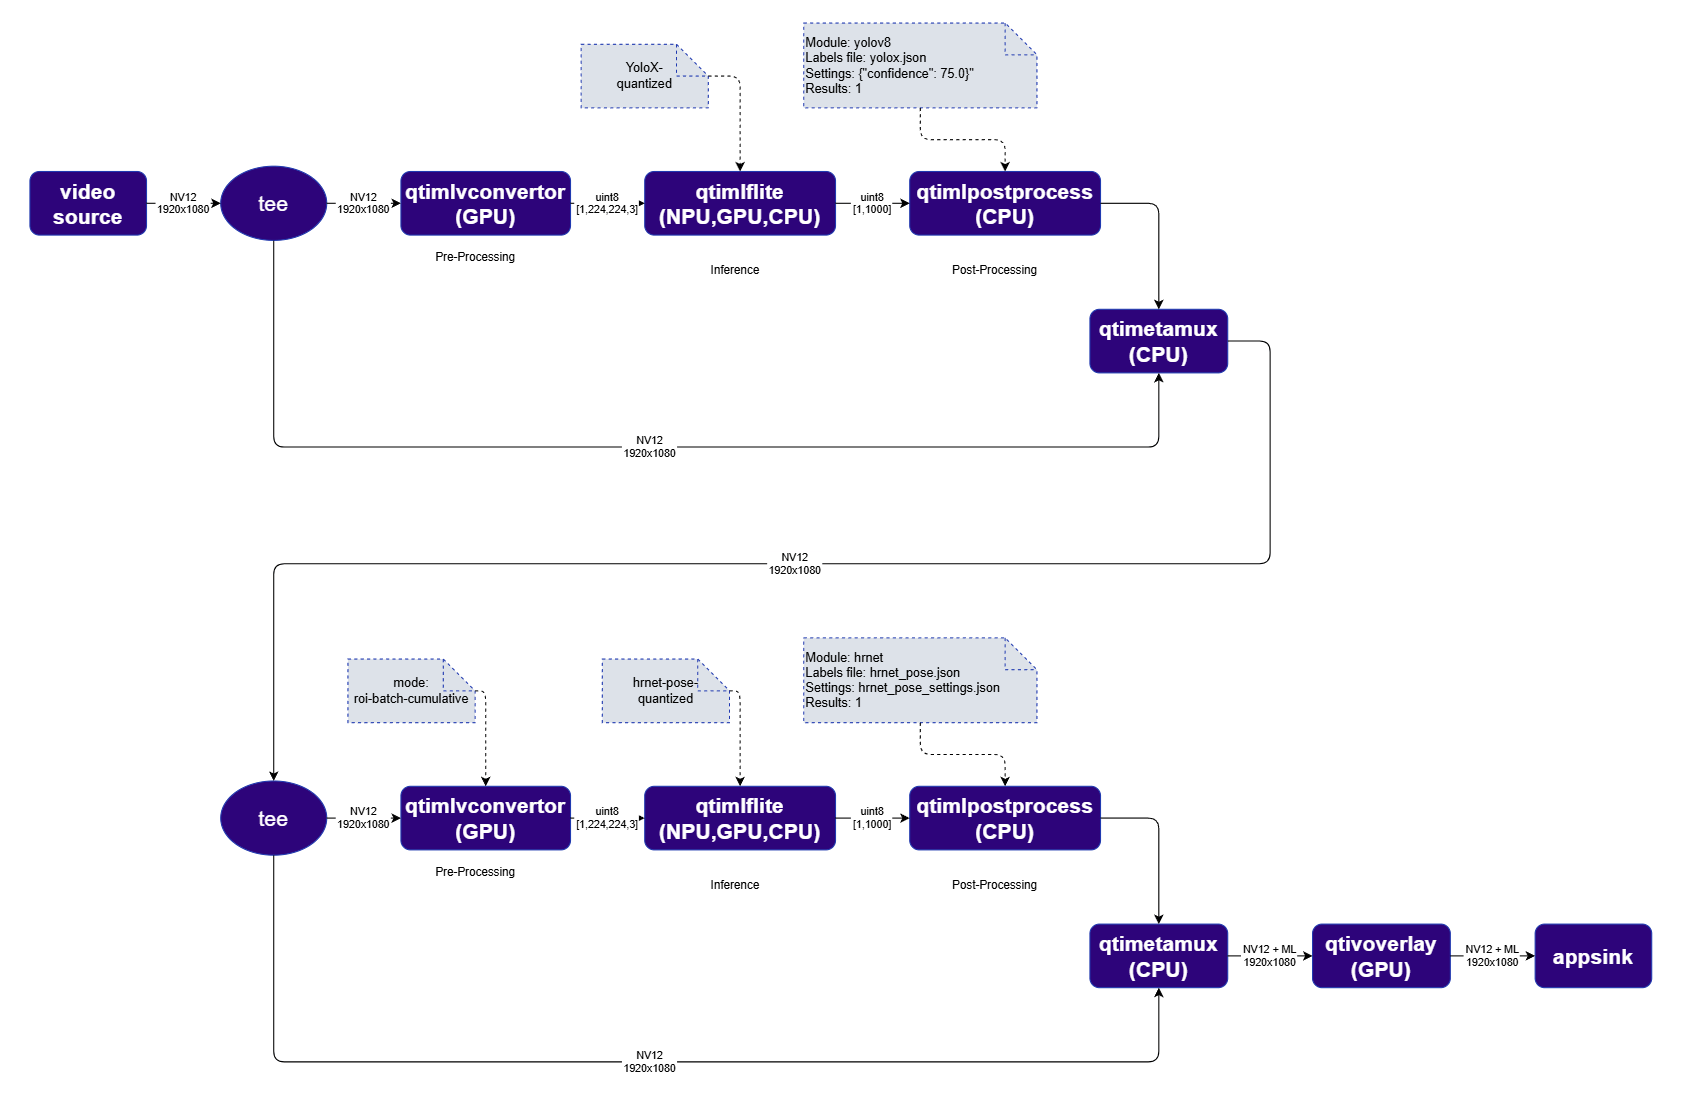 **Stage 1 — Person Detection:** [`qtimlvconverter`](../plugin-reference/qtimlvconverter) converts the NV12 frame to a tensor. [`qtimltflite`](../plugin-reference/qtimltflite) runs FootTrackNet inference. [`qtimlpostprocess`](../plugin-reference/qtimlpostprocess) parses the output into bounding boxes for detected persons.
**Stage 2 — Pose Estimation:** [`qtimlvconverter`](../plugin-reference/qtimlvconverter) in `roi-batch-cumulative` mode crops and centers each detected person's bounding box into individual tensors. [`qtimltflite`](../plugin-reference/qtimltflite) runs HRNet inference per person. [`qtimlpostprocess`](../plugin-reference/qtimlpostprocess) produces keypoints and skeleton connections.
All results are mapped back to the original frame and rendered by [`qtivoverlay`](../plugin-reference/qtivoverlay).
## Run example on device
| File | Download | Save as |
| --------------------- | ------------------------------------------------------------------------------------------------------------------------------------------------------ | ----------------------------- |
| YOLOX W8A8 model | [Qualcomm AI Hub — YOLOX](https://aihub.qualcomm.com/iot/models/yolox) | `yolox_quantized.tflite` |
| HRNet Pose W8A8 model | [Qualcomm AI Hub — HRNet Pose](https://aihub.qualcomm.com/iot/models/hrnet_pose) | `hrnet_pose_quantized.tflite` |
| Detection labels | coco.txt | `coco.txt` |
| Pose labels | coco\_pose.txt | `coco_pose.txt` |
| Pose settings | hrnet\_settings.json | `hrnet_pose_settings.json` |
| Sample video | Input video | `ai_demo_sample.mp4` |
If any downloaded file is a `.zip` archive, extract it on your host machine before copying:
`unzip filename.zip`
Create the required directories and transfer the downloaded files to your device.
```bash SCP (SSH) theme={null}
# Replace $HOME to the appropriate device path before running the commands.
# For QLI: /root
# For Ubuntu: /home/ubuntu
# Modify this based on your platform and ensure files are copied to the correct location on the device.
# Run from your host machine — replace and
ssh @ "mkdir -p $HOME/{models,labels,media,media/output}"
scp yolox_quantized.tflite @:$HOME/models/
scp hrnet_pose_quantized.tflite @:$HOME/models/
scp coco.txt @:$HOME/labels/
scp coco_pose.txt @:$HOME/labels/
scp hrnet_pose_settings.json @:$HOME/labels/
scp ai_demo_sample.mp4 @:$HOME/media/
```
```bash SCP (SSH) theme={null}
ssh @
```
```bash theme={null}
export MODEL_NAME_1=yolox_quantized.tflite
export MODEL_NAME_2=hrnet_pose_quantized.tflite
export LABELS_NAME_1=coco.txt
export LABELS_NAME_2=coco_pose.txt
export HRNET_SETTINGS=hrnet_pose_settings.json
export SRC_VIDEO_NAME=ai_demo_sample.mp4
export VIDEO_SOURCE="filesrc location=$HOME/media/$SRC_VIDEO_NAME ! qtdemux ! h264parse ! v4l2h264dec capture-io-mode=4 output-io-mode=4 ! video/x-raw,format=NV12"
```
```bash theme={null}
gst-launch-1.0 $VIDEO_SOURCE ! \
tee name=t1 \
t1. ! qtimlvconverter name=detection-preprocess ! queue ! \
qtimltflite name=detection-inference delegate=external \
external-delegate-path=libQnnTFLiteDelegate.so \
external-delegate-options="QNNExternalDelegate,backend_type=htp;" \
model=$HOME/models/$MODEL_NAME_1 ! queue ! \
qtimlpostprocess name=detection-postprocess results=8 module=yolov8 \
labels=$HOME/labels/$LABELS_NAME_1 settings='{"confidence": 51.0}' ! \
text/x-raw ! metamux_1. \
t1. ! qtimetamux name=metamux_1 ! queue ! \
tee name=t2 \
t2. ! qtimlvconverter name=pose-preprocess mode=roi-batch-cumulative \
image-disposition=centre ! queue ! \
qtimltflite name=pose-inference delegate=external \
external-delegate-path=libQnnTFLiteDelegate.so \
external-delegate-options="QNNExternalDelegate,backend_type=htp,htp_performance_mode=(string)2;" \
model=$HOME/models/$MODEL_NAME_2 ! queue ! \
qtimlpostprocess name=pose-postprocess results=1 module=hrnet \
labels=$HOME/labels/$LABELS_NAME_2 \
settings=$HOME/labels/$HRNET_SETTINGS ! \
text/x-raw ! metamux_2. \
t2. ! qtimetamux name=metamux_2 ! qtivoverlay ! waylandsink fullscreen=true sync=true
```
* **Python source code:** [gst-daisychain-detection-pose.py](https://github.com/qualcomm/gst-plugins-imsdk/tree/main/gst-python-examples/gst-daisychain-detection-pose.py)
* **Run:**
```bash theme={null}
python3 gst-ai-video-daisychain-pose-estimation.py -s "$VIDEO_SOURCE" -o display
```
* **Application source code:** [gst-ai-video-daisychain-pose-estimation](https://github.com/qualcomm/gst-plugins-imsdk/tree/main/gst-sample-apps/gst-ai-video-daisychain-pose-estimation)
* **Build your application:**
Steps to build custom application
Steps to build custom application
* **Run:**
```bash theme={null}
gst-ai-video-daisychain-pose-estimation -s "$VIDEO_SOURCE" -o display
```
## Expected output
Bounding boxes (from YOLOX) and skeleton keypoints (from HRNet) are overlaid on each video frame in real time.
## Exploring output options
The [`waylandsink`](../plugin-reference/waylandsink) in the pipeline above can be replaced with other output elements:
**Encode to file:**
```bash theme={null}
v4l2h264enc output-io-mode=5 capture-io-mode=4 ! queue ! h264parse ! mp4mux ! filesink location=$HOME/media/output.mp4
```
**Save raw frames:**
```bash theme={null}
filesink location=$HOME/media/frame.bin
```
**Stream over RTSP:**
```bash theme={null}
v4l2h264enc output-io-mode=4 capture-io-mode=4 ! queue ! h264parse config-interval=1 ! queue ! qtirtspbin address=0.0.0.0 port=8900
```
Access the stream at `rtsp://:8900/live`.
**Stage 1 — Person Detection:** [`qtimlvconverter`](../plugin-reference/qtimlvconverter) converts the NV12 frame to a tensor. [`qtimltflite`](../plugin-reference/qtimltflite) runs FootTrackNet inference. [`qtimlpostprocess`](../plugin-reference/qtimlpostprocess) parses the output into bounding boxes for detected persons.
**Stage 2 — Pose Estimation:** [`qtimlvconverter`](../plugin-reference/qtimlvconverter) in `roi-batch-cumulative` mode crops and centers each detected person's bounding box into individual tensors. [`qtimltflite`](../plugin-reference/qtimltflite) runs HRNet inference per person. [`qtimlpostprocess`](../plugin-reference/qtimlpostprocess) produces keypoints and skeleton connections.
All results are mapped back to the original frame and rendered by [`qtivoverlay`](../plugin-reference/qtivoverlay).
## Run example on device
| File | Download | Save as |
| --------------------- | ------------------------------------------------------------------------------------------------------------------------------------------------------ | ----------------------------- |
| YOLOX W8A8 model | [Qualcomm AI Hub — YOLOX](https://aihub.qualcomm.com/iot/models/yolox) | `yolox_quantized.tflite` |
| HRNet Pose W8A8 model | [Qualcomm AI Hub — HRNet Pose](https://aihub.qualcomm.com/iot/models/hrnet_pose) | `hrnet_pose_quantized.tflite` |
| Detection labels | coco.txt | `coco.txt` |
| Pose labels | coco\_pose.txt | `coco_pose.txt` |
| Pose settings | hrnet\_settings.json | `hrnet_pose_settings.json` |
| Sample video | Input video | `ai_demo_sample.mp4` |
If any downloaded file is a `.zip` archive, extract it on your host machine before copying:
`unzip filename.zip`
Create the required directories and transfer the downloaded files to your device.
```bash SCP (SSH) theme={null}
# Replace $HOME to the appropriate device path before running the commands.
# For QLI: /root
# For Ubuntu: /home/ubuntu
# Modify this based on your platform and ensure files are copied to the correct location on the device.
# Run from your host machine — replace and
ssh @ "mkdir -p $HOME/{models,labels,media,media/output}"
scp yolox_quantized.tflite @:$HOME/models/
scp hrnet_pose_quantized.tflite @:$HOME/models/
scp coco.txt @:$HOME/labels/
scp coco_pose.txt @:$HOME/labels/
scp hrnet_pose_settings.json @:$HOME/labels/
scp ai_demo_sample.mp4 @:$HOME/media/
```
```bash SCP (SSH) theme={null}
ssh @
```
```bash theme={null}
export MODEL_NAME_1=yolox_quantized.tflite
export MODEL_NAME_2=hrnet_pose_quantized.tflite
export LABELS_NAME_1=coco.txt
export LABELS_NAME_2=coco_pose.txt
export HRNET_SETTINGS=hrnet_pose_settings.json
export SRC_VIDEO_NAME=ai_demo_sample.mp4
export VIDEO_SOURCE="filesrc location=$HOME/media/$SRC_VIDEO_NAME ! qtdemux ! h264parse ! v4l2h264dec capture-io-mode=4 output-io-mode=4 ! video/x-raw,format=NV12"
```
```bash theme={null}
gst-launch-1.0 $VIDEO_SOURCE ! \
tee name=t1 \
t1. ! qtimlvconverter name=detection-preprocess ! queue ! \
qtimltflite name=detection-inference delegate=external \
external-delegate-path=libQnnTFLiteDelegate.so \
external-delegate-options="QNNExternalDelegate,backend_type=htp;" \
model=$HOME/models/$MODEL_NAME_1 ! queue ! \
qtimlpostprocess name=detection-postprocess results=8 module=yolov8 \
labels=$HOME/labels/$LABELS_NAME_1 settings='{"confidence": 51.0}' ! \
text/x-raw ! metamux_1. \
t1. ! qtimetamux name=metamux_1 ! queue ! \
tee name=t2 \
t2. ! qtimlvconverter name=pose-preprocess mode=roi-batch-cumulative \
image-disposition=centre ! queue ! \
qtimltflite name=pose-inference delegate=external \
external-delegate-path=libQnnTFLiteDelegate.so \
external-delegate-options="QNNExternalDelegate,backend_type=htp,htp_performance_mode=(string)2;" \
model=$HOME/models/$MODEL_NAME_2 ! queue ! \
qtimlpostprocess name=pose-postprocess results=1 module=hrnet \
labels=$HOME/labels/$LABELS_NAME_2 \
settings=$HOME/labels/$HRNET_SETTINGS ! \
text/x-raw ! metamux_2. \
t2. ! qtimetamux name=metamux_2 ! qtivoverlay ! waylandsink fullscreen=true sync=true
```
* **Python source code:** [gst-daisychain-detection-pose.py](https://github.com/qualcomm/gst-plugins-imsdk/tree/main/gst-python-examples/gst-daisychain-detection-pose.py)
* **Run:**
```bash theme={null}
python3 gst-ai-video-daisychain-pose-estimation.py -s "$VIDEO_SOURCE" -o display
```
* **Application source code:** [gst-ai-video-daisychain-pose-estimation](https://github.com/qualcomm/gst-plugins-imsdk/tree/main/gst-sample-apps/gst-ai-video-daisychain-pose-estimation)
* **Build your application:**
Steps to build custom application
Steps to build custom application
* **Run:**
```bash theme={null}
gst-ai-video-daisychain-pose-estimation -s "$VIDEO_SOURCE" -o display
```
## Expected output
Bounding boxes (from YOLOX) and skeleton keypoints (from HRNet) are overlaid on each video frame in real time.
## Exploring output options
The [`waylandsink`](../plugin-reference/waylandsink) in the pipeline above can be replaced with other output elements:
**Encode to file:**
```bash theme={null}
v4l2h264enc output-io-mode=5 capture-io-mode=4 ! queue ! h264parse ! mp4mux ! filesink location=$HOME/media/output.mp4
```
**Save raw frames:**
```bash theme={null}
filesink location=$HOME/media/frame.bin
```
**Stream over RTSP:**
```bash theme={null}
v4l2h264enc output-io-mode=4 capture-io-mode=4 ! queue ! h264parse config-interval=1 ! queue ! qtirtspbin address=0.0.0.0 port=8900
```
Access the stream at `rtsp://:8900/live`.