> ## Documentation Index
> Fetch the complete documentation index at: https://imsdkdocs.qualcomm.com/llms.txt
> Use this file to discover all available pages before exploring further.
# Image Classification
> Building image classification pipelines with QIM SDK
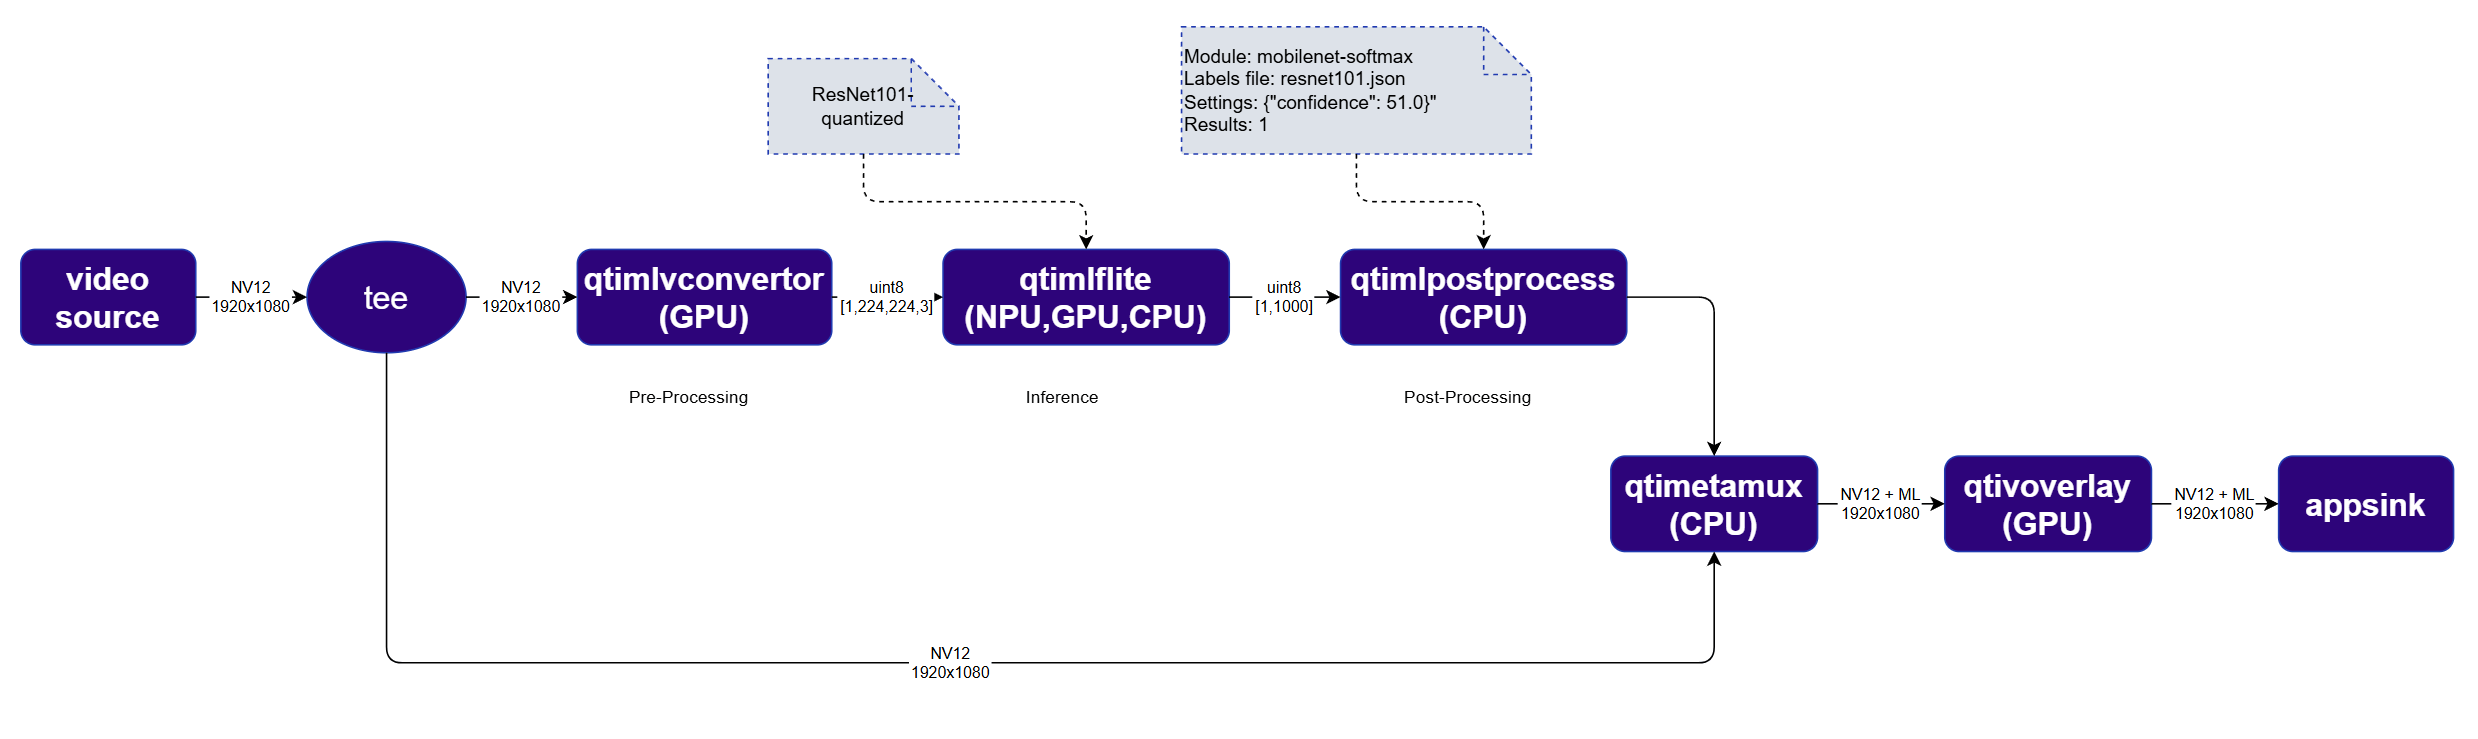
In an image classification system, the pipeline analyzes each frame of a video stream and assigns labels that reflect the scene's content such as identified objects or scene categories. Let's walk through an example of building an image classification pipeline with the QIM SDK using the ResNeXt101 image classification model which can be [downloaded from Qualcomm's AI Hub](https://aihub.qualcomm.com/iot/models/resnext101).
Here is what our pipeline in this example will look like:
 You can refer to the [Building AI Pipelines](../qimsdk-overview/sdkoverview) for more general information about each element of an AI pipeline
## Run example on device
| File | Download | Save as |
| --------------------- | ------------------------------------------------------------------------------------------------------------------------------------------------------ | ----------------------- |
| ResNeXt101 W8A8 model | [Qualcomm AI Hub — ResNeXt101](https://aihub.qualcomm.com/iot/models/resnext101) | `resnet101-w8a8.tflite` |
| Classification labels | imagenet.txt | `imagenet.txt` |
| Sample video | Input video | `ai_demo_sample.mp4` |
If any downloaded file is a `.zip` archive, extract it on your host machine before copying:
`unzip filename.zip`
Create the required directories and transfer the downloaded files to your device.
```bash SCP (SSH) theme={null}
# Replace $HOME to the appropriate device path before running the commands.
# For QLI: /root
# For Ubuntu: /home/ubuntu
# Modify this based on your platform and ensure files are copied to the correct location on the device.
# Run from your host machine — replace and
ssh @ "mkdir -p $HOME/{models,labels,media,media/output}"
scp resnet101-w8a8.tflite @:$HOME/models/
scp imagenet.txt @:$HOME/labels/
scp ai_demo_sample.mp4 @:$HOME/media/
```
```bash SCP (SSH) theme={null}
ssh @
```
```bash theme={null}
export MODEL_NAME=resnet101-w8a8.tflite
export LABELS_NAME=imagenet.txt
export SRC_VIDEO_NAME=ai_demo_sample.mp4
export VIDEO_SOURCE="filesrc location=$HOME/media/$SRC_VIDEO_NAME ! qtdemux ! h264parse ! v4l2h264dec capture-io-mode=4 output-io-mode=4 ! video/x-raw,format=NV12"
```
```bash theme={null}
gst-launch-1.0 $VIDEO_SOURCE ! \
tee name=t \
t. ! qtimlvconverter name=preprocess ! queue ! \
qtimltflite name=inference delegate=external \
external-delegate-path=libQnnTFLiteDelegate.so \
external-delegate-options="QNNExternalDelegate,backend_type=htp;" \
model=$HOME/models/$MODEL_NAME ! queue ! \
qtimlpostprocess name=postprocess results=1 module=mobilenet-softmax \
labels=$HOME/labels/$LABELS_NAME settings='{"confidence": 51.0}' ! \
text/x-raw ! metamux. \
t. ! qtimetamux name=metamux ! qtivoverlay ! waylandsink sync=true fullscreen=true
```
* **Python source code:** [gst-ai-video-classification.py](https://github.com/qualcomm/gst-plugins-imsdk/tree/main/gst-python-examples/gst-ai-video-classification.py)
* **Run:**
```bash theme={null}
python3 gst-ai-video-classification.py -s "$VIDEO_SOURCE" -o display
```
* **Application source code:** [gst-ai-video-classification](https://github.com/qualcomm/gst-plugins-imsdk/tree/main/gst-sample-apps/gst-ai-video-classification)
* **Build your application:**
Steps to build custom application
Steps to build custom application
* **Run:**
```bash theme={null}
gst-ai-video-classification -s "$VIDEO_SOURCE" -o display
```
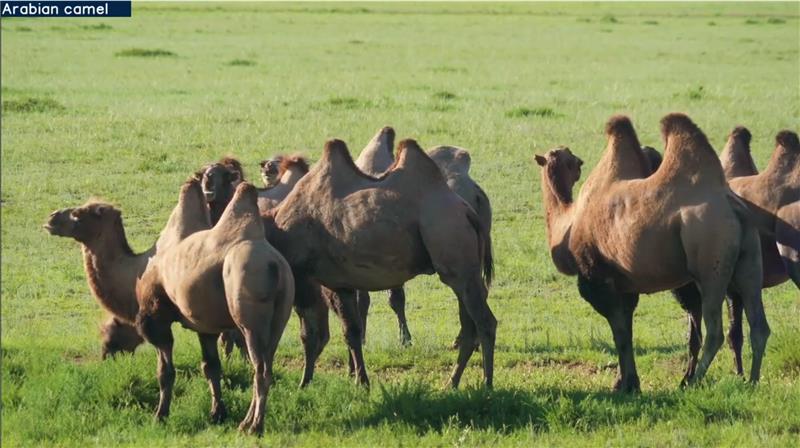
## Expected output
The result of the video classification is visually overlaid in the top-left corner of the frame.
You can refer to the [Building AI Pipelines](../qimsdk-overview/sdkoverview) for more general information about each element of an AI pipeline
## Run example on device
| File | Download | Save as |
| --------------------- | ------------------------------------------------------------------------------------------------------------------------------------------------------ | ----------------------- |
| ResNeXt101 W8A8 model | [Qualcomm AI Hub — ResNeXt101](https://aihub.qualcomm.com/iot/models/resnext101) | `resnet101-w8a8.tflite` |
| Classification labels | imagenet.txt | `imagenet.txt` |
| Sample video | Input video | `ai_demo_sample.mp4` |
If any downloaded file is a `.zip` archive, extract it on your host machine before copying:
`unzip filename.zip`
Create the required directories and transfer the downloaded files to your device.
```bash SCP (SSH) theme={null}
# Replace $HOME to the appropriate device path before running the commands.
# For QLI: /root
# For Ubuntu: /home/ubuntu
# Modify this based on your platform and ensure files are copied to the correct location on the device.
# Run from your host machine — replace and
ssh @ "mkdir -p $HOME/{models,labels,media,media/output}"
scp resnet101-w8a8.tflite @:$HOME/models/
scp imagenet.txt @:$HOME/labels/
scp ai_demo_sample.mp4 @:$HOME/media/
```
```bash SCP (SSH) theme={null}
ssh @
```
```bash theme={null}
export MODEL_NAME=resnet101-w8a8.tflite
export LABELS_NAME=imagenet.txt
export SRC_VIDEO_NAME=ai_demo_sample.mp4
export VIDEO_SOURCE="filesrc location=$HOME/media/$SRC_VIDEO_NAME ! qtdemux ! h264parse ! v4l2h264dec capture-io-mode=4 output-io-mode=4 ! video/x-raw,format=NV12"
```
```bash theme={null}
gst-launch-1.0 $VIDEO_SOURCE ! \
tee name=t \
t. ! qtimlvconverter name=preprocess ! queue ! \
qtimltflite name=inference delegate=external \
external-delegate-path=libQnnTFLiteDelegate.so \
external-delegate-options="QNNExternalDelegate,backend_type=htp;" \
model=$HOME/models/$MODEL_NAME ! queue ! \
qtimlpostprocess name=postprocess results=1 module=mobilenet-softmax \
labels=$HOME/labels/$LABELS_NAME settings='{"confidence": 51.0}' ! \
text/x-raw ! metamux. \
t. ! qtimetamux name=metamux ! qtivoverlay ! waylandsink sync=true fullscreen=true
```
* **Python source code:** [gst-ai-video-classification.py](https://github.com/qualcomm/gst-plugins-imsdk/tree/main/gst-python-examples/gst-ai-video-classification.py)
* **Run:**
```bash theme={null}
python3 gst-ai-video-classification.py -s "$VIDEO_SOURCE" -o display
```
* **Application source code:** [gst-ai-video-classification](https://github.com/qualcomm/gst-plugins-imsdk/tree/main/gst-sample-apps/gst-ai-video-classification)
* **Build your application:**
Steps to build custom application
Steps to build custom application
* **Run:**
```bash theme={null}
gst-ai-video-classification -s "$VIDEO_SOURCE" -o display
```
## Expected output
The result of the video classification is visually overlaid in the top-left corner of the frame.
 ## Stream Splitting via tee
One of the powerful features of **GStreamer** is the ability to split a video or audio stream into multiple branches, allowing the same stream to be processed or consumed in different ways simultaneously. In this example, we are using the `tee` element to split the original video stream. One branch runs through the AI processing pipeline to generate classifications, and at the end it is recombined with the original video stream so that the detected label can be displayed on top of the original image. Note that each branch connected to a tee runs on its own thread, so you often need `queue` elements after each branch to avoid blocking.
## Combining inference results with the original image
The [qtimetamux](../plugin-reference/qtimetamux) attaches the AI inference results to the original NV12 video frame as custom GStreamer metadata. This ensures synchronization between the video frame and its associated AI metadata, allowing downstream elements to seamlessly access both for visualization, network streaming, or automated decision-making.
## Adding a text overlay on top of the image
The [qtivoverlay](../plugin-reference/qtivoverlay) element reads the AI metadata and renders visual overlays, such as bounding boxes and labels, directly onto the video frame without requiring buffer duplication.
## Stream Splitting via tee
One of the powerful features of **GStreamer** is the ability to split a video or audio stream into multiple branches, allowing the same stream to be processed or consumed in different ways simultaneously. In this example, we are using the `tee` element to split the original video stream. One branch runs through the AI processing pipeline to generate classifications, and at the end it is recombined with the original video stream so that the detected label can be displayed on top of the original image. Note that each branch connected to a tee runs on its own thread, so you often need `queue` elements after each branch to avoid blocking.
## Combining inference results with the original image
The [qtimetamux](../plugin-reference/qtimetamux) attaches the AI inference results to the original NV12 video frame as custom GStreamer metadata. This ensures synchronization between the video frame and its associated AI metadata, allowing downstream elements to seamlessly access both for visualization, network streaming, or automated decision-making.
## Adding a text overlay on top of the image
The [qtivoverlay](../plugin-reference/qtivoverlay) element reads the AI metadata and renders visual overlays, such as bounding boxes and labels, directly onto the video frame without requiring buffer duplication.