 Beyond the default setup, the application offers flexible input and output configurations that can be tailored via command-line options, as described below:
## Command-Line Options
Beyond the default setup, the application offers flexible input and output configurations that can be tailored via command-line options, as described below:
## Command-Line Options
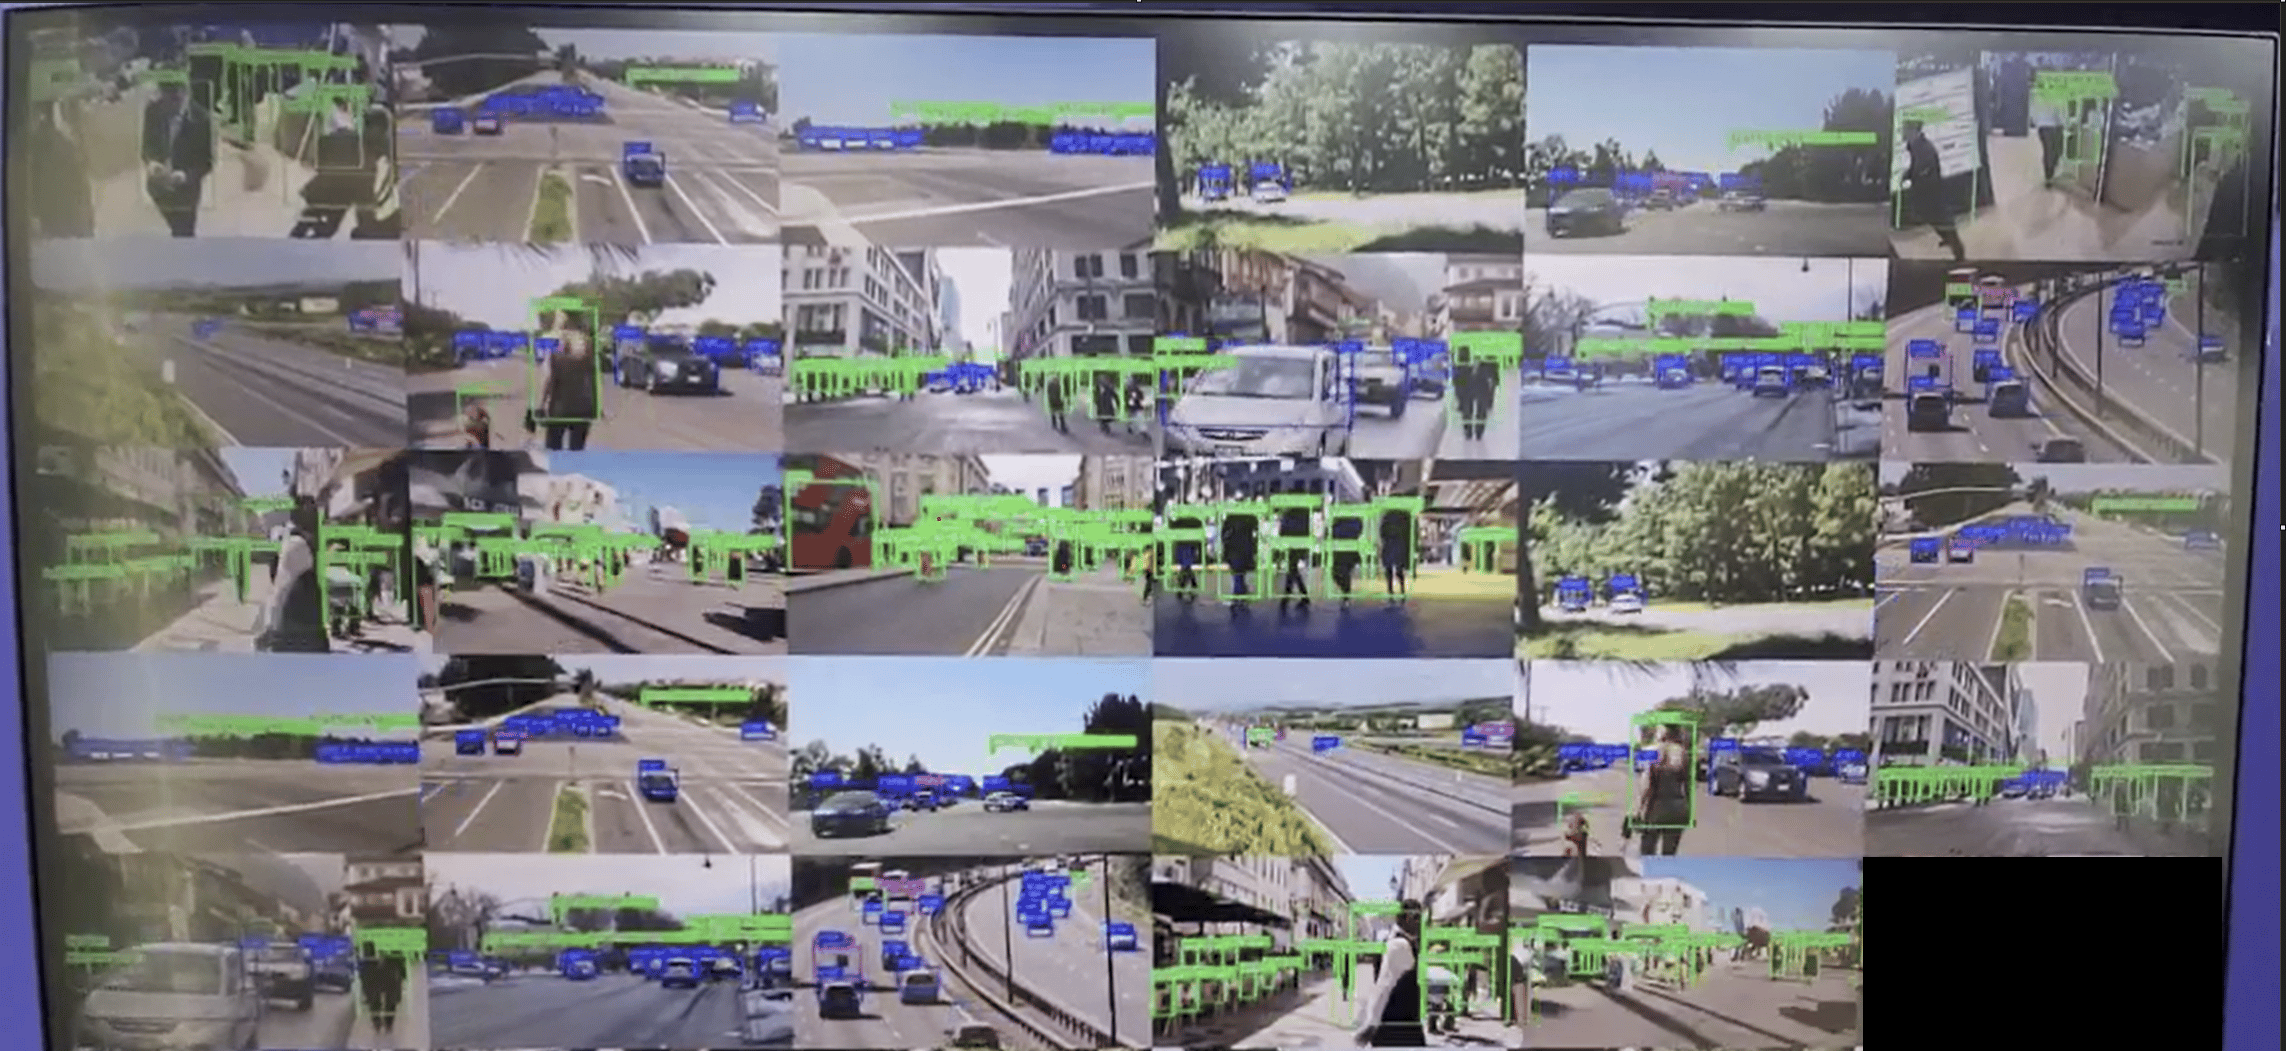
Process up to 31 concurrent IP camera streams in parallel with YOLOv8 object detection, compositing all streams into a unified video wall output and streaming over RTSP or WebRTC.
 ## Elements used in pipeline
| Element | Description |
| ---------------------------------------------------------- | ---------------------------------------------------------------------------------------------------------------------- |
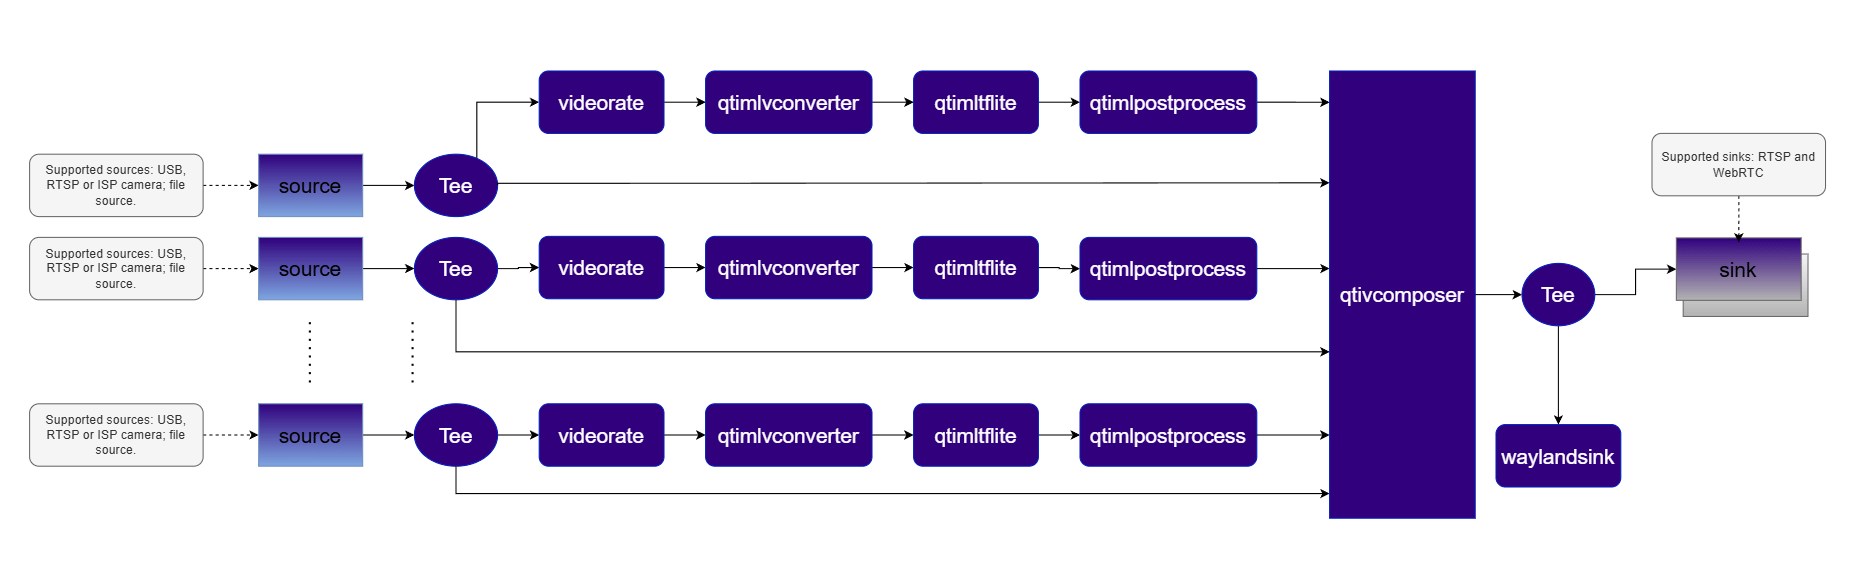
| `source` | Accepts input from an RTSP camera, USB camera, or local file source. |
| `tee` | Splits each decoded stream into parallel branches for simultaneous display and AI inference. |
| `videorate` | Adjusts the video frame rate — reduces rate by half to lower compute load while maintaining display continuity. |
| [`qtimlvconverter`](../plugin-reference/qtimlvconverter) | Prepares frames for inference — resizes, converts YUV to RGB, and normalizes input to match model requirements. |
| [`qtimltflite`](../plugin-reference/qtimltflite) | Runs the TFLite object detection model on each frame using the Qualcomm NPU via the QNN external delegate. |
| [`qtimlpostprocess`](../plugin-reference/qtimlpostprocess) | Converts raw output tensors into structured bounding boxes and labels via a dynamically loaded module. |
| [`qtimetamux`](../plugin-reference/qtimetamux) | Synchronizes inference results with the original video stream as per-frame structured metadata. |
| [`qtivcomposer`](../plugin-reference/qtivcomposer) | Composites video from all streams into a single 8×4 grid output and overlays RGBA masks onto corresponding YUV frames. |
| `v4l2h264enc` / `h264parse` | Encodes the composited stream into H.264 format for transmission. |
| [`waylandsink`](../plugin-reference/waylandsink) | Displays the composited video locally on the device. |
| `sink` | Streams the encoded video and metadata over RTSP or WebRTC via `rtspbin` or `webrtcbin`. |
## How it works
## Elements used in pipeline
| Element | Description |
| ---------------------------------------------------------- | ---------------------------------------------------------------------------------------------------------------------- |
| `source` | Accepts input from an RTSP camera, USB camera, or local file source. |
| `tee` | Splits each decoded stream into parallel branches for simultaneous display and AI inference. |
| `videorate` | Adjusts the video frame rate — reduces rate by half to lower compute load while maintaining display continuity. |
| [`qtimlvconverter`](../plugin-reference/qtimlvconverter) | Prepares frames for inference — resizes, converts YUV to RGB, and normalizes input to match model requirements. |
| [`qtimltflite`](../plugin-reference/qtimltflite) | Runs the TFLite object detection model on each frame using the Qualcomm NPU via the QNN external delegate. |
| [`qtimlpostprocess`](../plugin-reference/qtimlpostprocess) | Converts raw output tensors into structured bounding boxes and labels via a dynamically loaded module. |
| [`qtimetamux`](../plugin-reference/qtimetamux) | Synchronizes inference results with the original video stream as per-frame structured metadata. |
| [`qtivcomposer`](../plugin-reference/qtivcomposer) | Composites video from all streams into a single 8×4 grid output and overlays RGBA masks onto corresponding YUV frames. |
| `v4l2h264enc` / `h264parse` | Encodes the composited stream into H.264 format for transmission. |
| [`waylandsink`](../plugin-reference/waylandsink) | Displays the composited video locally on the device. |
| `sink` | Streams the encoded video and metadata over RTSP or WebRTC via `rtspbin` or `webrtcbin`. |
## How it works
 | Component | Description |
| ------------------------ | -------------------------------------------------------------------------------------------------------------------------------------- |
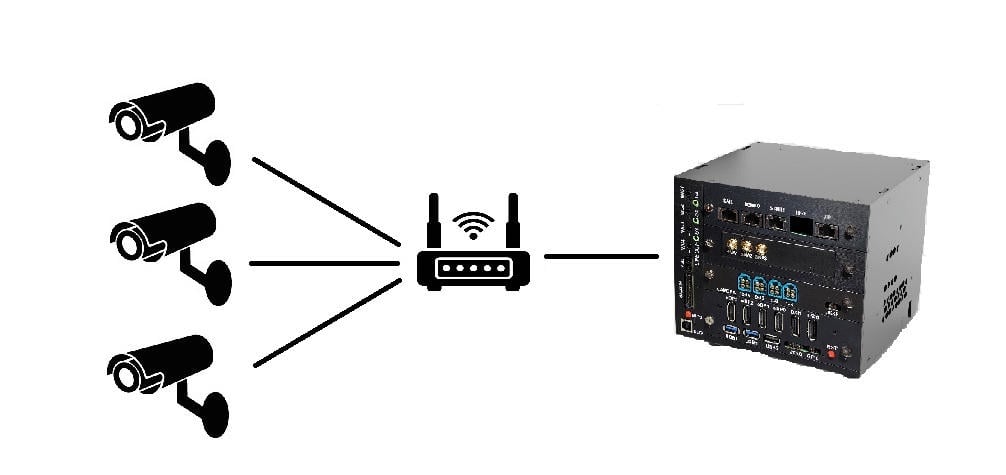
| **Edge Device** | IQ9 — Primary processing unit for AI inference and video composition. |
| **Camera Source** | IP/RTSP cameras. A local file source may be substituted if no physical camera is available. |
| **HDMI Display Monitor** | Connected to the edge device for rendering and visualizing pipeline output. |
| **PoE Switch** | Powers IP/RTSP cameras and provides network connectivity over a single Ethernet cable per camera. (Required for IP/RTSP setups only.) |
| **Local Network** | Ensures the edge device, cameras, and host machine are reachable on the same network. (Required for RTSP input or RTSP/WebRTC output.) |
#### Software
**Flash your Qualcomm Edge device** by following the device setup and flashing instructions [here](../installation).
**Once your device is ready**, follow the instructions below to set up the Security Video Wall pipeline.
##### AI Model and config files
| File | Download | Save as |
| ----------------- | ------------------------------------------------------------------------------------------------------------------------------------------------------ | ----------------------------- |
| YOLOv8 W8A8 model | [Qualcomm AI Hub — YOLOv8 Detection](https://aihub.qualcomm.com/iot/models/yolov8_det) | `yolov8_det_quantized.tflite` |
| Detection labels | yolov8.json | `yolov8.json` |
| Sample video | Input video | `video.mp4` |
**Copy files to device**
Beyond the default setup, the application offers flexible input and output configurations that can be tailored via command-line options, as described below:
## Command-Line Options
| Component | Description |
| ------------------------ | -------------------------------------------------------------------------------------------------------------------------------------- |
| **Edge Device** | IQ9 — Primary processing unit for AI inference and video composition. |
| **Camera Source** | IP/RTSP cameras. A local file source may be substituted if no physical camera is available. |
| **HDMI Display Monitor** | Connected to the edge device for rendering and visualizing pipeline output. |
| **PoE Switch** | Powers IP/RTSP cameras and provides network connectivity over a single Ethernet cable per camera. (Required for IP/RTSP setups only.) |
| **Local Network** | Ensures the edge device, cameras, and host machine are reachable on the same network. (Required for RTSP input or RTSP/WebRTC output.) |
#### Software
**Flash your Qualcomm Edge device** by following the device setup and flashing instructions [here](../installation).
**Once your device is ready**, follow the instructions below to set up the Security Video Wall pipeline.
##### AI Model and config files
| File | Download | Save as |
| ----------------- | ------------------------------------------------------------------------------------------------------------------------------------------------------ | ----------------------------- |
| YOLOv8 W8A8 model | [Qualcomm AI Hub — YOLOv8 Detection](https://aihub.qualcomm.com/iot/models/yolov8_det) | `yolov8_det_quantized.tflite` |
| Detection labels | yolov8.json | `yolov8.json` |
| Sample video | Input video | `video.mp4` |
**Copy files to device**
Beyond the default setup, the application offers flexible input and output configurations that can be tailored via command-line options, as described below:
## Command-Line Options