> ## Documentation Index
> Fetch the complete documentation index at: https://imsdkdocs.qualcomm.com/llms.txt
> Use this file to discover all available pages before exploring further.

# Restricted Zone Violation Detection with Foot-Based Spatial Intelligence

> Real-time pipeline that detects when a person steps into a predefined restricted zone using IM SDK foot detection — with color-coded visual alerts and RTSP/WebRTC output.

<div
  style={{
width: "100%", borderRadius: "14px", overflow: "hidden",
backgroundImage: "url('https://mintcdn.com/qimsdk/p8bRJ_K0_Mx14HV0/blogs/images/rz_expected-output.png?fit=max&auto=format&n=p8bRJ_K0_Mx14HV0&q=85&s=8305b65247903ce8e396b90bdd9050a2')",
backgroundSize: "cover", backgroundPosition: "center",
height: "260px", display: "flex", alignItems: "center", justifyContent: "center",
position: "relative", marginBottom: "1.5rem"
}}
>
  <div
    style={{
position: "absolute", bottom: "16px", left: "50%", transform: "translateX(-50%)",
background: "rgba(255,255,255,0.15)", border: "1px solid rgba(255,255,255,0.4)",
color: "#fff", fontSize: "0.75rem", fontWeight: 700, letterSpacing: "1px",
padding: "5px 14px", borderRadius: "20px", textTransform: "uppercase", whiteSpace: "nowrap",
zIndex: 1
}}
  >
    QIMSDK · Qualcomm
  </div>
</div>

<div style={{ marginBottom: "2rem" }}>
  <div
    style={{
fontSize: "0.72rem", fontWeight: 700, color: "#31017D",
letterSpacing: "1.5px", textTransform: "uppercase", marginBottom: "0.5rem"
}}
  >
    Safety & Security
  </div>

  <p style={{ fontSize: "0.95rem", color: "#555", lineHeight: 1.7, margin: "0 0 0.75rem" }}>
    Real-time pipeline that detects when a person steps into a predefined restricted zone using
    IM SDK foot detection — with color-coded visual alerts, bounding box status indicators, and RTSP/WebRTC output.
  </p>

  <div style={{ fontSize: "0.85rem", color: "#888", display: "flex", gap: "0.5rem", flexWrap: "wrap", alignItems: "center" }}>
    <span>QIMSDK Team</span>
    <span>·</span>
    <span>Jun 14, 2026</span>
    <span>·</span>
    <a href="/blogs" style={{ color: "#31017D", fontWeight: 600, textDecoration: "none" }}>← All posts</a>
  </div>
</div>

<hr style={{ border: "none", borderTop: "1px solid #eee", margin: "0 0 2rem" }} />

## Introduction

Monitoring access to restricted areas is a common requirement in industrial sites, warehouses, and other controlled environments. While these zones are often clearly marked, enforcing compliance in real time remains difficult. Manual supervision and post-event video review do not scale well and cannot provide the immediate response required in safety-critical scenarios.

The QIM SDK enables a shift from reactive monitoring to real-time, automated situational awareness. By using hardware-accelerated GStreamer plugins, the SDK offloads compute-intensive tasks — including video decoding, frame preparation, multi-stage AI inference, and encoding — to dedicated hardware blocks. Frame preparation includes resizing, color conversion (YUV to RGB), and pixel normalization for neural network input.

At the core of this use case is a streamlined pipeline that combines machine learning with spatial reasoning. A foot detection model identifies the location of a person's feet in each frame, providing a reliable indicator of physical position within the scene. These detections are then evaluated against a predefined restricted zone to determine, in real time, whether a boundary has been crossed.

The SDK also provides hardware-accelerated visualization through overlay rendering. Detection results and zone boundaries are composited directly onto video frames, with dynamic visual cues: **green** bounding boxes indicate the foot is outside the restricted zone, **red** indicates a violation.

Beyond visualization, the SDK supports AI metadata streaming, synchronizing detection and zone-evaluation results with the video stream and transmitting them in parallel for alerting, logging, or dashboard integration.

The complete application source code is available [here](https://github.com/qualcomm/gst-plugins-imsdk/tree/main/gst-sample-apps/gst-restricted-zone).

## Use Case Overview

<Steps>
  <Step title="Video Input">
    A camera monitors the restricted area and its surroundings. The pipeline accepts input from RTSP, ISP, USB, or file-based sources.
  </Step>

  <Step title="Foot Detection">
    Each frame is submitted to a foot detection model that identifies the location of each person's feet within the scene.
  </Step>

  <Step title="Zone Evaluation">
    `qtirestrictedzonedbg` evaluates each detected foot position against the predefined restricted zone polygon to determine whether a boundary has been crossed.
  </Step>

  <Step title="Metadata Generation">
    Detection results are attached to the video stream as structured per-frame metadata for downstream consumption.
  </Step>

  <Step title="Visualization">
    [`qtivoverlay`](../plugin-reference/qtivoverlay) renders bounding boxes and the restricted zone polygon onto video frames. Bounding boxes are **green** (outside zone) or **red** (violation).
  </Step>

  <Step title="Metadata Synchronization">
    [`qtimetamux`](../plugin-reference/qtimetamux) synchronizes all inference and zone-evaluation results with the original video frames, maintaining per-frame consistency.
  </Step>

  <Step title="Output">
    The annotated stream is delivered via RTSP or WebRTC. Structured detection data is transmitted in parallel as JSON metadata for alerting, logging, and external integrations.
  </Step>
</Steps>

## Pipeline diagram

<img src="https://mintcdn.com/qimsdk/p8bRJ_K0_Mx14HV0/blogs/images/rz_pipelines.png?fit=max&auto=format&n=p8bRJ_K0_Mx14HV0&q=85&s=77fc5501ca27e49be3067d5638c6ddc1" alt="Restricted Zone Pipeline" width="1243" height="860" data-path="blogs/images/rz_pipelines.png" />

## Elements used in pipeline

| Element                                                    | Description                                                                                                                    |
| ---------------------------------------------------------- | ------------------------------------------------------------------------------------------------------------------------------ |
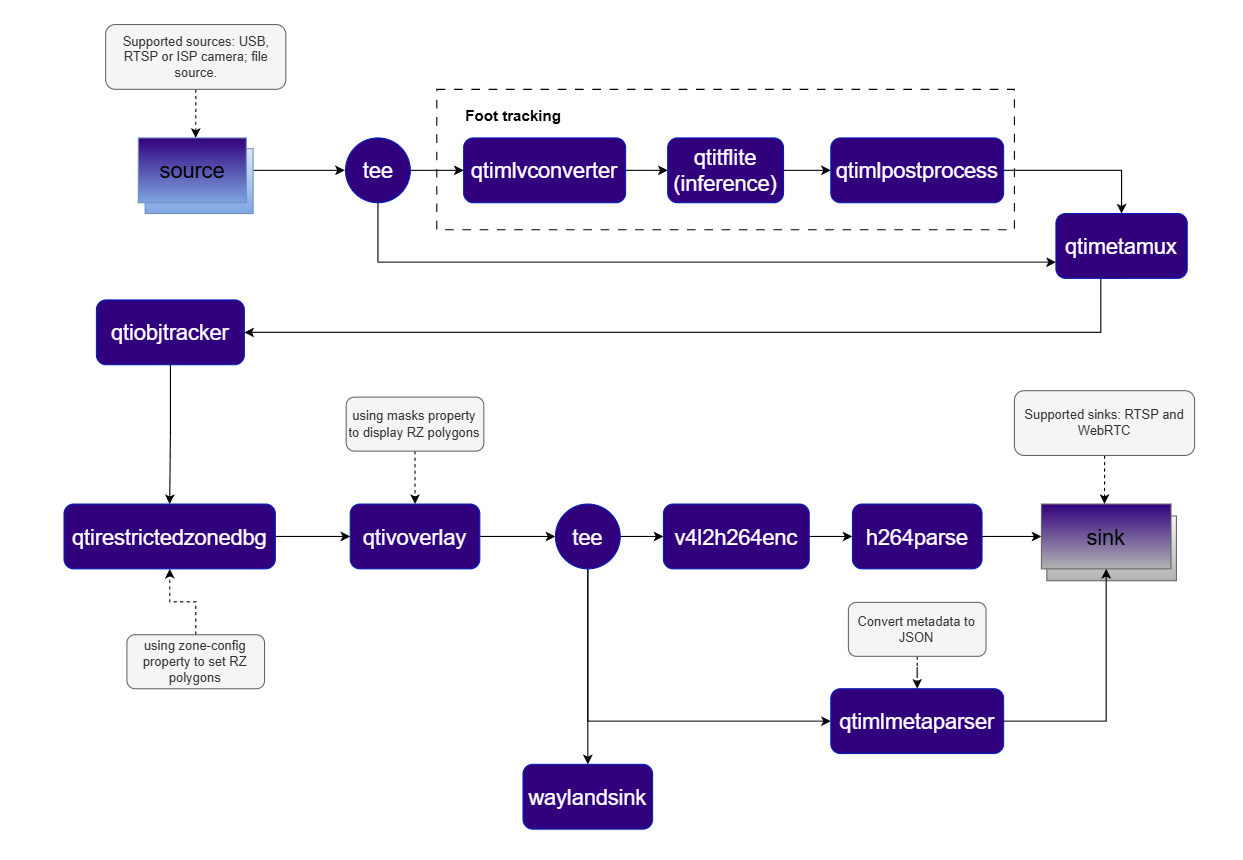
| `source`                                                   | Accepts video input from an RTSP camera, ISP camera, USB camera, or local file source.                                         |
| `tee`                                                      | Splits the stream into parallel branches for simultaneous display and AI inference.                                            |
| [`qtimlvconverter`](../plugin-reference/qtimlvconverter)   | Prepares frames for inference — performs resizing, YUV-to-RGB conversion, and normalization to match model input requirements. |
| [`qtimltflite`](../plugin-reference/qtimltflite)           | Executes the TFLite foot detection model on each frame using the Qualcomm HTP via the QNN external delegate.                   |
| [`qtimlpostprocess`](../plugin-reference/qtimlpostprocess) | Converts raw model tensors into structured bounding boxes and labels via a dynamically loaded module.                          |
| [`qtimetamux`](../plugin-reference/qtimetamux)             | Synchronizes inference results with the original video stream as per-frame structured metadata.                                |
| [`qtiobjtracker`](../plugin-reference/qtiobjtracker)       | Tracks detected feet across consecutive frames and assigns a consistent ID to each object.                                     |
| `qtirestrictedzonedbg`                                     | Defines the restricted zone polygon and evaluates detections against it. Updates bounding box color to **red** upon violation. |
| [`qtivoverlay`](../plugin-reference/qtivoverlay)           | Renders bounding boxes, labels, and the restricted zone polygon directly onto video frames.                                    |
| [`qtimlmetaparser`](../plugin-reference/qtimetaparser)     | Serializes per-frame metadata into JSON format for integration with external systems.                                          |
| `v4l2h264enc` / `h264parse`                                | Encodes the processed video stream into H.264 format.                                                                          |
| [`waylandsink`](../plugin-reference/waylandsink)           | Displays the video locally on the device.                                                                                      |
| `sink`                                                     | Streams the encoded video and metadata over RTSP or WebRTC via `rtspbin` or `webrtcbin`.                                       |

## How it works

<Steps>
  <Step title="Stage 1 — Foot Detection">
    The full video frame is preprocessed by [`qtimlvconverter`](../plugin-reference/qtimlvconverter) to align with model input requirements. Preprocessed tensors are passed to [`qtimltflite`](../plugin-reference/qtimltflite), which runs the foot detection model and produces raw output tensors.
  </Step>

  <Step title="Post-Processing">
    [`qtimlpostprocess`](../plugin-reference/qtimlpostprocess) converts the tensors into bounding box detections. [`qtimetamux`](../plugin-reference/qtimetamux) attaches these detections to the original video frame as metadata.
  </Step>

  <Step title="Stage 2 — Zone Evaluation">
    `qtirestrictedzonedbg` evaluates each detected foot position against the configured restricted zone polygon. If a foot lies inside the polygon, the pipeline flags it as a violation in real time.
  </Step>

  <Step title="Tracking">
    `qtiobjtracker` maintains object identity across frames, assigning a consistent tracking ID to each detected foot for reliable zone evaluation over time.
  </Step>

  <Step title="Visualization and Output">
    [`qtivoverlay`](../plugin-reference/qtivoverlay) renders bounding boxes and the restricted zone on the video stream. Visual cues update dynamically based on zone evaluation. The processed stream can be displayed locally, saved to file, or streamed via RTSP or WebRTC. `qtimlmetaparser` serializes metadata into JSON for external system integration.
  </Step>
</Steps>

## Run application on device

### Setup Requirements

#### Hardware

<img src="https://mintcdn.com/qimsdk/p8bRJ_K0_Mx14HV0/blogs/images/security-camera_hw-setup.png?fit=max&auto=format&n=p8bRJ_K0_Mx14HV0&q=85&s=09c59b6a9fbbd9b51c039e6f5d8f399e" alt="Hardware Setup" width="871" height="421" data-path="blogs/images/security-camera_hw-setup.png" />

| Component                | Description                                                                                                                                                                |
| ------------------------ | -------------------------------------------------------------------------------------------------------------------------------------------------------------------------- |
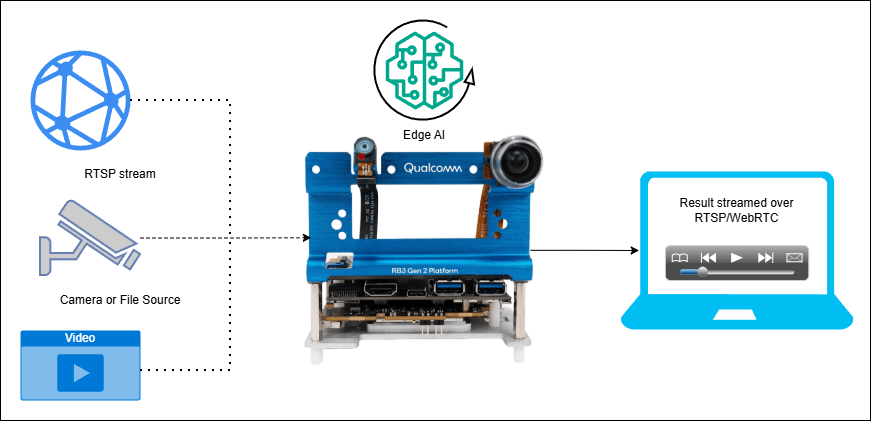
| **Edge Device**          | RB3 Gen 2, IQ8, or IQ9 — Primary processing unit for AI inference and video composition.                                                                                   |
| **Camera Source**        | IP/RTSP camera, ISP (on-device) camera, or USB camera. A local file source may be substituted if no physical camera is available.                                          |
| **HDMI Display Monitor** | Connected to the edge device for rendering and visualizing pipeline output.                                                                                                |
| **PoE Switch**           | Powers IP/RTSP cameras and provides network connectivity over a single Ethernet cable per camera. (Required for IP/RTSP camera setups only.)                               |
| **Local Network**        | Ensures the edge device, RTSP camera, and host machine are reachable on the same network. (Required when using RTSP camera input or streaming results via RTSP or WebRTC.) |

#### Software

**Flash your Qualcomm Edge device** by following the device setup and flashing instructions [here](../installation).

**Once your device is ready**, follow the instructions below to set up the Restricted Zone pipeline.

##### AI Model and config files

| File                 | Download                                                                                                                                               | Save as                           |
| -------------------- | ------------------------------------------------------------------------------------------------------------------------------------------------------ | --------------------------------- |
| Foot detection model | [Qualcomm AI Hub — Foot Track Net](https://aihub.qualcomm.com/iot/models/foot_track_net)                                                               | `foot_track_net_quantized.tflite` |
| Detection labels     | <a href="../labels/foot_track_net.json" download="foot_track_net.json">foot\_track\_net.json</a>                                                       | `foot_track_net.json`             |
| Detection settings   | <a href="../labels/foot_track_net_settings.json" download="foot_track_net_settings.json">foot\_track\_net\_settings.json</a>                           | `foot_track_net_settings.json`    |
| Sample video         | <a href="https://github.com/qualcomm/sample-apps-for-qualcomm-linux/raw/refs/heads/main/qualcomm-linux/artifacts/videos/demo_samples/">Input video</a> | `rz_sample.mp4`                   |

**Copy files to device**

<CodeGroup>
  ```bash SCP (SSH) theme={null}
  # Replace $HOME to the appropriate device path before running the commands.
  # For QLI:    /root
  # For Ubuntu: /home/ubuntu
  # Modify this based on your platform and ensure files are copied to the correct location on the device.

  ssh <user>@<device-ip> "mkdir -p $HOME/{models,labels,media,media/output}"
  scp foot_track_net_quantized.tflite   <user>@<device-ip>:$HOME/models/
  scp foot_track_net.json               <user>@<device-ip>:$HOME/labels/
  scp foot_track_net_settings.json      <user>@<device-ip>:$HOME/labels/
  scp rz_sample.mp4                         <user>@<device-ip>:$HOME/media/
  ```
</CodeGroup>

**Connect to device**

```bash theme={null}
ssh <user>@<device-ip>
```

**Run the Restricted Zone Application**

> **Note:** A display must be connected to the device. If no display is available, use the `--no-display` flag.

<AccordionGroup>
  <Accordion title="RTSP output">
    ```bash theme={null}
    gst-restricted-zone \
      --input-type=file \
      --input-config=$HOME/media/rz_sample.mp4 \
      --output-type=rtsp \
      --output-config=8900
    ```
  </Accordion>

  <Accordion title="WebRTC output">
    ```bash theme={null}
    gst-restricted-zone \
      --input-type=file \
      --input-config=$HOME/media/rz_sample.mp4 \
      --output-type=webrtc \
      --output-config=wss://webrtc.nirbheek.in:8443 \
      --webrtc-id=1010
    ```
  </Accordion>

  <Accordion title="Display only">
    ```bash theme={null}
    gst-restricted-zone \
      --input-type=file \
      --input-config=$HOME/media/rz_sample.mp4
    ```
  </Accordion>
</AccordionGroup>

> **Note:** This example uses an offline video file as input. To use an IP/RTSP camera or USB camera instead, update the `--input-type` argument accordingly — refer to the **Command-Line Options** section below.

It produces two key output results: an AI-annotated video stream and a JSON metadata stream. To visualize these results, refer to the **Host-Side Visualization** section below.

## Visualize the Results - Host-Side Visualization (Windows + WSL)

This section describes how to run the visualization client on a Windows host machine using **WSL (Windows Subsystem for Linux)**. The client renders the live video stream alongside a real-time AI metadata panel.

📥 The visualization client script can be downloaded here: <a href="../labels/rtsp_webrtc_client.zip" download="rtsp_webrtc_client.zip">rtsp\_webrtc\_client.zip</a>

It displays:

* **Left panel** — Live video stream with AI overlays (bounding boxes and restricted zone polygon).
* **Right panel** — Real-time AI metadata (JSON): object detections, tracking IDs, bounding boxes, and confidence scores.

**Step 1 — Install WSL and Ubuntu**

If WSL is not already installed, run the following from a Windows terminal:

```bash theme={null}
wsl --install Ubuntu-24.04
```

Once installed, update the system:

```bash theme={null}
sudo apt update && sudo apt upgrade -y
```

**Step 2 — Install System Dependencies**

```bash theme={null}
sudo apt install -y \
  python3 python3-pip python3-gi python3-gi-cairo \
  gir1.2-gstreamer-1.0 \
  gir1.2-gst-plugins-base-1.0 \
  gir1.2-gst-plugins-bad-1.0 \
  gstreamer1.0-tools \
  gstreamer1.0-plugins-base \
  gstreamer1.0-plugins-good \
  gstreamer1.0-plugins-bad \
  gstreamer1.0-plugins-ugly \
  gstreamer1.0-libav \
  python3-websocket \
  libnice10 \
  libnice-dev \
  gstreamer1.0-nice
```

**Step 3 — Run the Visualization Client Script**

<AccordionGroup>
  <Accordion title="RTSP">
    ```bash theme={null}
    python3 rtsp_webrtc_client.py rtsp://<DEVICE_IP>:8900/live
    ```
  </Accordion>

  <Accordion title="WebRTC">
    ```bash theme={null}
    python3 rtsp_webrtc_client.py --source webrtc --signalling-server wss://webrtc.nirbheek.in:8443 --peer-id 1010
    ```
  </Accordion>
</AccordionGroup>

**Step 4 — Expected Output**

| Panel | Content                                                                                       |
| ----- | --------------------------------------------------------------------------------------------- |
| Left  | Real-time decoded video stream with foot detection bounding boxes and restricted zone polygon |
| Right | Live AI metadata — tracking IDs, bounding boxes, foot coordinates, and confidence scores      |

After following the steps, the video and metadata streams should be up and running. When a person steps into the restricted zone, the corresponding bounding box changes from **green** to **red**.

The pipeline generates structured JSON metadata in the following format:

```json theme={null}
{
  "object_detection": [
    {
      "tracking_id": 7,
      "label": "person",
      "confidence": 71.63,
      "color": 16711935,
      "rectangle": {
        "x": 0.16, "y": 0.05,
        "width": 0.16, "height": 0.16
      },
      "landmarks": {
        "left_ankle":  { "x": 0.21, "y": 0.10 },
        "right_ankle": { "x": 0.20, "y": 0.07 }
      }
    }
  ],
  "parameters": { "timestamp": "49058322222" }
}
```

## Command-Line Options

<AccordionGroup>
  <Accordion title="--input-type">
    Selects the video input source for the pipeline.

    | Value  | Description                                                                             |
    | ------ | --------------------------------------------------------------------------------------- |
    | `usb`  | USB camera. Requires `--input-config=/dev/video0`.                                      |
    | `isp`  | Built-in ISP (on-device) camera. Optionally specify a camera ID via `--input-config=0`. |
    | `rtsp` | External IP/RTSP camera or stream. Requires `--input-config=rtsp://...`.                |
    | `file` | Local H.264-encoded video file. Requires `--input-config=/path/to/video.mp4`.           |
  </Accordion>

  <Accordion title="--input-config">
    Specifies the input source configuration corresponding to the selected `--input-type`.

    | Input Type | Value                    |
    | ---------- | ------------------------ |
    | USB        | `/dev/videoX`            |
    | ISP        | `<camera ID>`            |
    | RTSP       | `rtsp://<ip-or-url>`     |
    | File       | `/path/to/rz_sample.mp4` |
  </Accordion>

  <Accordion title="--output-type">
    Defines how the processed output video stream is delivered.

    | Value    | Description                                                                                      |
    | -------- | ------------------------------------------------------------------------------------------------ |
    | `none`   | No video output (headless mode).                                                                 |
    | `file`   | Save encoded output to a file. Requires `--output-config`.                                       |
    | `rtsp`   | Stream over RTSP. Requires `--output-config=<port>`. Access at `rtsp://<device-ip>:<port>/live`. |
    | `webrtc` | Stream over WebRTC. Requires `--output-config=ws://...`.                                         |
  </Accordion>

  <Accordion title="--output-config">
    Specifies the output destination configuration.

    | Output Type | Value                             |
    | ----------- | --------------------------------- |
    | File        | `/path/to/output.mp4`             |
    | RTSP        | `<port>`                          |
    | WebRTC      | `ws://<signalling-server>:<port>` |
  </Accordion>

  <Accordion title="--model-base-path">
    Root directory for AI model, label, and configuration files.

    | Asset Type                      | Resolved Path                      |
    | ------------------------------- | ---------------------------------- |
    | Model files (`*.tflite`)        | `<base-path>/models/<model_file>`  |
    | Label/settings files (`*.json`) | `<base-path>/labels/<labels_file>` |

    ```bash theme={null}
    --model-base-path=/root        # QLI
    --model-base-path=/home/ubuntu # Ubuntu
    ```
  </Accordion>

  <Accordion title="--no-display">
    Disables local on-screen rendering. Recommended for headless deployments, remote streaming (RTSP/WebRTC), or performance optimization.
  </Accordion>

  <Accordion title="--width / --height / --framerate">
    Sets the raw input video resolution and frame rate. Applicable only to ISP and USB inputs.

    ```bash theme={null}
    --width=1920 --height=1080 --framerate=30
    ```
  </Accordion>

  <Accordion title="--webrtc-id">
    Specifies the local WebRTC signaling client ID.

    ```bash theme={null}
    --webrtc-id=1010
    ```
  </Accordion>
</AccordionGroup>

## Update Restricted Zone Area

The restricted zone can be customized by setting the `zone-config` property of `qtirestrictedzonedbg`. The configuration supports one or more zones defined as ordered polygon vertex lists.

```c theme={null}
g_object_set(G_OBJECT(qtirestrictedzonedbg),
  "zone-config",
  "Zones,Zone1=<<640,420>,<687,408>,<843,476>,<848,528>,<937,583>,<641,729>>;",
  NULL);
```

Multiple zones can be defined in a single string:

```c theme={null}
"Zones,Zone1=<<...>>;Zone2=<<...>>;"
```

Each zone is an ordered list of (x, y) pixel coordinates. Points can be specified in clockwise or counterclockwise order. A polygon can contain any number of vertices. If a detected foot falls inside the polygon, a violation is triggered.

After updating the restricted zone coordinates, rebuild the application — see [Build the Application](#build-the-application) below.

## Implementation Deep-Dive

<AccordionGroup>
  <Accordion title="1. Application Configuration and Runtime Context">
    The application separates user-configurable settings from runtime state.

    ```c theme={null}
    typedef struct GstAppConfig {
      gchar *input_type, *input_config;
      gchar *output_type, *output_config;
      gchar *model_base_path;
      gboolean no_display;
      gint width, height, framerate, webrtc_id;
    } GstAppConfig;

    typedef struct GstAppContext {
      GstAppConfig config;
      GstElement  *pipeline;
      GMainLoop   *mloop;
      GstElement  *webrtc;
      gboolean     is_shutting_down;
    } GstAppContext;
    ```
  </Accordion>

  <Accordion title="2. Reusable Pipeline Skeleton">
    The pipeline is assembled from three logical sections: input branch, output branch, and application-specific user branch.

    ```c theme={null}
    static gboolean gst_app_create_pipe (GstAppContext *appctx) {
      GstElement *input_tail = NULL, *output_head = NULL, *meta_head = NULL;

      appctx->pipeline = gst_pipeline_new ("gst-ip-camera");

      if (!gst_app_create_input_pipe  (appctx, &input_tail))  return FALSE;
      if (!gst_app_create_output_pipe (appctx, &output_head, &meta_head)) return FALSE;
      if (!gst_app_create_user_pipe   (appctx, input_tail, output_head, meta_head)) return FALSE;
      return TRUE;
    }
    ```
  </Accordion>

  <Accordion title="3. Inference, Zone, and Overlay Configuration">
    The pipeline uses the QNN external delegate, QPD post-processing, JSON metadata serialization, and overlay masks.

    ```c theme={null}
    gst_element_set_enum_property (qtimlpostprocess, "module", "qpd");

    delegate_options = gst_structure_from_string (
        "QNNExternalDelegate,backend_type=htp;", NULL);
    g_object_set (G_OBJECT (qtimltflite),
        "external-delegate-path", "libQnnTFLiteDelegate.so",
        "external-delegate-options", delegate_options,
        "model", model_path, NULL);
    gst_element_set_enum_property (qtimltflite, "delegate", "external");

    g_object_set (G_OBJECT (qtirestrictedzonedbg),
        "zone-config",
        "Zones,Zone1=<<640,420>,<687,408>,<843,476>,<848,528>,<937,583>,<641,729>>;",
        NULL);

    g_object_set (G_OBJECT (qtivoverlay), "masks", overlay_rz, NULL);
    ```
  </Accordion>

  <Accordion title="4. Pipeline Linking">
    The metadata-enriched stream is routed through tracking, zone evaluation, and overlay before reaching the output branch.

    ```c theme={null}
    gst_element_link_many (input_tail, tee[0], queue[0], qtimetamux, NULL);

    gst_element_link_many (tee[0], queue[1], qtimlvconverter, queue[2],
        qtimltflite, queue[3], qtimlpostprocess, postprocess_caps,
        queue[4], qtimetamux, NULL);

    gst_element_link_many (qtimetamux, queue[5], qtiobjtracker,
        qtirestrictedzonedbg, qtivoverlay, tee[1], NULL);

    if (output_head != NULL)
        gst_element_link_many (tee[1], queue[6], output_head, NULL);
    if (meta_head != NULL)
        gst_element_link_many (tee[1], queue[7], qtimlmetaparser, meta_head, NULL);
    ```
  </Accordion>

  <Accordion title="5. WebRTC Signaling">
    WebRTC signaling uses explicit SDP offer/answer and ICE candidate exchange via WebSocket with `libsoup`.

    ```c theme={null}
    g_signal_emit_by_name (webrtcbin, "create-data-channel", name, NULL, &ch);

    GstPromise *promise = gst_promise_new_with_change_func (on_offer_created, appctx, NULL);
    g_signal_emit_by_name (webrtcbin, "create-offer", NULL, promise);

    g_signal_connect (appctx->webrtc, "on-ice-candidate",
        G_CALLBACK (on_webrtc_ice_candidate), appctx);
    ```

    | Callback           | Responsibility                                   |
    | ------------------ | ------------------------------------------------ |
    | `on_offer_created` | Constructs and sends the SDP offer               |
    | `on_ice_candidate` | Transmits ICE candidates to the signaling server |
    | `on_ws_message`    | Handles incoming WebSocket signaling messages    |
  </Accordion>
</AccordionGroup>

## Build the Application

* **Source code:** [gst-restricted-zone](https://github.com/qualcomm/gst-plugins-imsdk/tree/main/gst-sample-apps/gst-restricted-zone)
* **Build instructions:** [Steps to build custom application](../advanced/ubuntu-build#steps-to-build-custom-application)

## Conclusion

The Restricted Zone Alarm demonstrates how the IM SDK converts live video into actionable spatial intelligence. By combining AI-based foot detection with in-pipeline zone evaluation, it detects boundary violations in real time with low integration overhead.

The pipeline is designed for interoperability — results can be rendered on-screen, streamed over the network, or exported as structured metadata for downstream systems. This modular architecture makes the solution easy to extend for visualization, alerting, and external processing, making it a practical foundation for location-aware video analytics.
