> ## Documentation Index
> Fetch the complete documentation index at: https://imsdkdocs.qualcomm.com/llms.txt
> Use this file to discover all available pages before exploring further.
# Coding Agent
> Use the QIM SDK Python App Builder skill to generate Python pipeline apps with an AI coding agent.
## What is the Python App Builder Skill?
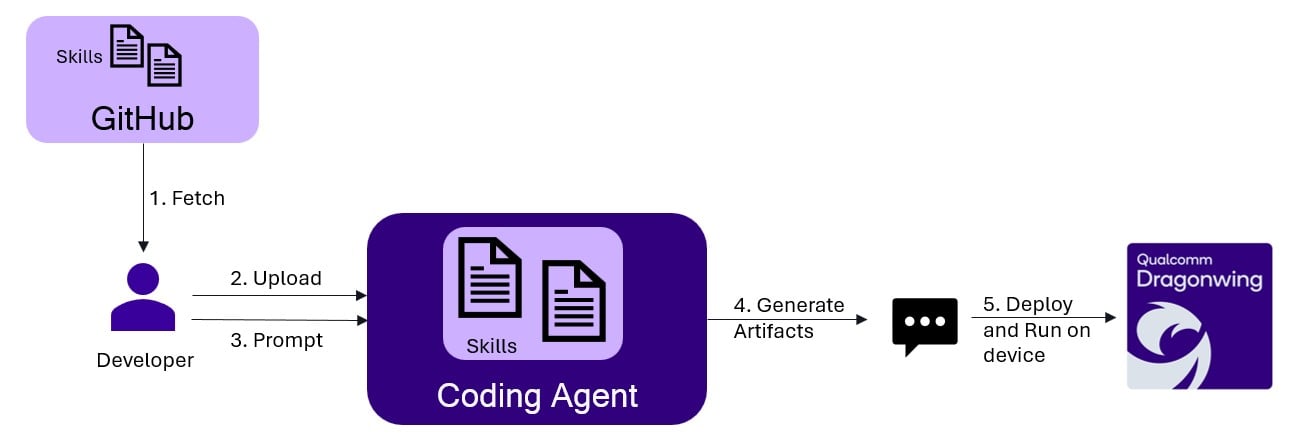
The **QIM SDK Python App Builder** is an AI coding skill that generates Python applications using `QIM SDK Python API`. You describe the pipeline behavior and configuration in natural language, and the agent produces a ready-to-run `main.py` built on the `QIM SDK Python API` — along with a `README.md` that documents information about the generated application.
**Flow**
 **What it generates**
For each request, the agent produces an artifact folder named `qimsdk-python-/` containing:
* **`main.py`** — a complete, runnable Python application using qimsdk python package, including pipeline construction, element wiring, stream filters, and ML inference configuration
* **`README.md`** — a detailed document covering:
* Purpose and pipeline behavior summary
* Configuration placeholders (input, model, labels, output paths)
* A step-by-step pipeline flow (text summary + Mermaid diagram)
* Steps to run the app on device
* **`A YAML config file`** — only when you request declarative YAML pipeline mode
**Supported use cases:**
| Category | Details |
| --------------------- | ---------------------------------------------------------------------------------------------------------------------------------------------------------------------------------------------- |
| **AI pipelines** | Object detection, image classification, semantic segmentation, face detection, pose estimation, super resolution, depth estimation, audio classification, object tracking, gesture recognition |
| **Inputs** | ISP camera, USB camera, file source (MP4/H.264), RTSP stream |
| **Outputs** | HDMI display, encoded file (MP4), RTSP stream, Redis/MQTT metadata |
| **ML backends** | TFLite (HTP/NPU), QNN, SNPE |
| **Pipeline patterns** | Single-stream, multi-stream, daisy-chained models, ML-bin fused inference, custom pre/post-processing, AppSrc/AppSink bridges, YAML config mode |
## Prerequisites
### For generating code
Qualcomm dev kits are not needed for code generation.
**Host Machine**: Any PC with internet access
**Coding Agent**: Any AI coding agent installed (Claude Code, Cursor, Codex, etc.) which supports skills — the skills provided are agent-agnostic.
This skill is designed to work well even with low-reasoning / smaller models.
Eg: A Sonnet 4.5 model is sufficient.
### For deploying and running apps
The target devices where QIM SDK is supported (see [QIM SDK Installation Guide](/installation))
## How to Use
### Step 1: Get the skill
Clone the skill repository to your host machine, then copy the **QIM SDK Python App Builder skill** into your coding agent's skills directory. Also copy the **qimsdk-deploy** skill, which deploys and runs the generated app on device (see [Step 4](#step-4-running-the-applications)):
```bash theme={null}
git clone https://github.com/qualcomm/qimsdk-agentic-skills
# Set this to your coding agent's skills directory.
# Claude Code example (see your agent's docs for its skills path):
# App Builder skill — generates the app
cp -r qimsdk-agentic-skills/skills/qimsdk-python-app-builder ~/.claude/skills
# Deploy skill — builds, pushes, and runs the app on device
cp -r qimsdk-agentic-skills/skills/qimsdk-deploy ~/.claude/skills
```
After copying, your skills directory should look like this:
```
/
├── qimsdk-python-app-builder/
│ ├── SKILL.md # Skill definition with rules and API quick reference
│ └── references/ # Condensed reference documents
└── qimsdk-deploy/
├── SKILL.md # Deploy skill definition
└── references/ # Condensed reference documents
```
The skills directory is agent-specific — Claude Code uses `~/.claude/skills/`. Check your coding agent's documentation for its skills location. You can also scope skills to a single workspace (e.g. Claude Code supports `/.claude/skills/`).
***
### Step 2: Load the skill
Restart (or reload) your coding agent after placing the skills so it picks them up. They will appear automatically in the `/skills` list.
To verify, open the agent panel and run:
```
/skills
```
You should see both `qimsdk-python-app-builder` and `qimsdk-deploy` listed.
***
### Step 3: Generate the application
Describe your pipeline to the agent. It will automatically activate the skill and generate a complete `main.py` and `README.md`.
#### Sample Prompt
**Prompt format — describe pipeline behavior and configuration:**
```
Create a QIM SDK Python app for single-stream YOLOX object detection from an
MP4 file, encoding the result to a file.
## Pipeline Behavior
- Decode an MP4 file using Qualcomm hardware decoder
- Run YOLOX object detection on full frames using TFLite external delegate on HTP/NPU
- Merge metadata with the video stream before overlay
- Overlay bounding boxes and labels
- Encode the overlaid video and save to an output MP4 file
## Configuration
- Input: ~/Downloads/qimsdk_samples/media/ai_demo_sample.mp4
- Model: ~/Downloads/qimsdk_samples/models/yolox_w8a8.tflite
- Labels: ~/Downloads/qimsdk_samples/labels/yolov8.json
- Backend: TFLite external delegate, HTP/NPU
- Confidence: 51.0
- Output: ~/Downloads/qimsdk_samples/media/obj_detect_out.mp4
```
More sample prompts can be found in the [Available Sample Prompts](#available-sample-prompts) section below.
#### Generated `README.md`
The README documents the generated app in full:
* **Purpose** — a plain-English summary of what the pipeline does
* **Files** — lists `main.py` and `README.md` with descriptions
* **Assumptions** — codec format, quantization requirements, camera defaults, output directory pre-conditions
* **Configuration** — all user-supplied paths (`INPUT_FILE`, `MODEL_PATH`, `LABELS_PATH`, `OUTPUT_FILE`) with instructions on where to change them
* **Placeholders to Fill** — any values you still need to supply, or a note that none remain when the request was fully specified
* **Pipeline Flow** — a `Text Summary` walkthrough of every element plus a `Mermaid Diagram` of the full pipeline
* **Steps to Run** — exact commands to run on device
# QIM SDK Python App — Single-Stream YOLOX Object Detection (MP4 → MP4)
## Purpose
Decode an MP4 file with the Qualcomm hardware decoder, run **YOLOX** object
detection on full frames using the **TFLite external delegate on the HTP/NPU**,
merge the detection metadata with the video stream, overlay bounding boxes and
class labels, then hardware-encode the annotated video to an output MP4 file.
Headless (no display branch).
## Files
* `main.py` — the qimsdk pipeline app
* `README.md` — this file
## Assumptions
* Input is H.264-in-MP4, decoded with `v4l2h264dec` (`capture-io-mode=4`,
`output-io-mode=4` — file source decoded through the hardware decoder).
* YOLOX (`yolox_w8a8.tflite`) uses the `yolov8` postprocess module with the
`yolov8.json` labels, per the model catalog.
* Confidence threshold is applied as inline postprocess settings
`{"confidence": 51.0}`.
* No display: the annotated stream is encoded and written straight to the
output MP4 (`v4l2h264enc` → `h264parse` → `mp4mux` → `filesink`).
* `pipeline.eos(True)` is set so `mp4mux` finalizes the container on EOS.
## Configuration (fixed constants in `main.py`)
| Value | Path |
| ------ | --------------------------------------------------------- |
| Input | `$HOME/Downloads/qimsdk_samples/media/ai_demo_sample.mp4` |
| Model | `$HOME/Downloads/qimsdk_samples/models/yolox_w8a8.tflite` |
| Labels | `$HOME/Downloads/qimsdk_samples/labels/yolov8.json` |
| Output | `$HOME/Downloads/qimsdk_samples/media/obj_detect_out.mp4` |
`$HOME` is expanded in Python (`os.environ['HOME']`) before being passed to any
element property, so the element receives a fully-resolved absolute path.
## Placeholders to Fill
None. All paths, model, labels, confidence, and delegate options are concrete.
## Pipeline Flow
### Text Summary
`filesrc` reads the MP4 and `qtdemux` extracts the H.264 elementary stream,
which `h264parse` prepares and `v4l2h264dec` hardware-decodes. A `queue`
(`q_dec`) decouples the decoder thread, then a `VideoFilter` constrains the
stream to NV12. A `tee` (`split`) branches:
* **Passthrough / video branch** → `qtimetamux` (`obj_mux`).
* **AI branch** → `queue` → `qtimlvconverter` (preprocess to model tensor) →
`queue` → `qtimltflite` (YOLOX, external delegate, HTP/NPU) → `queue` →
`qtimlpostprocess` (`module=yolov8`, labels, `{"confidence": 51.0}`) →
`TextFilter` → `queue` → `qtimetamux` (`obj_mux`).
`qtimetamux` merges the detection metadata back onto the video frames,
`qtivoverlay` draws the bounding boxes and class labels, and the annotated NV12
stream is hardware-encoded by `v4l2h264enc`, prepared by `h264parse`, muxed by
`mp4mux`, and written by `filesink` to the output MP4.
### Mermaid Diagram
```mermaid theme={null}
flowchart TD
SRC[filesrc] --> DEMUX[qtdemux]
DEMUX --> PARSE[h264parse]
PARSE --> DEC[v4l2h264dec]
DEC --> QDEC[queue q_dec]
QDEC --> NV12[NV12 VideoFilter]
NV12 --> SPLIT[tee split]
SPLIT -->|passthrough| MUX[qtimetamux obj_mux]
SPLIT -->|AI| Q1[queue q1]
Q1 --> PRE[qtimlvconverter]
PRE --> Q2[queue q2]
Q2 --> INFER[qtimltflite YOLOX HTP]
INFER --> Q4[queue q4]
Q4 --> POST[qtimlpostprocess module=yolov8]
POST --> TEXT[TextFilter]
TEXT --> Q5[queue q5]
Q5 --> MUX
MUX --> OVL[qtivoverlay]
OVL --> ENC[v4l2h264enc]
ENC --> PARSEOUT[h264parse parse_out]
PARSEOUT --> MP4[mp4mux]
MP4 --> SINK[filesink]
```
## Steps to Run
First ensure all referenced files — the input MP4, the `yolox_w8a8.tflite`
model, and the `yolov8.json` labels — are already present on the device at the
paths configured in `main.py`.
```bash theme={null}
# Copy the app to device
scp main.py @:~/
# SSH into device and run
ssh @
python3 ~/main.py
```
The input MP4 must exist at
`$HOME/Downloads/qimsdk_samples/media/ai_demo_sample.mp4` on the device, and the
output directory (`$HOME/Downloads/qimsdk_samples/media/`) must be writable so
the app can create `obj_detect_out.mp4`. The app runs to end-of-file, finalizes
the MP4, and exits.
#### Generated `main.py`
* The generated application constructs a tee-split pipeline: decoded frames are split into a passthrough branch and an AI branch.
* The AI branch runs `qtimlvconverter` (preprocess) → `qtimltflite` (YOLOX inference via HTP/NPU) → `qtimlpostprocess` → `TextFilter`, then merges back into `qtimetamux` with the passthrough video.
* `qtivoverlay` draws bounding boxes, and the result is hardware-encoded and written to an MP4 file via `filesink`.
* Pipeline construction and `pipeline.execute()` live inside `create_and_execute_pipeline()`; `main()` handles logging setup and calls it.
* All paths use `$HOME` expansion via `os.environ['HOME']` — element properties do not perform shell expansion.
```python theme={null}
#!/usr/bin/env python3
"""Single-stream YOLOX object detection from an MP4 file, encoded to an output MP4 file."""
import os
from qimsdk import Element, Pipeline, TextFilter, VideoFilter
# Example pipeline:
#
# src -> demux -> parse -> decoder -> q_dec -> [vf:NV12] -> tee name=split
# split. -> obj_mux -> qtivoverlay -> encoder -> parse_out -> mux -> filesink
# split. -> q1 -> preprocessing -> q2 -> inferencing -> q4
# -> postprocessing -> [mlf:text] -> q5 -> obj_mux.
#
# The pipeline reads an MP4/H.264 file, decodes it through the hardware decoder,
# runs YOLOX (yolov8 postprocess module) object detection on full frames using
# the HTP/NPU external delegate, merges the detection metadata back with the
# video, overlays the detected bounding boxes and class labels on each frame,
# and hardware-encodes the annotated stream to an output MP4 file.
INPUT_FILE = f"{os.environ['HOME']}/Downloads/qimsdk_samples/media/ai_demo_sample.mp4"
MODEL_PATH = f"{os.environ['HOME']}/Downloads/qimsdk_samples/models/yolox_w8a8.tflite"
LABELS_PATH = f"{os.environ['HOME']}/Downloads/qimsdk_samples/labels/yolov8.json"
OUTPUT_FILE = f"{os.environ['HOME']}/Downloads/qimsdk_samples/media/obj_detect_out.mp4"
def create_and_execute_pipeline() -> None:
# Reads the input MP4 file as raw bytes.
source = (
Element("filesrc", "source")
.set("location", INPUT_FILE)
)
# Extracts the elementary H.264 stream from the MP4 container.
demux = Element("qtdemux", "demux")
# Prepares the H.264 bitstream for the decoder.
parser = Element("h264parse", "parser")
# Decodes the compressed H.264 stream into raw video frames.
#
# DMA I/O modes are used to avoid unnecessary buffer copies. This is a
# file source decoded through the hardware decoder, so both io-modes are 4.
decoder = (
Element("v4l2h264dec", "decoder")
.set("capture-io-mode", 4)
.set("output-io-mode", 4)
)
# Queue immediately after hardware decode to decouple the decoder thread.
q_dec = Element("queue", "q_dec")
# Restricts the decoded stream to NV12 before branching for AI/overlay.
videofilter = VideoFilter().format("NV12")
# Splits decoded frames into a video/overlay branch and an AI branch.
split = Element("tee", "split")
# Queues frames from the tee into the AI branch.
q1 = Element("queue", "q1")
# Converts raw NV12 video frames into the model input tensor format.
preprocessing = Element("qtimlvconverter", "preprocessing")
# Queues converted tensors before inference.
q2 = Element("queue", "q2")
# Runs YOLOX object detection on full frames using the TFLite external
# delegate targeting the HTP/NPU.
inferencing = (
Element("qtimltflite", "inferencing")
.set("model", MODEL_PATH)
.set("delegate", "external")
.set("external-delegate-path", "libQnnTFLiteDelegate.so")
.set("external-delegate-options", "QNNExternalDelegate,backend_type=htp,log_level=(string)1;")
)
# Queues tensor outputs before postprocessing.
q4 = Element("queue", "q4")
# Decodes YOLOX model output tensors into detection metadata.
# YOLOX detection uses the yolov8 postprocess module per the model catalog.
# The confidence threshold (51.0) is applied via inline JSON settings.
postprocessing = (
Element("qtimlpostprocess", "postprocessing")
.set("module", "yolov8")
.set("labels", LABELS_PATH)
.set("settings", '{"confidence": 51.0}')
)
# Stream filter marking the AI branch output as text metadata.
mlf = TextFilter()
# Queues metadata before it is merged back with the video branch.
q5 = Element("queue", "q5")
# Merges detection metadata produced by the AI branch with the original
# video frames from the passthrough branch.
obj_mux = Element("qtimetamux", "obj_mux")
# Renders detected bounding boxes and class labels on top of the frame.
overlay = Element("qtivoverlay", "overlay")
# Hardware-encodes the annotated NV12 stream back to H.264.
#
# File source path decoded via hardware decoder: capture/output io-mode 4.
encoder = (
Element("v4l2h264enc", "encoder")
.set("capture-io-mode", 4)
.set("output-io-mode", 4)
)
# Prepares the encoded H.264 stream for muxing.
parse_out = Element("h264parse", "parse_out")
# Multiplexes the H.264 stream into an MP4 container.
mux = Element("mp4mux", "mux")
# Writes the final annotated video to the output MP4 file.
sink = (
Element("filesink", "sink")
.set("location", OUTPUT_FILE)
)
# Creates the pipeline, adds and links elements, and executes it.
pipeline = (
Pipeline("obj-detect-file-pipeline")
.add(source)
.add(demux)
.add(parser)
.add(decoder)
.add(q_dec)
.add_stream_filter("videofilter", videofilter)
.add(split)
.add(q1)
.add(preprocessing)
.add(q2)
.add(inferencing)
.add(q4)
.add(postprocessing)
.add_stream_filter("mlf", mlf)
.add(q5)
.add(obj_mux)
.add(overlay)
.add(encoder)
.add(parse_out)
.add(mux)
.add(sink)
.link("source", "demux", "parser", "decoder", "q_dec", "videofilter", "split")
.link("split", "obj_mux")
.link("split", "q1", "preprocessing", "q2", "inferencing", "q4",
"postprocessing", "mlf", "q5", "obj_mux")
.link("obj_mux", "overlay", "encoder", "parse_out", "mux", "sink")
)
# Ensures the MP4 muxer finalizes the container correctly on EOS.
pipeline.eos(True)
pipeline.execute()
def main() -> None:
from qimsdk import ImsdkGstLogMode, ImsdkLogLevel, SetImsdkGstLogMode, SetImsdkLogLevel
SetImsdkGstLogMode(ImsdkGstLogMode.ImsdkLog)
SetImsdkLogLevel(ImsdkLogLevel.Debug)
create_and_execute_pipeline()
if __name__ == "__main__":
main()
```
***
### Step 4: Running the applications
| File | Download | Save as |
| ---------------- | ------------------------------------------------------------------------------------------------------------------------------------------------------ | -------------------- |
| YOLOX W8A8 model | [Qualcomm AI Hub — YOLOX](https://aihub.qualcomm.com/iot/models/yolox) | `yolox_w8a8.tflite` |
| Detection labels | yolov8.json | `yolov8.json` |
| Sample video | Input video | `ai_demo_sample.mp4` |
If the downloaded model file is a `.zip` archive, extract it on your host machine before copying: `unzip filename.zip`
The input video, model, and labels must be present on the device before running — regardless of how you run the app. Copy them to the paths `main.py` expects:
```bash theme={null}
# Replace and with your device credentials.
ssh @ "mkdir -p ~/Downloads/qimsdk_samples/media ~/Downloads/qimsdk_samples/models ~/Downloads/qimsdk_samples/labels"
# Copy the assets to device (paths must match main.py)
scp ai_demo_sample.mp4 @:~/Downloads/qimsdk_samples/media/
scp yolox_w8a8.tflite @:~/Downloads/qimsdk_samples/models/
scp yolov8.json @:~/Downloads/qimsdk_samples/labels/
```
With the assets in place, you have two options to deploy and run the agent-generated `main.py`:
**Option A — Use the QIM SDK Deploy skill (Recommended):**
The `qimsdk-deploy` skill pushes `main.py` and runs it directly on the target device over SSH. It copies only `main.py` — the assets from the previous step must already be on the device.
**Option B — Follow the generated README:**
Follow the **steps to run** in the [generated `README.md`](#generated-readme-md) to manually copy `main.py` to device and run the app:
```bash theme={null}
# Copy the app to device
scp main.py @:~/
# SSH into device and run
ssh @
python3 ~/main.py
```
***
## Available Sample Prompts
| # | Prompt |
| -- | ----------------------------------------------------------------------------------------------------------------------------------------------------------------------------------------------------------------------------- |
| 1 | [Camera YOLOv8 object detection using fused TFLite ML-bin](https://github.com/qualcomm/qimsdk-agentic-skills/blob/main/sample-prompts/qimsdk-python-app-builder/AI_01_mlbin_yolov8_camera_overlay.md) |
| 2 | [Two-stage PPE daisy-chain — person detection → PPE detection → overlay display](https://github.com/qualcomm/qimsdk-agentic-skills/blob/main/sample-prompts/qimsdk-python-app-builder/AI_02_mlbin_ppe_daisy_chain_display.md) |
| 3 | [Object detection with custom postprocess placeholder](https://github.com/qualcomm/qimsdk-agentic-skills/blob/main/sample-prompts/qimsdk-python-app-builder/AI_03_custom_postprocess_detection_placeholder.md) |
| 4 | [Pose estimation with custom postprocess placeholder](https://github.com/qualcomm/qimsdk-agentic-skills/blob/main/sample-prompts/qimsdk-python-app-builder/AI_04_custom_postprocess_pose_placeholder.md) |
| 5 | [Inference app with tensor output via custom callback placeholder](https://github.com/qualcomm/qimsdk-agentic-skills/blob/main/sample-prompts/qimsdk-python-app-builder/AI_05_tensor_dump_callback_placeholder.md) |
| 6 | [YOLOv8 object detection pipeline with generated YAML config](https://github.com/qualcomm/qimsdk-agentic-skills/blob/main/sample-prompts/qimsdk-python-app-builder/AI_06_yaml_yolov8_generated_config.md) |
| 7 | [Object detection with custom preprocess placeholder](https://github.com/qualcomm/qimsdk-agentic-skills/blob/main/sample-prompts/qimsdk-python-app-builder/AI_07_custom_preprocess_detection_placeholder.md) |
| 8 | [Object detection with ML-bin custom preprocess placeholder](https://github.com/qualcomm/qimsdk-agentic-skills/blob/main/sample-prompts/qimsdk-python-app-builder/AI_08_mlbin_custom_preprocess_detection_placeholder.md) |
| 9 | [Load existing YOLOv8 detection pipeline from external YAML config](https://github.com/qualcomm/qimsdk-agentic-skills/blob/main/sample-prompts/qimsdk-python-app-builder/AI_09_yaml_yolov8_external_config.md) |
| 10 | [Single-stream YOLOX object detection from MP4, encoded to file](https://github.com/qualcomm/qimsdk-agentic-skills/blob/main/sample-prompts/qimsdk-python-app-builder/AI_10_single_stream_object_detection.md) |
| 11 | [AI wall — four parallel AI inference streams composed into a 2×2 grid display](https://github.com/qualcomm/qimsdk-agentic-skills/blob/main/sample-prompts/qimsdk-python-app-builder/AI_11_ai_wall.md) |
| 12 | [Four-stage gesture recognition daisy-chain pipeline](https://github.com/qualcomm/qimsdk-agentic-skills/blob/main/sample-prompts/qimsdk-python-app-builder/AI_12_gesture_recognition.md) |
| 13 | [Audio classification — classify audio events from video and overlay results](https://github.com/qualcomm/qimsdk-agentic-skills/blob/main/sample-prompts/qimsdk-python-app-builder/AI_13_audio_classification.md) |
| 14 | [Two pipelines bridged through application-managed buffers (AppSrc/AppSink)](https://github.com/qualcomm/qimsdk-agentic-skills/blob/main/sample-prompts/qimsdk-python-app-builder/MM_01_appsrc_appsink_bridge.md) |
**What it generates**
For each request, the agent produces an artifact folder named `qimsdk-python-/` containing:
* **`main.py`** — a complete, runnable Python application using qimsdk python package, including pipeline construction, element wiring, stream filters, and ML inference configuration
* **`README.md`** — a detailed document covering:
* Purpose and pipeline behavior summary
* Configuration placeholders (input, model, labels, output paths)
* A step-by-step pipeline flow (text summary + Mermaid diagram)
* Steps to run the app on device
* **`A YAML config file`** — only when you request declarative YAML pipeline mode
**Supported use cases:**
| Category | Details |
| --------------------- | ---------------------------------------------------------------------------------------------------------------------------------------------------------------------------------------------- |
| **AI pipelines** | Object detection, image classification, semantic segmentation, face detection, pose estimation, super resolution, depth estimation, audio classification, object tracking, gesture recognition |
| **Inputs** | ISP camera, USB camera, file source (MP4/H.264), RTSP stream |
| **Outputs** | HDMI display, encoded file (MP4), RTSP stream, Redis/MQTT metadata |
| **ML backends** | TFLite (HTP/NPU), QNN, SNPE |
| **Pipeline patterns** | Single-stream, multi-stream, daisy-chained models, ML-bin fused inference, custom pre/post-processing, AppSrc/AppSink bridges, YAML config mode |
## Prerequisites
### For generating code
Qualcomm dev kits are not needed for code generation.
**Host Machine**: Any PC with internet access
**Coding Agent**: Any AI coding agent installed (Claude Code, Cursor, Codex, etc.) which supports skills — the skills provided are agent-agnostic.
This skill is designed to work well even with low-reasoning / smaller models.
Eg: A Sonnet 4.5 model is sufficient.
### For deploying and running apps
The target devices where QIM SDK is supported (see [QIM SDK Installation Guide](/installation))
## How to Use
### Step 1: Get the skill
Clone the skill repository to your host machine, then copy the **QIM SDK Python App Builder skill** into your coding agent's skills directory. Also copy the **qimsdk-deploy** skill, which deploys and runs the generated app on device (see [Step 4](#step-4-running-the-applications)):
```bash theme={null}
git clone https://github.com/qualcomm/qimsdk-agentic-skills
# Set this to your coding agent's skills directory.
# Claude Code example (see your agent's docs for its skills path):
# App Builder skill — generates the app
cp -r qimsdk-agentic-skills/skills/qimsdk-python-app-builder ~/.claude/skills
# Deploy skill — builds, pushes, and runs the app on device
cp -r qimsdk-agentic-skills/skills/qimsdk-deploy ~/.claude/skills
```
After copying, your skills directory should look like this:
```
/
├── qimsdk-python-app-builder/
│ ├── SKILL.md # Skill definition with rules and API quick reference
│ └── references/ # Condensed reference documents
└── qimsdk-deploy/
├── SKILL.md # Deploy skill definition
└── references/ # Condensed reference documents
```
The skills directory is agent-specific — Claude Code uses `~/.claude/skills/`. Check your coding agent's documentation for its skills location. You can also scope skills to a single workspace (e.g. Claude Code supports `/.claude/skills/`).
***
### Step 2: Load the skill
Restart (or reload) your coding agent after placing the skills so it picks them up. They will appear automatically in the `/skills` list.
To verify, open the agent panel and run:
```
/skills
```
You should see both `qimsdk-python-app-builder` and `qimsdk-deploy` listed.
***
### Step 3: Generate the application
Describe your pipeline to the agent. It will automatically activate the skill and generate a complete `main.py` and `README.md`.
#### Sample Prompt
**Prompt format — describe pipeline behavior and configuration:**
```
Create a QIM SDK Python app for single-stream YOLOX object detection from an
MP4 file, encoding the result to a file.
## Pipeline Behavior
- Decode an MP4 file using Qualcomm hardware decoder
- Run YOLOX object detection on full frames using TFLite external delegate on HTP/NPU
- Merge metadata with the video stream before overlay
- Overlay bounding boxes and labels
- Encode the overlaid video and save to an output MP4 file
## Configuration
- Input: ~/Downloads/qimsdk_samples/media/ai_demo_sample.mp4
- Model: ~/Downloads/qimsdk_samples/models/yolox_w8a8.tflite
- Labels: ~/Downloads/qimsdk_samples/labels/yolov8.json
- Backend: TFLite external delegate, HTP/NPU
- Confidence: 51.0
- Output: ~/Downloads/qimsdk_samples/media/obj_detect_out.mp4
```
More sample prompts can be found in the [Available Sample Prompts](#available-sample-prompts) section below.
#### Generated `README.md`
The README documents the generated app in full:
* **Purpose** — a plain-English summary of what the pipeline does
* **Files** — lists `main.py` and `README.md` with descriptions
* **Assumptions** — codec format, quantization requirements, camera defaults, output directory pre-conditions
* **Configuration** — all user-supplied paths (`INPUT_FILE`, `MODEL_PATH`, `LABELS_PATH`, `OUTPUT_FILE`) with instructions on where to change them
* **Placeholders to Fill** — any values you still need to supply, or a note that none remain when the request was fully specified
* **Pipeline Flow** — a `Text Summary` walkthrough of every element plus a `Mermaid Diagram` of the full pipeline
* **Steps to Run** — exact commands to run on device
# QIM SDK Python App — Single-Stream YOLOX Object Detection (MP4 → MP4)
## Purpose
Decode an MP4 file with the Qualcomm hardware decoder, run **YOLOX** object
detection on full frames using the **TFLite external delegate on the HTP/NPU**,
merge the detection metadata with the video stream, overlay bounding boxes and
class labels, then hardware-encode the annotated video to an output MP4 file.
Headless (no display branch).
## Files
* `main.py` — the qimsdk pipeline app
* `README.md` — this file
## Assumptions
* Input is H.264-in-MP4, decoded with `v4l2h264dec` (`capture-io-mode=4`,
`output-io-mode=4` — file source decoded through the hardware decoder).
* YOLOX (`yolox_w8a8.tflite`) uses the `yolov8` postprocess module with the
`yolov8.json` labels, per the model catalog.
* Confidence threshold is applied as inline postprocess settings
`{"confidence": 51.0}`.
* No display: the annotated stream is encoded and written straight to the
output MP4 (`v4l2h264enc` → `h264parse` → `mp4mux` → `filesink`).
* `pipeline.eos(True)` is set so `mp4mux` finalizes the container on EOS.
## Configuration (fixed constants in `main.py`)
| Value | Path |
| ------ | --------------------------------------------------------- |
| Input | `$HOME/Downloads/qimsdk_samples/media/ai_demo_sample.mp4` |
| Model | `$HOME/Downloads/qimsdk_samples/models/yolox_w8a8.tflite` |
| Labels | `$HOME/Downloads/qimsdk_samples/labels/yolov8.json` |
| Output | `$HOME/Downloads/qimsdk_samples/media/obj_detect_out.mp4` |
`$HOME` is expanded in Python (`os.environ['HOME']`) before being passed to any
element property, so the element receives a fully-resolved absolute path.
## Placeholders to Fill
None. All paths, model, labels, confidence, and delegate options are concrete.
## Pipeline Flow
### Text Summary
`filesrc` reads the MP4 and `qtdemux` extracts the H.264 elementary stream,
which `h264parse` prepares and `v4l2h264dec` hardware-decodes. A `queue`
(`q_dec`) decouples the decoder thread, then a `VideoFilter` constrains the
stream to NV12. A `tee` (`split`) branches:
* **Passthrough / video branch** → `qtimetamux` (`obj_mux`).
* **AI branch** → `queue` → `qtimlvconverter` (preprocess to model tensor) →
`queue` → `qtimltflite` (YOLOX, external delegate, HTP/NPU) → `queue` →
`qtimlpostprocess` (`module=yolov8`, labels, `{"confidence": 51.0}`) →
`TextFilter` → `queue` → `qtimetamux` (`obj_mux`).
`qtimetamux` merges the detection metadata back onto the video frames,
`qtivoverlay` draws the bounding boxes and class labels, and the annotated NV12
stream is hardware-encoded by `v4l2h264enc`, prepared by `h264parse`, muxed by
`mp4mux`, and written by `filesink` to the output MP4.
### Mermaid Diagram
```mermaid theme={null}
flowchart TD
SRC[filesrc] --> DEMUX[qtdemux]
DEMUX --> PARSE[h264parse]
PARSE --> DEC[v4l2h264dec]
DEC --> QDEC[queue q_dec]
QDEC --> NV12[NV12 VideoFilter]
NV12 --> SPLIT[tee split]
SPLIT -->|passthrough| MUX[qtimetamux obj_mux]
SPLIT -->|AI| Q1[queue q1]
Q1 --> PRE[qtimlvconverter]
PRE --> Q2[queue q2]
Q2 --> INFER[qtimltflite YOLOX HTP]
INFER --> Q4[queue q4]
Q4 --> POST[qtimlpostprocess module=yolov8]
POST --> TEXT[TextFilter]
TEXT --> Q5[queue q5]
Q5 --> MUX
MUX --> OVL[qtivoverlay]
OVL --> ENC[v4l2h264enc]
ENC --> PARSEOUT[h264parse parse_out]
PARSEOUT --> MP4[mp4mux]
MP4 --> SINK[filesink]
```
## Steps to Run
First ensure all referenced files — the input MP4, the `yolox_w8a8.tflite`
model, and the `yolov8.json` labels — are already present on the device at the
paths configured in `main.py`.
```bash theme={null}
# Copy the app to device
scp main.py @:~/
# SSH into device and run
ssh @
python3 ~/main.py
```
The input MP4 must exist at
`$HOME/Downloads/qimsdk_samples/media/ai_demo_sample.mp4` on the device, and the
output directory (`$HOME/Downloads/qimsdk_samples/media/`) must be writable so
the app can create `obj_detect_out.mp4`. The app runs to end-of-file, finalizes
the MP4, and exits.
#### Generated `main.py`
* The generated application constructs a tee-split pipeline: decoded frames are split into a passthrough branch and an AI branch.
* The AI branch runs `qtimlvconverter` (preprocess) → `qtimltflite` (YOLOX inference via HTP/NPU) → `qtimlpostprocess` → `TextFilter`, then merges back into `qtimetamux` with the passthrough video.
* `qtivoverlay` draws bounding boxes, and the result is hardware-encoded and written to an MP4 file via `filesink`.
* Pipeline construction and `pipeline.execute()` live inside `create_and_execute_pipeline()`; `main()` handles logging setup and calls it.
* All paths use `$HOME` expansion via `os.environ['HOME']` — element properties do not perform shell expansion.
```python theme={null}
#!/usr/bin/env python3
"""Single-stream YOLOX object detection from an MP4 file, encoded to an output MP4 file."""
import os
from qimsdk import Element, Pipeline, TextFilter, VideoFilter
# Example pipeline:
#
# src -> demux -> parse -> decoder -> q_dec -> [vf:NV12] -> tee name=split
# split. -> obj_mux -> qtivoverlay -> encoder -> parse_out -> mux -> filesink
# split. -> q1 -> preprocessing -> q2 -> inferencing -> q4
# -> postprocessing -> [mlf:text] -> q5 -> obj_mux.
#
# The pipeline reads an MP4/H.264 file, decodes it through the hardware decoder,
# runs YOLOX (yolov8 postprocess module) object detection on full frames using
# the HTP/NPU external delegate, merges the detection metadata back with the
# video, overlays the detected bounding boxes and class labels on each frame,
# and hardware-encodes the annotated stream to an output MP4 file.
INPUT_FILE = f"{os.environ['HOME']}/Downloads/qimsdk_samples/media/ai_demo_sample.mp4"
MODEL_PATH = f"{os.environ['HOME']}/Downloads/qimsdk_samples/models/yolox_w8a8.tflite"
LABELS_PATH = f"{os.environ['HOME']}/Downloads/qimsdk_samples/labels/yolov8.json"
OUTPUT_FILE = f"{os.environ['HOME']}/Downloads/qimsdk_samples/media/obj_detect_out.mp4"
def create_and_execute_pipeline() -> None:
# Reads the input MP4 file as raw bytes.
source = (
Element("filesrc", "source")
.set("location", INPUT_FILE)
)
# Extracts the elementary H.264 stream from the MP4 container.
demux = Element("qtdemux", "demux")
# Prepares the H.264 bitstream for the decoder.
parser = Element("h264parse", "parser")
# Decodes the compressed H.264 stream into raw video frames.
#
# DMA I/O modes are used to avoid unnecessary buffer copies. This is a
# file source decoded through the hardware decoder, so both io-modes are 4.
decoder = (
Element("v4l2h264dec", "decoder")
.set("capture-io-mode", 4)
.set("output-io-mode", 4)
)
# Queue immediately after hardware decode to decouple the decoder thread.
q_dec = Element("queue", "q_dec")
# Restricts the decoded stream to NV12 before branching for AI/overlay.
videofilter = VideoFilter().format("NV12")
# Splits decoded frames into a video/overlay branch and an AI branch.
split = Element("tee", "split")
# Queues frames from the tee into the AI branch.
q1 = Element("queue", "q1")
# Converts raw NV12 video frames into the model input tensor format.
preprocessing = Element("qtimlvconverter", "preprocessing")
# Queues converted tensors before inference.
q2 = Element("queue", "q2")
# Runs YOLOX object detection on full frames using the TFLite external
# delegate targeting the HTP/NPU.
inferencing = (
Element("qtimltflite", "inferencing")
.set("model", MODEL_PATH)
.set("delegate", "external")
.set("external-delegate-path", "libQnnTFLiteDelegate.so")
.set("external-delegate-options", "QNNExternalDelegate,backend_type=htp,log_level=(string)1;")
)
# Queues tensor outputs before postprocessing.
q4 = Element("queue", "q4")
# Decodes YOLOX model output tensors into detection metadata.
# YOLOX detection uses the yolov8 postprocess module per the model catalog.
# The confidence threshold (51.0) is applied via inline JSON settings.
postprocessing = (
Element("qtimlpostprocess", "postprocessing")
.set("module", "yolov8")
.set("labels", LABELS_PATH)
.set("settings", '{"confidence": 51.0}')
)
# Stream filter marking the AI branch output as text metadata.
mlf = TextFilter()
# Queues metadata before it is merged back with the video branch.
q5 = Element("queue", "q5")
# Merges detection metadata produced by the AI branch with the original
# video frames from the passthrough branch.
obj_mux = Element("qtimetamux", "obj_mux")
# Renders detected bounding boxes and class labels on top of the frame.
overlay = Element("qtivoverlay", "overlay")
# Hardware-encodes the annotated NV12 stream back to H.264.
#
# File source path decoded via hardware decoder: capture/output io-mode 4.
encoder = (
Element("v4l2h264enc", "encoder")
.set("capture-io-mode", 4)
.set("output-io-mode", 4)
)
# Prepares the encoded H.264 stream for muxing.
parse_out = Element("h264parse", "parse_out")
# Multiplexes the H.264 stream into an MP4 container.
mux = Element("mp4mux", "mux")
# Writes the final annotated video to the output MP4 file.
sink = (
Element("filesink", "sink")
.set("location", OUTPUT_FILE)
)
# Creates the pipeline, adds and links elements, and executes it.
pipeline = (
Pipeline("obj-detect-file-pipeline")
.add(source)
.add(demux)
.add(parser)
.add(decoder)
.add(q_dec)
.add_stream_filter("videofilter", videofilter)
.add(split)
.add(q1)
.add(preprocessing)
.add(q2)
.add(inferencing)
.add(q4)
.add(postprocessing)
.add_stream_filter("mlf", mlf)
.add(q5)
.add(obj_mux)
.add(overlay)
.add(encoder)
.add(parse_out)
.add(mux)
.add(sink)
.link("source", "demux", "parser", "decoder", "q_dec", "videofilter", "split")
.link("split", "obj_mux")
.link("split", "q1", "preprocessing", "q2", "inferencing", "q4",
"postprocessing", "mlf", "q5", "obj_mux")
.link("obj_mux", "overlay", "encoder", "parse_out", "mux", "sink")
)
# Ensures the MP4 muxer finalizes the container correctly on EOS.
pipeline.eos(True)
pipeline.execute()
def main() -> None:
from qimsdk import ImsdkGstLogMode, ImsdkLogLevel, SetImsdkGstLogMode, SetImsdkLogLevel
SetImsdkGstLogMode(ImsdkGstLogMode.ImsdkLog)
SetImsdkLogLevel(ImsdkLogLevel.Debug)
create_and_execute_pipeline()
if __name__ == "__main__":
main()
```
***
### Step 4: Running the applications
| File | Download | Save as |
| ---------------- | ------------------------------------------------------------------------------------------------------------------------------------------------------ | -------------------- |
| YOLOX W8A8 model | [Qualcomm AI Hub — YOLOX](https://aihub.qualcomm.com/iot/models/yolox) | `yolox_w8a8.tflite` |
| Detection labels | yolov8.json | `yolov8.json` |
| Sample video | Input video | `ai_demo_sample.mp4` |
If the downloaded model file is a `.zip` archive, extract it on your host machine before copying: `unzip filename.zip`
The input video, model, and labels must be present on the device before running — regardless of how you run the app. Copy them to the paths `main.py` expects:
```bash theme={null}
# Replace and with your device credentials.
ssh @ "mkdir -p ~/Downloads/qimsdk_samples/media ~/Downloads/qimsdk_samples/models ~/Downloads/qimsdk_samples/labels"
# Copy the assets to device (paths must match main.py)
scp ai_demo_sample.mp4 @:~/Downloads/qimsdk_samples/media/
scp yolox_w8a8.tflite @:~/Downloads/qimsdk_samples/models/
scp yolov8.json @:~/Downloads/qimsdk_samples/labels/
```
With the assets in place, you have two options to deploy and run the agent-generated `main.py`:
**Option A — Use the QIM SDK Deploy skill (Recommended):**
The `qimsdk-deploy` skill pushes `main.py` and runs it directly on the target device over SSH. It copies only `main.py` — the assets from the previous step must already be on the device.
**Option B — Follow the generated README:**
Follow the **steps to run** in the [generated `README.md`](#generated-readme-md) to manually copy `main.py` to device and run the app:
```bash theme={null}
# Copy the app to device
scp main.py @:~/
# SSH into device and run
ssh @
python3 ~/main.py
```
***
## Available Sample Prompts
| # | Prompt |
| -- | ----------------------------------------------------------------------------------------------------------------------------------------------------------------------------------------------------------------------------- |
| 1 | [Camera YOLOv8 object detection using fused TFLite ML-bin](https://github.com/qualcomm/qimsdk-agentic-skills/blob/main/sample-prompts/qimsdk-python-app-builder/AI_01_mlbin_yolov8_camera_overlay.md) |
| 2 | [Two-stage PPE daisy-chain — person detection → PPE detection → overlay display](https://github.com/qualcomm/qimsdk-agentic-skills/blob/main/sample-prompts/qimsdk-python-app-builder/AI_02_mlbin_ppe_daisy_chain_display.md) |
| 3 | [Object detection with custom postprocess placeholder](https://github.com/qualcomm/qimsdk-agentic-skills/blob/main/sample-prompts/qimsdk-python-app-builder/AI_03_custom_postprocess_detection_placeholder.md) |
| 4 | [Pose estimation with custom postprocess placeholder](https://github.com/qualcomm/qimsdk-agentic-skills/blob/main/sample-prompts/qimsdk-python-app-builder/AI_04_custom_postprocess_pose_placeholder.md) |
| 5 | [Inference app with tensor output via custom callback placeholder](https://github.com/qualcomm/qimsdk-agentic-skills/blob/main/sample-prompts/qimsdk-python-app-builder/AI_05_tensor_dump_callback_placeholder.md) |
| 6 | [YOLOv8 object detection pipeline with generated YAML config](https://github.com/qualcomm/qimsdk-agentic-skills/blob/main/sample-prompts/qimsdk-python-app-builder/AI_06_yaml_yolov8_generated_config.md) |
| 7 | [Object detection with custom preprocess placeholder](https://github.com/qualcomm/qimsdk-agentic-skills/blob/main/sample-prompts/qimsdk-python-app-builder/AI_07_custom_preprocess_detection_placeholder.md) |
| 8 | [Object detection with ML-bin custom preprocess placeholder](https://github.com/qualcomm/qimsdk-agentic-skills/blob/main/sample-prompts/qimsdk-python-app-builder/AI_08_mlbin_custom_preprocess_detection_placeholder.md) |
| 9 | [Load existing YOLOv8 detection pipeline from external YAML config](https://github.com/qualcomm/qimsdk-agentic-skills/blob/main/sample-prompts/qimsdk-python-app-builder/AI_09_yaml_yolov8_external_config.md) |
| 10 | [Single-stream YOLOX object detection from MP4, encoded to file](https://github.com/qualcomm/qimsdk-agentic-skills/blob/main/sample-prompts/qimsdk-python-app-builder/AI_10_single_stream_object_detection.md) |
| 11 | [AI wall — four parallel AI inference streams composed into a 2×2 grid display](https://github.com/qualcomm/qimsdk-agentic-skills/blob/main/sample-prompts/qimsdk-python-app-builder/AI_11_ai_wall.md) |
| 12 | [Four-stage gesture recognition daisy-chain pipeline](https://github.com/qualcomm/qimsdk-agentic-skills/blob/main/sample-prompts/qimsdk-python-app-builder/AI_12_gesture_recognition.md) |
| 13 | [Audio classification — classify audio events from video and overlay results](https://github.com/qualcomm/qimsdk-agentic-skills/blob/main/sample-prompts/qimsdk-python-app-builder/AI_13_audio_classification.md) |
| 14 | [Two pipelines bridged through application-managed buffers (AppSrc/AppSink)](https://github.com/qualcomm/qimsdk-agentic-skills/blob/main/sample-prompts/qimsdk-python-app-builder/MM_01_appsrc_appsink_bridge.md) |