> ## Documentation Index
> Fetch the complete documentation index at: https://imsdkdocs.qualcomm.com/llms.txt
> Use this file to discover all available pages before exploring further.

# Quick start guide

> A Quick demonstration of C++ SDK for building AI application on Qualcomm platforms

## What is the QIM SDK C++ App Builder?

### Overview

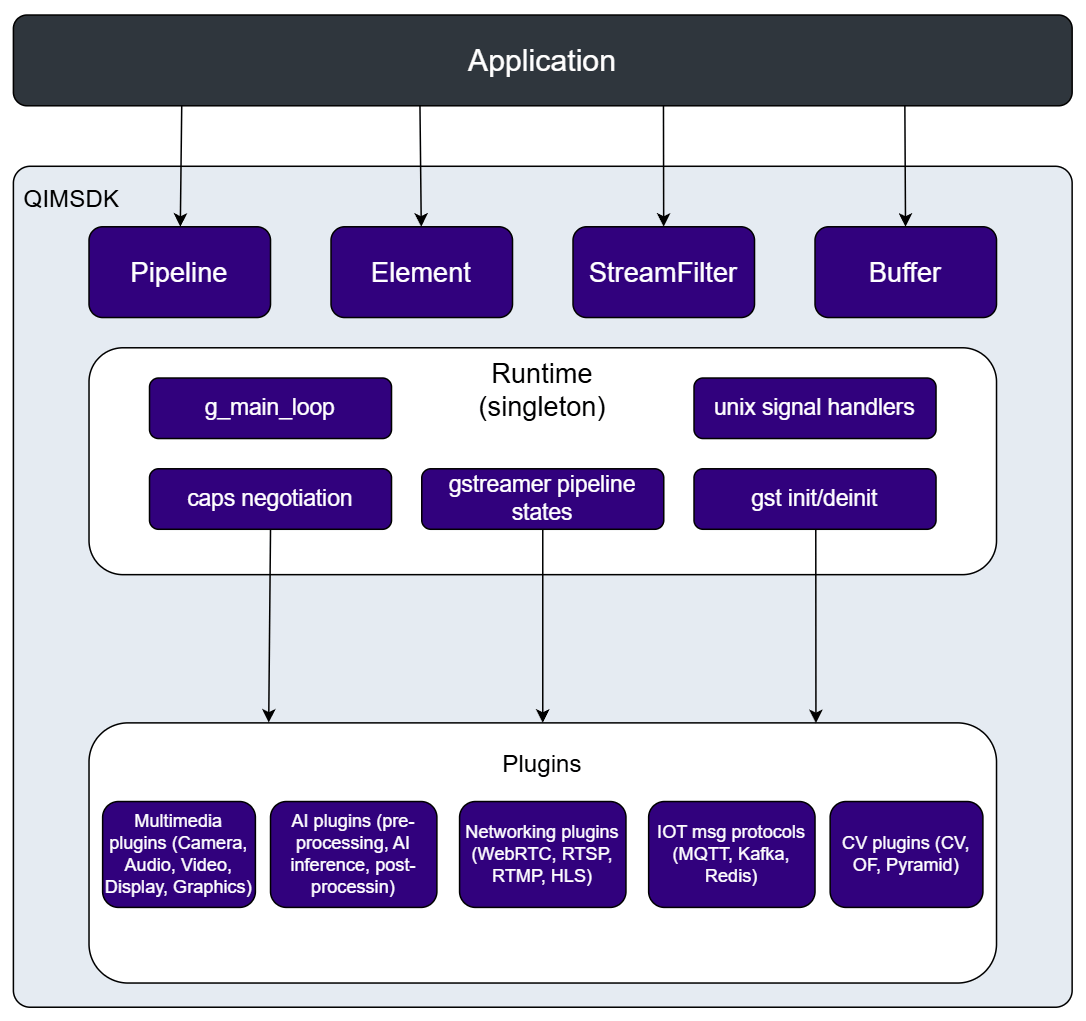
The **QIM SDK C++ App Builder** is a modern C++ SDK for building, running, and managing multimedia and AI pipelines on Qualcomm platforms. It sits as a high-level abstraction layer on top of GStreamer, taking care of framework-level concerns such as element negotiation, pad linking, signal management, event loops, and state transitions, so developers can stay focused on application logic instead of framework boilerplate.

<img src="https://mintcdn.com/qimsdk/QarSxH4rrv0vwi-l/app-builder/images/imsdk_overview.png?fit=max&auto=format&n=QarSxH4rrv0vwi-l&q=85&s=a927e3a6ea23ccab4080d3e28b88c18d" alt="Introduction" width="1086" height="1021" data-path="app-builder/images/imsdk_overview.png" />

### Key Capabilities

* **No GStreamer expertise required** — the SDK manages all underlying GStreamer mechanics internally, with no compile-time dependency on GStreamer headers.
* **Less code, no GStreamer boilerplate** — a fluent, high-level API bundles away the pipeline construction, element linking, and state management that GStreamer's native API would otherwise require, so a functional camera-to-display pipeline can be written in just a few lines of C++.
* **Custom pre/post-processing** — plug in your own pre- and post-processing logic around the built-in ML bins without writing a custom GStreamer element.
* **AI inference support** — built-in ML bins for TFLite, QNN, SNPE, and ONNX models.
* **Broad multimedia support** — video capture, signal processing, ML inference, overlay rendering, and display output.

### API Reference
<table className="api-code-table">
  <colgroup>
    <col style={{width: "12%"}} />

    <col style={{width: "38%"}} />

    <col style={{width: "50%"}} />
  </colgroup>

  <thead>
    <tr>
      <th>API</th>
      <th>Description</th>
      <th>API Code Reference</th>
    </tr>
  </thead>

  <tbody>
    <tr>
      <td>
        **Pipeline**
      </td>

      <td>
        Builds, links, and manages the full lifecycle of a GStreamer pipeline. Supports both programmatic (C++ fluent API) and declarative (YAML) pipeline definition. Key methods: `add()`, `link()`, `add_stream_filter()`, `execute()`, `prepare()`, `start()`, `stop()`, `get()`.
      </td>

      <td>
        ```cpp theme={null}
        Pipeline p("cam-pipeline");
        p.add("qtiqmmfsrc", "src").add("waylandsink", "sink").execute();
        ```
      </td>
    </tr>

    <tr>
      <td>
        **Element**
      </td>

      <td>
        Generic wrapper around a GStreamer element. Supports fluent property setting, either at creation time or at runtime, to update a live pipeline.
      </td>

      <td>
        ```cpp theme={null}
        Element sink("waylandsink", "display");
        sink.set("fullscreen", true);
        sink.set("sync", false);
        ```
      </td>
    </tr>

    <tr>
      <td>
        **Buffer**
      </td>

      <td>
        Unified buffer abstraction over native GStreamer memory. Provides read/write access, timestamp metadata, and zero-copy transfer paths. Key methods: `data()`, `size()`, `resize()`, `pts()`, `dts()`, `duration()`.
      </td>

      <td>
        ```cpp theme={null}
        sink.setBufferConsumer([](Buffer buf) {
          auto* data = buf.data();
          auto pts = buf.pts();
        });
        ```
      </td>
    </tr>

    <tr>
      <td>
        **AppSrc**
      </td>

      <td>
        App-facing source. Feeds buffers from application code into the pipeline using lambda callbacks or a push API.
      </td>

      <td>
        ```cpp theme={null}
        AppSrc src(pipeline.get("src"));
        src.setBufferProducer([](Buffer& buf) {
          // fill buf.data()
          return true;
        });
        ```
      </td>
    </tr>

    <tr>
      <td>
        **AppSink**
      </td>

      <td>
        App-facing sink. Delivers pipeline output buffers to application code with zero-copy.
      </td>

      <td>
        ```cpp theme={null}
        AppSink sink(pipeline.get("sink"));
        sink.setBufferConsumer([](Buffer buf) {
          // consume buf.data()
        });
        ```
      </td>
    </tr>

    <tr>
      <td>
        **CamSrc**
      </td>

      <td>
        Built-in ISP camera source. Exposes an API for runtime image capture and snapshots.
      </td>

      <td>
        ```cpp theme={null}
        CamSrc cam(pipeline.get("source"));
        cam.captureImage("snapshot.jpg");
        ```
      </td>
    </tr>

    <tr>
      <td>
        **MLPreProcess**
      </td>

      <td>
        Attaches a custom C++ lambda for pre-processing input frames before ML inference.
      </td>

      <td>
        ```cpp theme={null}
        MLPreProcess pre(pipeline.get("preproc"));
        pre.set_handler([](Buffer& buf) {
          // transform input frame
        });
        ```
      </td>
    </tr>

    <tr>
      <td>
        **MLPostProcess**
      </td>

      <td>
        Attaches a custom C++ lambda for post-processing raw inference tensor output.
      </td>

      <td>
        ```cpp theme={null}
        MLPostProcess pp(pipeline.get("postproc"));
        pp.set_handler([](Buffer& buf) {
          // parse inference output
        });
        ```
      </td>
    </tr>

    <tr>
      <td>
        **MLVideoTFLiteBin** / **MLVideoQNNBin** / **MLVideoSNPEBin** / **MLVideoONNXBin**
      </td>

      <td>
        All-in-one preprocess + inference + postprocess bins. Supports TFLite, QNN, SNPE, and ONNX models.
      </td>

      <td>
        ```cpp theme={null}
        pipeline.add("MLVideoTFLiteBin", "ml", "model", "/models/model.tflite", "delegate", "htp");
        ```
      </td>
    </tr>

    <tr>
      <td>
        **VideoFilter** / **AudioFilter** / **ImageFilter** / **H264Filter** / **TensorFilter** / **TextFilter**
      </td>

      <td>
        Fluent caps builders for `add_stream_filter()`. Describes stream characteristics for caps negotiation between pipeline stages.
      </td>

      <td>
        ```cpp theme={null}
        pipeline.add_stream_filter("vf", VideoFilter().format("NV12").resolution(1920, 1080).framerate(30));
        ```
      </td>
    </tr>
  </tbody>
</table>

***

## Build your application

<Note>
  Ensure you have QIM SDK installed. See [QIM SDK Installation Guide](../installation)
</Note>

Before running any of the applications below, create the sample directory tree on the target device:

```bash theme={null}
# ~ resolves automatically to the correct home directory on the device (/root on QLI, /home/ubuntu on Ubuntu).

ssh <user>@<device-ip> "mkdir -p ~/Downloads/qimsdk_samples/{media,models,labels}"
```

This is required even for apps that don't download any media, model, or label files (such as the camera capture and recording apps), since they still write their output under this path.

### USB Camera Source

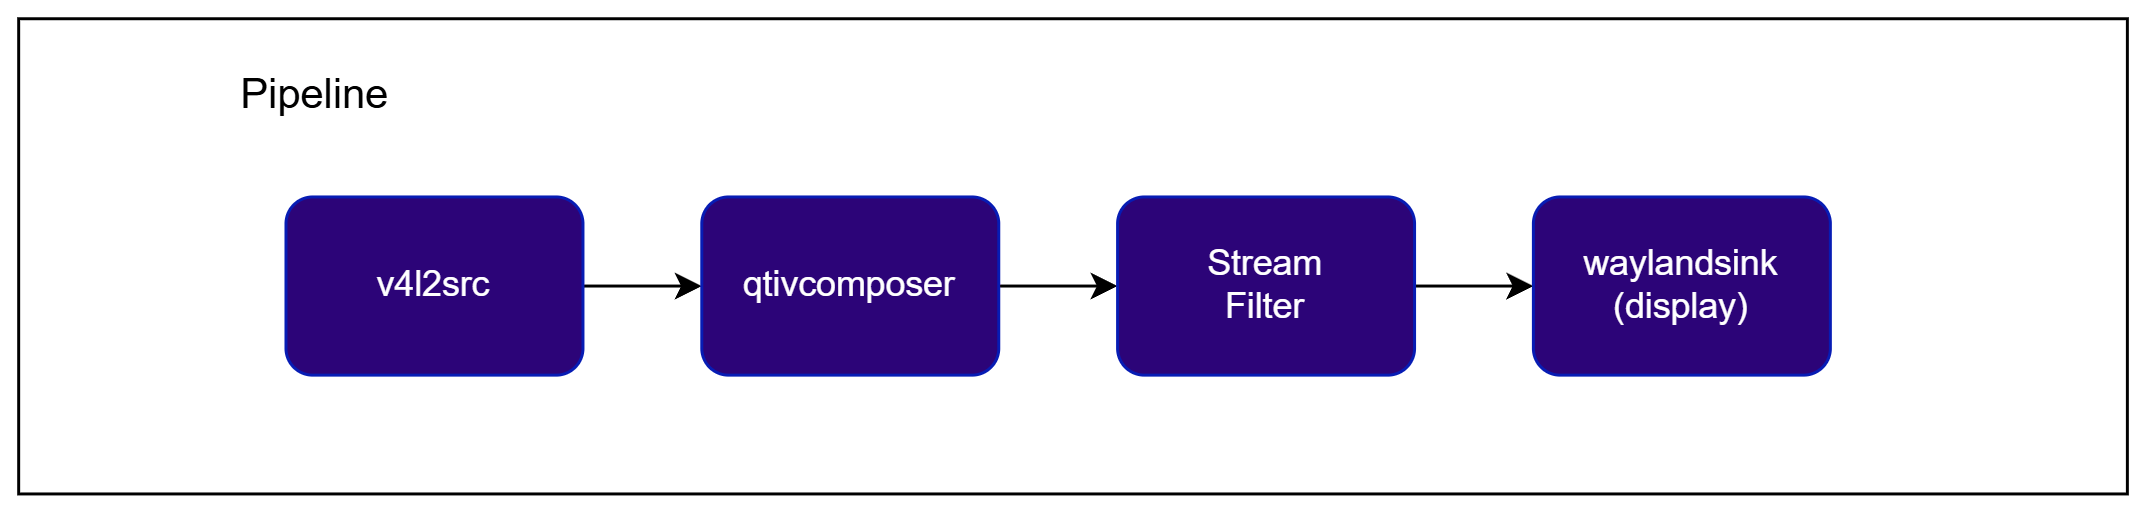
USB (UVC) cameras are handled by the `v4l2src` node. Each USB camera comes with its own format and frame constraints. Because of this, we always place `qtivtransform` right after the USB camera to ensure that the rest of the pipeline receives a hardware-friendly NV12 (Semi-planar YUV420) video format. `qtivtransform` automatically operates in passthrough mode if the USB camera already supports NV12, so you don't need to worry about any performance overhead.

<img src="https://mintcdn.com/qimsdk/QarSxH4rrv0vwi-l/app-builder/images/usb_cam_src.png?fit=max&auto=format&n=QarSxH4rrv0vwi-l&q=85&s=2eb0a04e674fbfb4ee468483a076bad3" alt="Introduction" width="2147" height="510" data-path="app-builder/images/usb_cam_src.png" />

<Tabs>
  <Tab title="Explicit coding style">
    <Info>
      Check application source code on GitHub: [`qimsdk_ref_usb_camera`](https://github.com/qualcomm/qimsdk/tree/main/cpp/examples/reference-apps/qimsdk_ref_usb_camera)

      Pre-built application on device: `/usr/bin/qimsdk_ref_usb_camera`
    </Info>

    ```cpp theme={null}
    #include <iostream>
    #include <qti/qimsdk.h>

    using namespace qti;

    //  Example pipeline:
    //
    //    source → transform → [videofilter] → display
    //
    //  The pipeline reads frames from a USB (V4L2) camera, rotates them, restricts
    //  the stream to NV12/1080p/30fps, and displays the result through Wayland.
    void create_and_execute_pipeline(const std::string &device) {
      // Captures frames from the USB camera source.
      Element source("v4l2src", "source");
      source.set("device", device);

      // Applies geometric transforms to video frames.
      Element transform("qtivtransform", "transform");

      // Stream filters used in branch links.
      // They define specific stream characteristics from the supported options.
      auto videofilter = VideoFilter().format("NV12").resolution(1920, 1080).framerate(30);

      // Render video stream on display.
      //
      // sync=false disables strict rendering synchronization to the pipeline clock.
      // fullscreen=true renders the output fullscreen on the target display.
      Element display("waylandsink", "display");
      display.set("sync", false);
      display.set("fullscreen", true);

      // Creates the pipeline, adds elements, links them explicitly, and executes it.
      Pipeline pipeline("usb-cam-pipeline");
      pipeline.add(source)
        .add(transform)
        .add_stream_filter("videofilter", videofilter)
        .add(display)
        .link("source", "transform", "videofilter", "display")
        .execute();
    }

    int main(int argc, char **argv) {
      // Route GStreamer logs through the QIM SDK logger and enable debug output.
      qti::SetImsdkGstLogMode(qti::ImsdkGstLogMode::ImsdkLog);
      qti::SetImsdkLogLevel(qti::ImsdkLogLevel::Debug);

      // V4L2 device node to capture from, defaults to /dev/video2. Pass -d/--device to override.
      std::string device = "/dev/video2";
      for (int i = 1; i < argc; ++i) {
        std::string arg = argv[i];
        if ((arg == "-d" || arg == "--device") && i + 1 < argc) {
          device = argv[++i];
        }
      }

      try {
        create_and_execute_pipeline(device);
      } catch (const std::exception &ex) {
        std::cerr << "Exception: " << ex.what() << std::endl;
        return 1;
      }

      return 0;
    }
    ```

    <Steps>
      <Step title="Connect a USB camera">
        Connect a USB (UVC) camera to the target device and verify it is exposed as `/dev/video2` (update the pipeline's `device` property if your camera is exposed on a different node).
      </Step>

      <Step title="Run the application">
        ```bash theme={null}
        /usr/bin/qimsdk_ref_usb_camera --input-config /dev/video2
        ```
      </Step>

      <Step title="Expected Output">
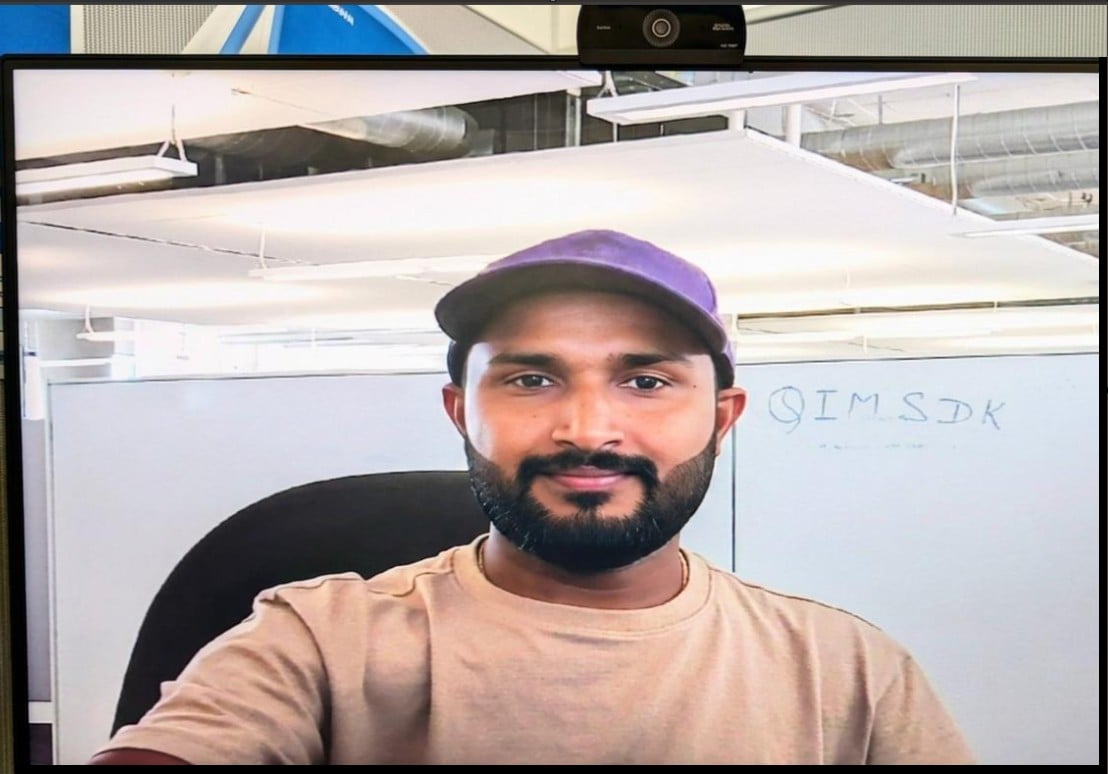
        The live camera feed is rotated and rendered fullscreen on the display in NV12 format at 1080p/30fps.

        <img src="https://mintcdn.com/qimsdk/vM1cbKMfLRcPD7xl/app-builder/images/usb-camera-preview.jpeg?fit=max&auto=format&n=vM1cbKMfLRcPD7xl&q=85&s=2ed060f58a450ceb48de22da1d5cf295" alt="Expected Output" width="1108" height="774" data-path="app-builder/images/usb-camera-preview.jpeg" />

        To stop the application, press **CTRL + C**.

      </Step>

      <Step title="Customize application">
        Refer to the [Steps to build custom application](/advanced/yocto-build#steps-to-build-custom-application) section to customize this application.
      </Step>
    </Steps>
  </Tab>

  <Tab title="Implicit coding style">
    <Info>
      Check application source code on GitHub: [`qimsdk_ref_usb_camera_impl`](https://github.com/qualcomm/qimsdk/tree/main/cpp/examples/reference-apps/qimsdk_ref_usb_camera_impl)

      Pre-built application on device: `/usr/bin/qimsdk_ref_usb_camera_impl`
    </Info>

    ```cpp theme={null}

    #include <iostream>

    #include <qti/qimsdk.h>

    using namespace qti;

    //  Example pipeline:
    //
    //    source → transform → [videofilter] → display
    //
    //  The pipeline reads frames from a USB (V4L2) camera, rotates them, restricts
    //  the stream to NV12/1080p/30fps, and displays the result through Wayland.

    void create_and_execute_pipeline(const std::string &device) {

      // Creates the pipeline, adds and links elements, and executes it.
      //
      // Elements are created on the fly as they are added, and linking is
      // implicit, following the order in which elements are added.
      //
      // sync=false disables strict rendering synchronization to the pipeline clock.
      // fullscreen=true renders the output fullscreen on the target display.
      Pipeline pipeline("usb-cam-pipeline");
      pipeline.add("v4l2src", "source", "device", device)
              .add("qtivtransform", "transform")
              .add_stream_filter("videofilter", VideoFilter().format("NV12").resolution(1920, 1080).framerate(30))
              .add("waylandsink", "display", "sync", false, "fullscreen", true)
              .execute();
    }

    int main(int argc, char **argv) {
      // Route GStreamer logs through the QIM SDK logger and enable debug output.
      qti::SetImsdkGstLogMode(qti::ImsdkGstLogMode::ImsdkLog);
      qti::SetImsdkLogLevel(qti::ImsdkLogLevel::Debug);

      // V4L2 device node to capture from, defaults to /dev/video2. Pass -d/--device to override.
      std::string device = "/dev/video2";
      for (int i = 1; i < argc; ++i) {
        std::string arg = argv[i];
        if ((arg == "-d" || arg == "--device") && i + 1 < argc) {
          device = argv[++i];
        }
      }

      try {
        create_and_execute_pipeline(device);
      } catch (const std::exception &ex) {
        std::cerr << "Exception: " << ex.what() << std::endl;
        return 1;
      }

      return 0;
    }
    ```

    <Steps>
      <Step title="Connect a USB camera">
        Connect a USB (UVC) camera to the target device and verify it is exposed as `/dev/video2` (update the pipeline's `device` property if your camera is exposed on a different node).
      </Step>

      <Step title="Run the application">
        ```bash theme={null}
        /usr/bin/qimsdk_ref_usb_camera_impl --input-config /dev/video2
        ```
      </Step>

      <Step title="Expected Output">
        The live camera feed is rotated and rendered fullscreen on the display in NV12 format at 1080p/30fps.

        <img src="https://mintcdn.com/qimsdk/vM1cbKMfLRcPD7xl/app-builder/images/usb-camera-preview.jpeg?fit=max&auto=format&n=vM1cbKMfLRcPD7xl&q=85&s=2ed060f58a450ceb48de22da1d5cf295" alt="Expected Output" width="1108" height="774" data-path="app-builder/images/usb-camera-preview.jpeg" />

        To stop the application, press **CTRL + C**.
      </Step>

      <Step title="Customize application">
        Refer to the [Steps to build custom application](/advanced/yocto-build#steps-to-build-custom-application) section to customize this application.
      </Step>
    </Steps>
  </Tab>

  <Tab title="YAML config style">
    <Info>
      See the full YAML configuration here: [qimsdk\_ref\_usb\_camera.yaml](https://github.com/qualcomm/qimsdk/blob/main/tools/appbuilders-configs/qimsdk_ref_usb_camera.yaml)

      Check application source code on GitHub: [qimsdk\_ref\_yml](https://github.com/qualcomm/qimsdk/tree/main/cpp/examples/reference-apps/qimsdk_ref_yml)

      Pre-built application on device: `/usr/bin/qimsdk_ref_yml`

      YAML configuration saved on device: `/etc/qimsdk/qimsdk_ref_usb_camera.yaml`
    </Info>

    ```yaml theme={null}
    pipeline:
      elements:
        - type: v4l2src
          name: source
          device: /dev/video2

        - type: qtivtransform
          name: transform

        - type: filter
          name: videostream
          video:
            format: NV12
            width: 1920
            height: 1080
            framerate: 30

        - type: waylandsink
          name: display
          sync: false
          fullscreen: true
    ```

    <Steps>
      <Step title="Connect a USB camera">
        Connect a USB (UVC) camera to the target device and verify it is exposed as `/dev/video2` (update the pipeline's `device` property if your camera is exposed on a different node).
      </Step>

      <Step title="Run the application">
        ```bash theme={null}
        qimsdk_ref_yml /etc/qimsdk/qimsdk_ref_usb_camera.yaml
        ```
      </Step>

      <Step title="Expected Output">
        The live camera feed is rotated and rendered fullscreen on the display in NV12 format at 1080p/30fps.

        <img src="https://mintcdn.com/qimsdk/vM1cbKMfLRcPD7xl/app-builder/images/usb-camera-preview.jpeg?fit=max&auto=format&n=vM1cbKMfLRcPD7xl&q=85&s=2ed060f58a450ceb48de22da1d5cf295" alt="Expected Output" width="1108" height="774" data-path="app-builder/images/usb-camera-preview.jpeg" />

        To stop the application, press **CTRL + C**.
      </Step>
    </Steps>
  </Tab>
</Tabs>

### Object Detection

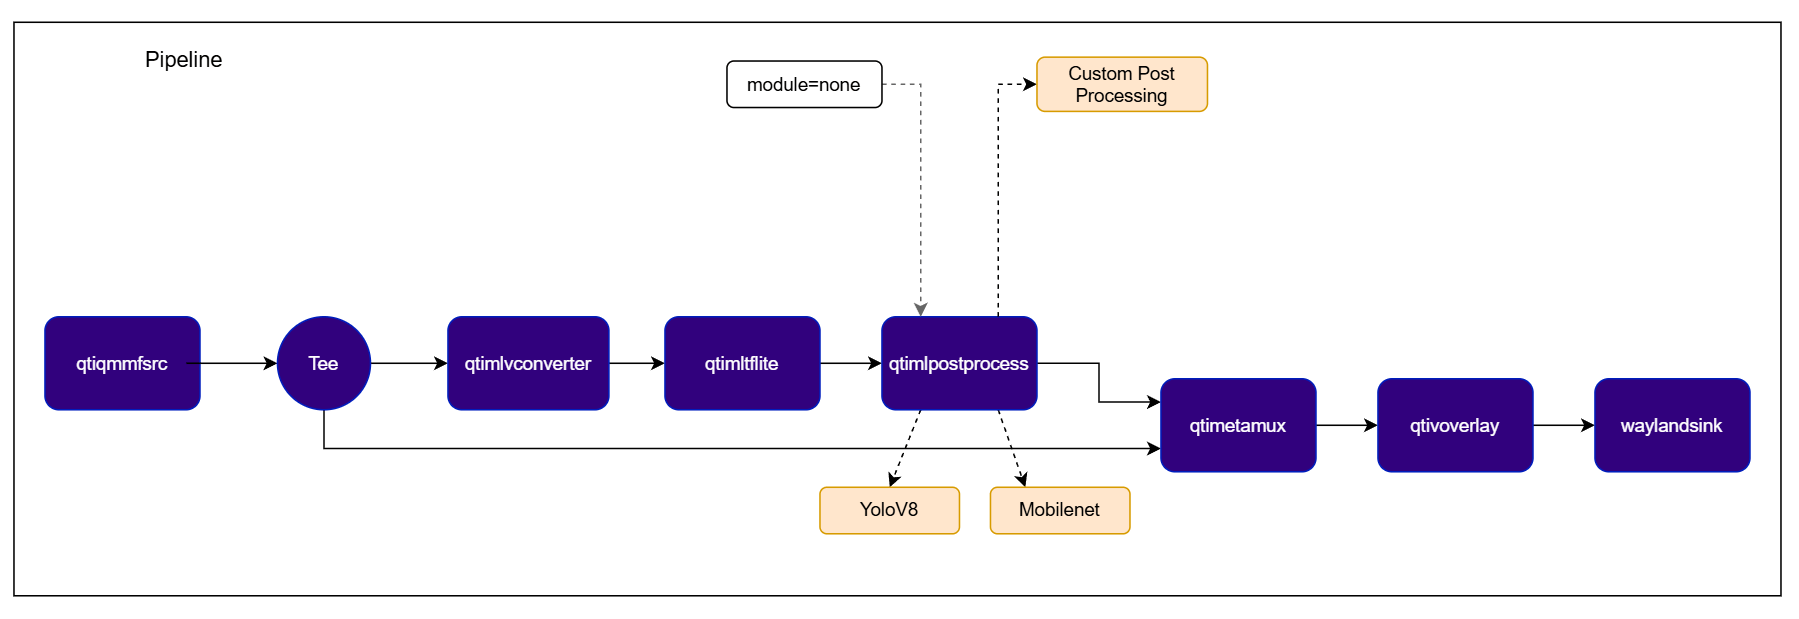
This pipeline captures from a built-in camera, runs an object detection model through an ML inference bin, renders bounding box overlays on the output frames, and displays the result. The ML bin handles preprocessing, inference, and postprocessing internally. The stream filter pins the input video format expected by the model. The overlay element draws detection results on each frame before display.

<img src="https://mintcdn.com/qimsdk/QarSxH4rrv0vwi-l/app-builder/images/object_det.png?fit=max&auto=format&n=QarSxH4rrv0vwi-l&q=85&s=5c252d39d2b0070fd2b02a8ee3dd3454" alt="Introduction" width="1805" height="286" data-path="app-builder/images/object_det.png" />

<Tabs>
  <Tab title="Explicit coding style">
    <Info>
      Check application source code on GitHub: [`qimsdk_ref_camera_yolov8`](https://github.com/qualcomm/qimsdk/tree/main/cpp/examples/reference-apps/qimsdk_ref_camera_yolov8)

      Pre-built application on device: `/usr/bin/qimsdk_ref_camera_yolov8`
    </Info>
  </Tab>
</Tabs>

<Steps>
  <Step title="Download Required Files">
    | File                   | Download                                                                     | Save as                       |
    | ---------------------- | ---------------------------------------------------------------------------- | ----------------------------- |
    | YOLOv8 detection model | [Qualcomm AI Hub — YOLOv8](https://aihub.qualcomm.com/iot/models/yolov8_det) | `yolov8_det_quantized.tflite` |
    | Detection labels       | <a href="../labels/yolov8.json" download="yolov8.json">yolov8.json</a>       | `yolov8.json`                 |

    <Note>
      If the downloaded model file is a `.zip` archive, extract it on your host machine before copying: `unzip filename.zip`

      Some AI Hub models require running the AI Hub export/optimize step for your target runtime before the downloaded file is usable — download alone isn't always sufficient.
    </Note>
  </Step>

  <Step title="Copy the assets to the device">
    The model and labels must be present on the device before running. Copy them to the paths the application expects:

    ```bash theme={null}
    # Replace <user> and <device-ip> with your device credentials.
    # ~ resolves automatically to the correct home directory on the device (/root on QLI, /home/ubuntu on Ubuntu).

    ssh <user>@<device-ip> "mkdir -p ~/Downloads/qimsdk_samples/models ~/Downloads/qimsdk_samples/labels"

    # Copy the assets to device
    scp yolov8_det_quantized.tflite <user>@<device-ip>:~/Downloads/qimsdk_samples/models/
    scp yolov8.json <user>@<device-ip>:~/Downloads/qimsdk_samples/labels/
    ```
  </Step>

  <Step title="Connect an IMX camera">
    This application uses the built-in ISP camera. On platforms without an onboard ISP camera (e.g. IQ9), attach an external IMX camera (e.g. from RB3 Gen2) before running the application — see [ISP Camera (Config #2 / qticamsrc)](/advanced/debugging#isp-camera-config-2--qticamsrc) for the procedure to switch from `libcamera` to `qticamsrc`.
  </Step>

  <Step title="Run the application">
    ```bash theme={null}
    /usr/bin/qimsdk_ref_camera_yolov8
    ```
  </Step>

  <Step title="Expected Output">
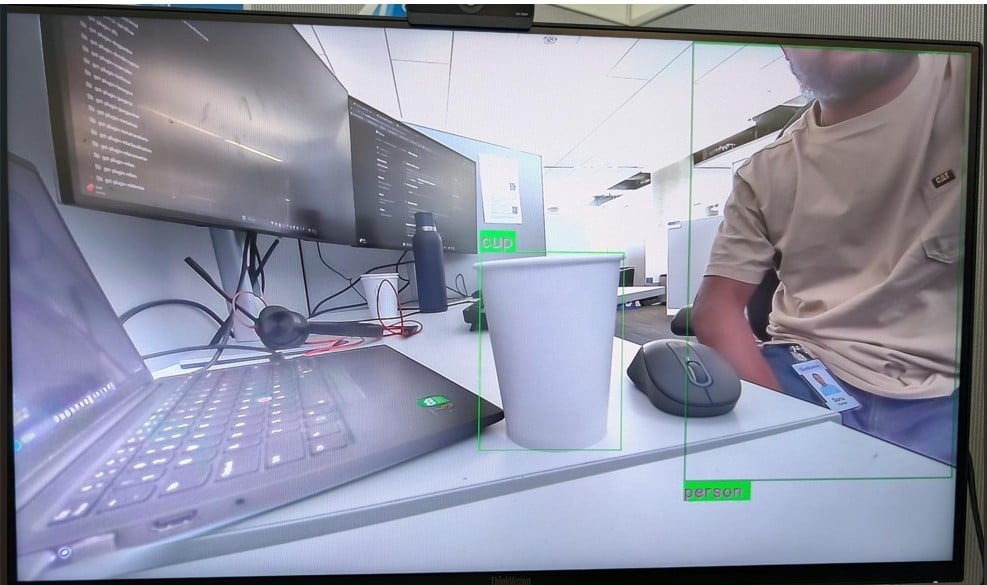
    The live camera feed is rendered fullscreen on the display with YOLOv8 bounding boxes and class labels overlaid on each detected object in real time.

    <img src="https://mintcdn.com/qimsdk/vM1cbKMfLRcPD7xl/app-builder/images/object-det-live.jpeg?fit=max&auto=format&n=vM1cbKMfLRcPD7xl&q=85&s=9e1969d7993f5be0c0e9e8b6dacb2095" alt="Expected Output" width="987" height="585" data-path="app-builder/images/object-det-live.jpeg" />

    To stop the application, press **CTRL + C**.

  </Step>
</Steps>

### Custom Post-Processing

The QIM SDK implements AI model post-processing through dedicated modules that take tensors as input and produce predictions. All underlying complexity — batching, daisy-chaining, image mask support, and ML metadata handling — is encapsulated within the post-processing plugin. This makes `MLPostProcess` the ideal integration point for application-specific logic, since the application does not need to handle any of that complexity directly. A specialized post-processing module manages the bindings between the pipeline and the application.

<img src="https://mintcdn.com/qimsdk/QarSxH4rrv0vwi-l/app-builder/images/custom_post.png?fit=max&auto=format&n=QarSxH4rrv0vwi-l&q=85&s=e58d0809d197ae3c2aa92815907df9fa" alt="Introduction" width="1799" height="619" data-path="app-builder/images/custom_post.png" />

<Tabs>
  <Tab title="Explicit coding style">
    <Info>
      Check application source code on GitHub: [`qimsdk_ref_external_postprocess_mlbin_yolov8`](https://github.com/qualcomm/qimsdk/tree/main/cpp/examples/reference-apps/qimsdk_ref_external_postprocess_mlbin_yolov8)

      Pre-built application on device: `/usr/bin/qimsdk_ref_external_postprocess_mlbin_yolov8`
    </Info>
  </Tab>
</Tabs>

<Steps>
  <Step title="Download Required Files">
    | File                   | Download                                                                                                                                               | Save as                       |
    | ---------------------- | ------------------------------------------------------------------------------------------------------------------------------------------------------ | ----------------------------- |
    | YOLOv8 detection model | [Qualcomm AI Hub — YOLOv8](https://aihub.qualcomm.com/iot/models/yolov8_det)                                                                           | `yolov8_det_quantized.tflite` |
    | Detection labels       | <a href="../labels/yolov8.json" download="yolov8.json">yolov8.json</a>                                                                                 | `yolov8.json`                 |
    | Sample video           | <a href="https://github.com/qualcomm/sample-apps-for-qualcomm-linux/raw/refs/heads/main/qualcomm-linux/artifacts/videos/demo_samples/">Input video</a> | `ai_demo_sample.mp4`          |

    <Note>
      If the downloaded model file is a `.zip` archive, extract it on your host machine before copying: `unzip filename.zip`

      Some AI Hub models require running the AI Hub export/optimize step for your target runtime before the downloaded file is usable — download alone isn't always sufficient.
    </Note>
  </Step>

  <Step title="Copy the assets to the device">
    The input video, model, and labels must be present on the device before running. Copy them to the paths the application expects:

    ```bash theme={null}
    # Replace <user> and <device-ip> with your device credentials.
    # ~ resolves automatically to the correct home directory on the device (/root on QLI, /home/ubuntu on Ubuntu).

    ssh <user>@<device-ip> "mkdir -p ~/Downloads/qimsdk_samples/media ~/Downloads/qimsdk_samples/models ~/Downloads/qimsdk_samples/labels"

    # Copy the assets to device
    scp ai_demo_sample.mp4 <user>@<device-ip>:~/Downloads/qimsdk_samples/media/
    scp yolov8_det_quantized.tflite <user>@<device-ip>:~/Downloads/qimsdk_samples/models/
    scp yolov8.json <user>@<device-ip>:~/Downloads/qimsdk_samples/labels/
    ```
  </Step>

  <Step title="Run the application">
    ```bash theme={null}
    /usr/bin/qimsdk_ref_external_postprocess_mlbin_yolov8
    ```
  </Step>

  <Step title="Expected Output">
    The video plays back with YOLOv8 bounding boxes and class labels decoded by the custom postprocessing callback, overlaid and rendered fullscreen on the display.

    <img src="https://mintcdn.com/qimsdk/WywR0vqVkL-AO2Rd/app-builder/images/expected-output-object-detect.png?fit=max&auto=format&n=WywR0vqVkL-AO2Rd&q=85&s=0765f511db9b649cbac010ebc9861230" alt="Expected Output" width="1262" height="709" data-path="app-builder/images/expected-output-object-detect.png" />

    To stop the application, press **CTRL + C**.
  </Step>

  <Step title="Customize application">
    Refer to the [Steps to build custom application](/advanced/yocto-build#steps-to-build-custom-application) section to customize this application.
  </Step>
</Steps>

***

## Benefits of QIM SDK C++ App Builder

* Significantly reduced source code
* Improved readability
* Internal GStreamer state transition handling
* Hidden End-of-Stream handling
* Automatic error and state event handling
* Automatic resource cleanup
* Simplified AppSink/AppSrc interaction using lambda functions
* SDK-managed buffer mapping and queries
* Simplified buffer access anywhere in the pipeline using wrapped GST probes
* YAML-based pipeline description