> ## Documentation Index
> Fetch the complete documentation index at: https://imsdkdocs.qualcomm.com/llms.txt
> Use this file to discover all available pages before exploring further.
# IMSDK Docker
> Build, configure, and run the IMSDK Docker container on Qualcomm platforms.
## Overview
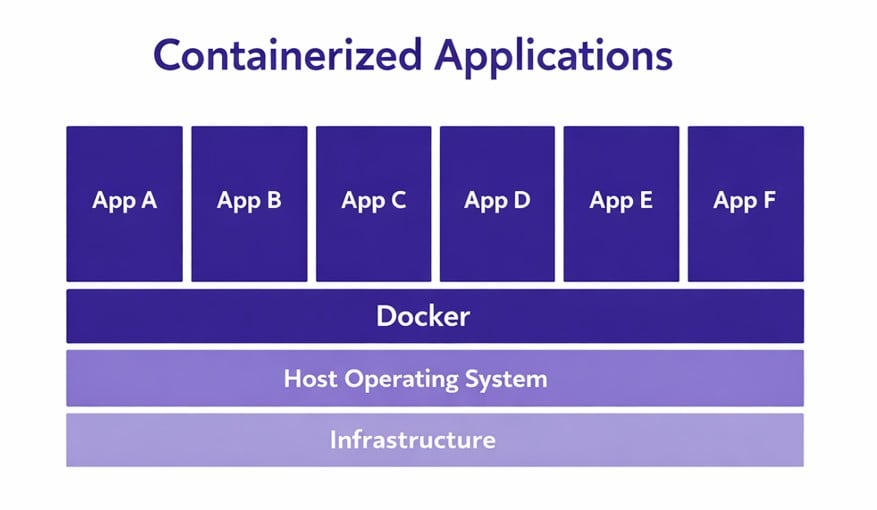
Containers are lightweight, isolated environments that package everything needed to run an application — code, dependencies, and system libraries — so it behaves consistently across platforms.
Advantages of containerization include:
* **Consistency:** Containers provide a consistent environment across multiple platforms and operating systems. Developers can create images that transform into containers when deployed, ensuring uniformity regardless of the underlying infrastructure.
* **Automation:** Containerization supports automated tasks. Developers can schedule actions without manual intervention, reducing repetitive work.
* **Stability:** Containers are based on Linux, with the Linux kernel present in every container. This stability extends to systems and devices, including when containers run on macOS or Windows.
* **Space efficiency:** Unlike traditional virtual machines, which consume significant server space and memory, containers include only application code and dependencies. They can run entirely in the cloud and minimize resource requirements.
 ## IMSDK in Docker
This container targets QLI 2.x and later. QLI 1.x is not supported.
IMSDK in a Docker container means the full Qualcomm multimedia and AI software stack is delivered as containerized environments instead of being manually installed directly on a host or target system.
In practice, a build container compiles and assembles all required components, including cross-compiled artifacts for Qualcomm ARM64 targets. The build then produces a deploy container that contains only the runtime pieces needed on the device.
**Key benefits of this approach:**
* **Reproducible builds:** Use the same toolchain, package versions, and scripts across developers and CI. Reduces "works on my machine" failures.
* **Build and runtime separation:** Use a heavy build image to compile artifacts and a lean deploy image that contains only runtime essentials.
* **Efficient cross-compilation:** Build on the host and target ARM64 Qualcomm devices reliably, faster than compiling directly on the target.
* **Secure runtime posture:** Run as a non-root user by default, avoid broad privileged-container dependencies, and use CDI-based explicit hardware passthrough for GPU, camera, and media devices.
* **Operational consistency:** Use versioned images that are testable, promotable, and rollback-friendly, with a predictable deployment flow using environment and CDI configuration on the target.
### Features
* **Debian (Trixie) base:** Built on Debian Trixie for a streamlined and lightweight foundation.
* **No platform dependencies:** Entirely self-sufficient — no eSDK or host platform content required to build or deploy.
* **Self-contained dependencies:** All necessary dependencies are installed directly inside the container, minimizing host-container compatibility issues and simplifying deployment on edge devices.
* **GStreamer 1.26:** Includes GStreamer 1.26 with the latest `gst-qti-oss-patches` for optimized performance on Qualcomm platforms.
* **Broad target support:** Validated across QLI 2.x, Ubuntu Server, and Ubuntu Desktop. Supports QCS615, QCS6490, IQ8, and IQ9.
### Versions
| Version | Status |
| ------- | ------ |
| 2.0.1 | Latest |
## Architecture
The following diagram explains the build and deployment flow of the IMSDK Docker image.
## IMSDK in Docker
This container targets QLI 2.x and later. QLI 1.x is not supported.
IMSDK in a Docker container means the full Qualcomm multimedia and AI software stack is delivered as containerized environments instead of being manually installed directly on a host or target system.
In practice, a build container compiles and assembles all required components, including cross-compiled artifacts for Qualcomm ARM64 targets. The build then produces a deploy container that contains only the runtime pieces needed on the device.
**Key benefits of this approach:**
* **Reproducible builds:** Use the same toolchain, package versions, and scripts across developers and CI. Reduces "works on my machine" failures.
* **Build and runtime separation:** Use a heavy build image to compile artifacts and a lean deploy image that contains only runtime essentials.
* **Efficient cross-compilation:** Build on the host and target ARM64 Qualcomm devices reliably, faster than compiling directly on the target.
* **Secure runtime posture:** Run as a non-root user by default, avoid broad privileged-container dependencies, and use CDI-based explicit hardware passthrough for GPU, camera, and media devices.
* **Operational consistency:** Use versioned images that are testable, promotable, and rollback-friendly, with a predictable deployment flow using environment and CDI configuration on the target.
### Features
* **Debian (Trixie) base:** Built on Debian Trixie for a streamlined and lightweight foundation.
* **No platform dependencies:** Entirely self-sufficient — no eSDK or host platform content required to build or deploy.
* **Self-contained dependencies:** All necessary dependencies are installed directly inside the container, minimizing host-container compatibility issues and simplifying deployment on edge devices.
* **GStreamer 1.26:** Includes GStreamer 1.26 with the latest `gst-qti-oss-patches` for optimized performance on Qualcomm platforms.
* **Broad target support:** Validated across QLI 2.x, Ubuntu Server, and Ubuntu Desktop. Supports QCS615, QCS6490, IQ8, and IQ9.
### Versions
| Version | Status |
| ------- | ------ |
| 2.0.1 | Latest |
## Architecture
The following diagram explains the build and deployment flow of the IMSDK Docker image.
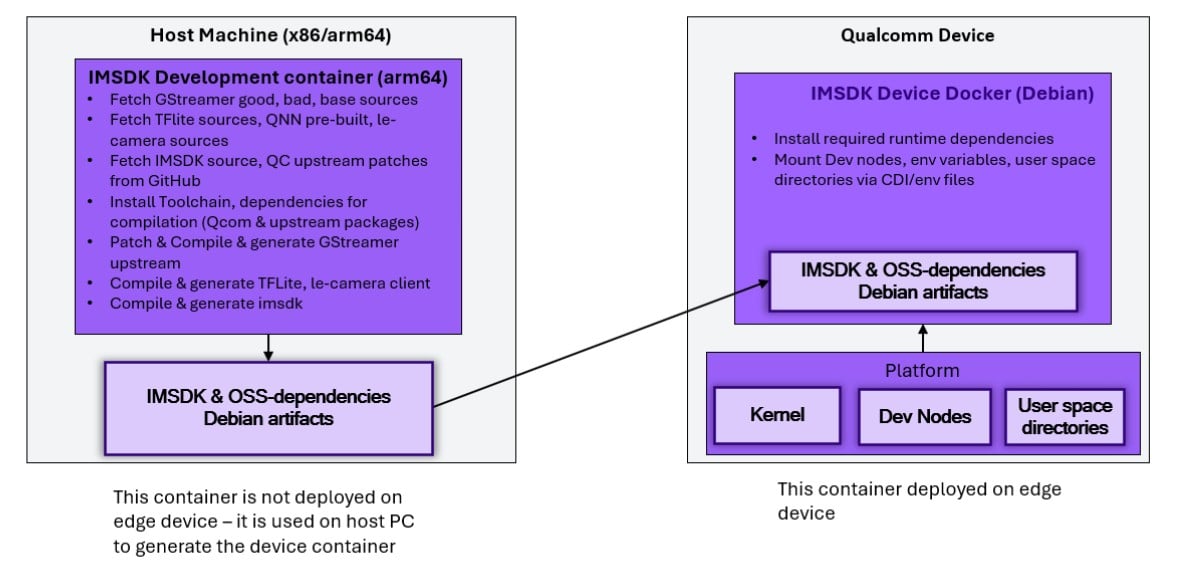 * The host machine runs a development container that compiles all IMSDK sources and dependencies into Debian artifacts.
* The generated artifacts are transferred to a Debian-based deploy container with CDI-managed hardware access that runs on the Qualcomm device.
## Quick Start Guide
Before getting started, ensure the device is set up by following the [Installation](/installation) guide.
QIMSDK Docker is not supported on SELinux-enabled QLI builds.
### Download configuration files
Before setting up the device, download the CDI and environment files for the target chipset and OS. The CDI JSON file provides platform-specific device mountings; the environment file sets the required variables inside the container.
Select your chipset to download the corresponding files:
| Target OS | CDI file | Environment file |
| -------------- | ----------------------------------------------------------------------------------------------------------------------- | --------------------------------------------------------------------------------------------------------------------- |
| QLI 2.x | qcs6490\_qli\_2x\_qimsdk.json | qcs6490\_qli\_2x\_qimsdk.env |
| Ubuntu Server | qcs6490\_ubuntu\_server\_qimsdk.json | qcs6490\_ubuntu\_server\_qimsdk.env |
| Ubuntu Desktop | qcs6490\_ubuntu\_desktop\_qimsdk.json | qcs6490\_ubuntu\_desktop\_qimsdk.env |
| Target OS | CDI file | Environment file |
| -------------- | ----------------------------------------------------------------------------------------------------------------------- | --------------------------------------------------------------------------------------------------------------------- |
| QLI 2.x | qcs8275\_qli\_2x\_qimsdk.json | qcs8275\_qli\_2x\_qimsdk.env |
| Ubuntu Server | qcs8275\_ubuntu\_server\_qimsdk.json | qcs8275\_ubuntu\_server\_qimsdk.env |
| Ubuntu Desktop | qcs8275\_ubuntu\_desktop\_qimsdk.json | qcs8275\_ubuntu\_desktop\_qimsdk.env |
| Target OS | CDI file | Environment file |
| -------------- | ----------------------------------------------------------------------------------------------------------------------- | --------------------------------------------------------------------------------------------------------------------- |
| QLI 2.x | qcs9075\_qli\_2x\_qimsdk.json | qcs9075\_qli\_2x\_qimsdk.env |
| Ubuntu Server | qcs9075\_ubuntu\_server\_qimsdk.json | qcs9075\_ubuntu\_server\_qimsdk.env |
| Ubuntu Desktop | qcs9075\_ubuntu\_desktop\_qimsdk.json | qcs9075\_ubuntu\_desktop\_qimsdk.env |
| Target OS | CDI file | Environment file |
| --------- | ----------------------------------------------------------------------------------------------------- | --------------------------------------------------------------------------------------------------- |
| QLI 2.x | qcs615\_qli\_2x\_qimsdk.json | qcs615\_qli\_2x\_qimsdk.env |
Copy the downloaded files to the device:
```bash theme={null}
scp .json @:/etc/cdi/qimsdk.json
scp .env @:/etc/docker/env/qimsdk.env
```
### Set up and run on the device
```bash theme={null}
ssh @
```
```bash theme={null}
mkdir -p /etc/cdi/ /etc/docker/env/
mkdir -p /etc/media /etc/models /etc/labels && chmod -R 666 /etc/media /etc/models /etc/labels
```
```bash theme={null}
docker pull artifacts.codelinaro.org/iot-solutions-microservices/qimsdk:latest
```
Tag the image locally:
```bash theme={null}
docker tag artifacts.codelinaro.org/iot-solutions-microservices/qimsdk:latest qimsdk:latest
```
```bash theme={null}
docker run -it -d --net host --env-file /etc/docker/env/qimsdk.env --device qualcomm.com/device=qimsdk -h qimsdk --name
```
After the container is running, execute a new terminal process in it:
```bash theme={null}
docker exec -ti bash
```
Once inside the container, refer to the **Examples** section to run sample [AI pipelines](/sample-pipelines/aipipelines), [multimedia pipelines](/sample-pipelines/multimediapipelines), [GStreamer C/C++ AI applications](/sample-application/ai-sample-applications), or [GStreamer C/C++ multimedia applications](/sample-application/multimedia-sample-applications).
Gstreamer Python sample applications are not supported in this QIMSDK container.
## Build an IMSDK container
All steps in this section are performed on a Ubuntu 22.04 or 24.04 machine which can be x86 or ARM64.
### Prerequisites
Install prerequisite packages on the host (one time only).
```bash theme={null}
sudo apt install -y jq tofrodos
sudo wget https://github.com/mikefarah/yq/releases/latest/download/yq_linux_amd64 -O /usr/bin/yq
sudo chmod +x /usr/bin/yq
```
```bash theme={null}
sudo apt install -y jq tofrodos qemu-user-static qemu-system-arm
sudo wget https://github.com/mikefarah/yq/releases/latest/download/yq_linux_amd64 -O /usr/bin/yq
sudo chmod +x /usr/bin/yq
wget http://archive.ubuntu.com/ubuntu/pool/universe/q/qemu/qemu-user-static_6.2+dfsg-2ubuntu6_amd64.deb
sudo dpkg -i qemu-user-static_6.2+dfsg-2ubuntu6_amd64.deb
rm qemu-user-static_6.2+dfsg-2ubuntu6_amd64.deb
```
Do **not** install `yq` via snap. If it was installed via snap, remove it and reinstall using the commands above:
```bash theme={null}
sudo snap remove yq
sudo systemctl stop snapd
```
Increase the maximum user watches and instances on the host to prevent this error during development:
```text theme={null}
System limit for number of file watchers reached
```
Add these lines to `/etc/sysctl.conf`:
```text theme={null}
fs.inotify.max_user_instances=8192
fs.inotify.max_user_watches=542288
```
Save the file and reboot the host system.
To build Docker image files, the host system requires at least 64 GB of RAM and a swap image of at least half the available RAM plus a small reserve.
For example, with 64 GB of RAM, the recommended swap size is at least 32 GB. With an 8 GB reserve, total RAM + swap + reserved memory is 104 GB.
Check whether swap is enabled:
```bash theme={null}
sudo swapon --show
```
If swap is missing or too small, create a new swap file:
```bash theme={null}
MEM_AVAIL=$(grep MemAvailable /proc/meminfo | awk '{printf "%.0f\n", $2/1024/1024}')
let MEM_SWAP="$MEM_AVAIL / 2 + 8"
sudo swapoff /swap.img
sudo fallocate -l "${MEM_SWAP}G" /swap.img
sudo chmod 600 /swap.img
sudo mkswap /swap.img
sudo swapon /swap.img
```
Edit `/etc/default/grub` and set:
```text theme={null}
GRUB_CMDLINE_LINUX_DEFAULT="text cgroup_enable=memory swapaccount=1"
```
Update GRUB:
```bash theme={null}
sudo update-grub
```
Edit `/etc/fstab` and add this line at the end of the file:
```text theme={null}
/swap.img none swap sw 0 0
```
Save and close all opened system files, then reboot the host system.
After rebooting, verify the swap image matches the expected size:
```bash theme={null}
sudo swapon --show
```
Docker must be configured on the host system once before building images.
Remove old Docker Desktop versions if present:
```bash theme={null}
sudo apt remove docker-desktop
rm -r $HOME/.docker/desktop
sudo rm /usr/local/bin/com.docker.cli
sudo apt purge docker-desktop
```
Install repository dependencies:
```bash theme={null}
sudo apt-get update
sudo apt-get install \
ca-certificates \
curl \
gnupg \
lsb-release
```
Create the Docker keyring directory:
```bash theme={null}
sudo mkdir -p /etc/apt/keyrings
```
Add the Docker GPG key:
```bash theme={null}
curl -fsSL https://download.docker.com/linux/ubuntu/gpg | sudo gpg --dearmor -o /etc/apt/keyrings/docker.gpg
```
Add the Docker repository:
```bash theme={null}
echo \
"deb [arch=$(dpkg --print-architecture) signed-by=/etc/apt/keyrings/docker.gpg] https://download.docker.com/linux/ubuntu \
$(lsb_release -cs) stable" | sudo tee /etc/apt/sources.list.d/docker.list > /dev/null
```
```bash theme={null}
sudo apt-get update
sudo apt-get install docker-ce docker-ce-cli
```
Add the user to the Docker group to run Docker commands without `sudo`:
```bash theme={null}
sudo groupadd docker
sudo usermod -aG docker $USER
newgrp docker
```
Until the host is rebooted, run `newgrp docker` in every newly opened terminal.
Tabs, unexpected spaces, and other invisible whitespace characters can break JSON configuration files and may cause a `docker.service failed to start` error.
Add the registry mirror configuration to `/etc/docker/daemon.json`:
```json theme={null}
{
"registry-mirrors": [""]
}
```
Restart Docker:
```bash theme={null}
sudo fromdos -f /etc/docker/daemon.json
sudo systemctl daemon-reload
sudo systemctl restart docker
```
If network downloads require a proxy, add the proxy configuration to the Docker daemon.
Tabs, unexpected spaces, and other invisible whitespace characters can break JSON configuration files and may cause a `docker.service failed to start` error.
Add the proxy configuration to `/etc/docker/daemon.json`:
```json theme={null}
{
"proxies": {
"http-proxy": "",
"https-proxy": "",
"no-proxy": ""
}
}
```
Restart Docker:
```bash theme={null}
sudo fromdos -f /etc/docker/daemon.json
sudo systemctl daemon-reload
sudo systemctl restart docker
```
Set proxy environment variables before invoking Docker build commands:
```bash theme={null}
export http_proxy=
export https_proxy=
export no_proxy=
```
This ensures that both the Docker daemon and build processes use the same proxy settings as the host system.
Until the host is rebooted, run `newgrp docker` in every newly opened terminal.
Run the Docker hello-world container:
```bash theme={null}
docker run hello-world
```
If the build image script fails with a `No space left on device` error, move the Docker directory to `/local/mnt`.
All containers must be restarted after moving the Docker directory because the Docker service is stopped during this procedure.
Stop Docker:
```bash theme={null}
service docker stop
```
Verify that no Docker process is running:
```bash theme={null}
ps faux
```
Check the Docker directory structure:
```bash theme={null}
sudo ls /var/lib/docker/
```
Back up the current Docker directory:
```bash theme={null}
tar -zcC /var/lib docker > /mnt/pd0/var_lib_docker-backup-$(date +%s).tar.gz
```
Move the Docker directory to the new partition:
```bash theme={null}
mv /var/lib/docker /local/mnt/docker
```
Create a symlink to the Docker directory in the new partition:
```bash theme={null}
ln -s /local/mnt/docker /var/lib/docker
```
Verify that the Docker directory structure is unchanged:
```bash theme={null}
sudo ls /var/lib/docker/
```
Start Docker:
```bash theme={null}
service docker start
```
List container names:
```bash theme={null}
docker ps -a
```
Start a listed container:
```bash theme={null}
docker start
```
Check that there are no active cgroup CPU and memory utilization restrictions on the host. The Docker service cgroup memory configuration entries should have `max` set as the value.
```bash theme={null}
sudo systemctl list-unit-files | grep -Ei docker
sudo systemctl status docker.service
cat /sys/fs/cgroup/system.slice/docker.service/
cat /sys/fs/cgroup/system.slice/docker.service/memory.max
cat /sys/fs/cgroup/system.slice/docker.service/memory.swap.max
```
If the host system has 64 GB RAM or less, tune system VM page swap and dentry and inode cache reclaim behavior.
**`vm.swappiness`**
Higher values cause more aggressive application memory page swapping; lower values favor keeping pages in memory longer. The default is usually `60` on recent Ubuntu and Debian versions, which may not fit the Docker build environment on systems with low available RAM. A value of `10` is recommended.
**`vm.vfs_cache_pressure`**
Intermittent high VFS pressure can result from creating many small temporary files during package installation, causing the OS to prematurely swap memory pages associated with cached dentries and inodes. The default is usually `100`. Setting it to `400` relaxes cache management by freeing cached pages earlier, reducing the chance of running out of memory during high multi-threaded load.
**`vm.min_free_kbytes`**
In heavy multi-stage Docker builds with many buildx threads, the host OS can exhaust available RAM quickly. The mandatory VM free memory watermark is controlled by `vm.min_free_kbytes`. Too low risks deadlocks under load; too high causes premature OOM kills. A value of `262144` KB better balances free memory under excessive load.
Edit `/etc/sysctl.conf` and add:
```text theme={null}
vm.swappiness=10
vm.vfs_cache_pressure=400
vm.min_free_kbytes=262144
```
### Build steps
Run the following commands on the host machine:
```bash theme={null}
git clone https://git.codelinaro.org/clo/le/sdk-tools.git -b imsdk-tools.lnx.1.0
cd sdk-tools/qimsdk-debian/
git checkout 513e0a3fe1e67e131fa4f65694eeb07294ce8356
```
Build `qimsdk_deploy_arm64`, which contains the minimal set of runtime binaries needed to execute GStreamer use cases:
```bash theme={null}
docker build --build-arg QIMSDK_ARG_QNP_VERSION= --target qimsdk_deploy_arm64 -t .
```
For example:
```bash theme={null}
docker build --build-arg QIMSDK_ARG_QNP_VERSION=2.47.0.260601 --target qimsdk_deploy_arm64 -t qimsdk .
```
If `QIMSDK_ARG_QNP_VERSION` is not provided, the QNN and SNPE plugins are disabled in the image.
See [qimsdk-debian/README.md](https://git.codelinaro.org/clo/le/sdk-tools/-/blob/513e0a3fe1e67e131fa4f65694eeb07294ce8356/qimsdk-debian/README.md) for more information about the Docker image composition and workflow.
Save the built image as a tar file:
```bash theme={null}
docker save -o qimsdk.tar
```
Copy the tar file to the device:
```bash theme={null}
scp qimsdk.tar @:$HOME/qimsdk.tar
```
Load the image on the device:
```bash theme={null}
docker load -i $HOME/qimsdk.tar
```
On a QLI device `$HOME` is `/root`; on a Ubuntu device it is `/home/ubuntu`.
With the image copied to the device, follow the [Set up and run on the device](#set-up-and-run-on-the-device) steps to configure CDI and start the container.
## Install additional packages inside the container
Use this procedure to install packages into an already running `qimsdk-debian` deploy container. The container must have been started with the `--net host` option. The following steps use Python as an example.
```bash theme={null}
docker exec -ti qimsdk sh
```
In the root shell, install the required packages:
```bash theme={null}
apt-get update
DEBIAN_FRONTEND=noninteractive TZ=Etc/UTC apt-get install -y --no-install-recommends \
python3 python3-pip python3-venv python3-gi gobject-introspection \
libgirepository-2.0-dev
apt -y upgrade
apt-get autoremove -y
apt-get clean
```
Create a Python virtual environment and install the required pip packages:
```bash theme={null}
python3 -m venv --system-site-packages /home/qimsdk/.venv
/home/qimsdk/.venv/bin/pip install PyGObject opencv-python
```
Add the virtual environment activation to shell startup files to avoid sourcing it manually in every new shell:
```bash theme={null}
echo "source /home/qimsdk/.venv/bin/activate" >> /root/.bash_aliases
echo "source ~/.venv/bin/activate" >> /home/qimsdk/.bash_aliases
chown -R qimsdk:qcom /home/qimsdk/.bash_aliases
```
After setup is complete, Python examples can be run from each new shell executed as the `qimsdk` user:
```bash theme={null}
docker exec -ti qimsdk bash
```
If automatic activation was not configured, run this command in every new shell executed as the `qimsdk` user inside the container:
```bash theme={null}
source ~/.venv/bin/activate
```
## Debugging
The following techniques apply to the QIMSDK container running on the Qualcomm device.
### Check container logs
```bash theme={null}
docker logs -f
```
```bash theme={null}
docker logs --tail 100 -f
```
### Inspect container state
```bash theme={null}
docker ps -a
```
Inspect detailed container metadata including environment variables, mounts, and network settings:
```bash theme={null}
docker inspect
```
### Restart a container
```bash theme={null}
docker stop
```
```bash theme={null}
docker start
```
* The host machine runs a development container that compiles all IMSDK sources and dependencies into Debian artifacts.
* The generated artifacts are transferred to a Debian-based deploy container with CDI-managed hardware access that runs on the Qualcomm device.
## Quick Start Guide
Before getting started, ensure the device is set up by following the [Installation](/installation) guide.
QIMSDK Docker is not supported on SELinux-enabled QLI builds.
### Download configuration files
Before setting up the device, download the CDI and environment files for the target chipset and OS. The CDI JSON file provides platform-specific device mountings; the environment file sets the required variables inside the container.
Select your chipset to download the corresponding files:
| Target OS | CDI file | Environment file |
| -------------- | ----------------------------------------------------------------------------------------------------------------------- | --------------------------------------------------------------------------------------------------------------------- |
| QLI 2.x | qcs6490\_qli\_2x\_qimsdk.json | qcs6490\_qli\_2x\_qimsdk.env |
| Ubuntu Server | qcs6490\_ubuntu\_server\_qimsdk.json | qcs6490\_ubuntu\_server\_qimsdk.env |
| Ubuntu Desktop | qcs6490\_ubuntu\_desktop\_qimsdk.json | qcs6490\_ubuntu\_desktop\_qimsdk.env |
| Target OS | CDI file | Environment file |
| -------------- | ----------------------------------------------------------------------------------------------------------------------- | --------------------------------------------------------------------------------------------------------------------- |
| QLI 2.x | qcs8275\_qli\_2x\_qimsdk.json | qcs8275\_qli\_2x\_qimsdk.env |
| Ubuntu Server | qcs8275\_ubuntu\_server\_qimsdk.json | qcs8275\_ubuntu\_server\_qimsdk.env |
| Ubuntu Desktop | qcs8275\_ubuntu\_desktop\_qimsdk.json | qcs8275\_ubuntu\_desktop\_qimsdk.env |
| Target OS | CDI file | Environment file |
| -------------- | ----------------------------------------------------------------------------------------------------------------------- | --------------------------------------------------------------------------------------------------------------------- |
| QLI 2.x | qcs9075\_qli\_2x\_qimsdk.json | qcs9075\_qli\_2x\_qimsdk.env |
| Ubuntu Server | qcs9075\_ubuntu\_server\_qimsdk.json | qcs9075\_ubuntu\_server\_qimsdk.env |
| Ubuntu Desktop | qcs9075\_ubuntu\_desktop\_qimsdk.json | qcs9075\_ubuntu\_desktop\_qimsdk.env |
| Target OS | CDI file | Environment file |
| --------- | ----------------------------------------------------------------------------------------------------- | --------------------------------------------------------------------------------------------------- |
| QLI 2.x | qcs615\_qli\_2x\_qimsdk.json | qcs615\_qli\_2x\_qimsdk.env |
Copy the downloaded files to the device:
```bash theme={null}
scp .json @:/etc/cdi/qimsdk.json
scp .env @:/etc/docker/env/qimsdk.env
```
### Set up and run on the device
```bash theme={null}
ssh @
```
```bash theme={null}
mkdir -p /etc/cdi/ /etc/docker/env/
mkdir -p /etc/media /etc/models /etc/labels && chmod -R 666 /etc/media /etc/models /etc/labels
```
```bash theme={null}
docker pull artifacts.codelinaro.org/iot-solutions-microservices/qimsdk:latest
```
Tag the image locally:
```bash theme={null}
docker tag artifacts.codelinaro.org/iot-solutions-microservices/qimsdk:latest qimsdk:latest
```
```bash theme={null}
docker run -it -d --net host --env-file /etc/docker/env/qimsdk.env --device qualcomm.com/device=qimsdk -h qimsdk --name
```
After the container is running, execute a new terminal process in it:
```bash theme={null}
docker exec -ti bash
```
Once inside the container, refer to the **Examples** section to run sample [AI pipelines](/sample-pipelines/aipipelines), [multimedia pipelines](/sample-pipelines/multimediapipelines), [GStreamer C/C++ AI applications](/sample-application/ai-sample-applications), or [GStreamer C/C++ multimedia applications](/sample-application/multimedia-sample-applications).
Gstreamer Python sample applications are not supported in this QIMSDK container.
## Build an IMSDK container
All steps in this section are performed on a Ubuntu 22.04 or 24.04 machine which can be x86 or ARM64.
### Prerequisites
Install prerequisite packages on the host (one time only).
```bash theme={null}
sudo apt install -y jq tofrodos
sudo wget https://github.com/mikefarah/yq/releases/latest/download/yq_linux_amd64 -O /usr/bin/yq
sudo chmod +x /usr/bin/yq
```
```bash theme={null}
sudo apt install -y jq tofrodos qemu-user-static qemu-system-arm
sudo wget https://github.com/mikefarah/yq/releases/latest/download/yq_linux_amd64 -O /usr/bin/yq
sudo chmod +x /usr/bin/yq
wget http://archive.ubuntu.com/ubuntu/pool/universe/q/qemu/qemu-user-static_6.2+dfsg-2ubuntu6_amd64.deb
sudo dpkg -i qemu-user-static_6.2+dfsg-2ubuntu6_amd64.deb
rm qemu-user-static_6.2+dfsg-2ubuntu6_amd64.deb
```
Do **not** install `yq` via snap. If it was installed via snap, remove it and reinstall using the commands above:
```bash theme={null}
sudo snap remove yq
sudo systemctl stop snapd
```
Increase the maximum user watches and instances on the host to prevent this error during development:
```text theme={null}
System limit for number of file watchers reached
```
Add these lines to `/etc/sysctl.conf`:
```text theme={null}
fs.inotify.max_user_instances=8192
fs.inotify.max_user_watches=542288
```
Save the file and reboot the host system.
To build Docker image files, the host system requires at least 64 GB of RAM and a swap image of at least half the available RAM plus a small reserve.
For example, with 64 GB of RAM, the recommended swap size is at least 32 GB. With an 8 GB reserve, total RAM + swap + reserved memory is 104 GB.
Check whether swap is enabled:
```bash theme={null}
sudo swapon --show
```
If swap is missing or too small, create a new swap file:
```bash theme={null}
MEM_AVAIL=$(grep MemAvailable /proc/meminfo | awk '{printf "%.0f\n", $2/1024/1024}')
let MEM_SWAP="$MEM_AVAIL / 2 + 8"
sudo swapoff /swap.img
sudo fallocate -l "${MEM_SWAP}G" /swap.img
sudo chmod 600 /swap.img
sudo mkswap /swap.img
sudo swapon /swap.img
```
Edit `/etc/default/grub` and set:
```text theme={null}
GRUB_CMDLINE_LINUX_DEFAULT="text cgroup_enable=memory swapaccount=1"
```
Update GRUB:
```bash theme={null}
sudo update-grub
```
Edit `/etc/fstab` and add this line at the end of the file:
```text theme={null}
/swap.img none swap sw 0 0
```
Save and close all opened system files, then reboot the host system.
After rebooting, verify the swap image matches the expected size:
```bash theme={null}
sudo swapon --show
```
Docker must be configured on the host system once before building images.
Remove old Docker Desktop versions if present:
```bash theme={null}
sudo apt remove docker-desktop
rm -r $HOME/.docker/desktop
sudo rm /usr/local/bin/com.docker.cli
sudo apt purge docker-desktop
```
Install repository dependencies:
```bash theme={null}
sudo apt-get update
sudo apt-get install \
ca-certificates \
curl \
gnupg \
lsb-release
```
Create the Docker keyring directory:
```bash theme={null}
sudo mkdir -p /etc/apt/keyrings
```
Add the Docker GPG key:
```bash theme={null}
curl -fsSL https://download.docker.com/linux/ubuntu/gpg | sudo gpg --dearmor -o /etc/apt/keyrings/docker.gpg
```
Add the Docker repository:
```bash theme={null}
echo \
"deb [arch=$(dpkg --print-architecture) signed-by=/etc/apt/keyrings/docker.gpg] https://download.docker.com/linux/ubuntu \
$(lsb_release -cs) stable" | sudo tee /etc/apt/sources.list.d/docker.list > /dev/null
```
```bash theme={null}
sudo apt-get update
sudo apt-get install docker-ce docker-ce-cli
```
Add the user to the Docker group to run Docker commands without `sudo`:
```bash theme={null}
sudo groupadd docker
sudo usermod -aG docker $USER
newgrp docker
```
Until the host is rebooted, run `newgrp docker` in every newly opened terminal.
Tabs, unexpected spaces, and other invisible whitespace characters can break JSON configuration files and may cause a `docker.service failed to start` error.
Add the registry mirror configuration to `/etc/docker/daemon.json`:
```json theme={null}
{
"registry-mirrors": [""]
}
```
Restart Docker:
```bash theme={null}
sudo fromdos -f /etc/docker/daemon.json
sudo systemctl daemon-reload
sudo systemctl restart docker
```
If network downloads require a proxy, add the proxy configuration to the Docker daemon.
Tabs, unexpected spaces, and other invisible whitespace characters can break JSON configuration files and may cause a `docker.service failed to start` error.
Add the proxy configuration to `/etc/docker/daemon.json`:
```json theme={null}
{
"proxies": {
"http-proxy": "",
"https-proxy": "",
"no-proxy": ""
}
}
```
Restart Docker:
```bash theme={null}
sudo fromdos -f /etc/docker/daemon.json
sudo systemctl daemon-reload
sudo systemctl restart docker
```
Set proxy environment variables before invoking Docker build commands:
```bash theme={null}
export http_proxy=
export https_proxy=
export no_proxy=
```
This ensures that both the Docker daemon and build processes use the same proxy settings as the host system.
Until the host is rebooted, run `newgrp docker` in every newly opened terminal.
Run the Docker hello-world container:
```bash theme={null}
docker run hello-world
```
If the build image script fails with a `No space left on device` error, move the Docker directory to `/local/mnt`.
All containers must be restarted after moving the Docker directory because the Docker service is stopped during this procedure.
Stop Docker:
```bash theme={null}
service docker stop
```
Verify that no Docker process is running:
```bash theme={null}
ps faux
```
Check the Docker directory structure:
```bash theme={null}
sudo ls /var/lib/docker/
```
Back up the current Docker directory:
```bash theme={null}
tar -zcC /var/lib docker > /mnt/pd0/var_lib_docker-backup-$(date +%s).tar.gz
```
Move the Docker directory to the new partition:
```bash theme={null}
mv /var/lib/docker /local/mnt/docker
```
Create a symlink to the Docker directory in the new partition:
```bash theme={null}
ln -s /local/mnt/docker /var/lib/docker
```
Verify that the Docker directory structure is unchanged:
```bash theme={null}
sudo ls /var/lib/docker/
```
Start Docker:
```bash theme={null}
service docker start
```
List container names:
```bash theme={null}
docker ps -a
```
Start a listed container:
```bash theme={null}
docker start
```
Check that there are no active cgroup CPU and memory utilization restrictions on the host. The Docker service cgroup memory configuration entries should have `max` set as the value.
```bash theme={null}
sudo systemctl list-unit-files | grep -Ei docker
sudo systemctl status docker.service
cat /sys/fs/cgroup/system.slice/docker.service/
cat /sys/fs/cgroup/system.slice/docker.service/memory.max
cat /sys/fs/cgroup/system.slice/docker.service/memory.swap.max
```
If the host system has 64 GB RAM or less, tune system VM page swap and dentry and inode cache reclaim behavior.
**`vm.swappiness`**
Higher values cause more aggressive application memory page swapping; lower values favor keeping pages in memory longer. The default is usually `60` on recent Ubuntu and Debian versions, which may not fit the Docker build environment on systems with low available RAM. A value of `10` is recommended.
**`vm.vfs_cache_pressure`**
Intermittent high VFS pressure can result from creating many small temporary files during package installation, causing the OS to prematurely swap memory pages associated with cached dentries and inodes. The default is usually `100`. Setting it to `400` relaxes cache management by freeing cached pages earlier, reducing the chance of running out of memory during high multi-threaded load.
**`vm.min_free_kbytes`**
In heavy multi-stage Docker builds with many buildx threads, the host OS can exhaust available RAM quickly. The mandatory VM free memory watermark is controlled by `vm.min_free_kbytes`. Too low risks deadlocks under load; too high causes premature OOM kills. A value of `262144` KB better balances free memory under excessive load.
Edit `/etc/sysctl.conf` and add:
```text theme={null}
vm.swappiness=10
vm.vfs_cache_pressure=400
vm.min_free_kbytes=262144
```
### Build steps
Run the following commands on the host machine:
```bash theme={null}
git clone https://git.codelinaro.org/clo/le/sdk-tools.git -b imsdk-tools.lnx.1.0
cd sdk-tools/qimsdk-debian/
git checkout 513e0a3fe1e67e131fa4f65694eeb07294ce8356
```
Build `qimsdk_deploy_arm64`, which contains the minimal set of runtime binaries needed to execute GStreamer use cases:
```bash theme={null}
docker build --build-arg QIMSDK_ARG_QNP_VERSION= --target qimsdk_deploy_arm64 -t .
```
For example:
```bash theme={null}
docker build --build-arg QIMSDK_ARG_QNP_VERSION=2.47.0.260601 --target qimsdk_deploy_arm64 -t qimsdk .
```
If `QIMSDK_ARG_QNP_VERSION` is not provided, the QNN and SNPE plugins are disabled in the image.
See [qimsdk-debian/README.md](https://git.codelinaro.org/clo/le/sdk-tools/-/blob/513e0a3fe1e67e131fa4f65694eeb07294ce8356/qimsdk-debian/README.md) for more information about the Docker image composition and workflow.
Save the built image as a tar file:
```bash theme={null}
docker save -o qimsdk.tar
```
Copy the tar file to the device:
```bash theme={null}
scp qimsdk.tar @:$HOME/qimsdk.tar
```
Load the image on the device:
```bash theme={null}
docker load -i $HOME/qimsdk.tar
```
On a QLI device `$HOME` is `/root`; on a Ubuntu device it is `/home/ubuntu`.
With the image copied to the device, follow the [Set up and run on the device](#set-up-and-run-on-the-device) steps to configure CDI and start the container.
## Install additional packages inside the container
Use this procedure to install packages into an already running `qimsdk-debian` deploy container. The container must have been started with the `--net host` option. The following steps use Python as an example.
```bash theme={null}
docker exec -ti qimsdk sh
```
In the root shell, install the required packages:
```bash theme={null}
apt-get update
DEBIAN_FRONTEND=noninteractive TZ=Etc/UTC apt-get install -y --no-install-recommends \
python3 python3-pip python3-venv python3-gi gobject-introspection \
libgirepository-2.0-dev
apt -y upgrade
apt-get autoremove -y
apt-get clean
```
Create a Python virtual environment and install the required pip packages:
```bash theme={null}
python3 -m venv --system-site-packages /home/qimsdk/.venv
/home/qimsdk/.venv/bin/pip install PyGObject opencv-python
```
Add the virtual environment activation to shell startup files to avoid sourcing it manually in every new shell:
```bash theme={null}
echo "source /home/qimsdk/.venv/bin/activate" >> /root/.bash_aliases
echo "source ~/.venv/bin/activate" >> /home/qimsdk/.bash_aliases
chown -R qimsdk:qcom /home/qimsdk/.bash_aliases
```
After setup is complete, Python examples can be run from each new shell executed as the `qimsdk` user:
```bash theme={null}
docker exec -ti qimsdk bash
```
If automatic activation was not configured, run this command in every new shell executed as the `qimsdk` user inside the container:
```bash theme={null}
source ~/.venv/bin/activate
```
## Debugging
The following techniques apply to the QIMSDK container running on the Qualcomm device.
### Check container logs
```bash theme={null}
docker logs -f
```
```bash theme={null}
docker logs --tail 100 -f
```
### Inspect container state
```bash theme={null}
docker ps -a
```
Inspect detailed container metadata including environment variables, mounts, and network settings:
```bash theme={null}
docker inspect
```
### Restart a container
```bash theme={null}
docker stop
```
```bash theme={null}
docker start
```